Monitor Different Systems with Munin
This is the second part and continuation of the ‘Network Monitoring Software Comparison’ series. Here is the link to the first part. Let’s go ahead and check out our software: Munin. From their main page, here is a quick snippet:
Munin uses the excellent RRDTool (written by Tobi Oetiker) and the framework is written in Perl, while plugins may be written in any language. Munin has a master/node architecture in which the master connects to all the nodes at regular intervals and asks them for data. It then stores the data in RRD files, and (if needed) updates the graphs.
So Munin uses Master/node terminology, but let’s get to it.
1. Install Munin-Master on the Ubuntu machine
Instructions on how to install
Munin installation instructions are available from this Munin page. To install it, just run this:
kerch:~>sudo apt-get install munin
Now to configure it. The master config file for Munin is /etc/munin/munin.conf. Explanation of the settings and options for this file are here. So I edited the file and added/modified the following section:
[kerch.dnsd.me]
  address 127.0.0.1
  use_node_name yes
The Munin master system doesn’t have a daemon process, it does it’s work via cron:
kerch:~>ls -1 /etc/cron.d/mu*
/etc/cron.d/munin
/etc/cron.d/munin-node
Every 5 minutes it checks the configuration files and then generates or collects the appropriate RRD files, which are then converted to graphs. The install process also sets up an Apache configuration file to serve it’s graphs:
kerch:~>ls /etc/apache2/conf.d/mu*
/etc/apache2/conf.d/munin
I will be monitoring the Master machine as well, luckily the munin-node package was auto installed when we installed the munin package. The configuration for a munin node is under /etc/munin/munin-node.conf. Usually we need to setup the IP of the master in that file, but since it will just monitor the local system, we don’t need to make any changes. Information on all the settings for that file are here. Now that everything is configured, let’s make sure munin-node is running:
kerch:~>sudo service munin-node status
munin-node start/running, process 3619
That looks good, as a quick test we can telnet to the daemon locally and fetch the load information:
kerch:~>telnet localhost 4949
Trying 127.0.0.1...
Connected to localhost.
Escape character is '^]'.
# munin node at kerch.dnsd.me
fetch load
load.value 0.31
That looks good, then going http://localhost/munin, I ended seeing the following page:

Then checking out the “Network Firewall” stats for the day, I saw the following.
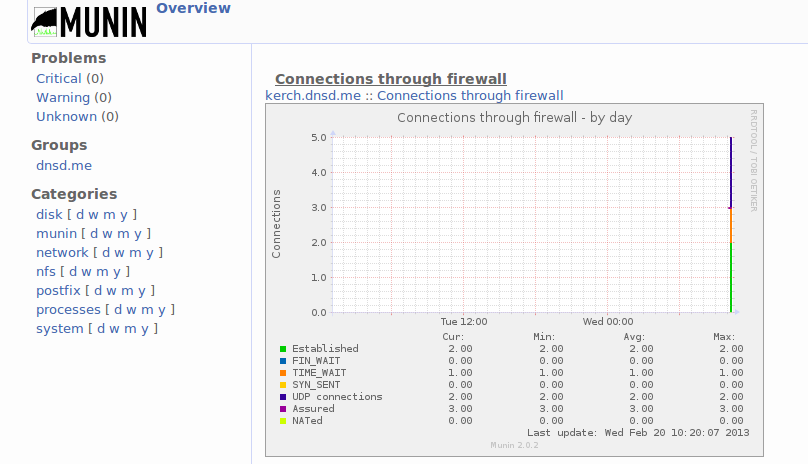
It looks like it started collecting data. Clicking on the host itself produces a page with all the graphs and it took a while to load 20+ graphs. I suppose I could disable some of the plugins :). From the munin-node.conf page we see this directive:
ignore_file Files to ignore when locating plugins. Directive may be repeated.
Checking out that setting on my setup:
kerch:~>grep ignore /etc/munin/munin-node.conf
# Regexps for files to ignore
ignore_file [#~]$
ignore_file DEADJOE$
ignore_file \.bak$
ignore_file %$
ignore_file \.dpkg-(tmp|new|old|dist)$
ignore_file \.rpm(save|new)$
ignore_file \.pod$
So anything with a .bak extension gets ignored. Here were the plugins that were enabled:
kerch:~>ls -Cw 80 /etc/munin/plugins/
cpu                     fw_packets      nfs4_client             processes
df                      if_err_eth0     nfs_client              proc_pri
df_inode                if_eth0         nfsd                    swap
diskstats               interrupts      nfsd4.bak               threads
entropy                 irqstats        open_files              uptime
forks.bak               load            open_inodes             users
fw_conntrack            memory          postfix_mailqueue       vmstat
fw_forwarded_local      munin_stats     postfix_mailvolume
So I moved some of the links to have the .bak extension, ie:
kerch:~>sudo mv /etc/munin/plugins/users /etc/munin/plugins/users.bak
Then to apply the new settings, we need to restart the munin-node service:
kerch:~>sudo service munin-node restart
munin-node stop/waiting
munin-node start/running, process 9678
Lastly, to double check if the plugin is really disabled:
kerch:~>telnet localhost 4949
Trying 127.0.0.1...
Connected to localhost.
Escape character is '^]'.
# munin node at kerch.dnsd.me
fetch users
# Unknown service
After disabling a bunch of the plugins it still took a while to load the page, but that at least it looked more organized. Now let’s configure a remote node to send data to the master.
2. Install Munin-node on FreeBSD
As always, find the package:
freebsd:~>whereis munin-node
munin-node: /usr/ports/sysutils/munin-node
Then let’s install the software:
freebsd:~>cd /usr/ports/sysutils/munin-node/
freebsd:/usr/ports/sysutils/munin-node/>sudo make install clean
After the install is done, enable the service by editing /etc/rc.conf and adding the following:
munin_node_enable="YES"
Then let’s allow out master to connect to this node. Edit /usr/local/etc/munin/munin-node.conf and add the following line:
allow ^192\.168\.1\.100$
Then start the service:
freebsd:~>sudo /usr/local/etc/rc.d/munin-node start
Starting munin_node.
Check to make sure it’s working locally:
freebsd:~>telnet localhost 4949
Trying 127.0.0.1...
Connected to localhost.localdomain.
Escape character is '^]'.
# munin node at freebsd.dnsd.me
fetch load
load.value 0.01
Then go back to the master and add the node to the configuration. This is done by editing /etc/munin/munin.conf and adding the following section:
[freebsd.dnsd.me]
  address 192.168.1.101
  use_node_name yes
Then trying to connect from the master to the node:
kerch:~>telnet 192.168.1.101 4949
Trying 192.168.1.101...
Connected to 192.168.1.101.
Escape character is '^]'.
# munin node at freebsd.dnsd.me
fetch load
load.value 0.02
Then checking the logs after the Cron job ran, I saw the following:
kerch:~>tail -5 /var/log/munin/munin-update.log
2013/02/20 11:55:08 [INFO]: Munin-update finished for node dnsd.me;kerch.dnsd.me (5.45 sec)
2013/02/20 11:55:09 [INFO]: Munin-update finished for node dnsd.me;freebsd.dnsd.me (6.15 sec)
2013/02/20 11:55:09 [INFO] Reaping Munin::Master::UpdateWorker<dnsd .me;kerch.dnsd.me>. Exit value/signal: 0/0
2013/02/20 11:55:09 [INFO] Reaping Munin::Master::UpdateWorker<freebsd.dnsd.me>. Exit value/signal: 0/0
2013/02/20 11:55:10 [INFO]: Munin-update finished (7.05 sec)
We can see that both nodes have been updated. You can also check under /var/lib/munin to make sure information about both nodes exist:
kerch:~>ls -1 /var/lib/munin/state*
/var/lib/munin/state-dnsd.me-freebsd.dnsd.me.storable
/var/lib/munin/state-dnsd.me-kerch.dnsd.me.storable
Lastly vising the site, I saw both nodes like so: 
Also clicking ‘system’ for the day, will show the CPU usage side by side for both nodes, it looks like this:  As I did with the Ubuntu machine, we can do the same thing and disable plugins under /usr/local/etc/munin/plugins on the FreeBSD machine as well. Now let’s set up the Fedora node.
3. Install Munin-node on Fedora
Let’s use yum to install the software:
moxz:~>sudo yum install munin-node
There were a few dependencies, mostly Perl modules. Next let’s configure the node to allow the master to connect to it. Edit /etc/munin/munin-node.conf and add the following entry:
allow ^192.168.1.100$
Let’s enable the munin-node service:
moxz:~>sudo systemctl enable munin-node
ln -s '/usr/lib/systemd/system/munin-node.service' '/etc/systemd/system/multi-user.target.wants/munin-node.service'
Next, let’s start the service and make sure it’s up:
moxz:~>sudo systemctl start munin-node
moxz:~>sudo systemctl status munin-node
munin-node.service - Munin Node Server.
          Loaded: loaded (/usr/lib/systemd/system/munin-node.service; enabled)
          Active: active (running) since Wed 2013-02-27 13:08:16 PST; 1 day 1h ago
            Docs: man:munin-node
        Main PID: 796 (munin-node)
          CGroup: name=systemd:/system/munin-node.service
                  └─796 /usr/bin/perl -wT /usr/sbin/munin-node
Next, let’s sure we can connect locally:
moxz:~>telnet localhost 4949
Trying 127.0.0.1...
Connected to localhost.
Escape character is '^]'.
# munin node at moxz.dnsd.me
fetch load
load.value 0.01
Next, let’s edit the firewall to allow our master to connect to TCP port 4949. Edit /etc/sysconfig/iptables, and add the following:
-A INPUT -s 192.168.1.0/24 -p tcp -m state --state NEW -m tcp --dport 4949 -j ACCEPT
I enabled my whole local subnet, but if you want to be more secure, you can just allow the Master’s IP address. Lastly restart the iptables instance to apply the settings:
moxz:~>sudo systemctl restart iptables
Now let’s go to the master and add our new node. On the Ubuntu machine edit /etc/munin/munin.conf and add the following:
[moxz.dnsd.me]
  address 192.168.1.102
  use_node_name yes
Also make sure you can connect to the node from the master:
kerch:~>telnet 192.168.1.102 4949
Trying 192.168.1.102...
Connected to 192.168.1.102.
Escape character is '^]'.
# munin node at moxz.dnsd.me
fetch load
load.value 0.03
That looks good. Then wait for the Cron job to finish and check the logs to confirm it looks good:
kerch:~>tail -4 /var/log/munin/munin-update.log
2013/02/20 13:45:13 [INFO]: Munin-update finished for node dnsd.me;moxz.dnsd.me (9.94 sec)
2013/02/20 13:45:13 [INFO] Reaping Munin::Master::UpdateWorker</dnsd><dnsd .me;kerch.dnsd.me>. Exit value/signal: 0/0
2013/02/20 13:45:13 [INFO] Reaping Munin::Master::UpdateWorker</dnsd><dnsd .me;moxz.dnsd.me>. Exit value/signal: 0/0
2013/02/20 13:45:14 [INFO]: Munin-update finished (11.19 sec)
Look like the node was added without issues. Checking out the management page (127.0.0.1/munin), confirmed that the node was there. As with the previous setups, we can disable any plugins under /etc/munin/plugins. Now let’s monitor our raid disk status.
4. Create a Custom Script for the FreeBSD Munin-node to Monitor Raid Status
Instructions on how to write a plug-in for Munin are here. Following the instuctions from the site, I wrote this script:
#!/bin/sh
case $1 in
   config)
        cat < <'EOM'
graph_title Raid_Status
graph_vlabel #_Disks
raid.label #_Disks
graph_args --base 1000 -l 0
graph_noscale true
graph_category disk
load.critical 1
graph_info Show Disks Online at a certain time
raid.info Online Disks from the Raid
EOM
        exit 0;;
esac
val=$(/usr/local/sbin/arcconf getconfig 1 PD | grep State | grep Online| /usr/bin/wc -l)
echo "raid.value $(echo $val)"
Here is what the script produced as ouput:
freebsd:~>./raid.sh
raid.value 2
freebsd:~>./raid.sh config
graph_title Raid_Status
graph_vlabel #_Disks
raid.label #_Disks
graph_args --base 1000 -l 0
graph_noscale true
graph_category disk
load.critical 1
graph_info Show Disks Online at a certain time
raid.info Online Disks from the Raid
Then installing the plugin:
freebsd:~>sudo cp raid.sh /usr/local/etc/munin/plugins/raid
Now for the test:
freebsd:~>munin-run raid
raid.value 2
freebsd:~>munin-run raid config
graph_title Raid_Status
graph_vlabel #_Disks
raid.label #_Disks
graph_args --base 1000 -l 0
graph_noscale true
graph_category disk
load.critical 1
graph_info Show Disks Online at a certain time
raid.info Online Disks from the Raid
That all looks good, lastly let’s restart the service and check if it works:
freebsd:~>sudo service munin-node restart
Stopping munin_node.
Waiting for PIDS: 90682.
Starting munin_node.
Now for a quick test.
freebsd:~>telnet localhost 4949
Trying 127.0.0.1...
Connected to localhost.localdomain.
Escape character is '^]'.
# munin node at freebsd.dnsd.me
fetch raid
raid.value 2
That looks good. Wait 5 minutes then check to see if a new RRD file has been generated on the master, here is what I saw after 5 minutes:
kerch:~>ls -1 /var/lib/munin/dnsd.me/*raid*
/var/lib/munin/dnsd.me/freebsd.dnsd.me-raid-load-g.rrd
/var/lib/munin/dnsd.me/freebsd.dnsd.me-raid-raid-g.rrd
Also checking out the values of the RRD file, I saw the following:
kerch:~>rrdtool fetch /var/lib/munin/dnsd.me/freebsd.dnsd.me-raid-raid-g.rrd AVERAGE | tail -4
1361402700: nan
1361403000: nan
1361403300: 2.0000000000e+00
1361403600: nan
Looks like our average value is 2, which is perfect. Going to the site and zooming in on the graph, I saw the following.  It just started to gather data and it looked okay. Now for the comparison
5. Collectd Vs. Munin
Pros for Munin
- The configuration split up, munin.conf for master and munin-node.conf for nodes
- The install configured Apache automatically
- Flexible plugins, even though I accomplished the same with Collectd, Munin seems to be more extensible (and it’s known for that)
- The management web page shows any thresholds that have entered critical state
Cons for Munins
- The Management Page loads all the graphs at once and it takes a while to process
- Munin runs on Perl, therefore many dependencies had to be installed
- Higher CPU Utilization
- Checking out top, I saw munin-html take 90% of the CPU, while Collectd is around 1%. Check it out:

- Lastly I don’t know if you want to call this irony, but I checked Collectd graphs and here is what I saw:
 At about 20:30 I installed Munin on the system, and right after that we see a spike in CPU usage every 5 minutes.
- Checking out top, I saw munin-html take 90% of the CPU, while Collectd is around 1%. Check it out:
- The setup depends on cron, if you made a change, you need to wait 5 minutes for the changes to occur, with Collectd you can just restart the agent
- Traffic is TCP, more overhead. Collectd uses udp.