RHCSA and RHCE Chapter 22 - Virtualization with KVM
KVM
From the Virtualization Getting Started Guide:
What is KVM?
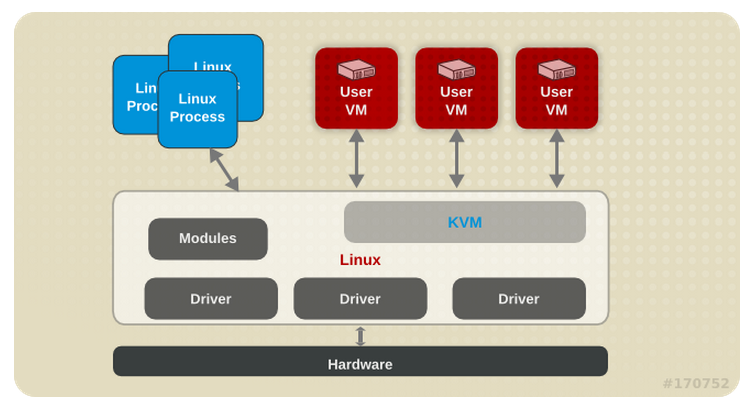
KVM (Kernel-based Virtual Machine) is a full virtualization solution for Linux on AMD64 and Intel 64 hardware that is built into the standard Red Hat Enterprise Linux 6 kernel. It can run multiple, unmodified Windows and Linux guest operating systems. The KVM hypervisor in Red Hat Enterprise Linux is managed with the libvirt API and tools built for libvirt (such as virt-manager and virsh). Virtual machines are executed and run as multi-threaded Linux processes controlled by these tools.
and from the Virtualization Tuning and Optimization Guide here is a quick overview:
Installing The Hypervisor
From the Virtualization Host Configuration and Guest Installation Guide
###Configuring a Virtualization Host installation This section covers installing virtualization tools and virtualization packages as part of a fresh Red Hat Enterprise Linux installation.
Installing the virtualization package group
Launch the Red Hat Enterprise Linux 6 installation program
Start an interactive Red Hat Enterprise Linux 6 installation from the Red Hat Enterprise Linux Installation CD-ROM, DVD or PXE.Continue installation up to package selection
Complete the other steps up to the package selection step.
Select the Virtualization Host server role to install a platform for guest virtual machines.
Installing the virtualization packages with yum
To use virtualization on Red Hat Enterprise Linux you require at least the qemu-kvm and qemu-img packages. These packages provide the user-level KVM emulator and disk image manager on the host Red Hat Enterprise Linux system.
To install the qemu-kvm and qemu-img packages, run the following command:
# yum install qemu-kvm qemu-imgSeveral additional virtualization management packages are also available:
Recommended virtualization packages
- python-virtinst - Provides the virt-install command for creating virtual machines.
- libvirt - The libvirt package provides the server and host side libraries for interacting with hypervisors and host systems. The libvirt package provides the libvirtd daemon that handles the library calls, manages virtual machines and controls the hypervisor.
- libvirt-python - The libvirt-python package contains a module that permits applications written in the Python programming language to use the interface supplied by the libvirt API.
- virt-manager - virt-manager, also known as Virtual Machine Manager, provides a graphical tool for administering virtual machines. It uses libvirt-client library as the management API.
- libvirt-client - The libvirt-client package provides the client-side APIs and libraries for accessing libvirt servers. The libvirt-client package includes the virsh command line tool to manage and control virtual machines and hypervisors from the command line or a special virtualization shell.
Install all of these recommended virtualization packages with the following command:
# yum install virt-manager libvirt libvirt-python python-virtinst libvirt-client####Installing Virtualization package groups
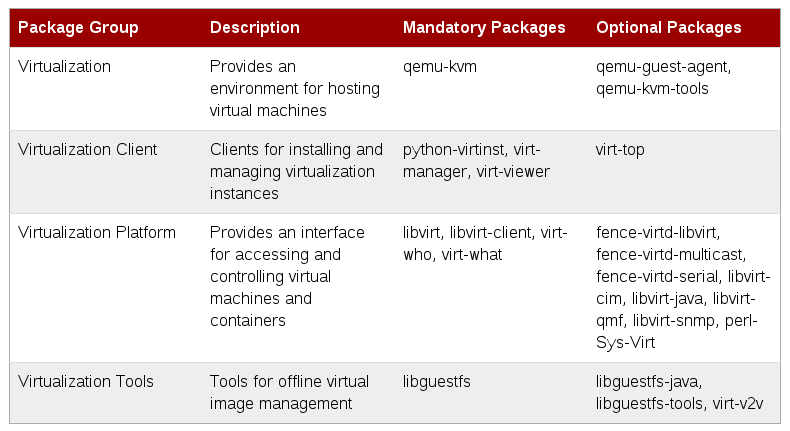
The virtualization packages can also be installed from package groups. The following table describes the virtualization package groups and what they provide.
Virtualization Package Groups
To install a package group, run the
yum groupinstall <groupname>command. For instance, to install the Virtualization Tools package group, run the yum groupinstall “Virtualization Tools” command.
Also from the Virtualization Host Configuration and Guest Installation Guide:
####Verifying virtualization extensions
Use this section to determine whether your system has the hardware virtualization extensions. Virtualization extensions (Intel VT-x or AMD-V) are required for full virtualization.
Run the following command to verify the CPU virtualization extensions are available:
$ grep -E 'svm|vmx' /proc/cpuinfoAnalyze the output.
The following output contains a vmx entry indicating an Intel processor with the Intel VT-x extension:
flags   : fpu tsc msr pae mce cx8 apic mtrr mca cmov pat pse36 clflush
dts acpi mmx fxsr sse sse2 ss ht  tm syscall lm constant_tsc pni monitor ds_cpl
vmx est tm2 cx16 xtpr lahf_lm
The following output contains an svm entry indicating an AMD processor with the AMD-V extensions:
flags   :  fpu tsc msr pae mce cx8 apic mtrr mca cmov pat pse36 clflush
    mmx fxsr sse sse2 ht syscall nx mmxext fxsr_opt lm 3dnowext 3dnow pni cx16
lahf_lm cmp_legacy svm cr8legacy ts fid vid ttp tm stc
If any output is received, the processor has the hardware virtualization extensions. However in some circumstances manufacturers disable the virtualization extensions in BIOS.
The “flags:” output content may appear multiple times, once for each hyperthread, core or CPU on the system.
The virtualization extensions may be disabled in the BIOS.
Ensure KVM subsystem is loaded
As an additional check, verify that the kvm modules are loaded in the kernel:
# lsmod | grep kvmIf the output includes kvm_intel or kvm_amd then the kvm hardware virtualization modules are loaded and your system meets requirements.
Install KVM Hypervisor Example
So let’s go ahead and install the necessary package to run KVM
[root@rhel3 ~]# yum install qemu-kvm qemu-img
My VM was running on VMware and I followed the instructions laid out here to enable nested hypervisor support. I was actually on ESXi 5.5 and all that I had to do was add the following to the vmx of the VM:
~ # tail -1 /vmfs/volumes/datastore1/RHEL_3/RHEL_3.vmx
vhv.enable = "TRUE"
Then after installing the above packages I saw the kvm module loaded:
[root@rhel3 ~]# lsmod | grep kvm
kvm_intel              53484  0
kvm                   316506  1 kvm_intel
and of course the CPU flags were there as well:
[root@rhel3 ~]# grep -E 'svm|vmx' /proc/cpuinfo
flags		: fpu vme de pse tsc msr pae mce cx8 apic sep mtrr pge mca cmov pat pse36 clflush dts mmx fxsr sse sse2 ss syscall nx rdtscp lm constant_tsc arch_perfmon pebs bts xtopology tsc_reliable nonstop_tsc aperfmperf unfair_spinlock pni pclmulqdq **vmx** ssse3 cx16 sse4_1 sse4_2 popcnt aes xsave avx hypervisor lahf_lm ida arat xsaveopt pln pts dts tpr_shadow vnmi ept vpid
flags		: fpu vme de pse tsc msr pae mce cx8 apic sep mtrr pge mca cmov pat pse36 clflush dts mmx fxsr sse sse2 ss syscall nx rdtscp lm constant_tsc arch_perfmon pebs bts xtopology tsc_reliable nonstop_tsc aperfmperf unfair_spinlock pni pclmulqdq **vmx** ssse3 cx16 sse4_1 sse4_2 popcnt aes xsave avx hypervisor lahf_lm ida arat xsaveopt pln pts dts tpr_shadow vnmi ept vpid
The libvirt daemon
From the Virtualization Administration Guide
The libvirt daemon provides an interface for managing virtual machines. You must have the libvirtd daemon installed and running on every remote host that needs managing.
$ ssh root@somehost
# chkconfig libvirtd on
# service libvirtd start
After libvirtd and SSH are configured you should be able to remotely access and manage your virtual machines. You should also be able to access your guests with VNC at this point.
Libvirt and libvirt tools
From the Virtualization Getting Started Guide:
The libvirt package is a hypervisor-independent virtualization API that is able to interact with the virtualization capabilities of a range of operating systems.
The libvirt package provides:
- A common, generic, and stable layer to securely manage virtual machines on a host.
- A common interface for managing local systems and networked hosts.
- All of the APIs required to provision, create, modify, monitor, control, migrate, and stop virtual machines, but only if the hypervisor supports these operations. Although multiple hosts may be accessed with libvirt simultaneously, the APIs are limited to single node operations.
The libvirt package is designed as a building block for higher level management tools and applications, for example,virt-manager and the virsh command-line management tools. With the exception of migration capabilities, libvirt focuses on managing single hosts and provides APIs to enumerate, monitor and use the resources available on the managed node, including CPUs, memory, storage, networking and Non-Uniform Memory Access (NUMA) partitions. The management tools can be located on separate physical machines from the host using secure protocols.
Red Hat Enterprise Linux 6 supports libvirt and included libvirt-based tools as its default method for virtualization management (as in Red Hat Enterprise Virtualization Management).
The libvirt package is available as free software under the GNU Lesser General Public License. The libvirt project aims to provide a long term stable C API to virtualization management tools, running on top of varying hypervisor technologies. The libvirt package supports Xen on Red Hat Enterprise Linux 5, and it supports KVM on both Red Hat Enterprise Linux 5 and Red Hat Enterprise Linux 6.
- virsh - The virsh command-line tool is built on the libvirt management API and operates as an alternative to the graphical virt-manager application. The virsh command can be used in read-only mode by unprivileged users or, with root access, full administration functionality. The virsh command is ideal for scripting virtualization administration.
- virt-manager - virt-manager is a graphical desktop tool for managing virtual machines. It allows access to graphical guest consoles and can be used to perform virtualization administration, virtual machine creation, migration, and configuration tasks. The ability to view virtual machines, host statistics, device information and performance graphs is also provided. The local hypervisor and remote hypervisors can be managed through a single interface.
- virt-install - virt-install is a command line tool to provision new virtual machines. It supports both text-based and graphical installations, using serial console, SDL, SPICE, or VNC client/server pair graphics. Installation media can be local, or exist remotely on an NFS, HTTP, or FTP server. The tool can also be configured to run unattended and kickstart the guest when installation is complete, allowing for easy automation of installation. This tool is installed as part of the python-virtinst package.
Virsh
From the Virtualization Administration Guide:
virsh is a command line interface tool for managing guest virtual machines and the hypervisor. The virsh command-line tool is built on the libvirt management API and operates as an alternative to the qemu-kvm command and the graphical virt-manager application. The virsh command can be used in read-only mode by unprivileged users or, with root access, full administration functionality. The virsh command is ideal for scripting virtualization administration.
virsh command quick reference
The following tables provide a quick reference for all virsh command line options.
####guest virtual machine management options
Command Shortcut (if available) Description –help -h Prints basic help information. –version [=short] -v Prints the libvirt library version –version [=long] -V Prints the libvirt library version in addition to the options and the driver it was compiled in –connect [URI] -c Connects to the specified URI as if done with the connect command instead of the default connection –debug [level] -d Enables the debug messages to be logged that are at the debug level or higher. The Level range is 0-4 The default setting is 4. Virsh_Debug has level descriptors. (XREF) –log [file] -l Writes logging details to the specified file. –quiet -q Prevents informational messages from being displayed –readonly -r Makes the initial connection as read-only, same as the –readonly option of the connect command. –timing -t Outputs the elapsed time information for each command –escape [string] -e Sets an alternative escape sequence for the console. By default ^] is used. Valid characters include alphabetic chatacters, @, [, ], \, ^, and _. ####guest virtual machine management commands
Command Description list Lists all guest virtual machines. dumpxml Outputs the XML configuration file for the guest virtual machine. create Creates a guest virtual machine from an XML configuration file and starts the new guest virtual machine. start Starts an inactive guest virtual machine. destroy Forces a guest virtual machine to stop. define Creates a guest virtual machine from an XML configuration file without starting the new guest virtual machine. domid Displays the guest virtual machine’s ID. domuuid Displays the guest virtual machine’s UUID. dominfo Displays guest virtual machine information. domname Displays the guest virtual machine’s name. domstate Displays the state of a guest virtual machine. quit Quits the interactive terminal. reboot Reboots a guest virtual machine. restore Restores a previously saved guest virtual machine stored in a file. resume Resumes a paused guest virtual machine. save Saves the present state of a guest virtual machine to a file. shutdown Gracefully shuts down a guest virtual machine. suspend Pauses a guest virtual machine. undefine Deletes all files associated with a guest virtual machine. migrate Migrates a guest virtual machine to another host physical machine. The following virsh command options manage guest virtual machine and hypervisor resources:
Resource management options
Command Description setmem Sets the allocated memory for a guest virtual machine. Refer to the virsh manpage for more details. setmaxmem Sets maximum memory limit for the hypervisor. Refer to the virsh manpage for more details. setvcpus Changes number of virtual CPUs assigned to a guest virtual machine. Refer to the virsh manpage for more details. vcpuinfo Displays virtual CPU information about a guest virtual machine. vcpupin Controls the virtual CPU affinity of a guest virtual machine. domblkstat Displays block device statistics for a running guest virtual machine. domifstat Displays network interface statistics for a running guest virtual machine. attach-device Attach a device to a guest virtual machine, using a device definition in an XML file. attach-disk Attaches a new disk device to a guest virtual machine. attach-interface Attaches a new network interface to a guest virtual machine. update-device Detaches a disk image from a guest virtual machine’s CD-ROM drive. detach-device Detaches a device from a guest virtual machine, takes the same kind of XML descriptions as command attach-device. detach-disk Detaches a disk device from a guest virtual machine. detach-interface Detach a network interface from a guest virtual machine. The virsh commands for managing and creating storage pools and volumes.
####Storage Pool options
Command Description find-storage-pool-sources Returns the XML definition for all storage pools of a given type that could be found. find-storage-pool-sources host port Returns data on all storage pools of a given type that could be found as XML. If the host physical machine and port are provided, this command can be run remotely. pool-autostart Sets the storage pool to start at boot time. pool-build The pool-build command builds a defined pool. This command can format disks and create partitions. pool-create pool-create creates and starts a storage pool from the provided XML storage pool definition file. pool-create-as name Creates and starts a storage pool from the provided parameters. If the –print-xml parameter is specified, the command prints the XML definition for the storage pool without creating the storage pool. pool-define Creates a storage bool from an XML definition file but does not start the new storage pool. pool-define-as name Creates but does not start, a storage pool from the provided parameters. If the –print-xml parameter is specified, the command prints the XML definition for the storage pool without creating the storage pool. pool-destroy Permanently destroys a storage pool in libvirt. The raw data contained in the storage pool is not changed and can be recovered with the pool-create command. pool-delete Destroys the storage resources used by a storage pool. This operation cannot be recovered. The storage pool still exists after this command but all data is deleted. pool-dumpxml Prints the XML definition for a storage pool. pool-edit Opens the XML definition file for a storage pool in the users default text editor. pool-info Returns information about a storage pool. pool-list Lists storage pools known to libvirt. By default, pool-list lists pools in use by active guest virtual machines. The –inactive parameter lists inactive pools and the –all parameter lists all pools. pool-undefine Deletes the definition for an inactive storage pool. pool-uuid Returns the UUID of the named pool. pool-name Prints a storage pool’s name when provided the UUID of a storage pool. pool-refresh Refreshes the list of volumes contained in a storage pool. pool-start Starts a storage pool that is defined but inactive. Volume options
Command Description vol-create Create a volume from an XML file. vol-create-from Create a volume using another volume as input. vol-create-as Create a volume from a set of arguments. vol-clone Clone a volume. vol-delete Delete a volume. vol-wipe Wipe a volume. vol-dumpxml Show volume information in XML. vol-info Show storage volume information. vol-list List volumes. vol-pool Returns the storage pool for a given volume key or path. vol-path Returns the volume path for a given volume name or key. vol-name Returns the volume name for a given volume key or path. vol-key Returns the volume key for a given volume name or path. Secret options
Command Description secret-define Define or modify a secret from an XML file. secret-dumpxml Show secret attributes in XML. secret-set-value Set a secret value. secret-get-value Output a secret value. secret-undefine Undefine a secret. secret-list List secrets. Network filter options
Command Description nwfilter-define Define or update a network filter from an XML file. nwfilter-undefine Undefine a network filter. nwfilter-dumpxml Show network filter information in XML. nwfilter-list List network filters. nwfilter-edit Edit XML configuration for a network filter. This table contains virsh command options for snapshots:
Snapshot options
Command Description snapshot-create Create a snapshot. snapshot-current Get the current snapshot. snapshot-delete Delete a domain snapshot. snapshot-dumpxml Dump XML for a domain snapshot. snapshot-list List snapshots for a domain. snapshot-revert Revert a domain to a snapshot. This table contains miscellaneous virsh commands:
Miscellaneous options
Command Description version Displays the version of virsh.
Virsh Commands
From the same guide:
The commands in this section are generic because they are not specific to any domain.
help
$ virsh help [command|group]The help command can be used with or without options. When used without options, all commands are listed, one perline. When used with an option, it is grouped into categories, displaying the keyword for each group.To display the commands that are only for a specific option, you need to give the keyword for that group as an option. For example:
$ virsh help pool
 Storage Pool (help keyword 'pool'):
	find-storage-pool-sources-as   find potential storage pool sources
	find-storage-pool-sources      discover potential storage pool sources
	pool-autostart                 autostart a pool
	pool-build                     build a pool
	pool-create-as                 create a pool from a set of args
	pool-create                    create a pool from an XML file
	pool-define-as                 define a pool from a set of args
	pool-define                    define (but don't start) a pool from an XML file
	pool-delete                    delete a pool
	pool-destroy                   destroy (stop) a pool
	pool-dumpxml                   pool information in XML
	pool-edit                      edit XML configuration for a storage pool
	pool-info                      storage pool information
	pool-list                      list pools
	pool-name                      convert a pool UUID to pool name
	pool-refresh                   refresh a pool
	pool-start                     start a (previously defined) inactive pool
	pool-undefine                  undefine an inactive pool
	pool-uuid                      convert a pool name to pool UUID
Using the same command with a command option, gives the help information on that one specific command. For example:
$virsh help vol-path
  NAME
	vol-path - returns the volume path for a given volume name or key

  SYNOPSIS
	vol-path <vol> [--pool <string>]

  OPTIONS
	[--vol] <string>  volume name or key
	--pool <string>  pool name or uuid
quit and exit
The quit command and the exit command will close the terminal. For example:
$virsh exit
$virsh quit
version
The version command displays the current libvirt version and displays information about where the build is from. For example:
$ virsh version
Compiled against library: libvirt 1.1.1
Using library: libvirt 1.1.1
Using API: QEMU 1.1.1
Running hypervisor: QEMU 1.5.3
connect
Connects to a hypervisor session. When the shell is first started this command runs automatically when the URI parameter is requested by the -c command. The URI specifies how to connect to the hypervisor. The most commonly used URIs are:
- xen:///- connects to the local XEN hypervisor
- qemu:///system - connects locally as root to the daemon supervising QEMU and KVM domains.
- xen:///session - connects locally as a user to the user’s set of QEMU and KVM domains
- lxc:/// - connects to a local Linux container
The command can be run as follows:
$virsh connect {name|URI}Where {name} is the machine name (hostname) or URL (the output of the virsh uri command) of the hypervisor. To initiate a read-only connection, append the above command with –readonly. For more information on URIs refer to Remote URIs If you are unsure of the URI, the uri command will display it:
$ virsh uri
qemu:///session
Libvirt and virsh Example
So let’s go ahead and install libvirtd and ensure that it’s running:
[root@rhel3 ~]# yum install libvirt
[root@rhel3 ~]# chkconfig --list libvirtd
libvirtd       	0:off	1:off	2:off	3:on	4:on	5:on	6:off
[root@rhel3 ~]# service libvirtd status
libvirtd is stopped
[root@rhel3 ~]# service libvirtd start
Starting libvirtd daemon:                                  [  OK  ]
[root@rhel3 ~]# service libvirtd status
libvirtd (pid  2006) is running...
Now let’s install virsh and connect to libvirtd:
[root@rhel3 ~]# yum install libvirt-client
Now for using virsh:
[root@rhel3 ~]# virsh
Welcome to virsh, the virtualization interactive terminal.

Type:  'help' for help with commands
	   'quit' to quit

virsh # connect qemu:///system

virsh # capabilities
<capabilities>

  <host>
	<uuid>564d4d7b-76ee-e8f8-4f94-73a2120ac990</uuid>
	<cpu>
	  <arch>x86_64</arch>
	  <model>Westmere</model>
	  <vendor>Intel</vendor>
	  <topology sockets='2' cores='1' threads='1'/>
	  <feature name='rdtscp'/>
	  <feature name='hypervisor'/>
	  <feature name='avx'/>
	  <feature name='osxsave'/>
	  <feature name='xsave'/>
	  <feature name='vmx'/>
	  <feature name='pclmuldq'/>
	  <feature name='ss'/>
	  <feature name='ds'/>
	  <feature name='vme'/>
	</cpu>
	<power_management>
	  <suspend_disk/>
	</power_management>
	<migration_features>
	  <live/>
	  <uri_transports>
		<uri_transport>tcp</uri_transport>
	  </uri_transports>
	</migration_features>
	<topology>
	  <cells num='1'>
		<cell id='0'>
		  <cpus num='2'>
			<cpu id='0'/>
			<cpu id='1'/>
		  </cpus>
		</cell>
	  </cells>
	</topology>
	<secmodel>
	  <model>selinux</model>
	  <doi>0</doi>
	</secmodel>
	<secmodel>
	  <model>dac</model>
	  <doi>0</doi>
	</secmodel>
  </host>

  <guest>
	<os_type>hvm</os_type>
	<arch name='i686'>
	  <wordsize>32</wordsize>
	  <emulator>/usr/libexec/qemu-kvm</emulator>
	  <machine>rhel6.4.0</machine>
	  <machine canonical='rhel6.4.0'>pc</machine>
	  <machine>rhel6.3.0</machine>
	  <machine>rhel6.2.0</machine>
	  <machine>rhel6.1.0</machine>
	  <machine>rhel6.0.0</machine>
	  <machine>rhel5.5.0</machine>
	  <machine>rhel5.4.4</machine>
	  <machine>rhel5.4.0</machine>
	  <domain type='qemu'>
	  </domain>
	  <domain type='kvm'>
		<emulator>/usr/libexec/qemu-kvm</emulator>
	  </domain>
	</arch>
	<features>
	  <cpuselection/>
	  <deviceboot/>
	  <acpi default='on' toggle='yes'/>
	  <apic default='on' toggle='no'/>
	  <pae/>
	  <nonpae/>
	</features>
  </guest>

  <guest>
	<os_type>hvm</os_type>
	<arch name='x86_64'>
	  <wordsize>64</wordsize>
	  <emulator>/usr/libexec/qemu-kvm</emulator>
	  <machine>rhel6.4.0</machine>
	  <machine canonical='rhel6.4.0'>pc</machine>
	  <machine>rhel6.3.0</machine>
	  <machine>rhel6.2.0</machine>
	  <machine>rhel6.1.0</machine>
	  <machine>rhel6.0.0</machine>
	  <machine>rhel5.5.0</machine>
	  <machine>rhel5.4.4</machine>
	  <machine>rhel5.4.0</machine>
	  <domain type='qemu'>
	  </domain>
	  <domain type='kvm'>
		<emulator>/usr/libexec/qemu-kvm</emulator>
	  </domain>
	</arch>
	<features>
	  <cpuselection/>
	  <deviceboot/>
	  <acpi default='on' toggle='yes'/>
	  <apic default='on' toggle='no'/>
	</features>
  </guest>

</capabilities>


virsh #
You can also run a command directly without going into the shell:
[root@rhel3 ~]#  virsh -c qemu:///system sysinfo | sed -n '/<bios>/,/<\/system>/p'
  <bios>
	<entry name='vendor'>Phoenix Technologies LTD</entry>
	<entry name='version'>6.00</entry>
	<entry name='date'>07/30/2013</entry>
	<entry name='release'>4.6</entry>
  </bios>
  <system>
	<entry name='manufacturer'>VMware, Inc.</entry>
	<entry name='product'>VMware Virtual Platform</entry>
	<entry name='version'>None</entry>
	<entry name='serial'>VMware-56 4d 4d 7b 76 ee </entry>
	<entry name='uuid'>564D4D7B-</entry>
	<entry name='sku'>Not Specified</entry>
	<entry name='family'>Not Specified</entry>
  </system>
Networking with libvirt
From the Virtualization Host Configuration and Guest Installation Guide:
Network Address Translation (NAT) with libvirt
One of the most common methods for sharing network connections is to use Network Address Translation (NAT) forwarding (also known as virtual networks).
Host configuration
Every standard libvirt installation provides NAT-based connectivity to virtual machines as the default virtual network. Verify that it is available with the
virsh net-list --allcommand.# virsh net-list --all Name State Autostart ----------------------------------------- default active yesIf it is missing, the example XML configuration file can be reloaded and activated:
# virsh net-define /usr/share/libvirt/networks/default.xmlThe default network is defined from /usr/share/libvirt/networks/default.xml
Mark the default network to automatically start:
# virsh net-autostart default
Network default marked as autostarted
Start the default network:
# virsh net-start default
Network default started
Once the libvirt default network is running, you will see an isolated bridge device. This device does not have any physical interfaces added. The new device uses NAT and IP forwarding to connect to the physical network. Do not add new interfaces.
# brctl show
bridge name     bridge id               STP enabled     interfaces
virbr0          8000.000000000000       yes
libvirt adds iptables rules which allow traffic to and from guest virtual machines attached to the virbr0 device in the INPUT, FORWARD, OUTPUT and POSTROUTING chains. libvirt then attempts to enable the ip_forward parameter. Some other applications may disable ip_forward, so the best option is to add the following to /etc/sysctl.conf.
net.ipv4.ip_forward = 1Guest virtual machine configuration
Once the host configuration is complete, a guest virtual machine can be connected to the virtual network based on its name. To connect a guest to the ‘default’ virtual network, the following could be used in the XML configuration file (such as /etc/libvirtd/qemu/myguest.xml) for the guest:
<interface type='network'>
   <source network='default'/>
</interface>
Bridged networking with libvirt
Bridged networking (also known as physical device sharing) is used to dedicate a physical device to a virtual machine. Bridging is often used for more advanced setups and on servers with multiple network interfaces.
To create a bridge (br0) based on the eth0 interface, execute the following command on the host:
# virsh iface-bridge eth0 br0Important
NetworkManager does not support bridging. NetworkManager must be disabled to use networking with the network scripts (located in the /etc/sysconfig/network-scripts/ directory).
# chkconfig NetworkManager off
# chkconfig network on
# service NetworkManager stop
# service network start
If you do not want to disable NetworkManager entirely, add “NM_CONTROLLED=no” to the ifcfg-* network script being used for the bridge.
VM Images and Installation Locations
From the Virtualization_Administration_Guide:
Use a central location for virtual machine installations and images. Virtual machine images should be stored under /var/lib/libvirt/images/. If you are using a different directory for your virtual machine images make sure you add the directory to your SELinux policy and relabel it before starting the installation. Use of shareable, network storage in a central location is highly recommended.
and from the Virtualization_Host_Configuration_and_Guest_Installation_Guide:
For ISO image files and guest storage images, the recommended location to use is /var/lib/libvirt/images/. Any other location may require additional configuration by SELinux.
Libvirt Networking and VM Image Location Example
Let’s make sure the default network is automatically configured:
[root@rhel3 ~]# virsh -c qemu:///system net-list
Name                 State      Autostart     Persistent
--------------------------------------------------
default              active     yes           yes
Now let’s make sure it’s assigned to a bridge:
[root@rhel3 ~]# virsh -c qemu:///system net-info default
Name            default
UUID            8405fc50-ead0-4afb-85bc-9baf521c2e27
Active:         yes
Persistent:     yes
Autostart:      yes
Bridge:         virbr0
Then install bridge-utils and check the bridge:
[root@rhel3 ~]# yum install bridge-utils
[root@rhel3 ~]# brctl show
bridge name	bridge id		STP enabled	interfaces
virbr0		8000.525400e08ccf	yes		virbr0-nic
Here are the firewall rules that were added by the libvirt package:
[root@rhel3 ~]# iptables -L -n -v
Chain INPUT (policy ACCEPT 0 packets, 0 bytes)
 pkts bytes target     prot opt in     out     source               destination
	0     0 ACCEPT     udp  --  virbr0 *       0.0.0.0/0            0.0.0.0/0           udp dpt:53
	0     0 ACCEPT     tcp  --  virbr0 *       0.0.0.0/0            0.0.0.0/0           tcp dpt:53
	0     0 ACCEPT     udp  --  virbr0 *       0.0.0.0/0            0.0.0.0/0           udp dpt:67
	0     0 ACCEPT     tcp  --  virbr0 *       0.0.0.0/0            0.0.0.0/0           tcp dpt:67
 4126  298K ACCEPT     all  --  *      *       0.0.0.0/0            0.0.0.0/0           state RELATED,ESTABLISHED
	0     0 ACCEPT     icmp --  *      *       0.0.0.0/0            0.0.0.0/0
	0     0 ACCEPT     all  --  lo     *       0.0.0.0/0            0.0.0.0/0
	6   360 ACCEPT     tcp  --  *      *       0.0.0.0/0            0.0.0.0/0           state NEW tcp dpt:22
  127 34552 REJECT     all  --  *      *       0.0.0.0/0            0.0.0.0/0           reject-with icmp-host-prohibited

Chain FORWARD (policy ACCEPT 0 packets, 0 bytes)
 pkts bytes target     prot opt in     out     source               destination
	0     0 ACCEPT     all  --  *      virbr0  0.0.0.0/0            192.168.122.0/24    state RELATED,ESTABLISHED
	0     0 ACCEPT     all  --  virbr0 *       192.168.122.0/24     0.0.0.0/0
	0     0 ACCEPT     all  --  virbr0 virbr0  0.0.0.0/0            0.0.0.0/0
	0     0 REJECT     all  --  *      virbr0  0.0.0.0/0            0.0.0.0/0           reject-with icmp-port-unreachable
	0     0 REJECT     all  --  virbr0 *       0.0.0.0/0            0.0.0.0/0           reject-with icmp-port-unreachable
	0     0 REJECT     all  --  *      *       0.0.0.0/0            0.0.0.0/0           reject-with icmp-host-prohibited

Chain OUTPUT (policy ACCEPT 1593 packets, 241K bytes)
 pkts bytes target     prot opt in     out     source               destination
And here is the nat table:
[root@rhel3 ~]# iptables -L -n -v -t nat
Chain PREROUTING (policy ACCEPT 73 packets, 14236 bytes)
 pkts bytes target     prot opt in     out     source               destination

Chain POSTROUTING (policy ACCEPT 12 packets, 699 bytes)
 pkts bytes target     prot opt in     out     source               destination
	0     0 MASQUERADE  tcp  --  *      *       192.168.122.0/24    !192.168.122.0/24    masq ports: 1024-65535
	0     0 MASQUERADE  udp  --  *      *       192.168.122.0/24    !192.168.122.0/24    masq ports: 1024-65535
	0     0 MASQUERADE  all  --  *      *       192.168.122.0/24    !192.168.122.0/24

Chain OUTPUT (policy ACCEPT 12 packets, 699 bytes)
 pkts bytes target     prot opt in     out     source               destination
I was okay with the NAT approach for now. I also wanted to make sure the ip_forward flag was applied:
[root@rhel3 ~]# cat /proc/sys/net/ipv4/ip_forward
0
[root@rhel3 ~]# grep ip_forward /etc/sysctl.conf
net.ipv4.ip_forward = 0
and it actually wasn’t for some reason, so I set the above value to 1 and then ran the following to apply the change:
[root@rhel3 ~]# sysctl -p
net.ipv4.ip_forward = 1
net.ipv4.conf.default.rp_filter = 1
net.ipv4.conf.default.accept_source_route = 0
kernel.sysrq = 0
kernel.core_uses_pid = 1
net.ipv4.tcp_syncookies = 1
net.bridge.bridge-nf-call-ip6tables = 0
net.bridge.bridge-nf-call-iptables = 0
net.bridge.bridge-nf-call-arptables = 0
kernel.msgmnb = 65536
kernel.msgmax = 65536
kernel.shmmax = 68719476736
kernel.shmall = 4294967296
Now checking the setting:
[root@rhel3 ~]# cat /proc/sys/net/ipv4/ip_forward
1
That’s better.
It sounds like we need to use the /var/lib/libvirt/images directory for storing ISOs and virtual disks. Let’s make sure it exists and has approproate selinux context:
[root@rhel3 ~]# ls -dZ /var/lib/libvirt/images
drwx--x--x. root root system_u:object_r:virt_image_t:s0 /var/lib/libvirt/images
That looks good. I copied a centos ISO in there which I will use for my VM install later:
[root@rhel3 ~]# rsync -avzP 192.168.1.101:/data/isos/centos/CentOS-6.5-x86_64-minimal.iso /var/lib/libvirt/images/.
Password:
receiving incremental file list

sent 11 bytes  received 62 bytes  29.20 bytes/sec
total size is 417333248  speedup is 5716893.81
VM Graphical framebuffers
From the Virtualization_Administration_Guide:
A graphics device allows for graphical interaction with the guest virtual machine OS. A guest virtual machine will typically have either a framebuffer or a text console configured to allow interaction with the admin.
To specify the graphical framebuffer devices configuration settings, use a management tool to make the following changes to the domain XML:
<devices>
   <graphics type='sdl' display=':0.0'/>
   <graphics type='vnc' port='5904'>
      <listen type='address' address='1.2.3.4'/>
   </graphics>
  <graphics type='rdp' autoport='yes' multiUser='yes' />
  <graphics type='desktop' fullscreen='yes'/>
  <graphics type='spice'>
    <listen type='network' network='rednet'/>
 </graphics>
 </devices>
The graphics element has a mandatory type attribute which takes the value sdl, vnc, rdp or desktop as explained below:
Graphical framebuffer elements
Parameter Description sdl This displays a window on the host physical machine desktop, it can take 3 optional arguments: a display attribute for the display to use, an xauth attribute for the authentication identifier, and an optional fullscreen attribute accepting values yes or no vnc Starts a VNC server. The port attribute specifies the TCP port number (with -1 as legacy syntax indicating that it should be auto-allocated). The autoport attribute is the new preferred syntax for indicating autoallocation of the TCP port to use. The listen attribute is an IP address for the server to listen on. The passwd attribute provides a VNC password in clear text. The keymap attribute specifies the keymap to use. It is possible to set a limit on the validity of the password be giving an timestamp passwdValidTo=’2010-04-09T15:51:00’ assumed to be in UTC. The connected attribute allows control of connected client during password changes. VNC accepts keep value only and note that it may not be supported by all hypervisors. Rather than using listen/port, QEMU supports a socket attribute for listening on a unix domain socket path. spice Starts a SPICE server. The port attribute specifies the TCP port number (with -1 as legacy syntax indicating that it should be auto-allocated), while tlsPort gives an alternative secure port number. The autoport attribute is the new preferred syntax for indicating auto-allocation of both port numbers. The listen attribute is an IP address for the server to listen on. The passwd attribute provides a SPICE password in clear text. The keymap attribute specifies the keymap to use. It is possible to set a limit on the validity of the password be giving an timestamp passwdValidTo=’2010-04-09T15:51:00’ assumed to be in UTC. The connected attribute allows control of connected client during password changes. SPICE accepts keep to keep client connected, disconnect to disconnect client and fail to fail changing password. Note it is not be supported by all hypervisors. The defaultMode attribute sets the default channel security policy, valid values are secure, insecure and the default any (which is secure if possible, but falls back to insecure rather than erroring out if no secure path is available).
Prepare firewall for VNC Example
I will just use VNC to connect to the VM’s console. If I am going to do that, I will need to open up the firewall to allow 5900-5910 at least for testing. We actually covered this in Chapter 13. Here is the command to do that:
[root@rhel3 ~]# iptables -I INPUT 8 -m state --state NEW -m tcp -p tcp --dport 5900:5910 -j ACCEPT
[root@rhel3 ~]# service iptables save
iptables: Saving firewall rules to /etc/sysconfig/iptables:[  OK  ]
If you want to use the SPICE protocol, check out my previous post here.
Creating guests with virt-install
From the Virtualization_Host_Configuration_and_Guest_Installation_Guide:
You can use the virt-install command to create guest virtual machines from the command line. virt-install is used either interactively or as part of a script to automate the creation of virtual machines. Using virt-install with Kickstart files allows for unattended installation of virtual machines.
The virt-install tool provides a number of options that can be passed on the command line. To see a complete list of options run the following command:
# virt-install --helpNote that you need root privileges in order for virt-install commands to complete successfully. The virt-install man page also documents each command option and important variables.
qemu-img is a related command which may be used before virt-install to configure storage options.
An important option is the –graphics option which allows graphical installation of a virtual machine.
Using virt-install to install a Red Hat Enterprise Linux 5 guest virtual machine
This example creates a Red Hat Enterprise Linux 5 guest:
virt-install \
   --name=guest1-rhel5-64 \
   --file=/var/lib/libvirt/images/guest1-rhel5-64.dsk \
   --file-size=8 \
   --nonsparse --graphics spice \
   --vcpus=2 --ram=2048 \
   --location=http://example1.com/installation_tree/RHEL5.6-Server-x86_64/os \
   --network bridge=br0 \
   --os-type=linux \
   --os-variant=rhel5.4
Ensure that you select the correct os-type for your operating system when running this command.
Creating a VM with virt-install Example
First let’s install the utility:
[root@rhel3 ~]# yum install python-virtinst
Here is a command that will create the VM:
[root@rhel3 ~]# virt-install --name=centos --ram=512 --vcpus=1 --cdrom=/var/lib/libvirt/images/CentOS-6.5-x86_64-minimal.iso --os-type=linux --os-variant=rhel6 --disk=/var/lib/libvirt/images/centos.img,size=5 --network network=default --graphics=vnc,listen=0.0.0.0,keymap=en-us --noautoconsole

Starting install...
Allocating 'centos.img'                                                                                         | 5.0 GB     00:00
Creating domain...                                                                                              |    0 B     00:00
Domain installation still in progress. You can reconnect to
the console to complete the installation process.
Now make sure the VM is running:
[root@rhel3 ~]# virsh list
 Id    Name                           State
----------------------------------------------------
 1     centos                         running
Now find the vncdisplay assigned to the VM:
[root@rhel3 ~]# virsh vncdisplay 1
127.0.0.1:0

[root@rhel3 ~]# netstat -ant | grep 590
tcp        0      0 0.0.0.0:5900                0.0.0.0:*                   LISTEN
Looks like it’s just 5900. Now let’s install virt-viewer:
[root@rhel3 ~]# yum install virt-viewer xauth xorg-x11-fonts-Type1
and reconnect to our host with X-forwarding:
elatov@fed:~$ssh -X rhel3 -l root
root@rhel3's password:
Last login: Sat May 24 18:04:13 2014 from fed.local.com
/usr/bin/xauth:  creating new authority file /root/.Xauthority
[root@rhel3 ~]# virt-viewer 1
and you should see the following:
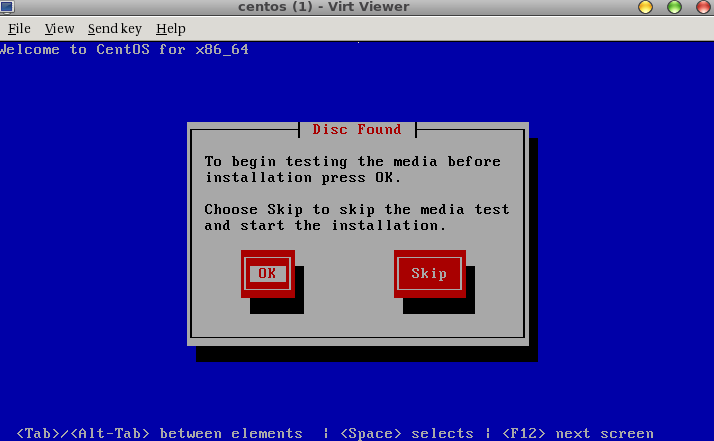
From there we can just finish the install. Let’s stop there, shutdown the VM, and delete it:
[root@rhel3 ~]# virsh
Welcome to virsh, the virtualization interactive terminal.

Type:  'help' for help with commands
	   'quit' to quit

virsh # list
 Id    Name                           State
----------------------------------------------------
 1     centos                         running

virsh # destroy 1
Domain 1 destroyed

virsh # list --all
 Id    Name                           State
----------------------------------------------------
 -     centos                         shut off

virsh # undefine centos
Domain centos has been undefined
Lastly remove the disk image file that was created for the VM:
[root@rhel3 ~]# rm /var/lib/libvirt/images/centos.img
rm: remove regular file '/var/lib/libvirt/images/centos.img'? y
Since I started the VNC server for the VM on 0.0.0.0 (remote and not just local), I could connect to the VM from a remote machine using a regular vnc client:
elatov@fed:~$vncviewer rhel3:0

TigerVNC Viewer 64-bit v1.3.0 (20140319)
Built on Mar 19 2014 at 17:09:18
Copyright (C) 1999-2011 TigerVNC Team and many others (see README.txt)
See http://www.tigervnc.org for information on TigerVNC.

Sat May 24 18:24:31 2014
 CConn:       connected to host rhel3 port 5900
 CConnection: Server supports RFB protocol version 3.8
 CConnection: Using RFB protocol version 3.8
 PlatformPixelBuffer: Using default colormap and visual, TrueColor, depth 24.
 CConn:       Using pixel format depth 24 (32bpp) little-endian rgb888
 CConn:       Using Tight encoding
 Viewport:    Unexpected release of FLTK key code 65293 (0xff0d)
and you will again see the same window:

If you are always able to SSH forward then might as well do that for security reasons, and then you can close the 5900 ports in the firewall. This was just for demostration purposes.
Creating guests with virt-manager
From the Virtualization_Host_Configuration_and_Guest_Installation_Guide:
virt-manager, also known as Virtual Machine Manager, is a graphical tool for creating and managing guest virtual machines.
Creating a guest virtual machine with virt-manager
Open virt-manager
Start virt-manager. Launch the Virtual Machine Manager application from the Applications menu and System Tools submenu. Alternatively, run the virt-manager command as root.
Optional: Open a remote hypervisor
Select the hypervisor and click the Connect button to connect to the remote hypervisor.
Create a new virtual machine
The virt-manager window allows you to create a new virtual machine. Click the Create a new virtual machine button to open the New VM wizard.
The New VM wizard breaks down the virtual machine creation process into five steps:
- Naming the guest virtual machine and choosing the installation type
- Locating and configuring the installation media
- Configuring memory and CPU options
- Configuring the virtual machine’s storage
- Configuring networking, architecture, and other hardware settings
Ensure that virt-manager can access the installation media (whether locally or over the network) before you continue.
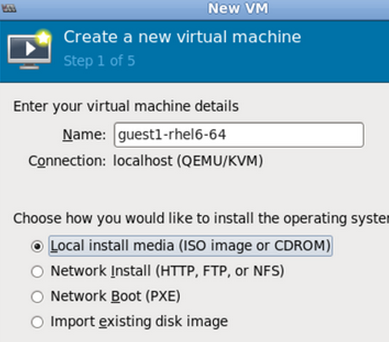
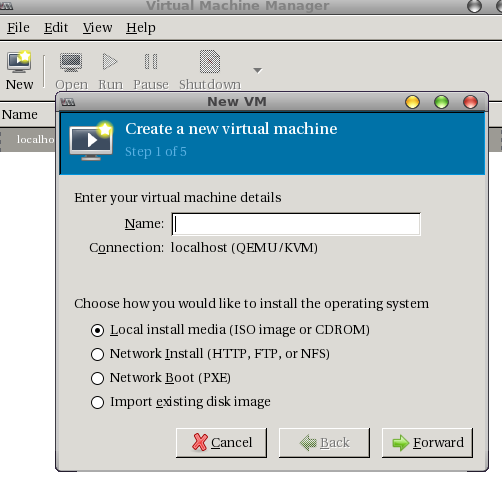
Specify name and installation type
The guest virtual machine creation process starts with the selection of a name and installation type. Virtual machine names can have underscores (_), periods (.), and hyphens (-).
Type in a virtual machine name and choose an installation type:
- Local install media (ISO image or CDROM) - This method uses a CD-ROM, DVD, or image of an installation disk (for example, .iso).
- Network Install (HTTP, FTP, or NFS) - This method involves the use of a mirrored Red Hat Enterprise Linux or Fedora installation tree to install a guest. The installation tree must be accessible through either HTTP, FTP, or NFS.
- Network Boot (PXE) - This method uses a Preboot eXecution Environment (PXE) server to install the guest virtual machine. To install via network boot, the guest must have a routable IP address or shared network device.
- Import existing disk image - This method allows you to create a new guest virtual machine and import a disk image (containing a pre-installed, bootable operating system) to it.
Click Forward to continue.
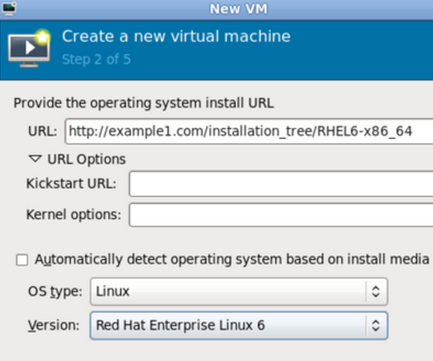
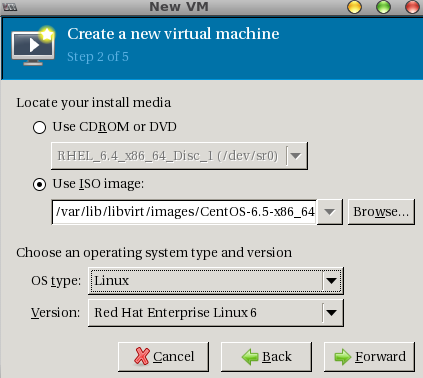
Configure installation
Next, configure the OS type and Version of the installation. Ensure that you select the appropriate OS type for your virtual machine. Depending on the method of installation, provide the install URL or existing storage path.
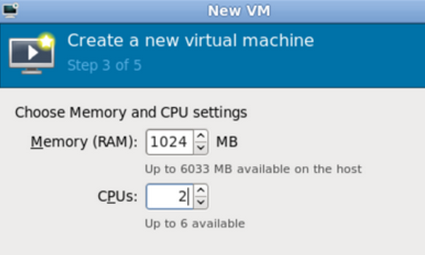
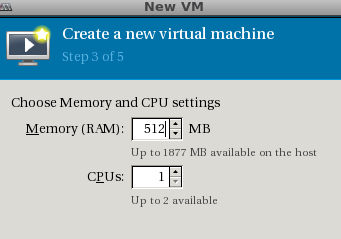
Configure CPU and memory
The next step involves configuring the number of CPUs and amount of memory to allocate to the virtual machine. The wizard shows the number of CPUs and amount of memory you can allocate; configure these settings and click Forward.
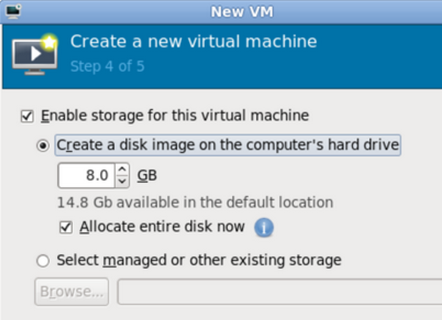
Configure storage
Assign storage to the guest virtual machine.
If you chose to import an existing disk image during the first step, virt-manager will skip this step.
Assign sufficient space for your virtual machine and any applications it requires, then click Forward to continue.
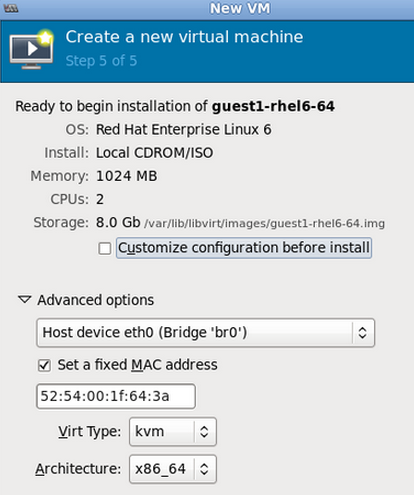
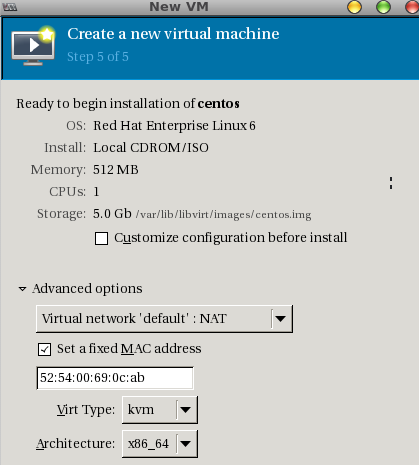
Final configuration
Verify the settings of the virtual machine and click Finish when you are satisfied; doing so will create the virtual machine with default networking settings, virtualization type, and architecture.
If you prefer to further configure the virtual machine’s hardware first, check the Customize configuration before install box first before clicking Finish. Doing so will open another wizard that will allow you to add, remove, and configure the virtual machine’s hardware settings.
After configuring the virtual machine’s hardware, click Apply. virt-manager will then create the virtual machine with your specified hardware settings.

Creating VM with virt-manager Example
First let’s install the utlility:
[root@rhel3 ~]# yum install virt-manager
Then launch the application if you are already using SSH X-Forwaring, if not, relogin with ssh enabling X-Forwaring (ssh -X).
[root@rhel3 ~]# virt-manager
process 11006: D-Bus library appears to be incorrectly set up; failed to read machine uuid: Failed to open "/var/lib/dbus/machine-id": No such file or directory
See the manual page for dbus-uuidgen to correct this issue.
  D-Bus not built with -rdynamic so unable to print a backtrace
Aborted
Initially I ran into issue launching that. It turns out this is a know issue and there was a bug filed on it. Here is link to the bug, to fix the issue, just run the following:
[root@rhel3 ~]# dbus-uuidgen > /var/lib/dbus/machine-id
or the following:
[root@rhel3 ~]# service messagebus start
Starting system message bus:                               [  OK  ]
After that, it started up without issues:
[root@rhel3 ~]# virt-manager
[root@rhel3 ~]#
And I saw the following window:
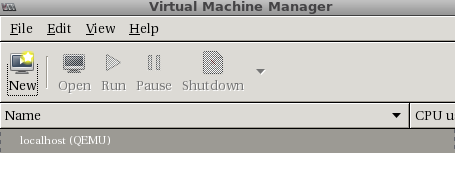
We can see that is already connected to the qemu system, which is great. Now let’s click “New” and you should see the following pop up:
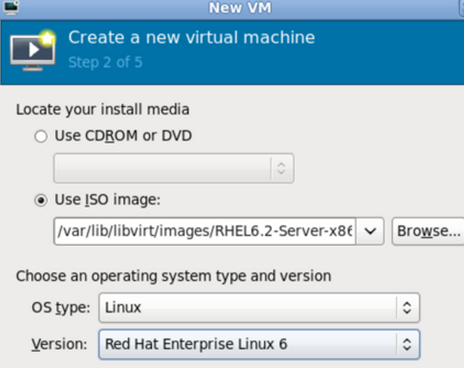
Name the VM, select Local install media, and click Forward. On the next page, choose to point to an ISO and upon clicking on that you will see the default volume (/var/lib/libvirt/images). From there you can select the ISO:

Then select the OS Type and Version. After done, it should look like this:
Click Forward, select RAM and CPU settings, it should look like this:
Click Forward and select the disk size:

Click Forward and you should see the final page:
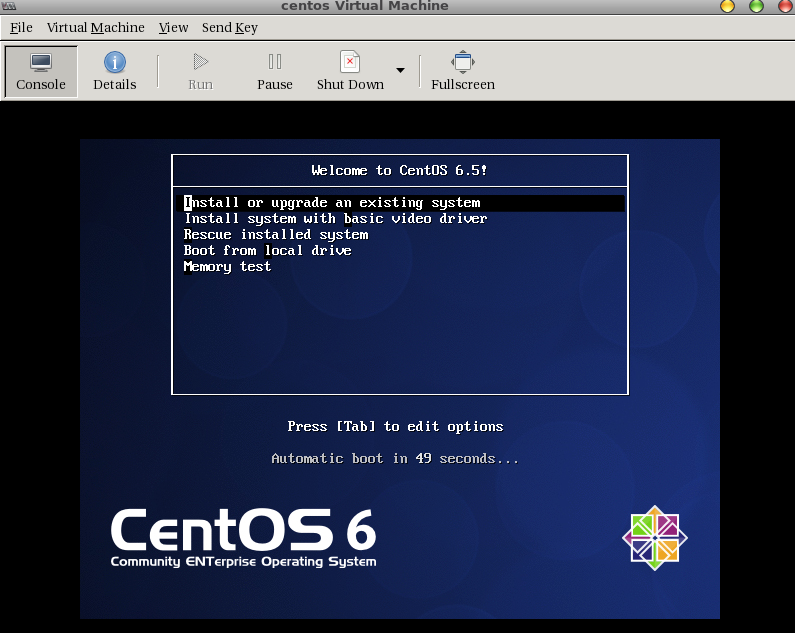
Upon clicking Finish you will see the console of the VM:
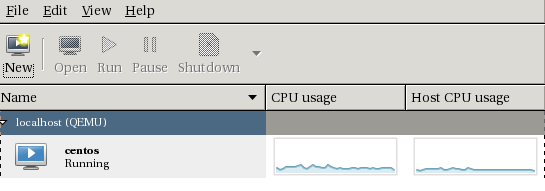
You will also see the VM in the Virt-Manager’s Inventory:
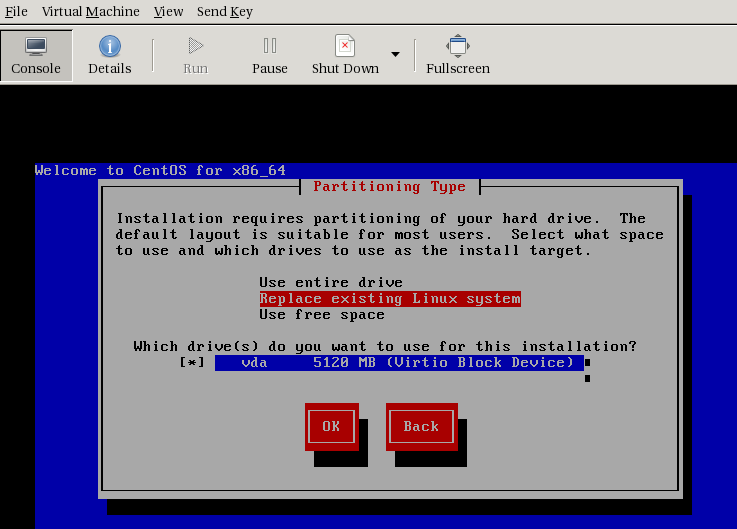
If you proceed with the VM install, here is how the disk setup page will look like:
After the install is finished, you will see the OS booted up:

You can also check on the KVM host it self to see all the parameters passed to the qemu-kvm binary when it starts up the VM, by checking out the VM specific logs that libvirt generates:
[root@rhel3 ~]# tail -3 /var/log/libvirt/qemu/centos.log
2014-05-25 01:12:47.827+0000: starting up
LC_ALL=C PATH=/sbin:/usr/sbin:/bin:/usr/bin QEMU_AUDIO_DRV=none /usr/libexec/qemu-kvm -name centos -S -M rhel6.4.0 -enable-kvm -m 512 -smp 1,sockets=1,cores=1,threads=1 -uuid 6eeb6219-97d4-7209-b422-b622494a12aa -nodefconfig -nodefaults -chardev socket,id=charmonitor,path=/var/lib/libvirt/qemu/centos.monitor,server,nowait -mon chardev=charmonitor,id=monitor,mode=control -rtc base=utc -no-shutdown -device piix3-usb-uhci,id=usb,bus=pci.0,addr=0x1.0x2 -drive file=/var/lib/libvirt/images/centos.img,if=none,id=drive-virtio-disk0,format=raw,cache=none -device virtio-blk-pci,scsi=off,bus=pci.0,addr=0x5,drive=drive-virtio-disk0,id=virtio-disk0,bootindex=1 -drive if=none,media=cdrom,id=drive-ide0-1-0,readonly=on,format=raw -device ide-drive,bus=ide.1,unit=0,drive=drive-ide0-1-0,id=ide0-1-0 -netdev tap,fd=22,id=hostnet0,vhost=on,vhostfd=23 -device virtio-net-pci,netdev=hostnet0,id=net0,mac=52:54:00:69:0c:ab,bus=pci.0,addr=0x3 -chardev pty,id=charserial0 -device isa-serial,chardev=charserial0,id=serial0 -device usb-tablet,id=input0 -vnc 127.0.0.1:0 -vga cirrus -device intel-hda,id=sound0,bus=pci.0,addr=0x4 -device hda-duplex,id=sound0-codec0,bus=sound0.0,cad=0 -device virtio-balloon-pci,id=balloon0,bus=pci.0,addr=0x6
char device redirected to /dev/pts/3
To find out the IP of the VM you can do a couple of things. First you can find the MAC address of the VM, with the following command:
[root@rhel3 ~]# virsh list
 Id    Name                           State
----------------------------------------------------
 4     centos                         running

[root@rhel3 ~]# virsh domiflist 4
Interface  Type       Source     Model       MAC
-------------------------------------------------------
vnet0      network    default    virtio      52:54:00:69:0c:ab
libvirt uses dnsmasq for it’s DHCP services, and all the leases are under /var/lib/libvirt/dnsmasq/default.leases. You can check the process table to see how dnsmasq was started:
[root@rhel3 ~]# ps -eaf | grep dnsma
nobody    2096     1  0 May24 ?        00:00:00 /usr/sbin/dnsmasq --strict-order --local=// --domain-needed --pid-file=/var/run/libvirt/network/default.pid --conf-file= --except-interface lo --bind-interfaces --listen-address 192.168.122.1 --dhcp-range 192.168.122.2,192.168.122.254 --dhcp-leasefile=/var/lib/libvirt/dnsmasq/default.leases --dhcp-lease-max=253 --dhcp-no-override --dhcp-hostsfile=/var/lib/libvirt/dnsmasq/default.hostsfile --addn-hosts=/var/lib/libvirt/dnsmasq/default.addnhosts
And /var/log/messages, will show all the DHCP leases as well:
[root@rhel3 log]# tail -4 messages
May 25 11:18:16 rhel3 dnsmasq-dhcp[2096]: DHCPREQUEST(virbr0) 192.168.122.85 52:54:00:69:0c:ab
May 25 11:18:16 rhel3 dnsmasq-dhcp[2096]: DHCPACK(virbr0) 192.168.122.85 52:54:00:69:0c:ab
May 25 11:40:38 rhel3 dnsmasq-dhcp[2096]: DHCPREQUEST(virbr0) 192.168.122.85 52:54:00:69:0c:ab
May 25 11:40:38 rhel3 dnsmasq-dhcp[2096]: DHCPACK(virbr0) 192.168.122.85 52:54:00:69:0c:ab
But we can just check out the file to see what our current DHCP leases are:
[root@rhel3 ~]# cat /var/lib/libvirt/dnsmasq/default.leases
1400985508 52:54:00:69:0c:ab 192.168.122.85 * *
We only one have now, but if you had multiple address, you could run the following little bash command to track down your VM:
[root@rhel3 ~]# for mac in `virsh domiflist centos |grep -o -E "([0-9a-f]{2}:){5}([0-9a-f]{2})"`; do grep $mac /var/lib/libvirt/dnsmasq/default.leases; done | awk '{print $3}'
192.168.122.85
[root@rhel3 ~]#
We can confirm by checking out the console:
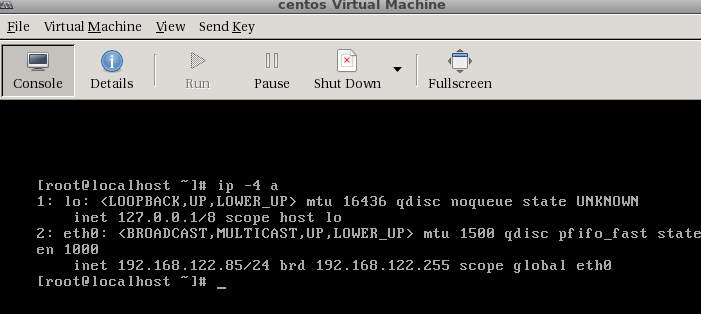
Or logging in via SSH from the host it self:
[root@rhel3 ~]# ssh 192.168.122.85 -l root
The authenticity of host '192.168.122.85 (192.168.122.85)' can't be established.
RSA key fingerprint is 65:62:aa:98:89:c1:57:19:1b:f9:aa:97:cf:7c:14:49.
Are you sure you want to continue connecting (yes/no)? yes
Warning: Permanently added '192.168.122.85' (RSA) to the list of known hosts.
root@192.168.122.85's password:
Last login: Sat May 24 19:38:13 2014
[root@localhost ~]# ip -4 a
1: lo: <LOOPBACK,UP,LOWER_UP> mtu 16436 qdisc noqueue state UNKNOWN
	inet 127.0.0.1/8 scope host lo
2: eth0: <BROADCAST,MULTICAST,UP,LOWER_UP> mtu 1500 qdisc pfifo_fast state UP qlen 1000
	inet 192.168.122.85/24 brd 192.168.122.255 scope global eth0
Lastly to make sure the NAT is working properly, check to see that you can reach the outside network from the VM itself:
[root@localhost ~]# ping google.com -c 3
PING google.com (74.125.239.100) 56(84) bytes of data.
64 bytes from nuq05s01-in-f4.1e100.net (74.125.239.100): icmp_seq=1 ttl=53 time=41.1 ms
64 bytes from nuq05s01-in-f4.1e100.net (74.125.239.100): icmp_seq=2 ttl=53 time=39.1 ms
64 bytes from nuq05s01-in-f4.1e100.net (74.125.239.100): icmp_seq=3 ttl=53 time=41.2 ms

--- google.com ping statistics ---
3 packets transmitted, 3 received, 0% packet loss, time 2045ms
rtt min/avg/max/mdev = 39.183/40.519/41.234/0.945 ms
Everything looks good.