Setting Up Open Source Puppet Master on CentOS 7
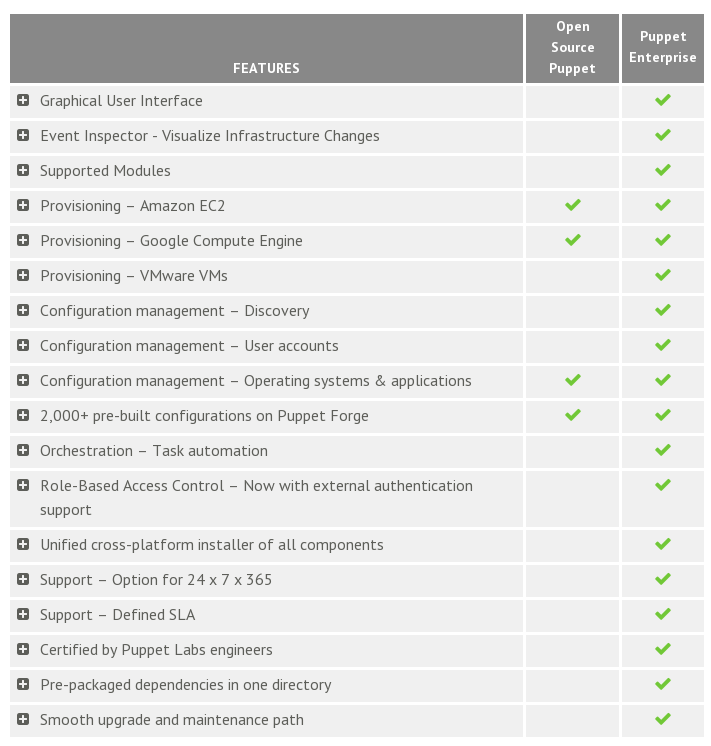
After playing around with the Vagrant and Puppet configuration, I decided to stand up a puppet master/server to play with. There are two different versions: Open Source Puppet and Puppet Enterprise. Here is a comparison of the two:
For now I will setup the Open Source one. Puppet has some awesome documentation so let’s follow their recommendations.
Preparing for the Puppet Deployment
From “Installing Puppet: Pre-Install Tasks” let’s setup/choose the necessary prereqiusites:
- Decide on a Deployment Type, I went with the “Agent/Master Puppet” deployment since I already played with the standalone setup
- Check OS Versions and System Requirements, I will use CentOS 7 which is similar to RHEL 7 and that is supported.
Check Your Network Configuration
I did a minimal install of CentOS 7 so now let’s make sure the prerequisites for networking are ready:
-
Firewalls
We have to make sure port 8140 is open. By default CentOS 7 uses firewalld. Unless you are running on a laptop I feel that firewalld is a little bit too much. So let’s remove it and configure iptables.
[elatov@puppet ~]$ sudo yum remove firewalld
[elatov@puppet ~]$ sudo yum install iptables-services
Now let’s add port 8140 to the default configuration. This is done by adding the following to the /etc/sysconfig/iptables file:
# Allow Puppet Clients
-A INPUT -p tcp -m state --state NEW -m tcp --dport 8140 --tcp-flags FIN,SYN,RST,ACK SYN -j ACCEPT
Now let’s enable and start the service and confirm the rule is in place:
[elatov@puppet ~]$ sudo systemctl enable iptables [elatov@puppet ~]$ sudo systemctl start iptables [elatov@puppet ~]$ sudo iptables -L -n -v | grep 8140 0 0 ACCEPT tcp -- * * 0.0.0.0/0 0.0.0.0/0 state NEW tcp dpt:8140 flags:0x17/0x02 -
Name resolution
I just added “puppet” to my DNS server so any machine was able to resolve puppet:
[elatov@puppet ~]$ host puppet
puppet.dnsd.me has address 10.0.0.6
If you don’t want to add that DNS entry you will have to ensure all the puppet clients have local /etc/hosts entries pointing to the puppet master.
-
Check Timekeeping on Your Puppet Master Server
I decided to use ntp to keep the puppet master in sync with an external time server. So let’s install ntpd on the machine:
[elatov@puppet ~]$ sudo yum install ntpNow let’s make sure the servers look good
[elatov@puppet ~]$ grep ^server /etc/ntp.conf
server 0.centos.pool.ntp.org iburst
server 1.centos.pool.ntp.org iburst
server 2.centos.pool.ntp.org iburst
server 3.centos.pool.ntp.org iburst
Next let’s enable the service
[elatov@puppet ~]$ sudo systemctl enable ntpd
[elatov@puppet ~]$ sudo systemctl start ntpd
Lastly check to make sure you are talking with the servers
[elatov@puppet ~]$ ntpq -p
     remote           refid      st t when poll reach   delay   offset  jitter
==============================================================================
*96.44.142.5     206.117.25.20    2 u   39   64    7   27.229   -1.662   7.270
+time.tritn.com  206.117.25.20    2 u   38   64    7   53.072    0.551   6.904
+us2.gombadi.com 147.84.59.145    2 u   35   64    7   56.172   -5.063   8.735
+atlantic1.hochs 209.51.161.238   2 u   36   64    7   92.751  -18.210  20.591
Install Puppet Server
From Installing Puppet: Red Hat Enterprise Linux (and Derivatives) let’s get the correct version of the puppet YUM repository:
[elatov@puppet ~]$ sudo rpm -ivh http://yum.puppetlabs.com/puppetlabs-release-el-7.noarch.rpm
Now let’s do the actual install:
[elatov@puppet ~]$ sudo yum install puppet-server
If we ever need to update the puppet-server version we can run the following:
[elatov@puppet ~]$ sudo puppet resource package puppet-server ensure=latest
I didn’t have to do that, but I am sure I will have to later on.
Configure a Puppet Master Server
From Installing Puppet: Post-Install Tasks, it looks like we need configure the following things:
- Get the master’s names and certificates set up
- Configure any necessary settings
- Put your Puppet modules and manifests in place
- Configure a production-ready web server
- Start the puppet master service
So let’s get to it.
Configure CA Master
There are a couple of different scenarios like if you have multiple Puppet Masters then you will have to dedicate one of them to be the CA master and then configure the other ones as Non-CA masters. I only have one Puppet master so I didn’t have to worry about that. From the above site:
When you create the puppet master’s certificate, you must include every DNS name at which agent nodes might try to contact the master.
Decide on a main name for Puppet services at your site, and make sure your DNS resolves it to the puppet master (or its load balancer). Unconfigured agents will try to find a master at puppet, so if you use this name it can reduce setup time.
In the [main] section of the master’s puppet.conf file, set the dns_alt_names setting to a comma-separated list of each hostname the master should be allowed to use
There are only two options for my setup:
- puppet
- puppet.dnsd.me
So here is how my puppet.conf looked like:
[elatov@puppet ~]$ grep dns_alt_names /etc/puppet/puppet.conf
	dns_alt_names = puppet,puppet.dnsd.me
After that we can run the following to generate the certificates:
[elatov@puppet ~]$ sudo puppet master --verbose --no-daemonize
Info: Creating a new SSL key for ca
Info: Creating a new SSL certificate request for ca
Info: Certificate Request fingerprint (SHA256): 76:76:1E:DA:C7:FE:01:0C:28:FA:D3:5E:FD:31:87:AC:FF:04:83:7D:E5:3A:1D:D5:1B:7E:6C:88:06:7D:0D:D8
Notice: Signed certificate request for ca
Info: Creating a new certificate revocation list
Info: Creating a new SSL key for puppet.dnsd.me
Info: csr_attributes file loading from /etc/puppet/csr_attributes.yaml
Info: Creating a new SSL certificate request for puppet.dnsd.me
Info: Certificate Request fingerprint (SHA256): 0A:44:CF:84:48:D2:C7:A1:62:D6:18:F2:B8:74:DC:88:45:D6:F3:32:26:50:B1:4F:10:E9:65:81:AB:05:39:9D
Notice: puppet.dnsd.me has a waiting certificate request
Notice: Signed certificate request for puppet.dnsd.me
Notice: Removing file Puppet::SSL::CertificateRequest puppet.dnsd.me at '/var/lib/puppet/ssl/ca/requests/puppet.dnsd.me.pem'
Notice: Removing file Puppet::SSL::CertificateRequest puppet.dnsd.me at '/var/lib/puppet/ssl/certificate_requests/puppet.dnsd.me.pem'
Notice: Starting Puppet master version 3.6.2
^CNotice: Caught INT; calling stop
After you see the Starting Puppet master line you can click CTRL-C to quit the puppet master.
Configure The Puppet Master
From Configuration: Short List of Important Settings we can see a couple of basic settings. I decided to explicitly set the ca setting to true and I also ended up enabling the autosigning feature. More information on auto signing can be seen in SSL Configuration: Autosigning Certificate Requests. I basically ended up specifying a whitelist which contains a list of hosts or domains which will be autosigned by the master (if the whitelist is a file that is executable by the puppet user then it can be a poicy based script). From the same page:
In policy-based autosigning, the CA will run an external policy executable every time it receives a CSR. This executable will examine the CSR and tell the CA whether the certificate is approved for autosigning. If the executable approves, the certificate is autosigned; if not, it is left for manual review.
Here is what I added to the /etc/puppet/puppet.conf file (the autosign file just a regular configuration file and not an executable):
[master]
	ca = true
	autosign = $confdir/autosign.conf
	dns_alt_names = puppet,puppet.dnsd.me
and here are the contents of the autosign.conf file:
[elatov@puppet ~]$ cat /etc/puppet/autosign.conf
*.dnsd.me
This was just a home setup, but there are obvious security issues with this. From the above page:
####Security Implications of Basic Autosigning
Since any host can provide any certname when requesting a certificate, basic autosigning should only be used in situations where you fully trust any computer able to connect to the puppet master.
With basic autosigning enabled, an attacker able to guess an unused certname allowed by autosign.conf would be able to obtain a signed agent certificate from the puppet master. They would then be able to obtain a configuration catalog, which may or may not contain sensitive information (depending on your deployment’s Puppet code and node classification).
Create Puppet Modules and Manifests
From the Installing Puppet: Post-Install Tasks page:
If you’re starting from scratch, ensure that the main manifest exists. You may also want to install some modules from the Puppet Forge.
I was starting from scratch so let’s get a main manifest going. From the Directories: The Main Manifest(s) page:
Location of Manifests
With Puppet Master
- When using no environments, the main manifest will default to
$confdir/manifests/site.pp, which is a single file. (See here for info about the confdir.) This location can be configured with the manifest setting.- If you are using directory environments, the main manifest will always be
$confdir/environments/<ENVIRONMENT NAME>/manifests, which is a directory. The location of the environments directory can be configured with the environmentpath setting; see the page about directory environments for more details.- If you are using config file environments, Puppet will look for a manifest setting in that environment’s config section; if it isn’t set there, Puppet will fall back to the manifest setting in the [master] or [main] section. See the page about config file environments for more details.
The main manifest may be a single file or a directory of .pp files. To check the actual manifest your puppet master will use, run
puppet config print manifest --section master --environment <ENVIRONMENT>...
####Directory Behavior (vs. Single File) If the main manifest is a directory, Puppet will parse every .pp file in the directory in alphabetical order and then evaluate the combined manifest.
Puppet will act as though the whole directory were just one big manifest; for example, a variable assigned in the file 01_all_nodes.pp would be accessible in node_web01.pp.
Puppet will only read the first level of files in a manifest directory; it won’t descend into subdirectories.
I wanted to find out what directory environments were and from the Directory Environments page:
Environments are isolated groups of puppet agent nodes. A puppet master server can serve each environment with completely different main manifests and modulepaths.
This frees you to use different versions of the same modules for different populations of nodes, which is useful for testing changes to your Puppet code before implementing them on production machines. (You could also do this by running a separate puppet master for testing, but using environments is often easier.)
####Directory Environments vs. Config File Environments There are two ways to set up environments on a puppet master: directory environments, and config file environments. Note that these are mutually exclusive — enabling one will completely disable the other.
This page is about directory environments, which are easier to use and will eventually replace config file environments completely.
Also from the same page here is a diagram that demonstrates how the directory structure would look like:
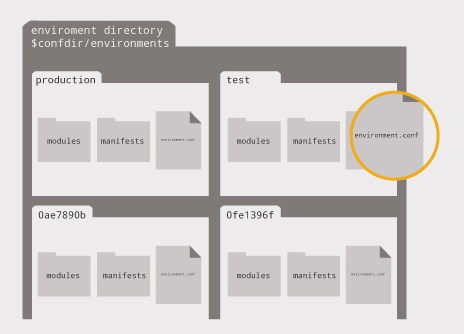
That seems like a very cool feature, I was only planning on managing like 3 machines (just to play around with the setup). But in a big puppet deployment it would be sweet to setup Prod/DEV/QA environments and push configs accordningly. For now I will skip the environment configurations.
I also noticed that if the main manifest is a directory then we can break down manifests into separate files. So let’s try that out. First let’s confirm the manifest location:
$ sudo puppet config print manifest --section master
/etc/puppet/manifests/site.pp
That location doesn’t even exist yet:
$ ls -la /etc/puppet/manifests/
total 0
drwxr-xr-x 2 root root   6 Jun  9 15:10 .
drwxr-xr-x 5 root root 131 Aug 16 10:53 ..
So let’s make it a directory and put a single manifest in the directory (each manifest will be a node definition… just in my example):
$ sudo mkdir /etc/puppet/manifests/site.pp
$ sudo touch /etc/puppet/manifests/site.pp/pup-node1.pp
Another method is to use the import functionatlity. From Language: Node Definitions:
Location
Node definitions should go in the site manifest (site.pp).
Alternately, you can store node definitions in any number of manifest files which are imported into site.pp:
# /etc/puppetlabs/puppet/manifests/site.pp

# Import every file in /etc/puppetlabs/puppet/manifests/nodes/
# (Usually, each file contains one node definition.)
import 'nodes/*.pp'

# Import several nodes from a single file
import 'extra_nodes.pp'
Creating a Puppet Module
So now we need to define a node in our node defintion so we can push settings to the node. Before this was done inside the site.pp manifest file, but now everything is done with classes and(or) modules. From Learning Puppet — Modules and Classes:
The End of the One Huge Manifest
You can write some pretty sophisticated manifests at this point, but so far you’ve just been putting them in one file (either /etc/puppetlabs/puppet/manifests/site.pp or a one-off to use with puppet apply).
Past a handful of resources, this gets unwieldy. You can probably already see the road to the three thousand line manifest of doom, and you don’t want to go there. It’s much better to split chunks of logically related code out into their own files, and then refer to those chunks by name when you need them.
Classes are Puppet’s way of separating out chunks of code, and modules are Puppet’s way of organizing classes so that you can refer to them by name.
From the same page here is an example of creating a simple ntp module:
Module Structure
- A module is a directory.
- The module’s name must be the name of the directory.
- It contains a manifests directory, which can contain any number of .pp files.
- The manifests directory should always contain an init.pp file.
- This file must contain a single class definition. The class’s name must be the same as the module’s name.
There’s more to know, but this will get us started. Let’s turn our NTP class into a real module:
# cd /etc/puppetlabs/puppet/modules
# mkdir -p ntp/manifests
# touch ntp/manifests/init.pp
Edit this init.pp file, and paste your ntp class definition into it. Be sure not to paste in the include statement; it’s not necessary here.
# /etc/puppetlabs/puppet/modules/ntp/manifests/init.pp

class ntp {
  case $operatingsystem {
    centos, redhat: {
      $service_name = 'ntpd'
      $conf_file    = 'ntp.conf.el'
    }
    debian, ubuntu: {
      $service_name = 'ntp'
      $conf_file    = 'ntp.conf.debian'
    }
  }

  package { 'ntp':
    ensure => installed,
  }
  file { 'ntp.conf':
    path    => '/etc/ntp.conf',
    ensure  => file,
    require => Package['ntp'],
    source  => "/root/examples/answers/${conf_file}"
  }
  service { 'ntp':
    name      => $service_name,
    ensure    => running,
    enable    => true,
    subscribe => File['ntp.conf'],
  }
}
Declaring Classes From Modules
Now that we have a working module, you can edit your site.pp file: if there are any NTP-related resources left in it, be sure to delete them, then add one line:
include ntp
So let’s create a simple module that ensures that a user called elatov is created. First let’s confirm where our modulepath is:
$ sudo puppet config print modulepath --section master
/etc/puppet/modules:/usr/share/puppet/modules
Now let’s create our module:
$ sudo mkdir -p /etc/puppet/modules/users/manifests
$ sudo vi /etc/puppet/modules/users/manifests/init.pp
Here is how my init.pp looked like in the end:
$ cat /etc/puppet/modules/users/manifests/init.pp
class users {
	user { "elatov":
		ensure     => present,
	uid	   => "1000",
		gid        => "1000",
		groups     => ["wheel"],
		membership => minimum,
		shell      => "/bin/bash",
	allowdupe  => false,
	managehome => true,
	}
}
and let’s include that class in our configuration node:
$ cat /etc/puppet/manifests/site.pp/pup-node1.pp
node 'pup-node1.dnsd.me' {
	include users
}
There are different ways to use a defined class, from Language: Classes:
####Include-Like Behavior The include, require, contain, and hiera_include functions let you safely declare a class multiple times; no matter how many times you declare it, a class will only be added to the catalog once. This can allow classes or defined types to manage their own dependencies, and lets you create overlapping “role” classes where a given node may have more than one role.
Include-like behavior relies on external data and defaults for class parameter values, which allows the external data source to act like cascading configuration files for all of your classes. When a class is declared, Puppet will try the following for each of its parameters:
- Request a value from the external data source, using the key
<class name>::<parameter name>. (For example, to get the apache class’s version parameter, Puppet would search for apache::version.)- Use the default value.
- Fail compilation with an error if no value can be found.
and here is the second one:
Resource-like Behavior
Resource-like class declarations require that you only declare a given class once. They allow you to override class parameters at compile time, and will fall back to external data for any parameters you don’t override. When a class is declared, Puppet will try the following for each of its parameters:
- Use the override value from the declaration, if present.
- Request a value from the external data source, using the key
<class name>::<parameter name>. (For example, to get the apache class’s version parameter, Puppet would search for apache::version.)- Use the default value.
- Fail compilation with an error if no value can be found.
So if you don’t need to change any parameters of the class, you can use include, here are examples from the same page:
Using include
The include function is the standard way to declare classes.
include base::linux
include base::linux # no additional effect; the class is only declared once

include base::linux, apache # including a list

$my_classes = ['base::linux', 'apache']
include $my_classes # including an array
The include function uses include-like behavior. (Multiple declarations OK; relies on external data for parameters.) It can accept:
- A single class
- A comma-separated list of classes
- An array of classes
If you are passing or changing parameters to/of a class then use class:
Using Resource-Like Declarations
Resource-like declarations look like normal resource declarations, using the special class pseudo-resource type.
# Overriding a parameter:
class {'apache':
  version => '2.2.21',
}
# Declaring a class with no parameters:
class {'base::linux':}
Resource-like declarations use resource-like behavior. (Multiple declarations prohibited; parameters may be overridden at compile-time.) You can provide a value for any class parameter by specifying it as resource attribute; any parameters not specified will follow the normal external/default/fail lookup path.
Here are the class definitions that the above examples are calling:
 # A class with no parameters
class base::linux {
  file { '/etc/passwd':
	owner => 'root',
	group => 'root',
	mode  => '0644',
  }
  file { '/etc/shadow':
	owner => 'root',
	group => 'root',
	mode  => '0440',
  }
}
and the second one:
 # A class with parameters
class apache ($version = 'latest') {
  package {'httpd':
    ensure => $version, # Using the class parameter from above
    before => File['/etc/httpd.conf'],
  }
  file {'/etc/httpd.conf':
    ensure  => file,
    owner   => 'httpd',
    content => template('apache/httpd.conf.erb'), # Template from a module
  }
  service {'httpd':
    ensure    => running,
    enable    => true,
    subscribe => File['/etc/httpd.conf'],
  }
}
I wasn’t overriding any class parameters so I used the include declaration.
Prepare a WebServer for the Puppet Master
From the Installing Puppet: Post-Install Tasks page:
Configure a Production-Ready Web Server
Puppet includes a basic puppet master web server, but you cannot use it for real-life loads. You must configure a production quality web server before you start managing your nodes with Puppet.
If you have no particular preference, you should use Passenger with Apache, since it works well and is simple to set up.
The page Configuring a Puppet Master Server with Passenger and Apache has most of the instructions laid out on how to install Passenger. We can either use the EPEL repository or the PupperLabs one. Since I already had the PuppetLabs one enabled (I did this when I installed the puppet-server package), I just ended up using that. So let’s the necessary packages:
$ sudo yum install httpd httpd-devel mod_ssl ruby-devel rubygems gcc gcc-c++ curl-devel openssl-devel zlib-devel
Now let’s get the gems necessary:
$ sudo gem install rack passenger
Fetching: rack-1.5.2.gem (100%)
Successfully installed rack-1.5.2
Parsing documentation for rack-1.5.2
Installing ri documentation for rack-1.5.2
Fetching: rake-10.3.2.gem (100%)
Successfully installed rake-10.3.2
Fetching: daemon_controller-1.2.0.gem (100%)
Successfully installed daemon_controller-1.2.0
Fetching: passenger-4.0.48.gem (100%)
Building native extensions.  This could take a while...
Successfully installed passenger-4.0.48
Parsing documentation for rake-10.3.2
Installing ri documentation for rake-10.3.2
Parsing documentation for daemon_controller-1.2.0
Installing ri documentation for daemon_controller-1.2.0
Parsing documentation for passenger-4.0.48
Installing ri documentation for passenger-4.0.48
4 gems installed
Now let’s get the apache-passenger module:
$ sudo /usr/local/bin/passenger-install-apache2-module
Welcome to the Phusion Passenger Apache 2 module installer, v4.0.48.

This installer will guide you through the entire installation process. It
shouldn't take more than 3 minutes in total.

Here's what you can expect from the installation process:

 1. The Apache 2 module will be installed for you.
 2. You'll learn how to configure Apache.
 3. You'll learn how to deploy a Ruby on Rails application.

Don't worry if anything goes wrong. This installer will advise you on how to
solve any problems.

Press Enter to continue, or Ctrl-C to abort.
Then press enter and choose Ruby:
Which languages are you interested in?

Use <space> to select.
If the menu doesn't display correctly, press '!'

-> Ruby
   Python
   Node.js
   Meteor
When it’s done installing, you will see the following:
Almost there!

Please edit your Apache configuration file, and add these lines:

   LoadModule passenger_module /usr/local/share/gems/gems/passenger-4.0.48/buildout/apache2/mod_passenger.so
   <IfModule mod_passenger.c>
	 PassengerRoot /usr/local/share/gems/gems/passenger-4.0.48
	 PassengerDefaultRuby /usr/bin/ruby
   </IfModule>

After you restart Apache, you are ready to deploy any number of web
applications on Apache, with a minimum amount of configuration!

Press ENTER to continue.
Deploying a web application: an example

Suppose you have a web application in /somewhere. Add a virtual host to your
Apache configuration file and set its DocumentRoot to /somewhere/public:

   <VirtualHost *:80>
	  ServerName www.yourhost.com
	  # !!! Be sure to point DocumentRoot to 'public'!
	  DocumentRoot /somewhere/public
	  <Directory /somewhere/public>
		 # This relaxes Apache security settings.
		 AllowOverride all
		 # MultiViews must be turned off.
		 Options -MultiViews
		 # Uncomment this if you're on Apache >= 2.4:
		 #Require all granted
	  </Directory>
   </VirtualHost>

And that's it! You may also want to check the Users Guide for security and
optimization tips, troubleshooting and other useful information:

  /usr/local/share/gems/gems/passenger-4.0.48/doc/Users guide Apache.html
  https://www.phusionpassenger.com/documentation/Users%20guide%20Apache.html

Enjoy Phusion Passenger, a product of Phusion (www.phusion.nl) :-)
https://www.phusionpassenger.com

Phusion Passenger is a trademark of Hongli Lai & Ninh Bui.
Now let’s move the puppet master application into a generic location:
$ sudo mkdir -p /usr/share/puppet/rack/puppetmasterd
$ sudo mkdir /usr/share/puppet/rack/puppetmasterd/public /usr/share/puppet/rack/puppetmasterd/tmp
$ sudo cp /usr/share/puppet/ext/rack/config.ru /usr/share/puppet/rack/puppetmasterd/
$ sudo chown puppet:puppet /usr/share/puppet/rack/puppetmasterd/config.ru
Lastly let’s configure apache to use the passenger module to host the puppetmaster rack-web-application. Let’s copy the sample config over:
$ sudo cp /usr/share/puppet/ext/rack/example-passenger-vhost.conf /etc/httpd/conf.d/puppetmaster.conf
After that modify the config to apply to your environment, here is what I ended up with:
$ cat /etc/httpd/conf.d/puppetmaster.conf
# This Apache 2 virtual host config shows how to use Puppet as a Rack
# application via Passenger. See
# http://docs.puppetlabs.com/guides/passenger.html for more information.

# You can also use the included config.ru file to run Puppet with other Rack
# servers instead of Passenger.

LoadModule passenger_module /usr/local/share/gems/gems/passenger-4.0.48/buildout/apache2/mod_passenger.so
PassengerRoot /usr/local/share/gems/gems/passenger-4.0.48
PassengerRuby /usr/bin/ruby

# you probably want to tune these settings
PassengerHighPerformance on
PassengerMaxPoolSize 6
PassengerPoolIdleTime 600
# PassengerMaxRequests 1000
PassengerStatThrottleRate 120
#RackAutoDetect Off
#RailsAutoDetect Off

Listen 8140

<VirtualHost *:8140>
		SSLEngine on
		SSLProtocol             ALL -SSLv2
		SSLCipherSuite          ALL:!aNULL:!eNULL:!DES:!3DES:!IDEA:!SEED:!DSS:!PSK:!RC4:!MD5:+HIGH:+MEDIUM:!LOW:!SSLv2:!EXP
		SSLHonorCipherOrder     on

	SSLCertificateFile      /var/lib/puppet/ssl/certs/puppet.dnsd.me.pem
		SSLCertificateKeyFile   /var/lib/puppet/ssl/private_keys/puppet.dnsd.me.pem
		SSLCertificateChainFile /var/lib/puppet/ssl/ca/ca_crt.pem
		SSLCACertificateFile    /var/lib/puppet/ssl/ca/ca_crt.pem
		SSLCARevocationFile     /var/lib/puppet/ssl/ca/ca_crl.pem
		# Apache 2.4 introduces the SSLCARevocationCheck directive and sets it to none
		# which effectively disables CRL checking; if you are using Apache 2.4+ you must
		# specify 'SSLCARevocationCheck chain' to actually use the CRL.
		# SSLCARevocationCheck chain
		SSLVerifyClient optional
		SSLVerifyDepth  1
		# The `ExportCertData` option is needed for agent certificate expiration warnings
		SSLOptions +StdEnvVars +ExportCertData

		# This header needs to be set if using a loadbalancer or proxy
		RequestHeader unset X-Forwarded-For

		RequestHeader set X-SSL-Subject %{SSL_CLIENT_S_DN}e
		RequestHeader set X-Client-DN %{SSL_CLIENT_S_DN}e
		RequestHeader set X-Client-Verify %{SSL_CLIENT_VERIFY}e

		DocumentRoot /usr/share/puppet/rack/puppetmasterd/public
		RackBaseURI /

	<Directory /usr/share/puppet/rack/puppetmasterd/>
		  Options None
		  AllowOverride None
		  # Apply the right behavior depending on Apache version.
		  <IfVersion < 2.4>
			Order allow,deny
			Allow from all
		  </IfVersion>
		  <IfVersion >= 2.4>
			Require all granted
		  </IfVersion>
		</Directory>
	ErrorLog /var/log/httpd/puppet.dnsd.me_ssl_error.log
		CustomLog /var/log/httpd/puppet.dnsd.me_ssl_access.log combined
</VirtualHost>
Make sure the configuration is okay:
$ sudo apachectl -t
Syntax OK
Disable Puppet Master if it was enabled:
$ systemctl list-unit-files | grep puppet
puppet.service                         disabled
puppetagent.service                    disabled
puppetmaster.service                   disabled
Then enable the httpd service and start it:
$ sudo systemctl enable httpd.service
ln -s '/usr/lib/systemd/system/httpd.service' '/etc/systemd/system/multi-user.target.wants/httpd.service'
$ sudo systemctl start httpd.service
Lastly make sure httpd is listening on port 8140:
$ sudo ss -lntp
State      Recv-Q Send-Q        Local Address:Port          Peer Address:Port
LISTEN     0      100               127.0.0.1:25                       *:*      users:(("master",1112,13))
LISTEN     0      128                       *:443                      *:*      users:(("httpd",7845,5))
LISTEN     0      128                       *:8140                     *:*      users:(("httpd",7845,4))
LISTEN     0      128                       *:80                       *:*      users:(("httpd",7845,3))
LISTEN     0      128                       *:22                       *:*      users:(("sshd",851,3))
At this point you can curl the puppet master and get a response:
$curl -k https://puppet.dnsd.me:8140
The environment must be purely alphanumeric, not ' '
If you don’t use the -k option it will give you a warning that it doesn’t trust the SSL cert:
$curl https://puppet.dnsd.me:8140
curl: (60) SSL certificate problem: self signed certificate in certificate chain
More details here: http://curl.haxx.se/docs/sslcerts.html

curl performs SSL certificate verification by default, using a "bundle"
 of Certificate Authority (CA) public keys (CA certs). If the default
 bundle file isn't adequate, you can specify an alternate file
 using the --cacert option.
If this HTTPS server uses a certificate signed by a CA represented in
 the bundle, the certificate verification probably failed due to a
 problem with the certificate (it might be expired, or the name might
 not match the domain name in the URL).
If you'd like to turn off curl's verification of the certificate, use
 the -k (or --insecure) option.
If you want, you can add the puppet CA cert to your system as a trusted SSL CA. Here is what I did on my Fedora laptop to achieve that. First get the CA from the puppet master:
elatov@fed:~$scp root@puppet.dnsd.me:/var/lib/puppet/ssl/certs/ca.pem ca-puppet.dnsd.me
root@puppet.dnsd.me's password:
ca.pem                                        100% 1956     1.9KB/s   00:00
I then added it to the ca-trust source directory:
elatov@fed:~$sudo mv ca-puppet.dnsd.me /etc/pki/ca-trust/source/anchors/.
Then regenerating the ca-bundle:
elatov@fed:~$sudo update-ca-trust
The above command will create a new /etc/pki/ca-trust/extracted/pem/tls-ca-bundle.pem file and /etc/pki/tls/certs/ca-bundle.crt is a symlink to that file:
elatov@fed:~$ls -l /etc/pki/tls/certs/ca-bundle.crt
lrwxrwxrwx 1 root root 49 Mar 25 09:07 /etc/pki/tls/certs/ca-bundle.crt -> /etc/pki/ca-trust/extracted/pem/tls-ca-bundle.pem
And that’s the default file that the OS uses to check for trusted SSL CAs. After that I can confirm it’s in the trust policy store:
elatov@fed:~$trust list --filter=ca-anchors |  head -5
pkcs11:id=%53%b5%43%de%eb%21%ad%df%8d%ee%0d%5e%a3%78%77%fe%ab%a7%06%45;object-type=cert
	type: certificate
	label: Puppet CA: puppet.dnsd.me
	trust: anchor
	category: authority
Now running the curl command without the -k arguement works fine:
elatov@fed:~$curl https://puppet.dnsd.me:8140
The environment must be purely alphanumeric, not ' '
This is competely unnecessary but I just did it cause I wanted my laptop to trust the puppet CA SSL cert (even though my laptop won’t be managed by the puppet master).
Install and Configure a Puppet Agent
Now that we are done with the puppet master configuration, let’s setup a puppet node/agent. From Installing Puppet: Red Hat Enterprise Linux (and Derivatives) we can see how to install the agent. We just add the same PuppetLabs YUM repo and install the puppet package instead of the puppet-server package. So I stood up a quick machine with vagrant and made sure the hostname is pup-node1.dnsd.me:
[vagrant@pup-node1 ~]$ hostname -s
pup-node1
[vagrant@pup-node1 ~]$ hostname -f
pup-node1.dnsd.me
And of course it could resolve the puppet.dnsd.me hostname:
[vagrant@pup-node1 ~]$ getent hosts puppet
10.0.0.6        puppet.dnsd.me
Now let’s install the Puppetlabs YUM repository:
[vagrant@pup-node1 ~]$ sudo rpm -ivh http://yum.puppetlabs.com/puppetlabs-release-el-7.noarch.rpm
and now let’s install the puppet agent:
[vagrant@pup-node1 ~]$ sudo yum install puppet
From Installing Puppet: Post-Install Tasks, here are the next steps:
After installing Puppet on a normal puppet agent node, you’ll need to:
- Configure Puppet
- Start the puppet agent service (or configure a cron job)
- Sign the new node’s certificate
- Classify (assign configurations to) the new node
Looking over Configuration: Short List of Important Settings, it looks like we need to define the server and the certname (this is basically the hostname of our node) if the hostname is not configured appropriately. So I just added the server directive (which is actually unncessary since by default the server directive is set to puppet… and my DNS was appropriately setup to resolve that name):
[vagrant@pup-node1 ~]$ grep server /etc/puppet/puppet.conf
	server = puppet.dnsd.me
and I was able to confirm it with the following command:
[vagrant@pup-node1 ~]$ sudo puppet config print server --section agent
puppet.dnsd.me
Here is the same command without making any changes to the /etc/puppet/puppet.conf file on the node:
[vagrant@pup-node1 ~]$ sudo puppet config print server --section agent
puppet
Now let’s go ahead and start the agent:
[vagrant@pup-node1 ~]$ systemctl list-unit-files | grep puppet
puppet.service                         disabled
puppetagent.service                    disabled
[vagrant@pup-node1 ~]$ sudo puppet resource service puppet ensure=running enable=true
Notice: /Service[puppet]/ensure: ensure changed 'stopped' to 'running'
service { 'puppet':
  ensure => 'running',
  enable => 'true',
}
[vagrant@pup-node1 ~]$ systemctl list-unit-files | grep puppet
puppet.service                         enabled
puppetagent.service                    disabled
Confirming the Puppet Node Applied the Manifest
After starting the agent, I saw the following on the puppet master under /var/log/messages:
Aug 16 20:56:59 puppet puppet-master[7899]: pup-node1.dnsd.me has a waiting certificate request
Aug 16 20:56:59 puppet puppet-master[7899]: Signed certificate request for pup-node1.dnsd.me
Aug 16 20:56:59 puppet puppet-master[7899]: Removing file Puppet::SSL::CertificateRequest pup-node1.dnsd.me at '/var/lib/puppet/ssl/ca/requests/pup-node1.dnsd.me.pem'
Aug 16 20:57:02 puppet puppet-master[7899]: Compiled catalog for pup-node1.dnsd.me in environment production in 0.02 seconds
So the autosign worked, you can also confirm by checking out the certs from the puppet master:
[elatov@puppet ~]$ sudo puppet cert list --all
+ "pup-node1.dnsd.me" (SHA256) 31:84:A7:DE:B6:70:D0:C4:61:67:13:CF:02:8E:0D:57:23:C5:62:FF:17:A5:F8:0F:3B:DF:64:07:53:E6:FC:B4
+ "puppet.dnsd.me"    (SHA256) 5B:7A:24:1D:49:2C:10:ED:E4:A8:F6:EE:E1:9A:29:54:62:74:71:39:35:72:DC:4D:20:99:4E:1F:5D:1B:23:C6 (alt names: "DNS:puppet", "DNS:puppet.dnsd.me")
and on the nodeI saw the following under /var/log/messages:
Aug 16 21:01:04 pup-node1 puppet: Could not retrieve fact='ipaddress', resolution='<anonymous>': Could not execute 'host pup-node1': command not found
Aug 16 21:01:04 pup-node1 puppet: Could not retrieve fact='ipaddress', resolution='<anonymous>': Could not execute 'host pup-node1': command not found
Aug 16 21:01:05 pup-node1 puppet-agent[1056]: Could not create user elatov: Execution of '/usr/sbin/useradd -g 1000 -G wheel -s /bin/bash -u 1000 -m elatov' returned 6: useradd: group '1000' does not exist
Aug 16 21:01:05 pup-node1 puppet-agent[1056]: (/Stage[main]/Users/User[elatov]/ensure) change from absent to present failed: Could not create user elatov: Execution of '/usr/sbin/useradd -g 1000 -G wheel -s /bin/bash -u 1000 -m elatov' returned 6: useradd: group '1000' does not exist
Looks like I need to create the group first, but I was glad to see it try. So I updated my users class:
[elatov@puppet ~]$ cat /etc/puppet/modules/users/manifests/init.pp
class users {
   group { "elatov":
		ensure => present,
		gid    => 1000
   }
	user { "elatov":
		ensure     => present,
	uid	   => "1000",
		gid        => "1000",
		groups     => ["wheel"],
		membership => minimum,
		shell      => "/bin/bash",
	allowdupe  => false,
	managehome => true,
	require    => Group["elatov"]
	}
}
I then went back to node and ran the following to pull the new configuration (this was described in Learning Puppet — Basic Agent/Master Puppet):
[root@pup-node1 ~]# puppet agent --test
Info: Retrieving pluginfacts
Info: Retrieving plugin
Could not retrieve fact='ipaddress', resolution='<anonymous>': Could not execute 'host pup-node1': command not found
Could not retrieve fact='ipaddress', resolution='<anonymous>': Could not execute 'host pup-node1': command not found
Info: Caching catalog for pup-node1.dnsd.me
Info: Applying configuration version '1408244977'
Notice: /Stage[main]/Users/Group[elatov]/ensure: created
Notice: /Stage[main]/Users/User[elatov]/ensure: created
Notice: Finished catalog run in 0.34 seconds
Checking the group and password files, I saw the following:
[root@pup-node1 ~]# getent passwd elatov
elatov:x:1000:1000::/home/elatov:/bin/bash
[root@pup-node1 ~]# getent group elatov
elatov:x:1000:
That all looks good. To fix the missing fact error above we need to install the bind-utils package on the node (that provides the host utility).
[vagrant@pup-node1 ~]$ sudo yum install bind-utils
If you are testing with vagrant and destroying the VM and spinning up a new one, the SSL key won’t match and the node won’t be able to check in with the puppet master. If that happens remove the cert from the master:
[elatov@puppet ~]$ sudo puppet cert clean pup-node1.dnsd.me
Notice: Revoked certificate with serial 3
Notice: Removing file Puppet::SSL::Certificate pup-node1.dnsd.me at '/var/lib/puppet/ssl/ca/signed/pup-node1.dnsd.me.pem'
Notice: Removing file Puppet::SSL::Certificate pup-node1.dnsd.me at '/var/lib/puppet/ssl/certs/pup-node1.dnsd.me.pem'
And if any are present on the node, remove them as well:
[vagrant@pup-node1 ~]$ sudo rm -f /var/lib/puppet/ssl/certs/pup-node1.dnsd.me.pem
and then re-check in with the master:
[vagrant@pup-node1 ~]$ sudo puppet agent -t
Info: csr_attributes file loading from /etc/puppet/csr_attributes.yaml
Info: Creating a new SSL certificate request for pup-node1.dnsd.me
Info: Certificate Request fingerprint (SHA256): 68:FF:41:72:C3:96:28:39:F3:7D:CD:6B:C8:E4:CC:AC:34:50:85:82:EA:40:3C:87:61:62:37:09:99:86:02:0F
Info: Caching certificate for pup-node1.dnsd.me
Info: Caching certificate_revocation_list for ca
Info: Caching certificate for pup-node1.dnsd.me
Info: Retrieving pluginfacts
Info: Retrieving plugin
Info: Caching catalog for pup-node1.dnsd.me
Info: Applying configuration version '1408244977'
Notice: /Stage[main]/Users/Group[elatov]/ensure: created
Notice: /Stage[main]/Users/User[elatov]/ensure: created
Notice: Finished catalog run in 0.26 seconds
If you want you can include the puppet cert in the vagrant box that way you won’t have to do this, but then if any one gets a hold of the box they will be able to check in with the master since that cert will be already registered on the host.
Agent and Master Communication
From Learning Puppet — Basic Agent/Master Puppet:
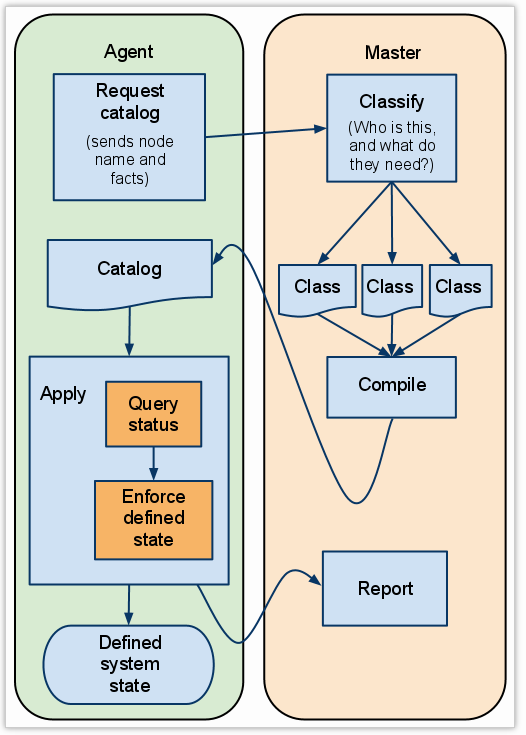
Puppet’s agent/master mode is pull-based. Usually, agents are configured to periodically fetch a catalog and apply it, and the master controls what goes into that catalog.
..
Running Puppet in agent/master mode works much the same way — the main difference is that it moves the manifests and compilation to the puppet master server. Agents don’t have to see any manifest files at all, and have no access to configuration information that isn’t in their own catalog.
..
The puppet agent subcommand fetches configurations from a master server. It has two main modes:
- Daemonize and fetch configurations every half-hour (default)
- Run once and quit
We’ll be using the second mode, since it gives a better view of what’s going on. To keep the agent from daemonizing, you should use the –test option, which also prints detailed descriptions of what the agent is doing.
If you accidentally run the agent without –test, it will daemonize and run in the background.
There used to a kick funcionality, more information on that in the Deprecated Command Line Features. It basically allowed the master to initiate a pull from the node, but it required some setup on the node (like listening on port 8139 and allowing certain hosts to access the pull functionality). It’s now a deprecated feature and will be replace with mcollective eventually.
We can also see that the default fetch period is every 30 minutes. This can be changed by modifying the runinterval option in the agent section of /etc/puppet/puppet.conf file on the node. From Configuration Reference
runinterval
How often puppet agent applies the catalog. Note that a runinterval of 0 means “run continuously” rather than “never run.” If you want puppet agent to never run, you should start it with the –no-client option. This setting can be a time interval in seconds (30 or 30s), minutes (30m), hours (6h), days (2d), or years (5y).
- Default: 30m