Setup Netatalk on OmniOS for Time Machine Backups
Time Machine Backups
I knew that for Time Machine backups the easiest way to backup to a remote machine is to use AFP. From OS X Yosemite: Disks you can use with Time Machine:
If your backup disk is on a network, the network server must use Apple File Protocol (AFP) file sharing, and both your Mac and the networked backup disk should have Mac OS X v10.5.6 or later. The AFP disk must also be “mounted” (available to your Mac) during the set up of Time Machine. After you select the network disk in Time Machine preferences as a backup disk, Time Machine automatically mounts the disk when it’s time to backup or restore your data.
There are a couple of work arounds you can do to use a samba share. The steps are laid out in Time Machine Over SMB Share. The gist of it:
- Mount the Samba Share
-
Create a sparse image file:
hdiutil create -size 200G -fs HFS+J -volname 'Time Machine Backups' -type SPARSEBUNDLE time_machine.sparsebundle -
Copy the Sparse Bundle onto the Samba share:
rsync -avzP time_machine.sparsebunde /Volumes/Samba_Share -
Mount the Sparse Bundle as a local Volume:
hdiutil attach /Volumes/Samba_Share/time_machine.sparsebundle -
Then enable non-supported destinations for Time Machine Backups
defaults write com.apple.systempreferences TMShowUnsupportedNetworkVolumes 1 -
Set the Sparse Bundle as the Destination for Time Machine Backups
sudo tmutil setdestination "/Volumes/Time Machine Backups" - Launch the Time Machine Preferences and run the backup
That’s cool and all but for some reason I wanted to try out setting up my own AFP server. My main storage box runs OmniOS so after doing some research it looks like you can install netatalk and mDNSResponder on opensolaris and use it for Time Machine Backups.
Installing netatalk and mDNSResponder on OmniOS
Before we go any further let’s create a time machine zfs volume
zfs create data/tm
zfs set compression=gzip data/tm
And as per AFP/netatalk Installer let enable the right acl settings:
zfs set aclinherit=passthrough data/tm
zfs set aclmode=passthrough data/tm
I was using napp-it so I just installed AFP using their scripts:
wget -O - www.napp-it.org/afp | perl
It just enables a pkg publisher and grabs the packages from there. If you want to run the command manually check out the steps laid in napp-it afp on omnios, the relevant note from that page:
pkg set-publisher -g http://scott.mathematik.uni-ulm.de/release uulm.mawi
pkg install netatalk
pkg unset-publisher uulm.mawi
After the install is done you will see the multicast daemon (mDNSResponder) running:
root@zf:~#ps -ef | grep mdns
noaccess 11818     1   0 10:06:45 ?           0:00 /usr/lib/inet/mdnsd
and netatalk running as well:
root@zf:~#ps -ef | grep afp
    root 12394 12392   0 10:17:03 ?           0:00 /usr/local/sbin/i386/cnid_metad -d -F /etc/afp.conf
    root 12393 12392   0 10:17:03 ?           0:01 /usr/local/sbin/i386/afpd -d -F /etc/afp.conf
and in the logs under /var/adm/messages you will see the following:
Jun  6 10:17:02 zf netatalk[12392]: [ID 702911 daemon.notice] Netatalk AFP server starting
Jun  6 10:17:02 zf netatalk[12392]: [ID 702911 daemon.notice] Registered with Zeroconf
Jun  6 10:17:02 zf cnid_metad[12394]: [ID 702911 daemon.notice] CNID Server listening on localhost:4700
Jun  6 10:17:03 zf afpd[12393]: [ID 702911 daemon.notice] Netatalk AFP/TCP listening on 192.168.1.103:548
You will also notice mdns added to your /etc/nsswitch.conf file:
root@zf:~#grep mdns /etc/nsswitch.conf
# server lookup.  See resolv.conf(4). For lookup via mdns
# svc:/network/dns/multicast:default must also be enabled. See mdnsd(1M)
hosts:      files dns mdns
ipnodes:   files dns mdns
Here is the information about the netatalk daemon:
root@zf:~#afpd -V
afpd 3.1.7 - Apple Filing Protocol (AFP) daemon of Netatalk

This program is free software; you can redistribute it and/or modify it under
the terms of the GNU General Public License as published by the Free Software
Foundation; either version 2 of the License, or (at your option) any later
version. Please see the file COPYING for further information and details.

afpd has been compiled with support for these features:

          AFP versions: 2.2 3.0 3.1 3.2 3.3 3.4
         CNID backends: dbd last tdb
      Zeroconf support: mDNSResponder
  TCP wrappers support: Yes
         Quota support: Yes
   Admin group support: Yes
    Valid shell checks: Yes
      cracklib support: No
            EA support: ad | sys
           ACL support: Yes
          LDAP support: Yes
         D-Bus support: No
     Spotlight support: No
         DTrace probes: Yes

              afp.conf: /etc/afp.conf
           extmap.conf: /etc/extmap.conf
       state directory: /var/netatalk/
    afp_signature.conf: /var/netatalk/afp_signature.conf
      afp_voluuid.conf: /var/netatalk/afp_voluuid.conf
       UAM search path: /usr/local/lib/netatalk//
  Server messages path: /var/netatalk/msg/
At this point we need to create a config file. I found a couple of sites with examples:
- Arch Linux Netatalk
- Time Machine backups using FreeBSD ZFS
- Install Netatalk 3.1.6 on OpenIndiana 151a9
- afp.conf sample for osx 10.7 lion time machine with netatalk 3.0 afpd on ubuntu 12.04
So I created group and added my user to it:
root@zf:~#groupadd tmusers
root@zf:~#useradd -g tmusers elatov
root@zf:~#passwd elatov
New Password:
Re-enter new Password:
passwd: password successfully changed for elatov
Also let’s create the directory for this user:
root@zf:~#mkdir /data/tm/elatov
root@zf:~#chown elatov:tmusers /data/tm/elatov
root@zf:~#chmod 700 /data/tm/elatov
And then added a simple config like this:
root@zf:~#cat /etc/afp.conf
;
; Netatalk 3.x configuration file
;

[Global]
 mimic model = TimeCapsule6,106
 log level = default:warn
 log file = /var/adm/afpd.log
 hosts allow = 192.168.1.0/24
 disconnect time = 1
 vol dbpath = /var/netatalk/CNID/$u/$v/

; [Homes]
; basedir regex = /xxxx

[time_mach]
 time machine = yes
 path=/data/tm/$u
 valid users = @tmusers
 #200 GB (units of MB)
 vol size limit = 204800
Most of the settings are covered in the above links, the mimic model string can be grabbed from the following file on a Mac:
/System/Library/CoreServices/CoreTypes.bundle/Contents/Info.plist
And you will see something like this:
<dict>
	<key>com.apple.device-model-code</key>
	<array>
		<string>AirPort6</string>
		<string>AirPort6,106</string>
		<string>TimeCapsule</string>
		<string>TimeCapsule6</string>
		<string>TimeCapsule6,106</string>
		<string>TimeCapsule6,109</string>
		<string>TimeCapsule6,113</string>
		<string>TimeCapsule6,116</string>
	</array>
</dict>
I then restarted both daemons:
svcadm restart netatalk
svcadm restart multicast
Mounting AFP Share on MacOS X
If you really want to you can compile afpfs-ng on a linux machine and check the status of the server. I tried that on my gentoo box and here is what I saw:
elatov@gen:~$/usr/local/afpng/bin/afpgetstatus zf:548
Server name: zf
Machine type: Netatalk3.1.7
AFP versions:
     AFP2.2
     AFPX03
     AFP3.1
     AFP3.2
UAMs:
     DHCAST128
     DHX2
Signature: 38ffffff40ff69ff7bffffff21ffffffffff92
I just wanted to query the server to make sure it responds with the right version. I then went to Finder -> Go -> Connect to Server (CMD+K) and entered the following url:
afp://zf
and it prompted me for a password but it failed to mount the drive, checking out the logs I saw the following:
tail -f /var/adm/afpd.log
Jun 06 11:50:00.418607 cnid_metad[15639] {cnid_metad.c:321} (error:CNID): set_dbdir: mkdir failed for /var/netatalk/CNID/elatov/time_mach/
Jun 06 11:50:01.419231 cnid_metad[15639] {cnid_metad.c:321} (error:CNID): set_dbdir: mkdir failed for /var/netatalk/CNID/elatov/time_mach/
Jun 06 11:50:01.419333 afpd[15765] {cnid_dbd.c:414} (error:CNID): transmit: Request to dbd daemon (volume time_mach) timed out.
Jun 06 11:50:01.419447 afpd[15765] {volume.c:857} (error:AFPDaemon): afp_openvol(/data/tm/elatov): Fatal error: Unable to get stamp value from CNID backend
Jun 06 11:50:05.727993 afpd[15765] {dsi_stream.c:504} (error:DSI): dsi_stream_read: len:0, unexpected EOF
So I went ahead and created the directory:
root@zf:~#mkdir /var/netatalk/CNID/elatov
After that the share mounted without issues:
elatov@macair:~$mount | grep afp
//elatov@zf/time_mach on /Volumes/time_mach (afpfs, nodev, nosuid, mounted by elatov)
elatov@macair:~$df -Ph -T afpfs
Filesystem              Size   Used  Avail Capacity  Mounted on
//elatov@zf/time_mach  200Gi   27Gi  173Gi    14%    /Volumes/time_mach
and I saw the client on the OmniOS machine:
root@zf:~#/usr/local/bin/macusers
PID      UID      Username         Name                 Logintime Mac
15947    978      elatov                                11:54:48
I then added the AFP share in the Time Machine Settings, after you add the afp share as the backup destination you can use tmutil to get the information about it:
elatov@macair:~$tmutil destinationinfo
====================================================
Name          : time_mach
Kind          : Network
URL           : afp://elatov@zf/time_mach
Mount Point   : /Volumes/time_mach-1
ID            : C17BD870-304F-4FDB-AF6D-3A78B24729AB
OmniOS Network Bandwidth Monitoring
When I started the back up I wanted to see what the BW usage was on omnios, so I enabled extented network monitoring:
root@zf:~#acctadm -e extended -f /var/log/net.log net
root@zf:~#acctadm net
            Net accounting: active
       Net accounting file: /var/log/net.log
     Tracked net resources: extended
   Untracked net resources: none
And then checking out the file (after waiting a couple of minutes), I saw the following:
root@zf:~#dlstat show-link -h -f /var/log/net.log e1000g0
LINK         START         END           RBYTES   OBYTES   BANDWIDTH
e1000g0      12:38:46      12:39:06      1408650  3190663     57.622 Mbp
e1000g0      12:39:06      12:39:26      1370705  3090352     56.064 Mbp
e1000g0      12:39:26      12:39:46      1653583  3670691     67.611 Mbp
e1000g0      12:39:46      12:40:06      1393440  3153884     56.999 Mbp
I was sitting around 54Mbp, which makes sense cause I was on Wireless on my Mac. After I was done checking out the Bandwidth I disabled the network monitoring:
root@zf:~#acctadm -D net
root@zf:~#acctadm net
            Net accounting: inactive
       Net accounting file: /var/log/net.log
     Tracked net resources: extended
   Untracked net resources: none
And on the omnios machine I did see the sparse bundle get created:
root@zf:~#ls -lh /data/tm/elatov/
total 17
drwx--S---   3 elatov   tmusers        9 Jun  6 12:47 macair.sparsebundle
Running the Bonjour Services on OmniOS
On Napp-it you can enable the bojour services to auto start if you want. In the Napp-it UI it will show what sample commands you can enter:
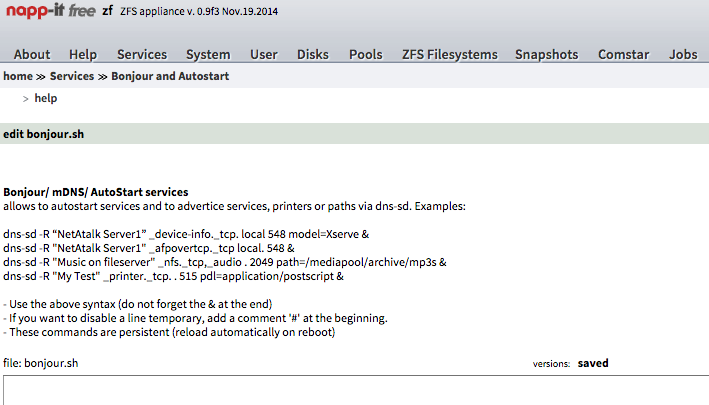
Basically run the following commands (also seen here)
root@zf:~#dns-sd -R "zf" _afpovertcp._tcp local. 548 &
[1] 19946
root@zf:~#Registering Service zf._afpovertcp._tcp.local. port 548
Got a reply for zf._afpovertcp._tcp.local.: Name now registered and active
Now on the mac if you query for afp services you will see the server respond to hosting that service:
elatov@macair:~$dns-sd -B _afpovertcp._tcp
Browsing for _afpovertcp._tcp
DATE: ---Sat 06 Jun 2015---
13:23:01.290  ...STARTING...
Timestamp     A/R    Flags  if Domain               Service Type         Instance Name
13:23:01.291  Add        2   4 local.               _afpovertcp._tcp.    zf
If you want the server to show up with an icon of a storage device you can also run this:
root@zf:~# dns-sd -R "zf" _device-info._tcp. local 548 model=Xserve &
and of course from the mac you can query that information:
elatov@macair:~$dns-sd -B _device-info._tcp
Browsing for _device-info._tcp
DATE: ---Sun 07 Jun 2015---
19:05:20.472  ...STARTING...
Timestamp     A/R    Flags  if Domain               Service Type         Instance Name
19:05:20.474  Add        2   4 local.               _device-info._tcp.   zf
And in Finder you will your see device:
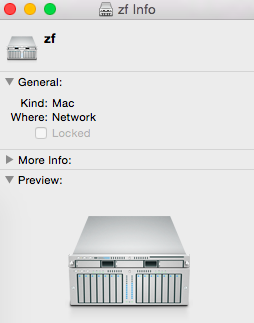
If you are manually mouting the afp share, it probably won’t matter that much.
Also, if you need to open up the firewall, the ports are covered here Arch Linux Netatalk