Install CyanogenMod 13 On Nexus 5
Install ADB & Fastboot
I used MacPorts to install adb, most of the instructions are laid out in MacPorts Install ADB. First install the android sdk:
sudo port install android
Then launch the Android SDK Manager and make sure to install Android SDK Platform-tools:
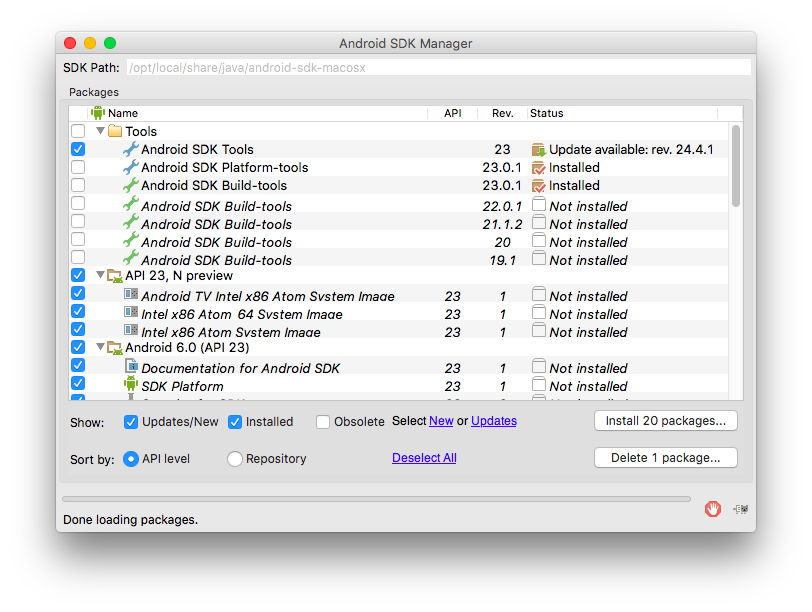
After that the binaries will be here:
┌─[elatov@macair] - [/Users/elatov] - [2016-04-03 04:27:02]
└─[0] <> ls -l /opt/local/share/java/android-sdk-macosx/platform-tools/{adb,fastboot}
-rwxr-xr-x  1 root  _developer  1175964 Apr  2 08:46 /opt/local/share/java/android-sdk-macosx/platform-tools/adb
-rwxr-xr-x  1 root  _developer   554816 Apr  2 08:46 /opt/local/share/java/android-sdk-macosx/platform-tools/fastboot
You can add that to the PATH variable or create symlinks in a directory which is in your PATH already.
Enable USB Debug Mode on Nexus 5
The instructions are pretty simple, on the Nexus:
- Go to Settings > About Phone
- Tap Build number 7 times until it says “You are now a developer“.
- Under Settings > Developer Options, set “USB debugging” to “On“.
Plug in the device and you should see the device:
┌─[elatov@macair] - [/Users/elatov] - [2016-04-02 09:32:49]
└─[0] <> adb devices -l
List of devices attached
06b       device usb:337X product:hammerhead model:Nexus_5 device:hammerhead
Backup Phone
I usually use adb for the backup. But there are a bunch of different ways, first I backed up everything:
┌─[elatov@macair] - [/Users/elatov] - [2016-04-02 09:20:34]
└─[0] <> adb backup -f nexus5.ab -apk -shared -all
Now unlock your device and confirm the backup operation.
And then I removed the system apps:
┌─[elatov@macair] - [/Users/elatov] - [2016-04-02 09:28:05]
└─[0] <> adb backup -f nexus5-no_sys.ab -apk -shared -all -nosystem
Now unlock your device and confirm the backup operation.
The backup options are described here. Here are the resulted files:
┌─[elatov@macair] - [/Users/elatov] - [2016-04-02 09:42:17]
└─[1] <> ls -lh *.ab
-rw-r-----  1 elatov  1000   675M Apr  2 09:32 nexus5-no_sys.ab
-rw-r-----  1 elatov  1000   923M Apr  2 09:28 nexus5.ab
Unlock Phone
We can follow the instructions laid out in How to Install LineageOS on hammerhead). First let’s boot the phone into the fastboot mode:
adb reboot bootloader
To confirm, we can run the following:
┌─[elatov@macair] - [/Users/elatov] - [2016-04-02 09:59:44]
└─[0] <> fastboot devices -l
06b       fastboot usb:337X
Now let’s unlock the device
┌─[elatov@macair] - [/Users/elatov] - [2016-04-02 09:59:46]
└─[0] <> fastboot oem unlock
...
OKAY [ 35.913s]
finished. total time: 35.913s
The previous command will reset the phone to factory settings. So re-enable usb-debug mode after the phone resets.
Install a Custom Recovery Image
I downloaded the recovery image and here is the file I ended up with:
┌─[elatov@macair] - [/Users/elatov] - [2016-04-02 10:00:54]
└─[0] <> ls -l download/twrp-2.8.7.1-hammerhead.img
-rw-r--r--@ 1 elatov  1000  15046656 Apr  2 09:55 download/twrp-2.8.7.1-hammerhead.img
Now let’s reboot into fastboot again:
┌─[elatov@macair] - [/Users/elatov] - [2016-04-02 10:02:52]
└─[0] <> adb reboot bootloader
┌─[elatov@macair] - [/Users/elatov] - [2016-04-02 10:12:26]
└─[0] <> fastboot devices -l
06b       fastboot usb:337X
Now let’s flash the recovery image onto the phone:
┌─[elatov@macair] - [/Users/elatov] - [2016-04-02 10:12:40]
└─[0] <> fastboot flash recovery download/twrp-2.8.7.1-hammerhead.img
target reported max download size of 1073741824 bytes
sending 'recovery' (14694 KB)...
OKAY [  0.671s]
writing 'recovery'...
OKAY [  1.132s]
finished. total time: 1.803s
Once the flash completes successfully, reboot the device into recovery to verify the installation. To boot to recovery mode:
- With the device powered down, hold the Volume Down and Volume Up buttons. Then press and hold the Power button until a boot menu appears. Navigate using the volume keys and select RECOVERY MODE using the Power key.
- Or type in
adb reboot recovery
After in recovery mode you will see a new recovery screen and you can confirm you are in recovery mode by running adb devices
┌─[elatov@macair] - [/Users/elatov] - [2016-04-02 10:15:55]
└─[0] <> adb devices
List of devices attached
06b	recovery
Installing CyanogenMod from Recovery Mode
First download all the files:
┌─[elatov@macair] - [/Users/elatov/download] - [2016-04-02 01:15:03]
└─[0] <> ls -l *.zip *.img
-rw-r--r--@ 1 elatov  1000  334188304 Apr  2 10:13 cm-13.0-20160316-SNAPSHOT-ZNH0EAO1QC-hammerhead.zip
-rw-r--r--@ 1 elatov  1000  122494130 Apr  2 10:10 open_gapps-arm-6.0-nano-20160402.zip
-rw-r--r--@ 1 elatov  1000   15046656 Apr  2 09:55 twrp-2.8.7.1-hammerhead.img
Now let’s push the CyanogenMod and gapps onto the phone:
┌─[elatov@macair] - [/Users/elatov] - [2016-04-02 10:15:59]
└─[0] <> adb push download/cm-13.0-20160316-SNAPSHOT-ZNH0EAO1QC-hammerhead.zip /sdcard/
4988 KB/s (334188304 bytes in 65.424s)

┌─[elatov@macair] - [/Users/elatov] - [2016-04-02 10:18:31]
└─[0] <> adb push download/open_gapps-arm-6.0-nano-20160402.zip /sdcard/
4901 KB/s (122494130 bytes in 24.406s)
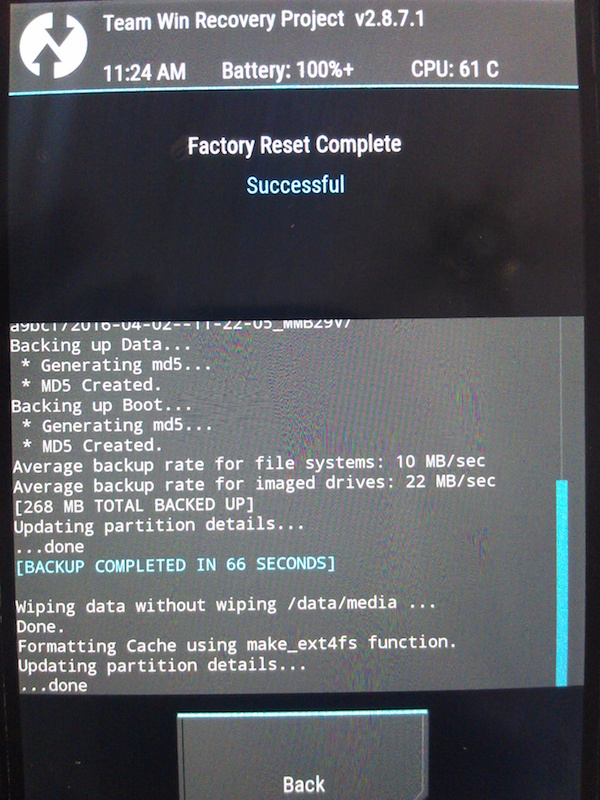
My phone was already in recovery mode, while in recovery mode I created a backup and reset the phone to factory settings:
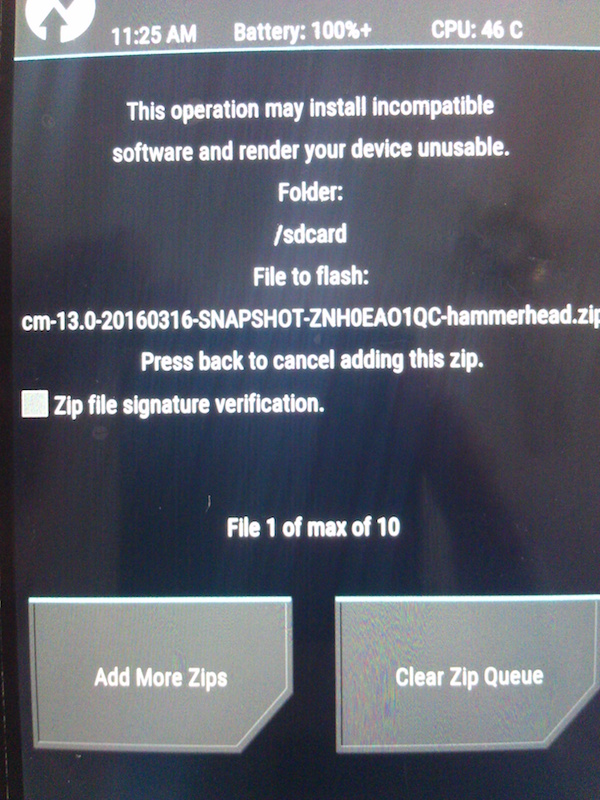
Then I chose Install and first chose the cm-13.0-20160316-SNAPSHOT-ZNH0EAO1QC-hammerhead.zip file:
And after that was complete I then installed did the same with the open_gapps-arm-6.0-nano-20160402.zip file.
Fix the Unauthorized Device
After the new install the devices showed up as unauthorized:
┌─[elatov@macair] - [/Users/elatov] - [2016-04-02 01:40:06]
└─[0] <> adb devices
List of devices attached
06b	unauthorized
To fix that, I moved the .android directory out of the way
┌─[elatov@macair] - [/Users/elatov] - [2016-04-02 01:40:12]
└─[0] <> sudo mv .android .android.orig
Then killed the adb server and tried again:
┌─[elatov@macair] - [/Users/elatov] - [2016-04-02 01:41:17]
└─[0] <> adb kill-server
┌─[elatov@macair] - [/Users/elatov] - [2016-04-02 01:41:32]
└─[0] <> adb devices
List of devices attached
* daemon not running. starting it now on port 5037 *
* daemon started successfully *
At this point the pop up on the phone showed up and I accepted my Mac and then I saw the following:
┌─[elatov@macair] - [/Users/elatov] - [2016-04-02 01:41:38]
└─[0] <> adb devices
List of devices attached
06b	device
Restoring from Backup
As I was resetting up the the phone, I had the option to restore all the apps from The Play Store (and I could choose which ones to install), this is only if you enabled backup to google:
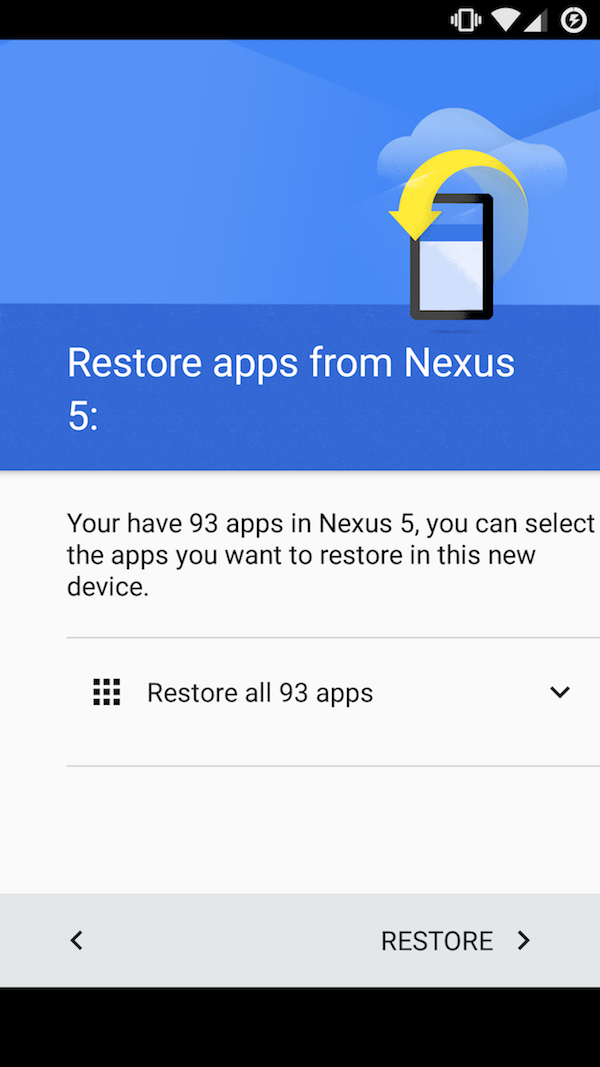
That just installed the applications without any settings. Then I just restored from the adb backup for the actual data:
adb restore nexus5-no_sys.ab
Fix Broken Sound
I noticed that after some time the sound would stop working, I ran into this thread and people fixed the issue by installing the SoundAbout App. I gave that a shot and so far do good.