Revert to ASUS-WRT from DD-WRT on the Asus RT-AC68U Router
I initially install dd-wrt on the Asus RT-AC68U Router (the instructions for that are here) and I actually really liked it. But I remember that the performance of the AsusWRT firmware is supposed to be better.
DD-WRT Speed Test
I recently got a fiber connection for my WAN and I wanted to see what speed I can reach. Plugging my laptop directly into the Modem, I saw the following:

That’s really good. Then plugging my laptop through the Router, I saw the following:

And here are the results with wifi:

It wasn’t as good. So I decided to try out AsusWRT
Create a backup of DD-WRT
Before completing wiping my router, I decided to create a backup. First go to the admin UI and export the config. Administration -> Backup and select Backup:
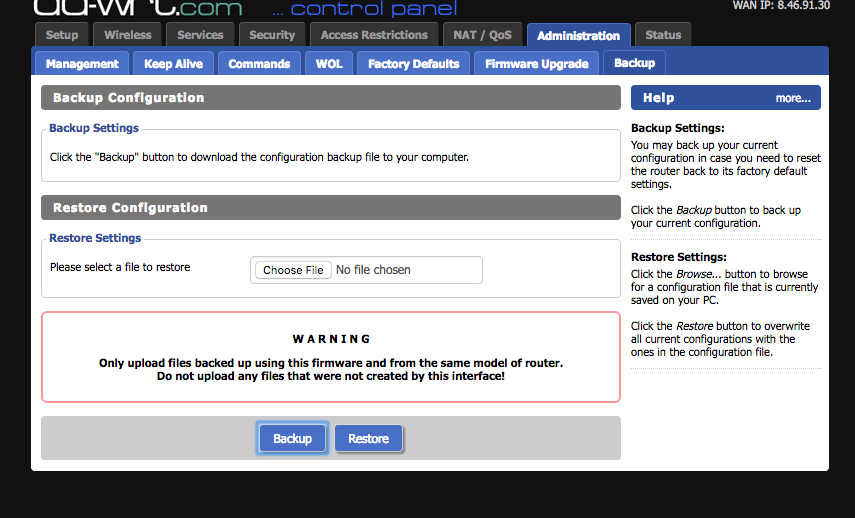
It will download a file called nvrambak.bin for the backup. I also grabbed the contents of the /jffs and /opt directories since I had a USB drive plugged in. First install a better version of tar (after ssh‘ing into the router):
# opkg install tar
And then create a tar archive:
# /opt/bin/tar -cpvjf /opt/backup/backup-8-27-16.tar.bz2 /opt /jjfs --exclude=/opt/backup
Then scp that backup to another machine:
# scp /opt/backup/backup-8-27-16.tar.bz2 mac:/tmp/
That should get your covered.
Installing AsusWRT
First get the latest stock firmare from the Asus Site. For the Asus RT-AC68U Router I found it here. I downloaded the latest version and ended up with the following file:
FW_RT_AC68U_30043803831.zip
If you extract the zip you see the trx file:
# unzip -l FW_RT_AC68U_30043803831.zip
Archive:  FW_RT_AC68U_30043803831.zip
  Length      Date    Time    Name
---------  ---------- -----   ----
 40280064  07-06-2016 21:32   RT-AC68U_3.0.0.4_380_3831-g93dfe8c.trx
---------                     -------
 40280064                     1 file
Put the Router into Recovery Mode
From the Router’s Manual pdf:
To launch the rescue mode and use the Firmware Restoration utility:
- Unplug the wireless router from the power source.
- Hold the Reset button at the rear panel and simultaneously replug the wireless router into the power source. Release the Reset button when the Power LED at the front panel flashes slowly, which indicates that the wireless router is in the rescue mode.
Resetting the Router to Factory Settings (Optional)
I noticed there are two procedures, from the Router’s Manual pdf:
Reset button
This button resets or restores the system to its factory default settings.
If things get really bad you can use the following instructions which I found at the asuswrt-merlin FAQ page:
Q: How do I put the router into Recovery Mode?
A: Turn the router off. Press the reset button, and while keeping it pressed turn it back on. Wait a few seconds until the power led blinks, and then release the reset button. Router will now be in Recovery Mode, reachable at 192.168.1.1.
Q: How do I wipe my settings?
A: Press the reset button for more than 5 seconds, then release it.
Q: How do I wipe my settings? Reset button does not work.
A: If the firmware fails to boot, then the reset button won’t work. Turn the router off, press the WPS button. While keeping it pressed turn the router back on. Wait a few seconds, then release the WPS button. Settings will be back to factory defaults.
Installing the Stock ASUS Firmware
After the router is in the Recovery/Rescue mode, install the Firmware Restoration Utility and launch it. I was using a Mac, and I actually found it in the App Store:

Then I configured my IP to be on the same network as the router (192.168.1.X/24) and I uploaded the trx file to the utility:
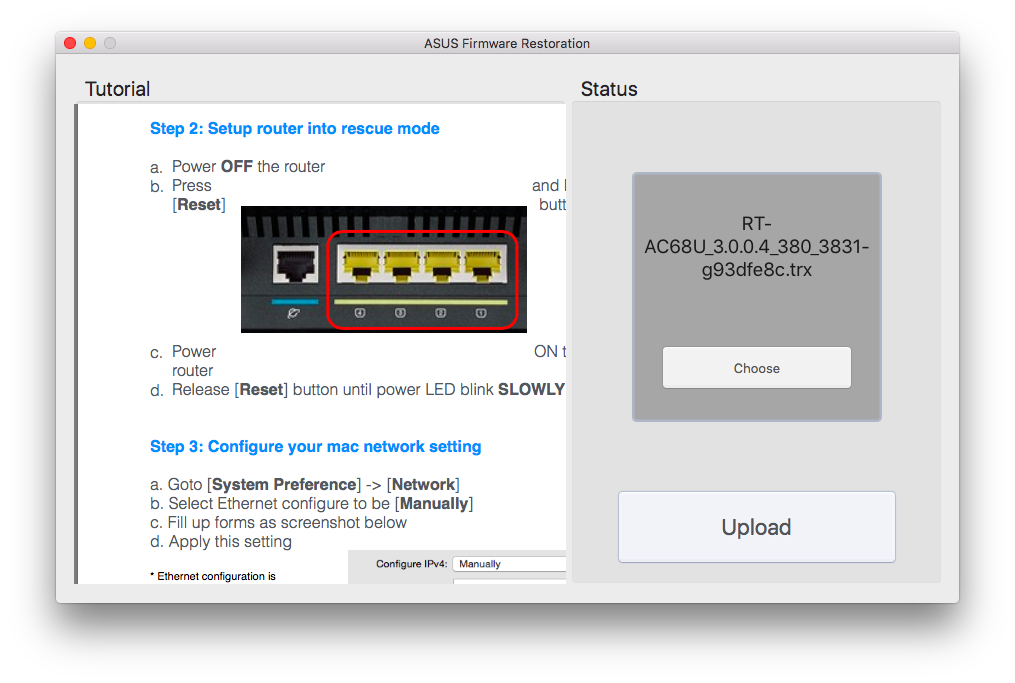
And then after you click Upload, it will start the upload:
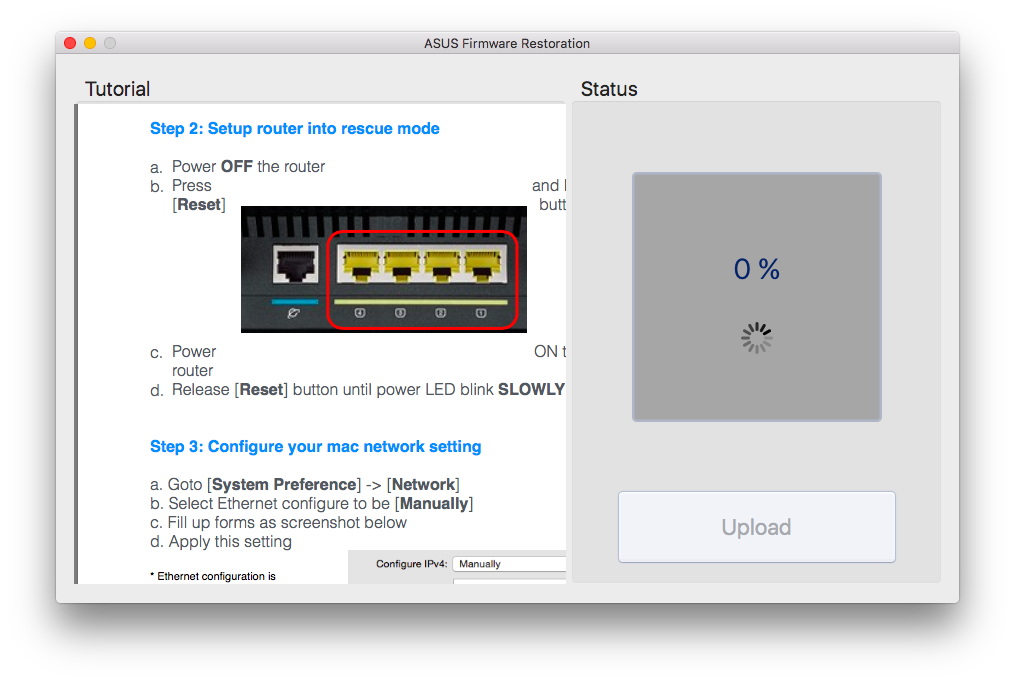
If all is well it will finish the upload and ask you to reboot your router. Then you can visit http://192.168.1.1 to finish the configuration.
AsusWRT Speed Test
After I installed and configured AsusWRT, I decided to run another speed test and here is what I saw:

That’s a little bit better :) Here is the version I was on:
ASUSWRT RT-AC68U_3.0.0.4 Wed Jul  6 12:15:38 UTC 2016

admin@(none):/tmp/home/root# nvram get firmver
3.0.0.4
admin@(none):/tmp/home/root# nvram get model
RT-AC68U
Installing AsusWRT Merlin Firmware
While I as at it, I decided to install the Merlin Firmware since it’s pretty much the same as AsusWRT with just a couple of more options. First I went to this page and downloaded the latest firmware. I ended up with the following file:
RT-AC68U_380.61_0.zip
After extracting it, I just grabbed the trx file:
# unzip -l RT-AC68U_380.61_0.zip
Archive:  RT-AC68U_380.61_0.zip
  Length     Date   Time    Name
 --------    ----   ----    ----
 33615872  08-04-16 20:37   RT-AC68U_380.61_0.trx
     9269  08-04-16 19:13   README-merlin.txt
   123456  08-04-16 19:13   Changelog.txt
       89  08-04-16 20:37   sha256sum.txt
 --------                   -------
 33748686                   4 files
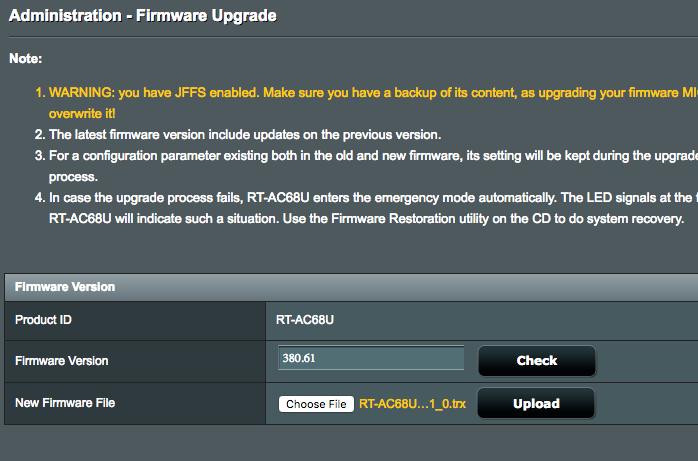
So from the AsusWRT Admin UI, I went to Administration -> Firmware Upgrade and uploaded the new trx file and clicked Upload:
After the update was done, here is the version I was on:
admin@RT-AC68U-1F08:/tmp/home/root# nvram get firmver
3.0.0.4
admin@RT-AC68U-1F08:/tmp/home/root# nvram get buildno
380.61
AsusWRT Merlin Speed Test
After upgrading the stock Asus Firmware to the Merlin Firmware here were the results of the speed test:

Very similar results and I get cool features, like SNMP and traffic stats saved to a usb disk (full list is available here). I also ran a test with wi-fi and it was pretty much the same accross both versions of AsusWRT:

VLAN Config
One thing that I missed from DD-WRT is the ease of the setup for VLANs, but luckily it’s still possible with the command line. This forum talks about the setup. Basically we can use the robocfg command to configure VLANs. Here is the default output from that command (before I made any changes):
admin@RT-AC68U-1F08:/tmp/home/root# robocfg show
Switch: enabled
Port 0: 1000FD enabled stp: none vlan: 2 jumbo: off mac: 00:0d:b9:3c:c0:66
Port 1:   DOWN enabled stp: none vlan: 1 jumbo: off mac: 00:00:00:00:00:00
Port 2:  100FD enabled stp: none vlan: 1 jumbo: off mac: 00:25:31:05:4d:27
Port 3:   DOWN enabled stp: none vlan: 1 jumbo: off mac: 00:00:00:00:00:00
Port 4: 1000FD enabled stp: none vlan: 1 jumbo: off mac: 00:0c:29:9a:98:fe
Port 8:   DOWN enabled stp: none vlan: 2 jumbo: off mac: 00:00:00:00:00:00
VLANs: BCM5301x enabled mac_check mac_hash
   1: vlan1: 1 2 3 4 5t
   2: vlan2: 0 5
  56: vlan56: 0 1 2 8u
  57: vlan57: 0 1 2t 8u
  58: vlan58: 0 3 8u
  59: vlan59: 0 1t 5 8u
  60: vlan60: 1t 4t 7 8u
  61: vlan61: 1t 2t 3t 5
  62: vlan62: 4t 5t 7
When I was initially testing, I ran the following to get what I needed:
/usr/sbin/robocfg vlan 1 ports "1 2 3 4t 5t"
/usr/sbin/robocfg vlan 3 ports "4t 5t"
/sbin/vconfig add eth0 3
/sbin/ifconfig vlan3 up
/sbin/ifconfig vlan3 10.0.0.1 netmask 255.255.255.0
But when I tried to add to a script it would freeze my router, eventually I realized that after enabling a couple of options the default config changed to have the vlan 1 port to have 8t instead of 5t (which makes sense, since that applies to a 1GB interfaces, more on that here). So I ended up with the following script on the router which worked for me (and survived a reboot):
admin@RT-AC68U-1F08:/tmp/home/root# cat /jffs/scripts/firewall-start
#!/bin/sh
/usr/sbin/robocfg vlan 1 ports "1 2 3 4t 8t"
/usr/sbin/robocfg vlan 3 ports "4t 8t"
/sbin/vconfig add eth0 3
/sbin//ifconfig vlan3 up
/sbin//ifconfig vlan3 10.0.0.1 netmask 255.255.255.0
Firewall Setup with FWBuilder
I wanted to use my existing setup as described in here and here. The iproute2 utility ip is always causing problems. This time around the ip link show <int> or ip link show dev <int> would not work on the router:
admin@RT-AC68U-1F08:/tmp/home/root# ip link show br0
RTNETLINK answers: Invalid argument
Cannot send link get request: Invalid argument
admin@RT-AC68U-1F08:/tmp/home/root# ip link show dev br0
RTNETLINK answers: Invalid argument
Cannot send link get request: Invalid argument
But the ip link show command would work:
admin@RT-AC68U-1F08:/tmp/home/root# ip link show  | grep br0 -A 1
10: br0: <BROADCAST,MULTICAST,ALLMULTI,UP,LOWER_UP> mtu 1500 qdisc noqueue state UNKNOWN mode DEFAULT
    link/ether 78:24:af:7b:1f:08 brd ff:ff:ff:ff:ff:ff
Luckily ip addr worked fine. So to integrate with fwbuilder I did a couple of things. On the FWBuilder side, I configured it to drop the script under /jffs/scripts/nat-start:
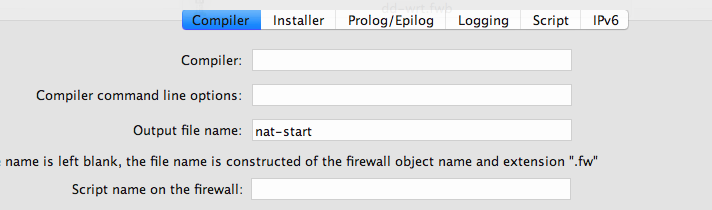
and to run a custom install script (/jffs/firewall/firewall.sh):

The install script removes the ip link show dev references and replaces them with ifconfig which still works and then it runs the script:
admin@RT-AC68U-1F08:/tmp/home/root# cat /jffs/firewall/firewall.sh
#!/bin/sh
# fix the firewall
/bin/sed -i 's/\$IP\ link\ show\ dev/\$IFCONFIG/' /jffs/scripts/nat-start
# run the firewall
/jffs/scripts/nat-start start
And lastly I unchecked the Verify interfaces before loading firewall policy, this got rid of the ip link show commands:
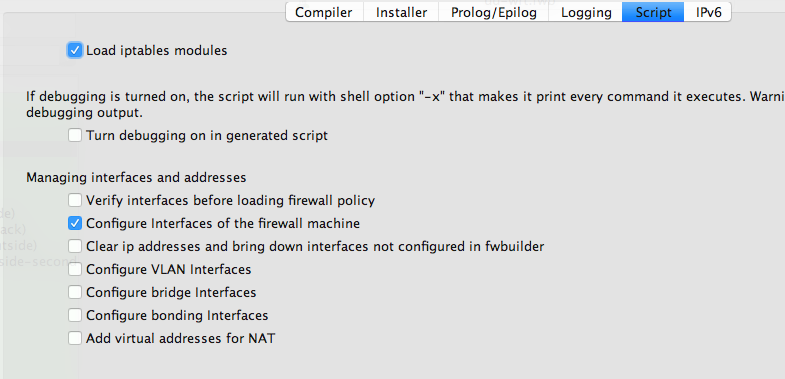
After those changes, I was able to successfully push the firewall of type dd-wrt with jffs without issues.
dnsmasq setup
On my dd-wrt router I also used dnsmasq as a DNS server, it was pretty convinient, but there is no UI for such a setup in AsusWRT so we can configure it via custom configs. There are nice examples of the setup steps at Custom domains with dnsmasq and Enforce Safesearch. In the end I created the following configuration:
admin@RT-AC68U-1F08:/tmp/home/root# cat /jffs/configs/dnsmasq.conf.add
interface=vlan3
dhcp-range=interface:vlan3,10.0.0.150,10.0.0.254,86400s
local=/kar.int/
expand-hosts
domain-needed
bogus-priv
addn-hosts=/jffs/hosts.home
strict-order
And then I just restarted the dnsmasq service:
service restart_dnsmasq
Entware Configuration
Entware is the new version of optware and is available for AsusWRT. The setup is covered here. We basically just run entware-setup.sh and that’s it:
admin@RT-AC68U-1F08:/jffs# entware-setup.sh
 Info:  This script will guide you through the Entware installation.
 Info:  Script modifies "entware" folder only on the chosen drive,
 Info:  no other data will be changed. Existing installation will be
 Info:  replaced with this one. Also some start scripts will be installed,
 Info:  the old ones will be saved on Entware partition with name
 Info:  like /tmp/mnt/sda1/jffs_scripts_backup.tgz

 Info:  Looking for available partitions...
[1] --> /tmp/mnt/sda1
 =>  Please enter partition number or 0 to exit
[0-1]: 1
 Info:  /tmp/mnt/sda1 selected.
 Info:  Creating /tmp/mnt/sda1/entware folder...
 Info:  Creating /tmp/opt symlink...
 Info:  Creating /jffs scripts backup...
tar: removing leading '/' from member names
 Info:  Modifying start scripts...
Info: Checking for prerequisites and creating folders...
Info: Basic packages installation...
Downloading http://pkg.entware.net/binaries/armv7/Packages.gz.
Updated list of available packages in /opt/var/opkg-lists/packages.
Installing entware-opt (222108-2) to root...
Downloading http://pkg.entware.net/binaries/armv7/entware-opt_222108-2_armv7soft.ipk.
Installing libc (2.23-5) to root...
Downloading http://pkg.entware.net/binaries/armv7/libc_2.23-5_armv7soft.ipk.
Installing libgcc (5.4.0-5) to root...
Downloading http://pkg.entware.net/binaries/armv7/libgcc_5.4.0-5_armv7soft.ipk.
Installing libssp (5.4.0-5) to root...
Downloading http://pkg.entware.net/binaries/armv7/libssp_5.4.0-5_armv7soft.ipk.
Installing librt (2.23-5) to root...
Downloading http://pkg.entware.net/binaries/armv7/librt_2.23-5_armv7soft.ipk.
Installing libpthread (2.23-5) to root...
Downloading http://pkg.entware.net/binaries/armv7/libpthread_2.23-5_armv7soft.ipk.
Installing libstdcpp (5.4.0-5) to root...
Downloading http://pkg.entware.net/binaries/armv7/libstdcpp_5.4.0-5_armv7soft.ipk.
Installing ldconfig (2.23-5) to root...
Downloading http://pkg.entware.net/binaries/armv7/ldconfig_2.23-5_armv7soft.ipk.
Installing findutils (4.6.0-1) to root...
Downloading http://pkg.entware.net/binaries/armv7/findutils_4.6.0-1_armv7soft.ipk.
Installing terminfo (6.0-1b) to root...
Downloading http://pkg.entware.net/binaries/armv7/terminfo_6.0-1b_armv7soft.ipk.
Installing locales (2.23-5) to root...
Downloading http://pkg.entware.net/binaries/armv7/locales_2.23-5_armv7soft.ipk.
Configuring libgcc.
Configuring libc.
Configuring libssp.
Configuring libpthread.
Configuring librt.
Configuring terminfo.
Configuring ldconfig.
Configuring locales.
Entware uses separate locale-archive file independent from main system
Creating locale archive - /opt/usr/lib/locale/locale-archive
Adding en_EN.UTF-8
Adding ru_RU.UTF-8
You can download locale sources from http://pkg.entware.net/sources/i18n_glib223.tar.gz
You can add new locales to Entware using /opt/bin/localedef.new
Configuring libstdcpp.
Configuring findutils.
Configuring entware-opt.
Updating /opt/etc/ld.so.cache... done.
Info: Congratulations!
Info: If there are no errors above then Entware-ng was successfully initialized.
Info: Add /opt/bin & /opt/sbin to your PATH variable
Info: Add '/opt/etc/init.d/rc.unslung start' to startup script for Entware-ng services to start
Info: Found a Bug? Please report at https://github.com/Entware-ng/Entware-ng/issues
Now I can use opkg to install nice cool packages on the router.
Fixing Auto Logout Issue
After the many changes that I made, I realized I couldn’t make any changes in the admin UI. Any time I would hit Apply, it would just log me out. I ran into this forum and one of the folks mentioned that after changing the default IP, he ran into the issue. So I thought that it’s probably the issue with my vlan3 interface, so I ssh‘ed into the router and down’ed the interface:
# ifconfig vlan3 down
And then I was able to make changes without issue in the Admin UI. Also going to the page by IP vs hostname, helped out.
NAT Acceleration
The reason for the amazing speed is because of NAT Acceleration. This website goes over the pros and cons of using NAT Acceleration. First, there are actually a couple of components to it, from that page:
Level 1: CTF (Cut Through Forwarding): Software optimization technique to accelerate NAT traffic. You may need this option if your internet provider is offer you speed above 100 mb /sec. You generally need this option if you want to achieve peak speeds especially for speed above 200 mb/sec.
CTF or Cut-Through Forwarding is achieved by the router starting to send out transmission frames as soon as it receives its destination. However, the router relies on the end device to tell it whether the data is corrupted for resend. This restriction can cause problems with a few common home uses.
When you have CTF or level 1 NAT Acceleration disabled, the router will “store” the entire frame before sending it out to its destination. This holding period may require more router’s CPU use.
Level 2: Level 1 (CTF) + FA (Flow Accelerator): Hardware NAT acceleration mechanism design for accelerating wired DHCP and Static IP connections.
You will need Flow Accelerator option to fully take advantage of internet provider’s Gigabit service is offered.
Unfortunately some network feature are not supported with NAT Acceleration. Here is a quick list:
- QoS
- Port Forwarding
- IP Traffic Monitoring
- Streaming Services
The Port Forwarding impacted me the most. I noticed that some ports worked and some didn’t, which described some of the behavior other folks saw. But I also noticed that SSL enabled ports (80 vs 443 … and other similart services) worked all the time. So this gave me a chance to SSL enable most of the services. If you end up disabling NAT Acceleration then the VLAN configuration will change from:
/usr/sbin/robocfg vlan 1 ports "1 2 3 4t 8t"
/usr/sbin/robocfg vlan 3 ports "4t 8t"
to this:
/usr/sbin/robocfg vlan 1 ports "1 2 3 4t 5t"
/usr/sbin/robocfg vlan 3 ports "4t 5t"