Cert Manager, Botkube, and Tekton Pipelines with Conditions
I wanted to configure Cert Manager to automatically renew a Wild Card SSL Certificate and I also wanted to get notified when the renewal occurred. I ran into a couple of options for the notifications component:
- k8s-notify from Redhat
- This looked really good it just didn’t support plain web hooks, but other than really cool project
- eventrouter from heptio/VMware
- This also looked cool, but it didn’t look like it could filter out events it would just forward everything over to a sink (which definitely has it’s use case, check out How Grafana Labs Effectively Pairs Loki and Kubernetes Events)
- kubernetes-event-exporter from opsgenie
- This was actually my second choice, but I just really like the ease of use of the other ones
- Kubernetes Event Exporter from caicloud
- This was actually an interesting project, where it would create metrics for prometheus to scrape from the kubernetes events, which I thought was an interesting thought
- Kubewatch from bitnami
- This looked great, but it seemed like it was supporting specific type of events like pods changes and deployments, but wasn’t generic enough to support any resource change.
- BotKube from infracloudio
- For some reason this one looked cool, so I decided to try it out.
I settled on using BotKube since it seemed the most flexible. Since I was playing around with tekton, I also decided to create a Pipeline to automatically send a message to slack when the certificate is updated. So let’s get into the configuration one by one.
Cert Manager
Installation
The Cert Manager components are documented very well. From that same doc, here is a nice illustration of what it supports:
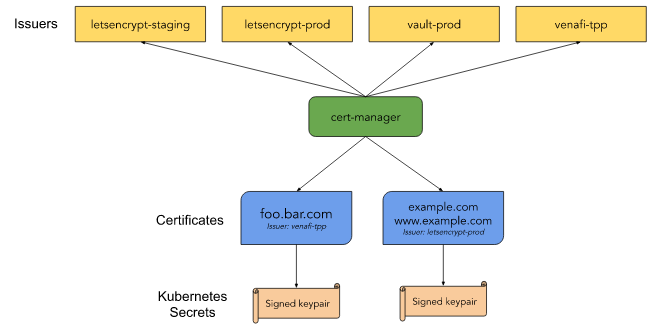
The installation is covered in Installing with regular manifests, so I just ran the following:
kubectl apply --validate=false -f https://github.com/jetstack/cert-manager/releases/download/v0.15.0/cert-manager.yaml
And after the install was finished I had the following CRDs:
> kubectl get crd | grep -i cert-manager
certificaterequests.cert-manager.io                   2020-05-12T01:58:25Z
certificates.cert-manager.io                          2020-05-12T01:58:25Z
challenges.acme.cert-manager.io                       2020-05-12T01:58:25Z
clusterissuers.cert-manager.io                        2020-05-12T01:58:25Z
issuers.cert-manager.io                               2020-05-12T01:58:25Z
orders.acme.cert-manager.io                           2020-05-12T01:58:25Z
And the following pods running:
> k get pods -n cert-manager
NAME                                       READY   STATUS    RESTARTS   AGE
cert-manager-7cb75cf6b4-gxjp6              1/1     Running   0          4d5h
cert-manager-cainjector-759496659c-vgq5k   1/1     Running   0          4d5h
cert-manager-webhook-7c75b89bf6-8gpvn      1/1     Running   0          5d1h
Let’s move to the next steps.
Creating a ClusterIssuer
Next you can define an Issuer, I was using Let’s Encrypt in the past so I decided to keep that. Here are the instructions on configuring an ACME Issuer. I ended up creating the following configuration:
> cat cluster-issuer.yaml
apiVersion: cert-manager.io/v1alpha2
kind: ClusterIssuer
metadata:
  name: letsencrypt-prod
  namespace: cert-manager
spec:
  acme:
    server: https://acme-v02.api.letsencrypt.org/directory
#    server: https://acme-staging-v02.api.letsencrypt.org/directory
    email: "YOUR_EMAIL"
    privateKeySecretRef:
      # Secret resource that will be used to store the account's private key.
      name: issuer-account-key
    solvers:
    - dns01:
        cloudflare:
          email: "YOUR_EMAIL"
          apiKeySecretRef:
            name: cloudflare-api-key-secret
            key: api-key
This defines which server to use and also which solver.
DNS01 Solver
I knew I wanted to get a Wild Card SSL Certificate and I decided to use the dns01 challenge to accomplish that. I also decided to use cloudflare for my DNS provider and the configuration for that is covered in cloudflare. I created a private key which contained my API key:
> cat cf-secret.yaml
apiVersion: v1
kind: Secret
metadata:
  name: cloudflare-api-key-secret
  namespace: cert-manager
type: Opaque
stringData:
  api-key: YOU_CLOUDFLARE_KEY
Then creating the secret and issuer worked out:
> k apply -f cf-secret.yaml
> k apply -f cluster-issuer.yaml
And I saw my clusterissuer created:
> k get clusterissuers
NAME               READY   AGE
letsencrypt-prod   True    5d1h
And ready to process new certificates:
> k get clusterissuers letsencrypt-prod -o json | jq .status
{
  "acme": {
    "lastRegisteredEmail": "YOUR_EMAIL",
    "uri": "https://acme-v02.api.letsencrypt.org/acme/acct/85910270"
  },
  "conditions": [
    {
      "lastTransitionTime": "2020-05-12T02:23:08Z",
      "message": "The ACME account was registered with the ACME server",
      "reason": "ACMEAccountRegistered",
      "status": "True",
      "type": "Ready"
    }
  ]
}
Now let’s move on to the next steps.
Creating a Certificate
Now that we have the clusterIssuer and we defined our solver let’s request a Certificate. I ended up creating the following config:
> cat cert.yaml
apiVersion: cert-manager.io/v1alpha2
kind: Certificate
metadata:
  name: wild-YOUR_DOMAIN
#  namespace: cert-manager
spec:
  secretName: wild-YOUR_DOMAIN
  issuerRef:
    name: letsencrypt-prod
    kind: ClusterIssuer
  dnsNames:
    - "YOUR_DOMAIN"
    - "*.YOUR_DOMAIN"
Then applying that configuration will automatically trigger a request process and you will see a challenge created:
> k get challenges
NAME                                                STATE     DOMAIN    AGE
wild-YOUR_DOMAIN-1876214257-1906930536-3362969436   pending   YOUR_DOMAIN  6s
wild-YOUR_DOMAIN-1876214257-1906930536-3864605829             YOUR_DOMAIN   6s
And you can describe the challenge to see how far along it is in the process:
> k describe challenge wild-YOUR_DOMAIN-1876214257-1906930536-3362969436 | tail
Status:
  Presented:   false
  Processing:  true
  Reason:      Waiting for DNS Record
  State:       pending
Events:
  Type     Reason        Age                 From          Message
  ----     ------        ----                ----          -------
  Normal   Started       10m                 cert-manager  Challenge scheduled for processing
And you will also see orders in a pending state:
> k get orders
NAME                                     STATE     AGE
wild-YOUR_DOMAIN-1876214257-1906930536   pending   6m33s
And if you check out the events you will see the following:
> k get events --sort-by='.metadata.creationTimestamp' -A -w
default     68s         Normal    GeneratedKey        certificate/wild-YOUR_DOMAIN                                                  Generated a new private key
default     68s         Normal    OrderCreated        certificaterequest/wild-YOUR_DOMAIN-1876214257                                Created Order resource default/wild-YOUR_DOMAIN-1876214257-1906930536
default     68s         Normal    Requested           certificate/wild-YOUR_DOMAIN                                                  Created new CertificateRequest resource "wild-YOUR_DOMAIN-1876214257"
default     67s         Normal    Created             order/wild-YOUR_DOMAIN-1876214257-1906930536                                  Created Challenge resource "wild-YOUR_DOMAIN-1876214257-1906930536-3864605829" for domain "YOUR_DOMAIN"
default     67s         Normal    Created             order/wild-YOUR_DOMAIN-1876214257-1906930536                                  Created Challenge resource "wild-YOUR_DOMAIN-1876214257-1906930536-3362969436" for domain "YOUR_DOMAIN"
default     66s         Normal    Started             challenge/wild-YOUR_DOMAIN-1876214257-1906930536-3362969436                   Challenge scheduled for processing
After it’s done the challenges will be gone, and the order will become valid:
> k get challenges
No resources found in default namespace.
> k get orders
NAME                                     STATE     AGE
wild-YOUR_DOMAIN-1392782545-2299396756   valid     4d5h
If you are interested you can also dig up the original CertificateRequest:
> k get CertificateRequests
NAME                          READY   AGE
wild-YOUR_DOMAIN-1392782545   True    4d5h
And at this point you will see the secret that you specified with the TLS certificate:
> k get secret wild-YOUR_DOMAIN -o json | jq .data
{
  "ca.crt": "",
  "tls.crt": "LS0t...",
  "tls.key": "LS0..."
}
Super Cool. BTW there is also a super nice guide that covers the steps really well here: Installing cert-manager on Kubenetes with CloudFlare DNS - Update.
Botkube
I decided to try out BotKube, from their documentation here is the architecture:
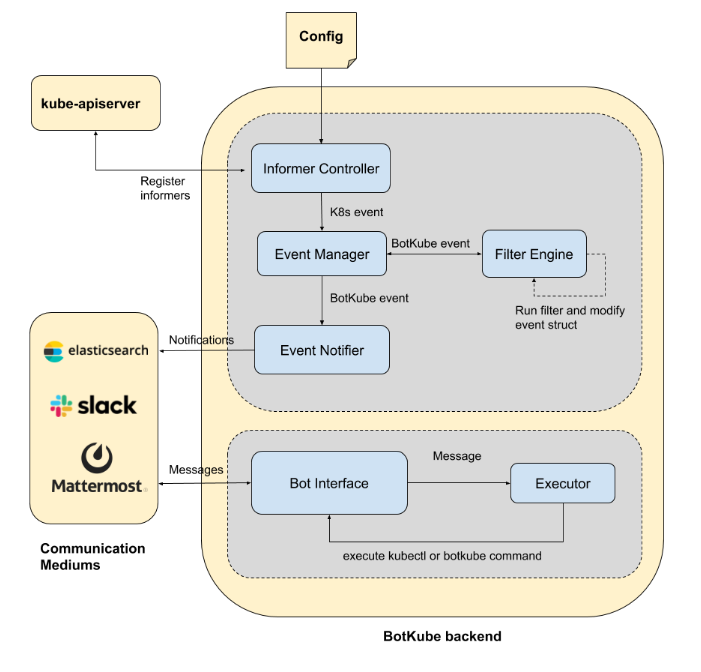
It’s pretty nifty, it basically monitors all the events from the kube-apiserver and is then able to send notifications based on the criteria that you define.
BotKube Install
The install process is covered in BotKube > Installation > Slack. First install the App in slack:

Then invite the @BotKube to your channel:

Then download the manifest file:
> wget -q https://raw.githubusercontent.com/infracloudio/botkube/v0.10.0/deploy-all-in-one.yaml
You can apply that to install for now:
> k apply -f deploy-all-in-one.yaml
Now let’s configure it
BotKube Configuration
First let’s configure our slack settings:
> cat secret.yaml
apiVersion: v1
kind: Secret
metadata:
  name: botkube-communication-secret
  namespace: botkube
  labels:
    app: botkube
type: Opaque
stringData:
  comm_config.yaml: |
    # Communication settings
    communications:
      # Settings for Slack
      slack:
        enabled: true
        channel: 'general'
        token: 'YOUR_TOKEN'
        notiftype: short
And also what to monitor:
> cat cm.yaml
# Configmap
apiVersion: v1
kind: ConfigMap
metadata:
  name: botkube-configmap
  namespace: botkube
  labels:
    app: botkube
data:
  resource_config.yaml: |
    ## Resources you want to watch
    resources:
      - name: secret
        namespaces:
          include:
            - default
        events:
          - all
      - name: deployment
        namespaces:
          include:
            - all
        events:
          - create
          - update
          - delete
          - error
        updateSetting:
          includeDiff: true
          fields:
            - spec.template.spec.containers[*].image
            - status.availableReplicas
    recommendations: true

    # Setting to support multiple clusters
    settings:
      clustername: k8s
      allowkubectl: true
      restrictAccess: false
      #kubectl:
      #  enabled: true
      #  defaultNamespace: default
      #  restrictAccess: false
      configwatcher: true
      upgradeNotifier: true
I decided to keep an eye on the deployments as well, but for the next section we only need to monitor secrets. After you apply both:
k apply -f secret.yaml cm.yaml
You should see the pod running:
> k -n botkube get po
NAME                       READY   STATUS    RESTARTS   AGE
botkube-655f987c58-wwkn7   1/1     Running   1          17m
Using BotKube
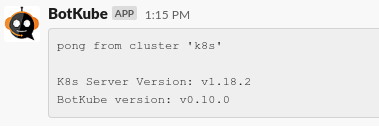
After the install and configurations are finished, you will be able to get the status of the Bot in slack:
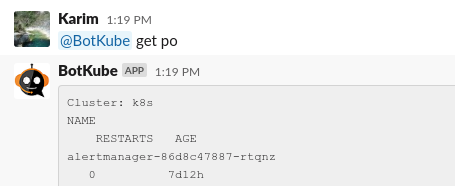
If you enabled the kubectl options you can also run kubectl commands:
If you update the configmap, you will also see the following notification:
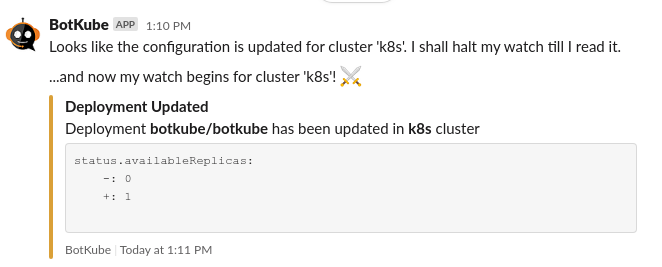
And this will confirm the deployment section is working.
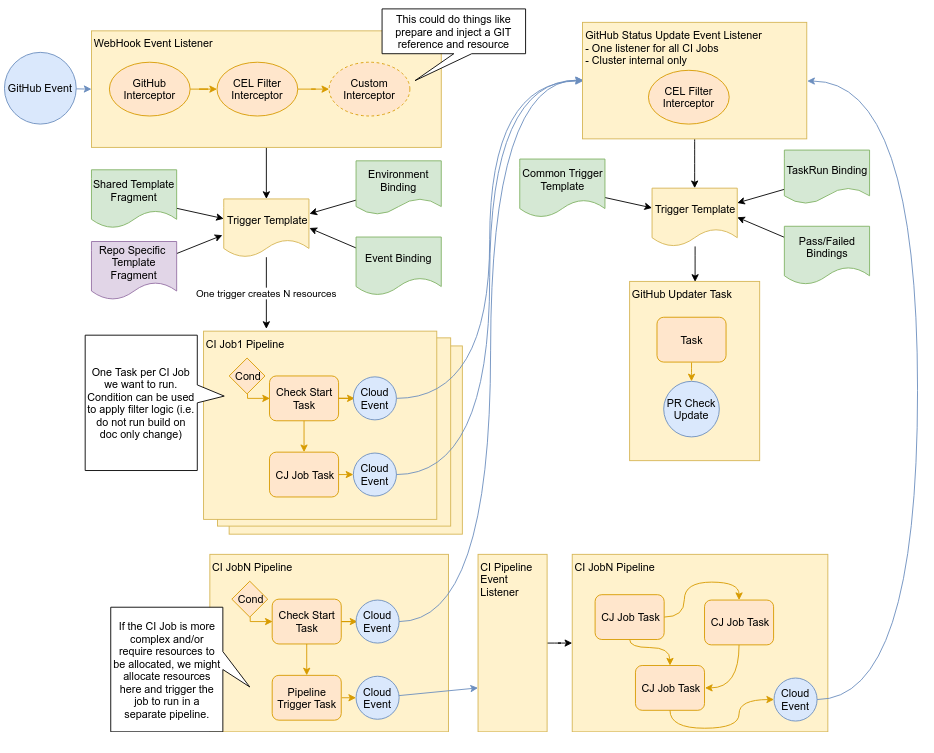
Tekton
Let’s break this down into a couple of sections. As I kept playing around with tekton I ran into this pretty awesome flow diagram from their documentation (CI with Tekton), it kind helped me put all the pieces together:
Here is the directory structure that I had:
> tree
.
├── pipeline
│   ├── cert-pipeline.yaml
│   └── condition.yaml
├── tasks
│   ├── cert-task.yaml
│   └── slack-secret.yaml
└── trigger
    ├── eventlistener.yaml
    ├── secret-test.yaml
    ├── triggerbinding.yaml
    └── triggertemplate.yaml
Let’s get into these one by one.
Event Listener
First let’s create an event listener, to which botkube can post to:
> cat eventlistener.yaml
---
apiVersion: triggers.tekton.dev/v1alpha1
kind: EventListener
metadata:
  name: bot-listener
spec:
  triggers:
    - name: bot-trigger
      interceptors:
        - cel:
            filter: "body.meta.kind == 'Secret'"
            overlays:
            - key: extensions.secret_name
              expression: "body.meta.name"
      bindings:
        - name: bot-pipeline-binding
      template:
        name: bot-pipeline-template
I did end up using a CEL Interceptor since I wanted to ignore the deployment updates. We will see the full body of the message from botkube to find out how to generate the filter. Next here is the triggerbinding:
> cat triggerbinding.yaml
apiVersion: triggers.tekton.dev/v1alpha1
kind: TriggerBinding
metadata:
  name: bot-pipeline-binding
spec:
  params:
  - name: body
    value: $(body)
  - name: secret_name
    value: $(body.extensions.secret_name)
And lastly here is the triggertemplate:
> cat triggertemplate.yaml
apiVersion: triggers.tekton.dev/v1alpha1
kind: TriggerTemplate
metadata:
  name: botkube-pipeline-template
spec:
  params:
  - name: body
    description: "Body of BotKube Post (For testing)"
    default: "Test body"
  - name: secret_name
    description: "Secret Name Changed"
    default: "Me"
  resourcetemplates:
  - apiVersion: tekton.dev/v1beta1
    kind: PipelineRun
    metadata:
      generateName: cert-pr-
    spec:
      pipelineRef:
        name: cert-pipeline
      params:
        - name: secret_name
          value: $(params.secret_name)
      workspaces:
      - name: shared-workspace
        emptyDir: {}
This will kick off the cert-pipeline with a pipelinerun.
Tekton Task
Here is task I created:
> cat tasks/cert-task.yaml
apiVersion: tekton.dev/v1beta1
kind: Task
metadata:
  name: cert-task
spec:
  workspaces:
    - name: shared
      description: shared workspace
  params:
  - name: secret_name
    description: "secret name of the tls cert"
    type: string
  steps:
  - name: get-pem-files
    image: gcr.io/cloud-builders/kubectl
    script: |
      #!/bin/bash
      SECRET_NAME="$(params.secret_name)"
      KUBECTL="/builder/google-cloud-sdk/bin/kubectl"
      SHARED_DIR="$(workspaces.shared.path)"
      CERT_BASE="${SHARED_DIR}/${SECRET_NAME}"
      CERT_FILE="${CERT_BASE}.crt"
      KEY_FILE="${CERT_BASE}.key"
      BASE64="/usr/bin/base64"
      echo "Getting Certs from Secrets"
      # run command
      ${KUBECTL} get secret -n default ${SECRET_NAME} -o jsonpath="{.data['tls\.crt']}" | ${BASE64} -d > ${CERT_FILE}
      ${KUBECTL} get secret -n default ${SECRET_NAME} -o jsonpath="{.data['tls\.key']}" | ${BASE64} -d > ${KEY_FILE}

  - name: send-mesg
    image: ellerbrock/alpine-bash-curl-ssl
    script: |
      #!/bin/bash
      SECRET_NAME="$(params.secret_name)"
      SHARED_DIR="$(workspaces.shared.path)"
      CERT_BASE="${SHARED_DIR}/${SECRET_NAME}"
      CERT_FILE="${CERT_BASE}.crt"
      KEY_FILE="${CERT_BASE}.key"
      SUBJECT="Let's Encrypt Cert Updated"
      SLACK_MSG="${SHARED_DIR}/msg"
      CURL="/usr/bin/curl"
      OPENSSL="/usr/bin/openssl"
      SED="/bin/sed"
      # Create new slack message
      # Add cert info to the message
      ${OPENSSL} x509 -in ${CERT_FILE} -noout -issuer > ${SLACK_MSG}
      ${OPENSSL} x509 -in ${CERT_FILE} -noout -subject >> ${SLACK_MSG}
      ${OPENSSL} x509 -in ${CERT_FILE} -noout -dates >> ${SLACK_MSG}
      # prepare the mesg for slack
      while IFS= read -r line; do
        body="$body$line\n"
      done < ${SLACK_MSG}
      escapedText=$(echo $body | ${SED} 's/"/\"/g' | ${SED} "s/'/\'/g")
      esSubject=$(echo $SUBJECT | ${SED} 's/"/\"/g' | ${SED} "s/'/\'/g")

      # create JSON payload
      json="{\"blocks\": [{\"type\": \"section\", \"text\": { \"type\": \"mrkdwn\", \"text\": \"*${esSubject}*\n$escapedText\"}}]}"

      # fire off slack message post
      ${CURL} -s -d "payload=$json" "${SLACK_URL}"

    env:
    - name: SLACK_URL
      valueFrom:
        secretKeyRef:
          name: webhook-secret
          key: url
I specified a workspace to keep track of where that data is shared between the steps. And, here the secret for the slack URL:
> cat slack-secret.yaml
kind: Secret
apiVersion: v1
metadata:
  name: webhook-secret
stringData:
  url: YOUR_SLACK_URL
Next we can define a condition for our pipeline, which makes sure we only start our pipeline, only if the cert secret changes:
> cat pipeline/condition.yaml
apiVersion: tekton.dev/v1alpha1
kind: Condition
metadata:
  name: check-cert-secret
spec:
  params:
    - name: secret_name
      type: string
    - name: domain_name
      type: string
  check:
    image: ubuntu
    script: |
      #!/bin/bash
      DOMAIN="$(params.domain_name)"
      SECRET_NAME="wild-${DOMAIN//\./-}"
      # troubleshooting
      if [[ $(params.secret_name) =~ ${SECRET_NAME} ]]; then
        echo "The $(params.secret_name) secret changed, proceeding"
        exit 0
      else
        echo "The $(params.secret_name) secret changed but we are waiting for ${SECRET_NAME} secret, quitting"
        exit 1
      fi
And finally here is the pipeline:
> cat pipeline/cert-pipeline.yaml
apiVersion: tekton.dev/v1beta1
kind: Pipeline
metadata:
  name: cert-pipeline
spec:
  workspaces:
    - name: shared-workspace
      description: shared space between tasks
  params:
    - name: secret_name
      description: "The Secret that changed"
    - name: domain_name
      description: "Domain Name we are monitoring"
      default: "test.domain"
  tasks:
    - name: print-cert-info
      conditions:
      - conditionRef: check-cert-secret
        params:
          - name: secret_name
            value: "$(params.secret_name)"
          - name: domain_name
            value: "$(params.domain_name)"
      taskRef:
        name: cert-task
      workspaces:
        - name: shared
          workspace: shared-workspace
      params:
        - name: secret_name
          value: "$(params.secret_name)"
You can probably store the domain in a secret but for my testing I left that out.
Test out the Pipeline
I created a test secret to test with, which just had a CA cert. Then I created the cert:
> k apply -f trigger/secret-test.yaml
Next let’s get the eventlistener:
> k get svc -l eventlistener=botkube-listener
NAME                  TYPE        CLUSTER-IP      EXTERNAL-IP   PORT(S)    AGE
el-botkube-listener   ClusterIP   10.96.158.176   <none>        8080/TCP   76m
Now let’s post a sample payload:
> curl -X POST -d '{"meta": {"kind": "Secret", "name": "wild-test-domain"}}' 10.96.158.176:8080
{"eventListener":"botkube-listener","namespace":"default","eventID":"hvcdf"}
If all is well, we should see the pipelinerun finish:
> tkn pr list
NAME                 STARTED         DURATION    STATUS
cert-pr-hktxd        1 minute ago    1 minute    Succeeded
> tkn pr logs cert-pr-hktxd
[print-cert-info : get-pem-files] Getting Certs from Secrets

[print-cert-info : send-mesg] ok
And if you check out the taskruns you should see those complete as well. There will be two, one for the task and one for the condition check:
> tkn tr list
NAME                                                              STARTED         DURATION    STATUS
cert-pr-hktxd-print-cert-info-z5j78                               2 minutes ago   1 minute    Succeeded
cert-pr-hktxd-print-cert-info-z5j78-check-cert-secret-0-djvzn     2 minutes ago   9 seconds   Succeeded
> tkn tr logs cert-pr-hktxd-print-cert-info-z5j78-check-cert-secret-0-djvzn
[condition-check-check-cert-secret] The wild-test-domain secret changed, proceeding
And if you check out your slack channel, you should see something like this:
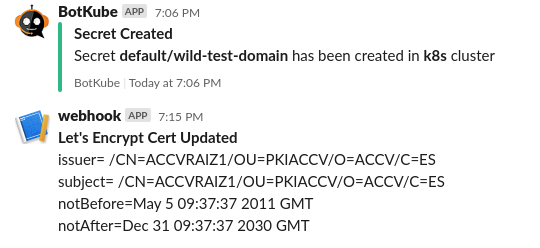
I am glad to see all the components come together. I just added the following section to the BotKube to enable it to send POSTs to the Tekton Event listener:
> cat secret.yaml
apiVersion: v1
kind: Secret
metadata:
  name: botkube-communication-secret
  namespace: botkube
  labels:
    app: botkube
type: Opaque
stringData:
  comm_config.yaml: |
    # Communication settings
    communications:
      # Settings for Slack
      slack:
        enabled: true
        channel: 'general'
        token: 'YOUR_SLACK_TOKEN'
        notiftype: short
      # Settings for Webhook
      webhook:
        enabled: true
        url: 'http://el-botkube-listener.default.svc.cluster.local:8080'