velero with rook ceph CSI
After switching to rook-ceph I needed to update my velero configuration to make sure I can take backups of my PVCs. In the process I ended up learning a lot about the velero backup flow.
Velero Snapshot Data Movement
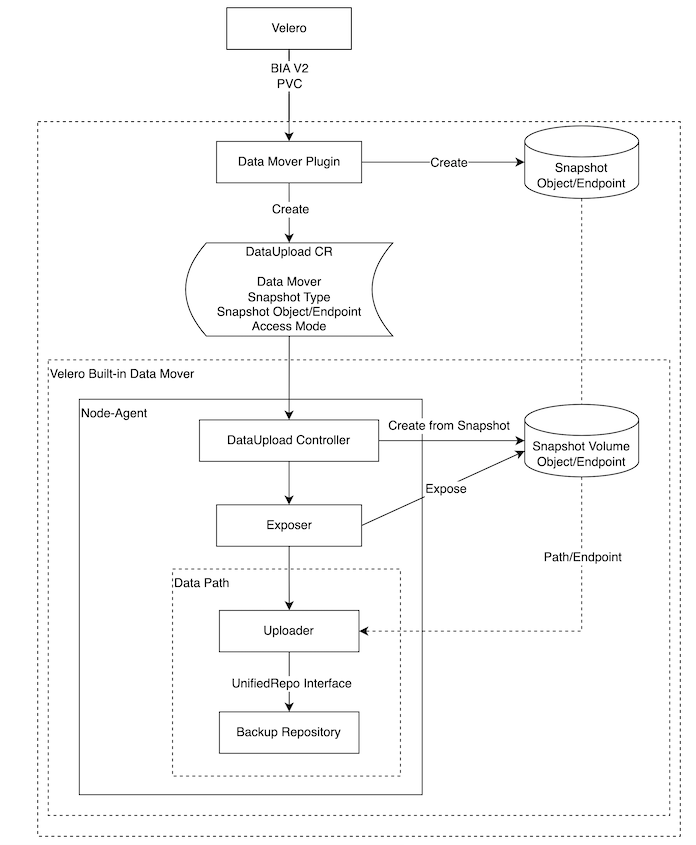
By default velero doesn’t backup data to a remote location (this is briefly discussed in this issue). It just creates a snapshot and if a backupStorageLocation is configured it will only copy the kubernetes resources (since kubernetes is mostly stateless). But in my setup I wanted to copy the PVC data as well. To my surprise there are actually a lot of parts involved in this type of backup. From design/volume-snapshot-data-movement/backup-workflow.png
And also from design/volume-snapshot-data-movement/backup-sequence.png:
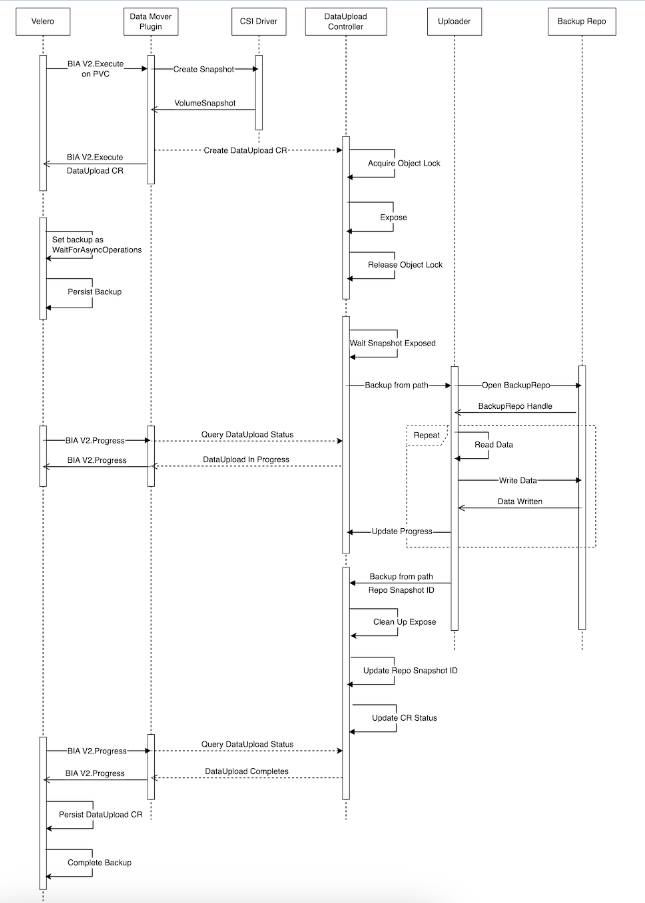
I also found this similar from An overview of Data Mover
I feel like the flow can be broken down into a couple of stages:
- Velero uses CSI to create a
VolumeSnapshot(this only exists for the duration of thebackup) - The
VolumeSnapshotcreates aVolumeSnapshotContentCR DataUploadCR is created to uploadVolumeSnapshotContentto a remote location (this is handled for theNodeAgentrunning on each node)
There is a similar description in CSI Snapshot Data Movement:
- When the backup starts, you will see the
VolumeSnapshotandVolumeSnapshotContentobjects created, but after the backup finishes, the objects will disappear.- After snapshots are created, you will see one or more
DataUploadCRs created.- You may also see some intermediate objects (i.e.,
pods,PVCs,PVs) created in Velero namespace or the cluster scope, they are to help data movers to move data. And they will be removed after the backup completes.- The phase of a
DataUploadCR changes several times during the backup process and finally goes to one of the terminal status,Completed,FailedorCancelled.
Enabling Snapshots on rook-ceph CSI
There is actually a separate controller that needs to be installed to handle this. From Snapshots:
Prerequisites
- Install the snapshot controller and snapshot v1 CRD.
- We also need a VolumeSnapshotClass for volume snapshot to work
To install the snapshot controller we can use a helm chart:
helm repo add piraeus-charts https://piraeus.io/helm-charts/
helm install snapshot-controller piraeus-charts/snapshot-controller
To install the VolumeSnapshotClass we can use the rook-ceph-cluster helm chart:
helm repo add rook-release https://charts.rook.io/release
helm install --create-namespace --namespace rook-ceph rook-ceph-cluster \
   --set operatorNamespace=rook-ceph rook-release/rook-ceph-cluster -f values.yaml
Make sure in the values.yaml you have the following section:
cephBlockPoolsVolumeSnapshotClass:
  enabled: true
  name: ceph-block
  isDefault: false
  deletionPolicy: Delete
  annotations: {}
  labels:
    velero.io/csi-volumesnapshot-class: "true"
  parameters: {}
the label velero.io/csi-volumesnapshot-class: "true" is important and is covered in Container Storage Interface Snapshot Support in Velero:
- The Velero CSI plugins, to backup CSI backed PVCs, will choose the
VolumeSnapshotClassin the cluster based on the following logic:
- Default Behavior: You can simply create a
VolumeSnapshotClassfor a particular driver and put a label on it to indicate that it is the defaultVolumeSnapshotClassfor that driver. Note: For each driver type, there should only be 1 VolumeSnapshotClass with the labelvelero.io/csi-volumesnapshot-class: "true".
Configuring Velero for CSI Snapshot Data Movement
From CSI Snapshot Data Movement. Here are the steps:
- Install Velero Node Agent
- Configure A Backup Storage Location
- Install Velero with CSI support on source cluster
- Perform the back up
I was using the velero helm chart, to perform the first 3 steps create the following values.yaml file (review Velero and OpenEBS for the backupStorageLocation setup):
initContainers:
  - name: velero-plugin-for-gcp
    image: velero/velero-plugin-for-gcp:v1.9.0
    imagePullPolicy: IfNotPresent
    volumeMounts:
      - mountPath: /target
        name: plugins
deployNodeAgent: true

configuration:
  features: EnableCSI
  defaultSnapshotMoveData: true
  backupStorageLocation:
    - name: default
      provider: gcp
      bucket: backups
      prefix: velero
  volumeSnapshotLocation:
    - name: default
      provider: csi
      config: {}
And then install it:
helm repo add vmware-tanzu https://vmware-tanzu.github.io/helm-charts
helm install vmware-tanzu/velero --namespace velero -f values.yaml
That will deploy all the necessary containers:
> k get po -n velero
NAME                                                           READY   STATUS      RESTARTS      AGE
node-agent-77npb                                               1/1     Running     1 (10h ago)   17h
node-agent-gv7rn                                               1/1     Running     1 (10h ago)   17h
node-agent-r8vrm                                               1/1     Running     1 (10h ago)   17h
velero-65d6b867d6-qkpnj                                        1/1     Running     1 (10h ago)   17h
Then to perform the backup, we can run the following:
velero backup create postges-backup -l app.kubernetes.io/name=postgresql --snapshot-move-data
If all is well, the backup should complete:
> velero backup get
NAME               STATUS      ERRORS   WARNINGS   CREATED                         EXPIRES   STORAGE LOCATION   SELECTOR
postges-backup     Completed   0        1          2024-07-13 08:33:18 -0600 MDT   12d       default            app=postgres
postges-backup-2   Completed   0        0          2024-07-30 20:56:40 -0600 MDT   29d       default            app.kubernetes.io/name=postgresql
And you will also see a dataupload CR:
> k get dataupload -n velero
NAME                     STATUS      STARTED   BYTES DONE   TOTAL BYTES   STORAGE LOCATION   AGE   NODE
postges-backup-2-l2qnx   Completed   20m       85824963     85824963      default            20m   ma
Checking the contents of the Backup Storage Location
By default velero uses kopia as the file system data mover. From Unified Repository & Kopia Integration Design:
velero basically initializes a repository and then uploads or downloads data to/from it. After performing the backup, we can actually use the kopia binary to check out the contents of the backups. By default kopia encrypts all the data so we let’s get the password used for that:
k get secret -n velero velero-repo-credentials -o jsonpath={.data.epository-password} | base64 -d
Then we can connect to the repository:
> kopia repository connect gcs --bucket my-backups --credentials-file ~/credentials-velero --prefix velero/kopia/default/
Enter password to open repository:

Connected to repository.

NOTICE: Kopia will check for updates on GitHub every 7 days, starting 24 hours after first use.
To disable this behavior, set environment variable KOPIA_CHECK_FOR_UPDATES=false
I needed the trailing / at the end, else it failed to connect and it looks like someone ran into a similar issue. After that you can list the snapshots:
> kopia snapshot ls --all
default@default:snapshot-data-upload-download/kopia/default/data-postgres-0
  2024-08-05 12:22:40 MDT k9b864e38c1cb8c560031c6cd958237fa 119.1 MB dgrwxrwxr-x files:2501 dirs:29 (latest-1,hourly-1,daily-1,weekly-1,monthly-1,annual-1) pins:velero-pin
You can show that content:
> kopia content show k9b864e38c1cb8c560031c6cd958237fa
{"stream":"kopia:directory","entries":[{"name":"data","type":"d","mode":"020000700","mtime":"2024-08-04T03:15:36.712Z","uid":1001,"gid":1001,"obj":"k3a1a83095384b41b4e04b6b3337c7c3a","summ":{"size":119092763,"files":2501,"symlinks":0,"dirs":27,"maxTime":"2024-08-05T18:22:00.724Z","numFailed":0}},{"name":"lost+found","type":"d","mode":"020000770","mtime":"2024-07-31T00:56:44Z","gid":1001,"obj":"kdf4f572c7fdfceb36619d7ef1c8ecf29","summ":{"size":0,"files":0,"symlinks":0,"dirs":1,"maxTime":"2024-07-31T00:56:44Z","numFailed":0}}],"summary":{"size":119092763,"files":2501,"symlinks":0,"dirs":29,"maxTime":"2024-08-05T18:22:00.724Z","numFailed":0}}
We can see in this instances it’s directory, we can mount that directory locally:
> kopia mount k9b864e38c1cb8c560031c6cd958237fa /tmp/b
Mounted 'k9b864e38c1cb8c560031c6cd958237fa' on /tmp/b
Press Ctrl-C to unmount.
And from another shell you can confirm the files:
> ls /tmp/b/data
base           pg_multixact  pg_stat_tmp  pg_xact
global         pg_notify     pg_subtrans  postgresql.auto.conf
pg_commit_ts   pg_replslot   pg_tblspc    postmaster.opts
pg_dynshmem    pg_serial     pg_twophase  postmaster.pid
pg_ident.conf  pg_snapshots  PG_VERSION
pg_logical     pg_stat       pg_wal
You can also do a full restore:
> kopia restore k9b864e38c1cb8c560031c6cd958237fa /tmp/b
Restoring to local filesystem (/tmp/b) with parallelism=8...
Processed 65 (629.8 KB) of 2529 (119.1 MB) 603.7 KB/s (0.5%) remaining 3m15s.
Processed 112 (68.1 MB) of 2529 (119.1 MB) 31.7 MB/s (57.2%) remaining 0s.
Processed 140 (68.7 MB) of 2529 (119.1 MB) 21.1 MB/s (57.7%) remaining 1s.
Processed 187 (69.8 MB) of 2529 (119.1 MB) 16.4 MB/s (58.6%) remaining 2s.
Processed 206 (70.2 MB) of 2529 (119.1 MB) 13.3 MB/s (58.9%) remaining 2s.
Processed 253 (71 MB) of 2529 (119.1 MB) 11.1 MB/s (59.6%) remaining 3s.
...
Processed 2515 (118.7 MB) of 2529 (119.1 MB) 2.6 MB/s (99.7%) remaining 0s.
Processed 2530 (119.1 MB) of 2529 (119.1 MB) 2.6 MB/s (100.0%) remaining 0s.
Restored 2501 files, 29 directories and 0 symbolic links (119.1 MB).
And you should see the same contents:
> ls /tmp/b/data
base           pg_multixact  pg_stat_tmp  pg_xact
global         pg_notify     pg_subtrans  postgresql.auto.conf
pg_commit_ts   pg_replslot   pg_tblspc    postmaster.opts
pg_dynshmem    pg_serial     pg_twophase  postmaster.pid
pg_ident.conf  pg_snapshots  PG_VERSION
pg_logical     pg_stat       pg_wal