Create a Base OpenSUSE Image for Vagrant
There are a bunch of examples on the process. Here are a few sites:
- Creating A Base Box
- How to Create a CentOS Vagrant Base Box
- Creating a Custom Vagrant Box
- Building a Vagrant Box from Start to Finish
First of all let’s define what a box is in Vagrant terminology, from Vagrant Docs: Boxes:
Instead of building a virtual machine from scratch, which would be a slow and tedious process, Vagrant uses a base image to quickly clone a virtual machine. These base images are known as boxes in Vagrant, and specifying the box to use for your Vagrant environment is always the first step after creating a new Vagrantfile.
So let’s create a base image / box of an OpenSuse VM. So let’s download the OpenSuse ISO:
elatov@kmac:~$ls -lh  download/openSUSE-13.1-DVD-i586.iso
-rw-r--r--  1 elatov  staff   4.1G Jun  6 11:37 download/openSUSE-13.1-DVD-i586.iso
Create a Template VM in VirtualBox
Now let’s create a VM in VirtualBox. Here is the command sequence for that.
-
Create a VM:
elatov@kmac:~$VBoxManage createvm --name vagrant-opensuse13-32bit --ostype OpenSUSE --register Virtual machine 'vagrant-opensuse13-32bit' is created and registered. UUID: e6e1c3fe-1321-4c2e-b17a-f81c31b345ea Settings file: '/Users/elatov/.virt/vagrant-opensuse13-32bit/vagrant-opensuse13-32bit.vbox' -
Assign 1GB of RAM to the VM
elatov@kmac:~$VBoxManage modifyvm vagrant-opensuse13-32bit --memory 1024 -
Assign a Nic to the VM and set the network type to NAT
elatov@kmac:~$VBoxManage modifyvm vagrant-opensuse13-32bit --nic1 nat -
Create a NAT rule from host machine 2223 to VM port 22
elatov@kmac:~$VBoxManage modifyvm vagrant-opensuse13-32bit --natpf1 "guestssh,tcp,,2223,,22" -
Create the Hard Drive and attach it to the VM
elatov@kmac:~$VBoxManage createhd --filename .virt/vagrant-opensuse13-32bit/vagrant-opensuse13-32bit.vdi --size 15000 --format VDI 0%...10%...20%...30%...40%...50%...60%...70%...80%...90%...100% Disk image created. UUID: afe7c8c7-a679-45c0-afbb-8e72e1472faa elatov@kmac:~$VBoxManage storagectl vagrant-opensuse13-32bit --name "SATA Controller" --add sata --controller IntelAhci elatov@kmac:~$VBoxManage storageattach vagrant-opensuse13-32bit --storagectl "SATA Controller" --port 0 --device 0 --type hdd --medium .virt/vagrant-opensuse13-32bit/vagrant-opensuse13-32bit.vdi -
Create an IDE port and attach an ISO to it
elatov@kmac:~$VBoxManage storagectl vagrant-opensuse13-32bit --name "IDE Controller" --add ide --controller PIIX4 elatov@kmac:~$VBoxManage storageattach vagrant-opensuse13-32bit --storagectl "IDE Controller" --port 1 --device 0 --type dvddrive --medium download/openSUSE-13.1-DVD-i586.iso -
Confirm all the settings
elatov@kmac:~$VBoxManage showvminfo vagrant-opensuse13-32bit Name: vagrant-opensuse13-32bit Groups: / Guest OS: openSUSE (32 bit) UUID: e6e1c3fe-1321-4c2e-b17a-f81c31b345ea Config file: /Users/elatov/.virt/vagrant-opensuse13-32bit/vagrant-opensuse13-32bit.vbox Snapshot folder: /Users/elatov/.virt/vagrant-opensuse13-32bit/Snapshots Log folder: /Users/elatov/.virt/vagrant-opensuse13-32bit/Logs Hardware UUID: e6e1c3fe-1321-4c2e-b17a-f81c31b345ea Memory size: 1024MB Page Fusion: off VRAM size: 8MB CPU exec cap: 100% HPET: off Chipset: piix3 Firmware: BIOS Number of CPUs: 1 PAE: on Long Mode: off Synthetic CPU: off CPUID overrides: None Boot menu mode: message and menu Boot Device (1): Floppy Boot Device (2): DVD Boot Device (3): HardDisk Boot Device (4): Not Assigned ACPI: on IOAPIC: off Time offset: 0ms RTC: local time Hardw. virt.ext: on Nested Paging: on Large Pages: on VT-x VPID: on VT-x unr. exec.: on State: powered off (since 2014-06-10T23:04:03.387000000) Monitor count: 1 3D Acceleration: off 2D Video Acceleration: off Teleporter Enabled: off Teleporter Port: 0 Teleporter Address: Teleporter Password: Tracing Enabled: off Allow Tracing to Access VM: off Tracing Configuration: Autostart Enabled: off Autostart Delay: 0 Default Frontend: Storage Controller Name (0): SATA Controller Storage Controller Type (0): IntelAhci Storage Controller Instance Number (0): 0 Storage Controller Max Port Count (0): 30 Storage Controller Port Count (0): 30 Storage Controller Bootable (0): on Storage Controller Name (1): IDE Controller Storage Controller Type (1): PIIX4 Storage Controller Instance Number (1): 0 Storage Controller Max Port Count (1): 2 Storage Controller Port Count (1): 2 Storage Controller Bootable (1): on SATA Controller (0, 0): /Users/elatov/.virt/vagrant-opensuse13-32bit/vagrant-opensuse13-32bit.vdi (UUID: afe7c8c7-a679-45c0-afbb-8e72e1472faa) IDE Controller (1, 0): /Users/elatov/download/openSUSE-13.1-DVD-i586.iso (UUID: d1c5766b-c139-44cd-8267-160b35c06c5a) NIC 1: MAC: 080027FE0A3B, Attachment: NAT, Cable connected: on, Trace: off (file: none), Type: 82540EM, Reported speed: 0 Mbps, Boot priority: 0, Promisc Policy: deny, Bandwidth group: none NIC 1 Settings: MTU: 0, Socket (send: 64, receive: 64), TCP Window (send:64, receive: 64) NIC 1 Rule(0): name = guestssh, protocol = tcp, host ip = , host port = 2223, guest ip = , guest port = 22 NIC 2: disabled NIC 3: disabled NIC 4: disabled NIC 5: disabled NIC 6: disabled NIC 7: disabled NIC 8: disabled Pointing Device: PS/2 Mouse Keyboard Device: PS/2 Keyboard UART 1: disabled UART 2: disabled LPT 1: disabled LPT 2: disabled Audio: disabled Clipboard Mode: disabled Drag'n'drop Mode: disabled VRDE: disabled USB: disabled EHCI: disabled USB Device Filters: <none> Available remote USB devices: <none> Currently Attached USB Devices: <none> Bandwidth groups: <none> Shared folders: <none> VRDE Connection: not active Clients so far: 0 Video capturing: not active Capture screens: 0 Capture file: /Users/elatov/.virt/vagrant-opensuse13-32bit/vagrant-opensuse13-32bit.webm Capture dimensions: 1024x768 Capture rate: 512 kbps Capture FPS: 25 Guest: Configured memory balloon size: 0 MB -
Enable RDE for the VM, so we can connect to the VM using Remote Desktop (port 3389) and finish the install.
elatov@kmac:~$VBoxManage modifyvm vagrant-opensuse13-32bit --vrde on elatov@kmac:~$VBoxManage modifyvm vagrant-opensuse13-32bit --vram 128 -
Start the VM in headless mode:
elatov@kmac:~$VBoxHeadless --startvm vagrant-opensuse13-32bit Oracle VM VirtualBox Headless Interface 4.3.12 (C) 2008-2014 Oracle Corporation All rights reserved. VRDE server is listening on port 3389. -
Connect to the VM with your favorite RDP Client
elatov@kmac:~$open /Applications/Remote\ Desktop\ Connection.app- Note - you need to install the Oracle Extras Extension pack to be able to use RDP with a VM. If it’s too much hassle, just open the regular VirtualBox Application and do the install there. From Virtualbox downloads:
VirtualBox 4.3.12 Oracle VM VirtualBox Extension Pack All supported platforms Support for USB 2.0 devices, VirtualBox RDP and PXE boot for Intel cards.

-
Finish installing and configuring the VM from the Remote Desktop client, or the regular Non-headless Virtualbox application:
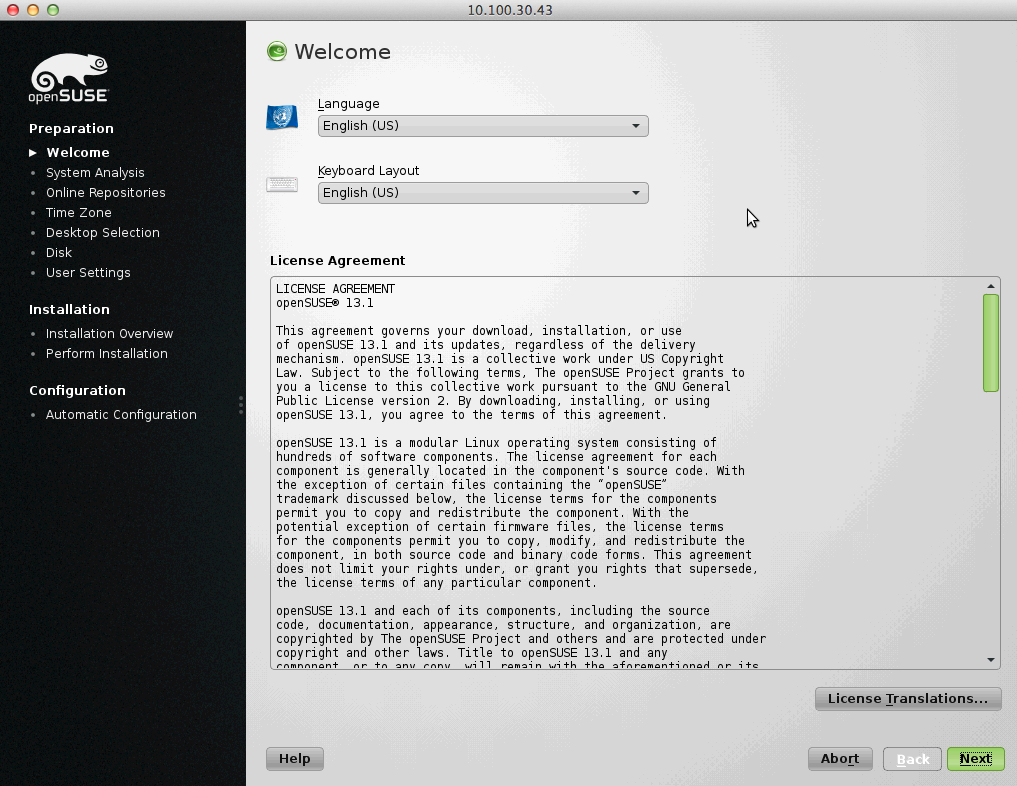
-
During the installation, create a vagrant user as an administrator user:
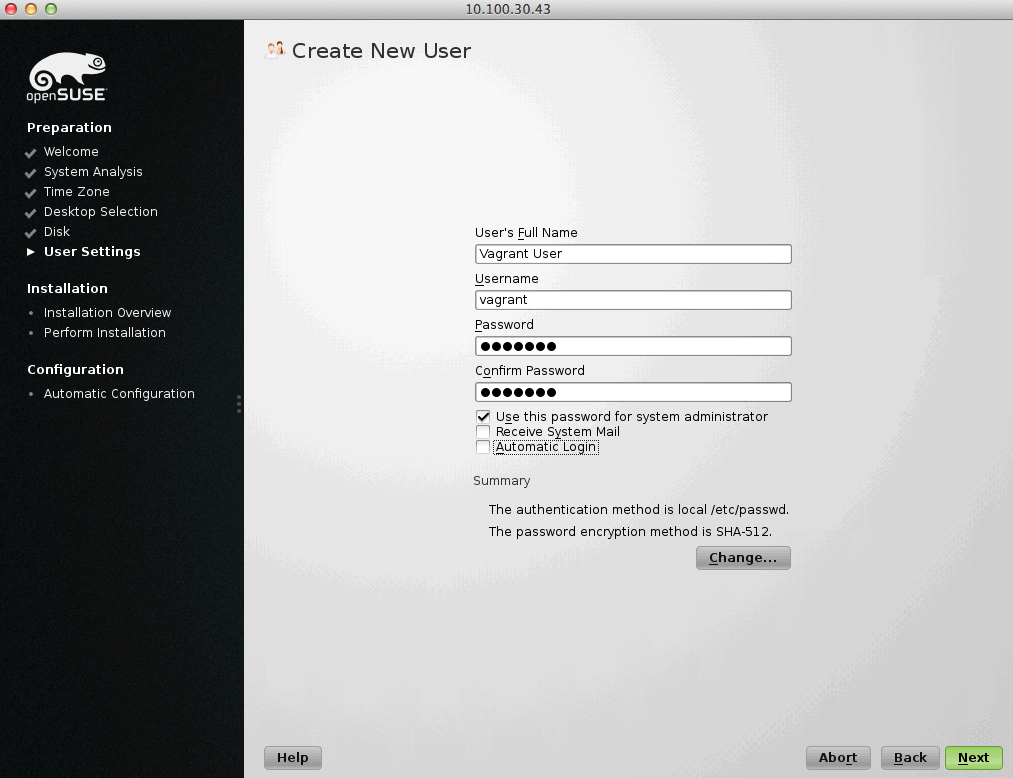
-
By default the firewall blocks port 22, so let’s go ahead and open that:
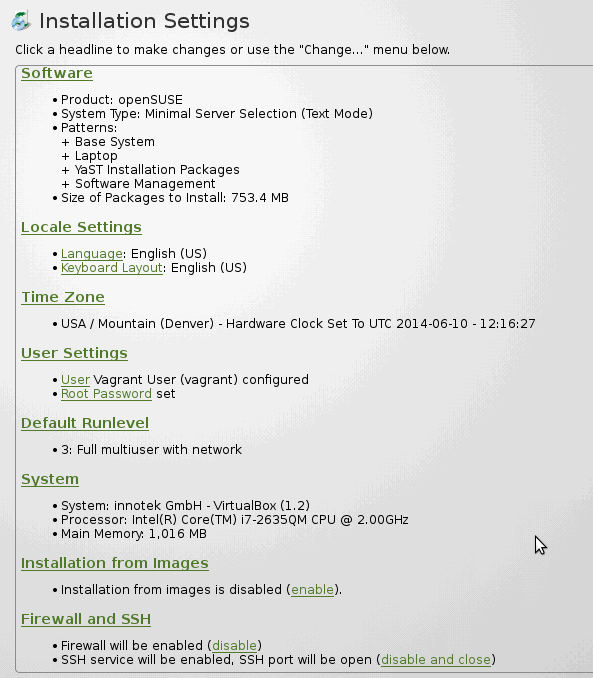
-
After the install is finished, it will automatically reboot and will again boot from the CD. This time around choose to boot from the Hard Drive:
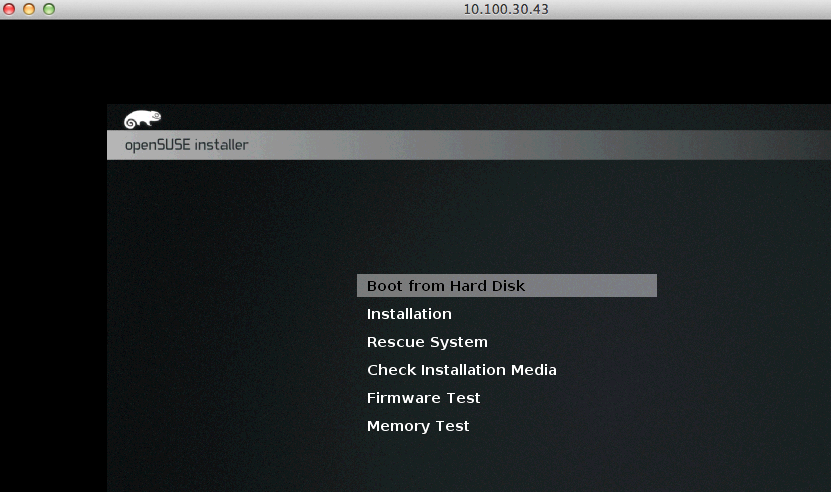
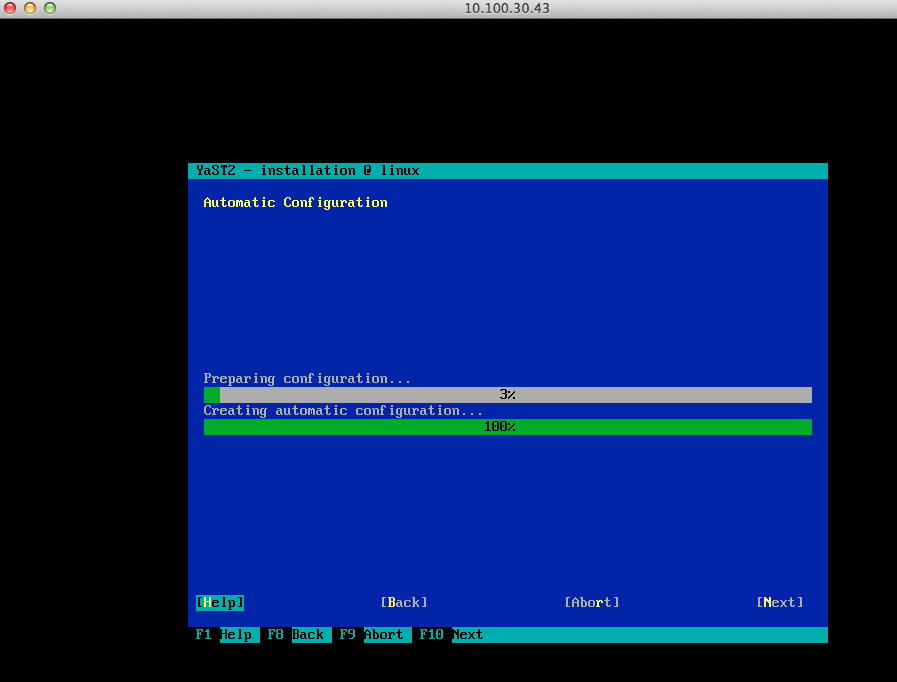
This time around it will use yast to install packages:
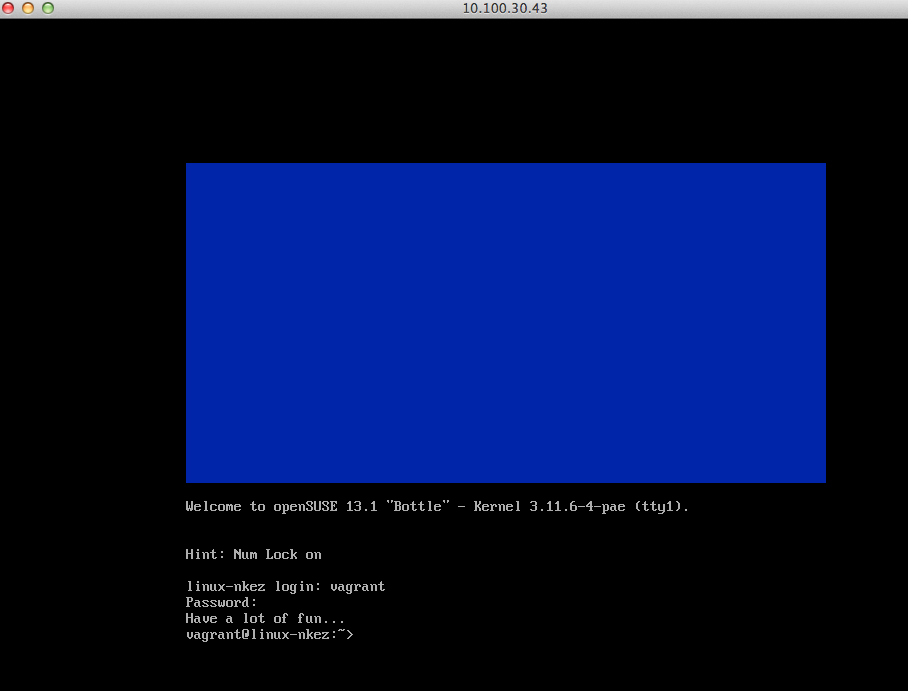
After that’s done you will be able to login into the system as the vagrant user:
At this point you can ssh to the VM like so:
elatov@kmac:~$ssh vagrant@127.0.0.1 -p 2223
The authenticity of host '[127.0.0.1]:2223 ([127.0.0.1]:2223)' can't be established.
ECDSA key fingerprint is ec:dc:c2:91:b8:4f:1d:18:a2:7b:63:a2:d2:a6:40:49.
Are you sure you want to continue connecting (yes/no)? yes
Warning: Permanently added '[127.0.0.1]:2223' (ECDSA) to the list of known hosts.
Password:
Last login: Tue Jun 10 12:24:28 2014
Have a lot of fun...
vagrant@linux-nkez:~>
Configure the Guest OS
There are a couple of things we need to do on the VM to prep it for Vagrant.
Add Directories with system binaries to Vagrant’s User Path
This will ease the pain of typing out the full path of the command. So let’s add /usr/sbin and /sbin to the vagrant’s user PATH. SSH into the template VM:
elatov@kmac:~$ssh vagrant@127.0.0.1 -p 2223
Password:
Last login: Tue Jun 10 12:45:42 2014 from 10.0.2.2
Have a lot of fun...
vagrant@linux-nkez:~>
And run the following to add those directories to the PATH:
vagrant@linux-nkez:~> echo "export PATH=/usr/sbin:/sbin:$PATH" >> .profile
vagrant@linux-nkez:~> . .profile
Configure sudo for the vagrant user
First we have to make sure the vagrant use can run sudo without a password. During the install I made the vagrant user an admin so he already had sudo privileges, just not passwordless. So let’s edit the /etc/sudoers file to allow passwordless sudo commands:
vagrant@linux-nkez:~> sudo /usr/sbin/visudo
And add the following into the file:
Defaults !requiretty
vagrant ALL=(ALL) NOPASSWD: ALL
Now let’s install the public SSH key used by vagrant:
vagrant@linux-nkez:~> mkdir .ssh
vagrant@linux-nkez:~> curl -k https://raw.githubusercontent.com/mitchellh/vagrant/master/keys/vagrant.pub > .ssh/authorized_keys
  % Total    % Received % Xferd  Average Speed   Time    Time     Time  Current
                                 Dload  Upload   Total   Spent    Left  Speed
100   409  100   409    0     0   1295      0 --:--:-- --:--:-- --:--:--  1298
vagrant@linux-nkez:~> chmod 0700 .ssh
vagrant@linux-nkez:~> chmod 0600 .ssh/authorized_keys
Now let’s try to login with ssh and run a sudo command
elatov@kmac:~$ssh vagrant@localhost -p 2223 -i .vagrant.d/insecure_private_key 'sudo date'
Tue Jun 10 13:20:19 MDT 2014
If you get any errors fix them as they come up and make sure it doesn’t prompt you for any passwords.
Update the OS
Next go ahead and update the system:
vagrant@linux-nkez:~> sudo zypper update
Loading repository data...
Reading installed packages...

The following NEW packages are going to be installed:
  kernel-default-3.11.10-11.1 kernel-pae-3.11.10-11.1 keyutils
  virtualbox-guest-kmp-default-4.2.18_k3.11.10_11-2.12.1

The following packages are going to be upgraded:
  aaa_base aaa_base-extras autofs bind-libs bind-utils ca-certificates
  ca-certificates-mozilla coreutils curl dbus-1 dbus-1-x11 file file-magic
  fontconfig gio-branding-openSUSE glib2-tools glibc glibc-extra glibc-locale
  gpg2 grub2 grub2-i386-efi grub2-i386-pc iputils kernel-firmware kpartx krb5
  less libblkid1 libcap-ng0 libcurl4 libdbus-1-3 libgio-2_0-0 libglib-2_0-0
  libgmodule-2_0-0 libgobject-2_0-0 libgudev-1_0-0 libmagic1 libmount1
  libopenssl1_0_0 libparted0 libpng16-16 libprocps1 libpython2_7-1_0
  libsolv-tools libstorage4 libstorage-ruby libtirpc1 libudev1 libupower-glib1
  libuuid1 libxml2-2 libyaml-0-2 libzypp logrotate lvm2 mdadm mozilla-nspr
  multipath-tools nfs-client nscd openssh openssl pam parted pm-utils procps
  python-base release-notes-openSUSE rpm rsync ruby20 sudo sysconfig
  sysconfig-netconfig sysconfig-network systemd
  systemd-presets-branding-openSUSE systemd-sysvinit tar udev udevmountd upower
  util-linux vim virtualbox-guest-tools yast2 yast2-add-on yast2-ldap-client
  yast2-network yast2-ruby-bindings yast2-storage yast2-trans-en_US
  yast2-ycp-ui-bindings zypper zypper-aptitude

96 packages to upgrade, 4 new.
Overall download size: 144.2 MiB. After the operation, additional 249.5 MiB
will be used.
Continue? [y/n/? shows all options] (y):
After that’s done go ahead and poweroff the VM:
vagrant@linux-nkez:~> sudo /sbin/poweroff
Connection to localhost closed by remote host.
Connection to localhost closed.
Install the Latest VirtualBox Guest Additions
Then install VirtualBox Guest Additions (this is necessary if you plan to share files between VMs using the shared folders mechanism from VirtualBox). First let’s unmount the ISO that we used to install OpenSUSE with:
elatov@kmac:~$VBoxManage modifyvm vagrant-opensuse13-32bit --dvd none
And now let’s connect the VBoxAdditions ISO:
elatov@kmac:~$VBoxManage modifyvm vagrant-opensuse13-32bit --dvd /Applications/VirtualBox.app/Contents/MacOS/VBoxGuestAdditions.iso
Then power the VM back up:
elatov@kmac:~$VBoxHeadless --startvm vagrant-opensuse13-32bit
Oracle VM VirtualBox Headless Interface 4.3.12
(C) 2008-2014 Oracle Corporation
All rights reserved.

VRDE server is listening on port 3389.
You will actually notice that by default the tools are installed:
vagrant@linux-nkez:~> rpm -qa | grep virtualbox
virtualbox-guest-kmp-default-4.2.18_k3.11.10_11-2.12.1.i586
virtualbox-guest-tools-4.2.18-2.12.1.i586
virtualbox-guest-kmp-default-4.2.18_k3.11.6_4-2.2.10.i586
But they are usually a version behind:
elatov@kmac:~$VBoxManage --version
4.3.12r93733
So the latest VirtualBox is 4.3.12, but the tools are 4.2.18. Not sure if that matters, but for experiment’s sake let’s install the latest version. First let’s remove the ones included with the OS:
vagrant@linux-nkez:~> sudo zypper rm virtualbox-guest-kmp-default virtualbox-guest-tools virtualbox-guest-x11
Loading repository data...
Reading installed packages...
Package 'virtualbox-guest-x11' is not installed.
'virtualbox-guest-x11' not found in package names. Trying capabilities.
No provider of 'virtualbox-guest-x11' is installed.
Resolving package dependencies...

The following 3 packages are going to be REMOVED:
  virtualbox-guest-kmp-default-4.2.18_k3.11.6_4-2.2.10
  virtualbox-guest-kmp-default-4.2.18_k3.11.10_11-2.12.1 virtualbox-guest-tools

3 packages to remove.
After the operation, 1.6 MiB will be freed.
Continue? [y/n/? shows all options] (y): y
Next let’s install the necessary packages to compile the latest virtualbox guest additions:
vagrant@linux-nkez:~> sudo zypper in kernel-devel gcc make
Loading repository data...
Reading installed packages...
Resolving package dependencies...

The following 14 NEW packages are going to be installed:
  binutils gcc gcc48 glibc-devel kernel-default-devel kernel-devel
  kernel-pae-devel libasan0 libatomic1 libgomp1 libitm1 linux-glibc-devel make
  site-config

14 new packages to install.
Overall download size: 26.4 MiB. After the operation, additional 105.0 MiB will
be used.
Continue? [y/n/? shows all options] (y):
Now for the actual install of the guest additions, let’s mount the ISO within the opensuse VM and do the install:
vagrant@linux-nkez:~> sudo mount /dev/dvd /media
mount: /dev/sr0 is write-protected, mounting read-only
vagrant@linux-nkez:~> sudo /media/VBoxLinuxAdditions.run
Verifying archive integrity... All good.
Uncompressing VirtualBox 4.3.12 Guest Additions for Linux............
VirtualBox Guest Additions installer
Copying additional installer modules ...
add_symlink: link file /usr/lib/VBoxGuestAdditions already exists
Installing additional modules ...
Removing existing VirtualBox non-DKMS kernel modules                 done
Building the VirtualBox Guest Additions kernel modules
Building the main Guest Additions module                             done
Building the shared folder support module                            done
Building the OpenGL support module                                   done
Doing non-kernel setup of the Guest Additions                        done
Starting the VirtualBox Guest Additions                              done
Installing the Window System drivers
Could not find the X.Org or XFree86 Window System, skipping.
Reboot and make sure the kernel modules are loaded after the reboot:
vagrant@linux-nkez:~> sudo /sbin/reboot
Connection to localhost closed.
elatov@kmac:~$ssh vagrant@localhost -p 2223 -i .vagrant.d/insecure_private_key
Last login: Tue Jun 10 13:37:07 2014 from 10.0.2.2
Have a lot of fun...
vagrant@linux-nkez:~> lsmod | grep guest
vboxguest             231664  2 vboxsf
vagrant@linux-nkez:~> sudo systemctl status vboxadd
vboxadd.service - LSB: VirtualBox Linux Additions kernel modules
   Loaded: loaded (/etc/init.d/vboxadd)
   Active: active (exited) since Tue 2014-06-10 13:46:23 MDT; 6h ago
  Process: 406 ExecStart=/etc/init.d/vboxadd start (code=exited, status=0/SUCCESS)

Jun 10 13:46:22 linux-nkez systemd[1]: Starting LSB: VirtualBox Linux Addit.....
Jun 10 13:46:23 linux-nkez vboxadd[406]: Starting the VirtualBox Guest Addit...e
Jun 10 13:46:23 linux-nkez systemd[1]: Started LSB: VirtualBox Linux Additi...s.
Hint: Some lines were ellipsized, use -l to show in full.
Everything looks good.
Clean up References to /dev/disk/by-id
One thing I noticed was that the VM was configured to look under /dev/disk/by-id/ata-VBOX_HARDDISK_* in /etc/fstab for the /boot partition. To get around that, I labled the filesystem and configured /etc/fstab to use the label instead of the devide path. Here is the entry from /etc/fstab:
/dev/disk/by-id/ata-VBOX_HARDDISK_VBafe7c8c7-aa2f47e1-part1 /boot ext4 acl,user_xattr 1 2
To create a label for the boot partition run the following:
vagrant@linux-nkez:~> sudo e2label /dev/sda1 boot
vagrant@linux-nkez:~> sudo e2label /dev/sda1
boot
Then modify /etc/fstab to use the label:
LABEL=boot /boot ext4 acl,user_xattr 1 2
Fix the “SMBus base address uninitialized” message
To get rid of the following message during boot:
[ 16.115174] piix4_smbus 0000:00:07.0: SMBus base address uninitialized - upgrade BIOS or use force_addr=0xaddr
Do the following, first blacklist the ic2_piix4 module, this is done by editing the /etc/modprobe.d/50-blacklist.conf file:
sudo vi /etc/modprobe.d/50-blacklist.conf
and adding the following to it:
blacklist i2c_piix4
Then rebuild the initrd image:
vagrant@linux-nkez:~> sudo /sbin/mkinitrd

Kernel image:   /boot/vmlinuz-3.11.10-11-default
Initrd image:   /boot/initrd-3.11.10-11-default
Root device:	/dev/system/root (mounted on / as ext4)
Resume device:	/dev/system/swap
Kernel Modules:	hwmon thermal_sys thermal processor fan dm-mod dm-log dm-region-hash dm-mirror dm-snapshot scsi_dh scsi_dh_alua scsi_dh_hp_sw scsi_dh_emc scsi_dh_rdac libata libahci ahci linear
Features:       acpi dm block lvm2
To be safe, you can also rebuild grub as well (mkinitrd already does this, but just in case):
vagrant@linux-nkez:~> sudo /usr/sbin/grub2-mkconfig -o /boot/grub2/grub.cfg
Generating grub.cfg ...
Found theme: /boot/grub2/themes/openSUSE/theme.txt
Found linux image: /boot/vmlinuz-3.11.10-11-pae
Found initrd image: /boot/initrd-3.11.10-11-pae
Found linux image: /boot/vmlinuz-3.11.10-11-default
Found initrd image: /boot/initrd-3.11.10-11-default
Found linux image: /boot/vmlinuz-3.11.6-4-pae
Found initrd image: /boot/initrd-3.11.6-4-pae
Found linux image: /boot/vmlinuz-3.11.6-4-default
Found initrd image: /boot/initrd-3.11.6-4-default
done
Zero out unused space
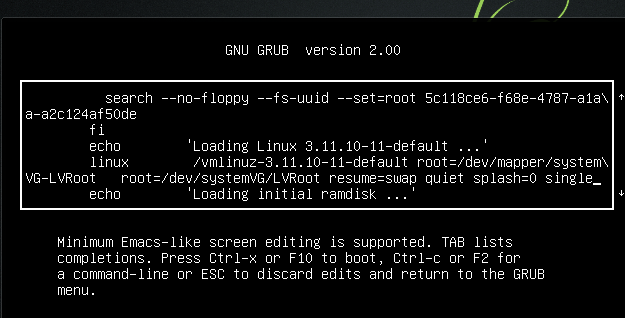
Another thing you can do is clean up all the space to make the box image smaller. Boot the VM into single user mode (append single to the linux line in grub):
Then install zerofree:
zypper install zerofree
remount / with read-only:
mount -o remount,ro /
then zero out the unused data:
zerofree -v /dev/mapper/system-root
If you don’t want to install zerofree, you can do something like this:
vagrant@linux-nkez:~> sudo dd if=/dev/zero of=/EMPTY bs=1M
dd: error writing ‘/EMPTY’: No space left on device
11358+0 records in
11357+0 records out
11909644288 bytes (12 GB) copied, 20.3938 s, 584 MB/s
vagrant@linux-nkez:~> sudo rm -f /EMPTY
vagrant@linux-nkez:~> sudo poweroff
Then compact the virtual disk:
elatov@kmac:~$VBoxManage modifyhd .virt/vagrant-opensuse13-32bit/vagrant-opensuse13-32bit.vdi --compact
0%...10%...20%...30%...40%...50%...60%...70%...80%...90%...100%
Then power off the VM. The above (zerofree) saved about 130MB:
elatov@kmac:~/vagrant-boxes$vagrant package --output vagrant-opensuse13-32bit-small.box --base vagrant-opensuse13-32bit
==> vagrant-opensuse13-32bit: Exporting VM...
==> vagrant-opensuse13-32bit: Compressing package to: /Users/elatov/vagrant-boxes/vagrant-opensuse13-32bit-small.box
elatov@kmac:~/vagrant-boxes$ls -lh
total 6459208
-rw-r--r--  1 elatov  staff   688M Jun 11 12:35 vagrant-opensuse13-32bit-small.box
-rw-r--r--  1 elatov  staff   823M Jun 11 10:54 vagrant-opensuse13-32bit.box
Here is the dd one (vagrant-opensuse13-32bit-small2.box):
elatov@kmac:~/vagrant-boxes$ls -lh
total 7887792
-rw-r--r--  1 elatov  staff   688M Jun 11 12:35 vagrant-opensuse13-32bit-small.box
-rw-r--r--  1 elatov  staff   698M Jun 11 12:50 vagrant-opensuse13-32bit-small2.box
-rw-r--r--  1 elatov  staff   823M Jun 11 10:54 vagrant-opensuse13-32bit.box
zerofree vs dd was about 10MB difference.
Create a Box from the VM template
To create a box/ base image from our template VM, we can do the following:
elatov@kmac:~$mkdir vagrant-boxes
elatov@kmac:~$cd vagrant-boxes/
elatov@kmac:~/vagrant-boxes$vagrant package --output vagrant-opensuse13_1-32bit.box --base vagrant-opensuse13-32bit
==> vagrant-opensuse13-32bit: Clearing any previously set forwarded ports...
==> vagrant-opensuse13-32bit: Exporting VM...
==> vagrant-opensuse13-32bit: Compressing package to: /Users/elatov/vagrant-boxes/vagrant-opensuse13_1-32bit.box
Now let’s add the box to our local vagrant inventory:
elatov@kmac:~$vagrant box add opensuse13-32 vagrant-boxes/vagrant-opensuse13_1-32bit.box
==> box: Adding box 'opensuse13-32' (v0) for provider:
    box: Downloading: file:///Users/elatov/vagrant-boxes/vagrant-opensuse13_1-32bit.box
==> box: Successfully added box 'opensuse13-32' (v0) for 'virtualbox'!
You can check the boxes that in your vagrant instance by running the following:
elatov@kmac:~$vagrant box list
hashicorp/precise32 (virtualbox, 1.0.0)
opensuse13-32       (virtualbox, 0)
Now let’s init a vm from that box:
elatov@kmac:~$mkdir new_vm
elatov@kmac:~$cd new_vm/
elatov@kmac:~/new_vm$vagrant init opensuse13-32
A `Vagrantfile` has been placed in this directory. You are now
ready to `vagrant up` your first virtual environment! Please read
the comments in the Vagrantfile as well as documentation on
`vagrantup.com` for more information on using Vagrant.
Lastly let’s power on the new VM:
elatov@kmac:~/new_vm$vagrant up
Bringing machine 'default' up with 'virtualbox' provider...
==> default: Importing base box 'opensuse13-32'...
==> default: Matching MAC address for NAT networking...
==> default: Setting the name of the VM: new_vm_default_1402452161178_31361
==> default: Fixed port collision for 22 => 2222. Now on port 2200.
==> default: Clearing any previously set network interfaces...
==> default: Preparing network interfaces based on configuration...
    default: Adapter 1: nat
==> default: Forwarding ports...
    default: 22 => 2200 (adapter 1)
==> default: Booting VM...
==> default: Waiting for machine to boot. This may take a few minutes...
    default: SSH address: 127.0.0.1:2200
    default: SSH username: vagrant
    default: SSH auth method: private key
    default: Warning: Connection timeout. Retrying...
    default: Warning: Connection timeout. Retrying...
    default: Warning: Connection timeout. Retrying...
==> default: Machine booted and ready!
==> default: Checking for guest additions in VM...
==> default: Mounting shared folders...
    default: /vagrant => /Users/elatov/new_vm
After the VM is up, you can ssh into it:
elatov@kmac:~/new_vm$vagrant ssh
Last login: Tue Jun 10 19:46:57 2014 from 10.0.2.2
Have a lot of fun...
vagrant@linux-nkez:~> ls /dev/disk/by-id/
ata-VBOX_CD-ROM_VB2-01700376
ata-VBOX_HARDDISK_VB46ac6aa5-c6b2e7b3
ata-VBOX_HARDDISK_VB46ac6aa5-c6b2e7b3-part1
ata-VBOX_HARDDISK_VB46ac6aa5-c6b2e7b3-part2
And you should also see the shared mount point from virtualbox there:
vagrant@linux-nkez:~> df -h -t vboxsf
Filesystem      Size  Used Avail Use% Mounted on
none            414G  202G  213G  49% /vagrant