Create a Test Wordpress Instance using Puppet and Vagrant
As I was playing around with Vagrant:
- Simple Vagrant Setup
- Create a Base OpenSUSE Image for Vagrant
- Upload Vagrant Box to the Vagrant Cloud
- OpenSUSE Base Box for Vagrant From SUSE Studio
- Multi VM Vagrant Setup
I realized I could also use Puppet to provision the VM. This was my chance to learn puppet, so I set a goal for my self to stand up a web server (with apache/php/wordpress) and a db server (with mysql and a wordpress db).
Puppet can get really advanced with classes and modules. Puppet provides a lot of modules from Puppet Forge, you can install them using puppet module install. Before I started using classes or modules, I wanted to do a manual setup of wordpress just to get familiar with puppet. Having said that, I am sure this is not the most efficient way of doing this.
Install puppet on the Vagrant Base Box
As I was using my minimal base image of openSUSE (that I created with SUSE Studio, process is described here), I realized I was missing some packages to use puppet. So I booted up the Base Image and installed the following:
linux-mjbf:~ # zypper install ca-certificates-mozilla puppet wget
I did end up using one puppet module, but it was just a small one:
linux-mjbf:~ # puppet module install puppetlabs-stdlib
After it’s installed you can confirm the module is there by running the following:
linux-mjbf:~ # puppet module list
/etc/puppet/modules
└── puppetlabs-stdlib (v4.2.2)
I also ended up opening ports 80 and 3306 on the base image:
linux-mjbf:~ # grep ^FW_SERVICES_EXT_TCP /etc/sysconfig/SuSEfirewall2
FW_SERVICES_EXT_TCP="22 80 3306"
After that, I packaged up a new box and uploaded it to the vagrant cloud (for more information on the upload, check out this post).
Prepare Web Puppet file
I was using my Mac to run vagrant and VirtualBox, so I installed puppet on there locally, just so I can parse the config prior to appying it. Instructions on the install are laid out in Installing Puppet: Mac OS X. We just have to install 3 packages, from the above page:
Puppet Labs’ OS X packages can be found here. You will need three packages total:
- The most recent Facter package (
facter-<VERSION>.dmg)- The most recent Hiera package (
hiera-<VERSION>.dmg)- The most recent Puppet package (
puppet-<VERSION>.dmg)
After that, you can install the stdlib module for the local user:
elatov@kmac:~$puppet module install puppetlabs-stdlib
elatov@kmac:~$puppet module list
/Users/elatov/.puppet/modules
└── puppetlabs-stdlib (v4.2.2)
After messing around with different puppet functionality, I ended up with the following manifest puppet file for the web server:
elatov@kmac:~/test2/manifests$cat web.pp
# Global setttings
Exec { path => [ "/bin/", "/sbin/" , "/usr/bin/", "/usr/sbin/" ] }

exec { "system-update":
	command => "zypper update -y",
	onlyif => "test $(facter uptime_seconds) -lt 300",
}

package { "wget":
	ensure  => present,
}

package { "apache2":
	ensure  => present,
	require => Exec["system-update"],
}

package { "apache2-mod_php5":
	ensure  => present,
	require => Exec["system-update"],
}

package { "php5-mysql":
	ensure  => latest,
	require => Exec["system-update"],
}

service { "apache2":
	ensure  => "running",
	enable => "true",
	require => Package["apache2"],
}

$install_dir = '/srv/www/htdocs/wp'

file { "${install_dir}":
	ensure  => directory,
	recurse => true,
}

file { "${install_dir}/wp-config-sample.php":
	ensure => present,
}

exec { 'Download wordpress':
	command => "wget http://wordpress.org/latest.tar.gz -O /tmp/wp.tar.gz",
	creates => "/tmp/wp.tar.gz",
	require => [ File["${install_dir}"], Package["wget"] ],
} ->
exec { 'Extract wordpress':
	command => "sudo tar zxvf /tmp/wp.tar.gz --strip-components=1 -C ${install_dir}",
	creates => "${install_dir}/index.php",
	require => Exec["Download wordpress"],
} ->
exec { "copy_def_config":
	command => "/usr/bin/cp ${install_dir}/wp-config-sample.php ${install_dir}/wp-config.php",
	creates => "${install_dir}/wp-config.php",
	require => File["${install_dir}/wp-config-sample.php"],
} ->
file_line { 'db_name_line':
  path  => "${install_dir}/wp-config.php",
  line  => "define('DB_NAME', 'wordpress_db');",
  match => "^define\\('DB_NAME*",
} ->
file_line { 'db_user_line':
  path  => "${install_dir}/wp-config.php",
  line  => "define('DB_USER', 'wordpress_user');",
  match => "^define\\('DB_USER*",
} ->
file_line { 'db_password_line':
  path  => "${install_dir}/wp-config.php",
  line  => "define('DB_PASSWORD', 'wordpress');",
  match => "^define\\('DB_PASSWORD*",
} ->
file_line { 'db_host_line':
  path  => "${install_dir}/wp-config.php",
  line  => "define('DB_HOST', '192.168.33.3');",
  match => "^define\\('DB_HOST*",
} ~>
exec { 'Change ownership':
	command     => "sudo chown -R wwwrun:www ${install_dir}",
	require => Exec["Extract wordpress"],
	refreshonly => true,
}

exec { "enable-php-module":
	command => "sudo a2enmod php5",
	unless => "grep php5 /etc/sysconfig/apache2",
	require => Package["apache2-mod_php5"],
	notify => Service["apache2"],
}
The documentation for puppet is really good and most of the above is pretty self explanatory. You will notice that I ended up using -> and ~>. Those are explained in Language: Relationships and Ordering. From that page:
You can create relationships between two resources or groups of resources using the
->and~>operators.
->(ordering arrow)Causes the resource on the left to be applied before the resource on the right. Written with a hyphen and a greater-than sign.
~>(notification arrow)Causes the resource on the left to be applied first, and sends a refresh event to the resource on the right if the left resource changes. Written with a tilde and a greater-than sign.
When I was downloading the wordpress source, I used those to make sure I have the file prior to extract it (and other steps as well). Another thing that you see is the file_line directive, this comes from the stdlib module and allows you to edit files. Lastly I also ended using the facter command. From the Facter page:
Facter is an independent, cross-platform Ruby library designed to gather information on all the nodes you will be managing with Puppet. It is available on all platforms that Puppet is available.
The command basically provides OS information. You can get a full list of available variables by just running the command:
vagrant@web:~> sudo facter
architecture => x86_64
blockdevice_sda_model => VBOX HARDDISK
blockdevice_sda_size => 17179869184
blockdevice_sda_vendor => ATA
blockdevice_sr0_model => CD-ROM
blockdevice_sr0_size => 1073741312
blockdevice_sr0_vendor => VBOX
blockdevices => sda,sr0
domain => vagrant
facterversion => 1.7.2
filesystems => btrfs,ext2,ext3,ext4,hfs,hfsplus,iso9660,jfs,minix,msdos,qnx4,reiserfs,ufs,vfat,xfs
fqdn => web.vagrant
hardwareisa => x86_64
hardwaremodel => x86_64
hostname => web
id => root
interfaces => eth0,eth1,lo
ipaddress => 10.0.2.15
ipaddress_eth0 => 10.0.2.15
ipaddress_eth1 => 192.168.33.2
ipaddress_lo => 127.0.0.1
is_virtual => true
kernel => Linux
kernelmajversion => 3.11
kernelrelease => 3.11.10-11-default
kernelversion => 3.11.10
macaddress => 08:00:27:DA:8A:8F
macaddress_eth0 => 08:00:27:DA:8A:8F
macaddress_eth1 => 08:00:27:CA:48:4D
memoryfree => 368.69 MB
memoryfree_mb => 368.69
memorysize => 491.17 MB
memorysize_mb => 491.17
memorytotal => 491.17 MB
mtu_eth0 => 1500
mtu_eth1 => 1500
mtu_lo => 65536
netmask => 255.255.255.0
netmask_eth0 => 255.255.255.0
netmask_eth1 => 255.255.255.0
netmask_lo => 255.0.0.0
network_eth0 => 10.0.2.0
network_eth1 => 192.168.33.0
network_lo => 127.0.0.0
operatingsystem => OpenSuSE
operatingsystemrelease => 13.1
osfamily => Suse
path => /usr/bin:/bin:/usr/sbin:/sbin
physicalprocessorcount => 1
processor0 => Intel(R) Core(TM) i7-2635QM CPU @ 2.00GHz
processorcount => 1
ps => ps -ef
puppetversion => 3.2.4
rubysitedir => /usr/lib64/ruby/site_ruby/2.0.0
rubyversion => 2.0.0
selinux => false
sshdsakey => AAAAB3Nza5imQDCcipbt0g=
sshecdsakey => AAAAE2VjZHNhLX1U31tGqnscTgKHE=
sshfp_dsa => SSHFP 2 1 0f301b1cafe3ef40a7858cf48
SSHFP 2 2 eabe780551e3cfbf0ecb3eb60b24ce17df4501335
sshfp_ecdsa => SSHFP 3 1 afd579d1ca89aa469df695b262
SSHFP 3 2 07bfb507b8c7ab3b5613223
sshfp_rsa => SSHFP 1 1 72a8ec4798f16b
SSHFP 1 2 d53856c7e6541f
sshrsakey => AAAAB
swapfree => 766.44 MB
swapfree_mb => 766.44
swapsize => 768.00 MB
swapsize_mb => 768.00
timezone => MDT
uniqueid => 007f0100
uptime => 0:21 hours
uptime_days => 0
uptime_hours => 0
uptime_seconds => 1310
virtual => virtualbox
So you can use this if you need to check some variable prior to running a command or make some OS dependent choice, when I was going through the puppet tutorial, this was the example they provided:
case $::operatingsystem {
  'CentOS': { $apache_pkg = 'httpd' }
  'Redhat': { $apache_pkg = 'httpd' }
  'Debian': { $apache_pkg = 'apache2' }
  'Ubuntu': { $apache_pkg = 'apache2' }
  default: { fail("Unrecognized operating system for webserver") }
}
file {'/root/case.txt':
  ensure  => present,
  content => "Apache package name: ${apache_pkg}\n"
}
Any facter result can be obtained by prepending it with $::. So the above checks what OS you have using the facter operatingsystem variable and then sets the appropriate name for a package. To test if the puppet file is okay, we run use the puppet parser command:
elatov@kmac:~/test2/manifests$puppet parser validate web.pp
elatov@kmac:~/test2/manifests$
If there were any errors in the puppet file, we would’ve seen them. After that, we can enable the puppet provisioner by uncommenting the following in the VagrantFile:
config.vm.provision "puppet" do |puppet|
     puppet.manifests_path = "manifests"
     puppet.manifest_file  = "web.pp"
end
Here was my complete VagrantFile:
elatov@kmac:~/test2$grep -vE '  #|^$' Vagrantfile.orig
# -*- mode: ruby -*-
# vi: set ft=ruby :
# Vagrantfile API/syntax version. Don't touch unless you know what you're doing!
VAGRANTFILE_API_VERSION = "2"
Vagrant.configure(VAGRANTFILE_API_VERSION) do |config|
  config.vm.box = "elatov/opensuse13-64"
  config.vm.network "forwarded_port", guest: 80, host: 8080
  config.vm.provision "puppet" do |puppet|
     puppet.manifests_path = "manifests"
     puppet.manifest_file  = "web.pp"
   end
end
Then inside the test2 directory (this was where I initiated my vagrant environment), I placed my manifest files:
elatov@kmac:~/test2$tree
.
├── Vagrantfile
└── manifests
    └── web.pp

1 directory, 4 files
Then doing a vagrant up, I saw the following:
elatov@kmac:~/test2$vagrant up
Bringing machine 'default' up with 'virtualbox' provider...
==> default: Importing base box 'elatov/opensuse13-64'...
==> default: Matching MAC address for NAT networking...
==> default: Checking if box 'elatov/opensuse13-64' is up to date...
==> default: Setting the name of the VM: test2_default_1403797312665_7634
==> default: Clearing any previously set network interfaces...
==> default: Preparing network interfaces based on configuration...
    default: Adapter 1: nat
==> default: Forwarding ports...
    default: 80 => 8080 (adapter 1)
    default: 22 => 2222 (adapter 1)
==> default: Running 'pre-boot' VM customizations...
==> default: Booting VM...
==> default: Waiting for machine to boot. This may take a few minutes...
    default: SSH address: 127.0.0.1:2222
    default: SSH username: vagrant
    default: SSH auth method: private key
    default: Warning: Connection timeout. Retrying...
==> default: Machine booted and ready!
==> default: Checking for guest additions in VM...
==> default: Setting hostname...
==> default: Configuring and enabling network interfaces...
==> default: Mounting shared folders...
    default: /vagrant => /Users/elatov/Documents
    default: /tmp/vagrant-puppet-2/manifests => /Users/elatov/test2/manifests
==> default: Running provisioner: puppet...
==> default: Running Puppet with web.pp...
==> default: Notice: /Stage[main]//File[/srv/www/htdocs/wp]/ensure: created
==> default: Notice: /Stage[main]//File[/srv/www/htdocs/wp/wp-config-sample.php]/ensure: created
==> default: Notice: /Stage[main]//Exec[Download wordpress]/returns: executed successfully
==> default: Notice: /Stage[main]//Exec[Extract wordpress]/returns: executed successfully
==> default: Notice: /Stage[main]//Exec[copy_def_config]/returns: executed successfully
==> default: Notice: /Stage[main]//File_line[db_name_line]/ensure: created
==> default: Notice: /Stage[main]//File_line[db_user_line]/ensure: created
==> default: Notice: /Stage[main]//File_line[db_password_line]/ensure: created
==> default: Notice: /Stage[main]//File_line[db_host_line]/ensure: created
==> default: Notice: /Stage[main]//Exec[Change ownership]: Triggered 'refresh' from 1 events
==> default: Notice: /Stage[main]//Exec[system-update]/returns: executed successfully
==> default: Notice: /Stage[main]//Package[php5-mysql]/ensure: created
==> default: Notice: /Stage[main]//Package[apache2-mod_php5]/ensure: created
==> default: Notice: /Stage[main]//Exec[enable-php-module]/returns: executed successfully
==> default: Notice: /Stage[main]//Service[apache2]/ensure: ensure changed 'stopped' to 'running'
==> default: Notice: Finished catalog run in 83.04 seconds
You can modify the puppet manifest file and re-run the provisioning like so:
elatov@kmac:~/test2$vagrant provision web
==> web: Running provisioner: puppet...
==> web: Running Puppet with web.pp...
==> web: Notice: /Stage[main]//File_line[db_name_line]/ensure: created
==> web: Notice: Finished catalog run in 3.18 seconds
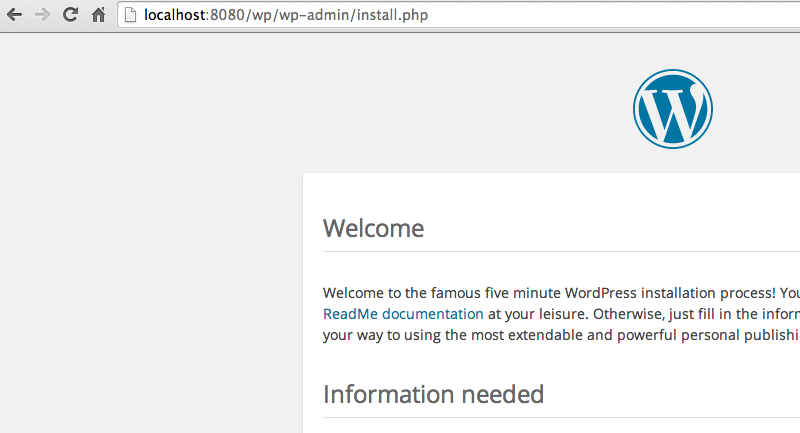
It will only apply the changes that are necessary (if you made necessary checks in your puppet manifest file). If you try to visit the wordpress instance (http://localhost:8080/wp), you will see the following:

And that’s expected since we haven’t done our DB server yet, but at least we know apache is up and is parsing PHP appropriately.
Create the DB Puppet manifest file
This one wasn’t as complicated, here are the contents of the file:
elatov@kmac:~/test2/manifests$cat db.pp
# Global setttings
Exec { path => [ "/bin/", "/sbin/" , "/usr/bin/", "/usr/sbin/" ] }

exec { "system-update":
	command => "zypper update -y",
	onlyif => "test $(facter uptime_seconds) -lt 300",
}

package { "mysql-community-server-client":
	ensure  => present,
}

package { "mysql-community-server":
        ensure  => present,
        require => Exec["system-update"],
}

service { "mysql":
	ensure  => "running",
	enable => "true",
	require => Package["mysql-community-server"],
}

$mysql_password = "testing"
$db_name = "wordpress_db"
$db_user = "wordpress_user"
$db_pass = "wordpress"
$db_access = "192.168.33.%"

exec { "set-mysql-password":
    unless => "mysqladmin -u root -p\"$mysql_password\" status",
    command => "mysqladmin -u root password \"$mysql_password\"",
    require => [ Package["mysql-community-server-client"], Service["mysql"] ]
}

exec { "create-wordpress-db":
      unless => "mysql -uroot -p$mysql_password ${db_name}",
      command => "mysql -uroot -p$mysql_password -e \"create database ${db_name}; grant all on ${db_name}.* to ${db_user}@'$db_access' identified by '$db_pass';\"",
      require => [ Package["mysql-community-server-client"], Service["mysql"], Exec["set-mysql-password"] ]
}
If you spin up a new vagrant instance, you will see the puppet provisioner do the following:
==> db: Mounting shared folders...
    db: /vagrant => /Users/elatov/Documents
    db: /tmp/vagrant-puppet-2/manifests => /Users/elatov/test2/manifests
==> db: Running provisioner: puppet...
==> db: Running Puppet with db.pp...
==> db: Notice: /Stage[main]//Package[mysql-community-server-client]/ensure: created
==> db: Notice: /Stage[main]//Exec[system-update]/returns: executed successfully
==> db: Notice: /Stage[main]//Package[mysql-community-server]/ensure: created
==> db: Notice: /Stage[main]//Service[mysql]/ensure: ensure changed 'stopped' to 'running'
==> db: Notice: /Stage[main]//Exec[set-mysql-password]/returns: executed successfully
==> db: Notice: /Stage[main]//Exec[create-wordpress-db]/returns: executed successfully
==> db: Notice: Finished catalog run in 101.79 seconds
Preparing a MultiVM VagrantFile
I had an example in this post, expanding on that example (I just added the puppet provisioner section), I ended up with this VagrantFile:
elatov@kmac:~/test2$cat Vagrantfile
# -*- mode: ruby -*-
# vi: set ft=ruby :
boxes = [
  { :name => :db,:pup => 'db',:ip => '192.168.33.3',:ssh_port => 2202,:cpus => 1,:mem => 512 },
  { :name => :web,:pup => 'web',:ip => '192.168.33.2',:ssh_port => 2201,:http_port => 8080,:cpus => 1, :mem => 512},
  ]

# Vagrantfile API/syntax version. Don't touch unless you know what you're doing!
VAGRANTFILE_API_VERSION = "2"

Vagrant.configure(VAGRANTFILE_API_VERSION) do |config|
    boxes.each do |opts|
        config.vm.define opts[:name] do |config|
    	    config.vm.box       = "elatov/opensuse13-64"
    	    config.vm.network  "private_network", ip: opts[:ip]
    	    config.vm.network  "forwarded_port", guest: 22, host: opts[:ssh_port]
    	    config.vm.network  "forwarded_port", guest: 80, host: opts[:http_port] if opts[:http_port]
    	    config.vm.hostname = "%s.vagrant" % opts[:name].to_s
    	    config.vm.synced_folder "~/stuff", "/vagrant"
	    config.vm.provider "virtualbox" do |vb|
  	    # Use VBoxManage to customize the VM. For example to change memory:
    	        vb.customize ["modifyvm", :id, "--cpus", opts[:cpus] ] if opts[:cpus]
    	        vb.customize ["modifyvm", :id, "--memory", opts[:mem] ] if opts[:mem]
	    end
	    config.vm.provision "puppet" do |puppet|
                puppet.manifests_path = "manifests"
                puppet.manifest_file  = "%s.pp" % opts[:pup].to_s
                #puppet.options = "--verbose --debug"
            end
       end
    end
end
This basically defines two vagrant boxes on top and then runs through a for loop creating each box and configuring each VM with the options defined above. If you do a vagrant up with that VagrantFile you will see both VMs getting created and provisioned approriately. You will also notice that there are two interfaces, the NAT is the default one which vagrant uses to access the VM, and the private one is used for the communication between the VMs (Apache/WP/PHP to talk to MySQL). After they are deployed, if you visit http://localhost:8080/wp, you will see the wordpress instance:
BTW if you don’t care for the for loop in the VagrantFile, here is a multi VM VagrantFile that manually defines all the VMs:
Vagrant::Config.run do |config|
  config.vm.define :lb do |lb_config|
      lb_config.vm.network("33.33.33.10")
      lb_config.vm.box  = "CentOS-5.7-x86_64"
      lb_config.vm.forward_port("nginx",80,8080)
      lb_config.ssh.timeout = 300
      lb_config.ssh.max_tries = 300
      lb_config.vm.provision  :puppet do  |puppet|
        puppet.manifests_path = "puppet/vagrant-manifests"
        puppet.manifest_file = "lb.pp"
        puppet.module_path  = "puppet/modules"
      end
  end
  config.vm.define :web do |web_config|
      web_config.vm.network("33.33.33.50")
      web_config.vm.box  = "CentOS-5.7-x86_64"
      web_config.vm.forward_port("apache",8081,8081)
      web_config.vm.forward_port("varnish",8082,8082)
      web_config.ssh.timeout = 300
      web_config.ssh.max_tries = 300
      web_config.vm.provision  :puppet do  |puppet|
        puppet.manifests_path = "puppet/vagrant-manifests"
        puppet.manifest_file = "web.pp"
        puppet.module_path  = "puppet/modules"
      end
  end
  config.vm.define :db do |db_config|
      db_config.vm.network("33.33.33.100")
      db_config.vm.box  = "CentOS-5.7-x86_64"
      db_config.ssh.timeout = 300
      db_config.ssh.max_tries = 300
      db_config.vm.provision  :puppet do  |puppet|
        puppet.manifests_path = "puppet/vagrant-manifests"
        puppet.manifest_file = "db.pp"
        puppet.module_path  = "puppet/modules"
      end
  end
end
This example was taken from vagrant-tutorial
Trying it out from scratch
If you want to try out the above, you just need to do 3 things:
-
Grab my Vagrant Box
$ vagrant box add elatov/opensuse13-64 -
Grab my VagrantFile and Puppet manifest files
$ git clone https://github.com/elatov/vagrant.git -
Instantiate the Vagrant Environment
$ cd vagrant; vagrant up
That’s it, go to http://localhost:8080/wp and you can configure your brand new wordpress instance.
When you are done with the setup, you can just run the following to remove it:
elatov@kmac:~/test2$vagrant destroy
    web: Are you sure you want to destroy the 'web' VM? [y/N] y
==> web: Forcing shutdown of VM...
==> web: Destroying VM and associated drives...
==> web: Running cleanup tasks for 'puppet' provisioner...
    db: Are you sure you want to destroy the 'db' VM? [y/N] y
==> db: Forcing shutdown of VM...
==> db: Destroying VM and associated drives...
==> db: Running cleanup tasks for 'puppet' provisioner...
Just for reference here are some exceprts from the vagrant up of the comlete setup:
==> db: Running provisioner: puppet...
==> db: Running Puppet with db.pp...
==> db: Notice: /Stage[main]//Package[mysql-community-server-client]/ensure: created
==> db: Notice: /Stage[main]//Exec[system-update]/returns: executed successfully
==> db: Notice: /Stage[main]//Package[mysql-community-server]/ensure: created
==> db: Notice: /Stage[main]//Service[mysql]/ensure: ensure changed 'stopped' to 'running'
==> db: Notice: /Stage[main]//Exec[set-mysql-password]/returns: executed successfully
==> db: Notice: /Stage[main]//Exec[create-wordpress-db]/returns: executed successfully
==> db: Notice: Finished catalog run in 116.65 seconds
..
..
==> web: Mounting shared folders...
    web: /vagrant => /Users/elatov/Documents
    web: /tmp/vagrant-puppet-4/manifests => /private/tmp/vagrant/manifests
==> web: Running provisioner: puppet...
==> web: Running Puppet with web.pp...
==> web: Notice: /Stage[main]//File[/srv/www/htdocs/wp]/ensure: created
==> web: Notice: /Stage[main]//File[/srv/www/htdocs/wp/wp-config-sample.php]/ensure: created
==> web: Notice: /Stage[main]//Exec[Download wordpress]/returns: executed successfully
==> web: Notice: /Stage[main]//Exec[Extract wordpress]/returns: executed successfully
==> web: Notice: /Stage[main]//Exec[copy_def_config]/returns: executed successfully
==> web: Notice: /Stage[main]//File_line[db_name_line]/ensure: created
==> web: Notice: /Stage[main]//File_line[db_user_line]/ensure: created
==> web: Notice: /Stage[main]//File_line[db_password_line]/ensure: created
==> web: Notice: /Stage[main]//File_line[db_host_line]/ensure: created
==> web: Notice: /Stage[main]//Exec[Change ownership]: Triggered 'refresh' from 1 events
==> web: Notice: /Stage[main]//Exec[system-update]/returns: executed successfully
==> web: Notice: /Stage[main]//Package[php5-mysql]/ensure: created
==> web: Notice: /Stage[main]//Package[apache2-mod_php5]/ensure: created
==> web: Notice: /Stage[main]//Exec[enable-php-module]/returns: executed successfully
==> web: Notice: /Stage[main]//Service[apache2]/ensure: ensure changed 'stopped' to 'running'
==> web: Notice: Finished catalog run in 99.66 seconds
So in 117 + 100 seconds (about 4 minutes), you can have a test wordpress instance (pretty neat). BTW here is the total space the whole environment took:
elatov@kmac:~$du -shc .vagrant.d/boxes/elatov-VAGRANTSLASH-opensuse13-64/ .virt/test2*
396M	.vagrant.d/boxes/elatov-VAGRANTSLASH-opensuse13-64/
1.6G	.virt/test2_db_1403727651036_85635
1.6G	.virt/test2_web_1403727460722_39206
3.6G	total
Better Approach to Puppet
There are already modules out there:
Which basically automate what I did above. With those we have a couple of options, either pre-install them on the base box or install them on your local machine and then set the puppet module_path variable in the VagrantFile.
We can also create modules instead of using single manifest files. From Learning Puppet — Modules and Classes:
The End of the One Huge Manifest
You can write some pretty sophisticated manifests at this point, but so far you’ve just been putting them in one file (either /etc/puppetlabs/puppet/manifests/site.pp or a one-off to use with puppet apply).
Past a handful of resources, this gets unwieldy. You can probably already see the road to the three thousand line manifest of doom, and you don’t want to go there. It’s much better to split chunks of logically related code out into their own files, and then refer to those chunks by name when you need them.
Classes are Puppet’s way of separating out chunks of code, and modules are Puppet’s way of organizing classes so that you can refer to them by name.
Here are some examples of the Modules approach with puppet and here is the structure of one of the examples:
elatov@kmac:~/vagrant-examples$tree example3
example3
├── Vagrantfile
└── puppet
    ├── manifests
    │   └── site.pp
    └── modules
        └── baseconfig
            ├── files
            │   └── bashrc
            └── manifests
                └── init.pp

6 directories, 4 files
Check out the contents of the files for a better understanding of how it all goes together.