Partition Zabbix 2.2 MySQL Database
So I ran out of space on my debian box which was hosting the zabbix DB.
elatov@kerch:~$df -h .
Filesystem              Size  Used Avail Use% Mounted on
/dev/mapper/vg1-root   15G   15G     0 100% /
And the database was taking up half of that:
elatov@kerch:~$sudo du -ha -d 1 /var/lib/mysql
275M	/var/lib/mysql/ibdata1
8.0K	/var/lib/mysql/snort
5.0M	/var/lib/mysql/ib_logfile0
5.0M	/var/lib/mysql/ib_logfile1
212K	/var/lib/mysql/performance_schema
1.1M	/var/lib/mysql/mysql
7.3G	/var/lib/mysql/zabbix
4.0K	/var/lib/mysql/mysql_upgrade_info
368K	/var/lib/mysql/snorby
7.6G	/var/lib/mysql
We can also check out which tables are taking up most space:
mysql> SELECT TABLE_SCHEMA, TABLE_NAME,(INDEX_LENGTH+DATA_LENGTH)/(1024*1024) AS SIZE_MB, TABLE_ROWS FROM INFORMATION_SCHEMA.TABLES WHERE TABLE_SCHEMA NOT IN ("mysql", "information_schema") ORDER BY SIZE_MB DESC LIMIT 10;
+--------------+--------------+-----------+------------+
| TABLE_SCHEMA | TABLE_NAME   | SIZE_MB   | TABLE_ROWS |
+--------------+--------------+-----------+------------+
| zabbix       | history_uint | 2876.3938 |   63322049 |
| zabbix       | history      | 1811.3573 |   39872569 |
| zabbix       | history_str  |  366.0589 |    5620476 |
| zabbix       | trends_uint  |  167.2290 |    2237286 |
| zabbix       | trends       |   90.7308 |    1236063 |
| zabbix       | history_log  |   64.8759 |     250807 |
| zabbix       | events       |   39.2031 |     282850 |
| wordpress    | wp_posts     |   21.4355 |       1727 |
| zabbix       | sessions     |    4.0469 |        472 |
| wordpress    | wp_postmeta  |    2.7580 |       7332 |
+--------------+--------------+-----------+------------+
10 rows in set (0.03 sec)
So I did some research and it looks like partitioning the zabbix DB is the way to go. Here are some sites that talk about it:
- MySQL Database Partitioning
- Yet Another MySQL Partitioning
- Partitioning to the database zabbix MySQL
Hot Add vmdk to VM
So let’s go ahead and add a disk to the VM, so we can fix up our DB server. First let’s figure out where our VM is on the ESX host:
~ # vim-cmd vmsvc/getallvms | grep VM1
6      VM1    [datastore1] VM1/VM1.vmx     debian6_64Guest         vmx-08
So the VM is on datastore1. So go into the VM’s directory and first create a 10GB vmdk:
~ # cd /vmfs/volumes/datastore1/VM1/
/vmfs/volumes/533e29ae-e243ce90-39a5-685b35c99610/VM1 # vmkfstools -c 10G -d eagerzeroedthick VM1-1.vmdk
Creating disk 'VM1-1.vmdk' and zeroing it out...
Create: 100% done.
Lastly let’s go ahead and add the disk to the VM:
~ # vim-cmd vmsvc/device.diskaddexisting 6 /vmfs/volumes/datastore1/VM1/VM1-1.vmdk 0 1
On the VM let’s scan for new SCSI devices. First determine which SCSI host we need to rescan:
root@kerch:~# lsscsi
[0:0:0:0]    disk    VMware   Virtual disk     1.0   /dev/sda
[2:0:0:0]    cd/dvd  NECVMWar VMware IDE CDR10 1.00  /dev/sr0
It looks like /dev/sda (the first disk) is on scsi_host0 (and I added the vmdk as the second device of the first SCSI controller… these were the 0 1 parameters at the end of my vim-cmd command… for more information check out VMware KB 1006685). So let’s scan scsi_host0:
root@kerch:~# echo "- - -" > /sys/class/scsi_host/host0/scan
after that you should see the new device:
root@kerch:~# dmesg | tail -4
[53648.636743]  sdb: unknown partition table
[53648.642094] sd 0:0:1:0: [sdb] Cache data unavailable
[53648.642097] sd 0:0:1:0: [sdb] Assuming drive cache: write through
[53648.642360] sd 0:0:1:0: [sdb] Attached SCSI disk
and of course fdisk can see it as well:
root@kerch:~# fdisk -l /dev/sdb

Disk /dev/sdb: 10.7 GB, 10737418240 bytes
255 heads, 63 sectors/track, 1305 cylinders, total 20971520 sectors
Units = sectors of 1 * 512 = 512 bytes
Sector size (logical/physical): 512 bytes / 512 bytes
I/O size (minimum/optimal): 512 bytes / 512 bytes
Disk identifier: 0x00000000

Disk /dev/sdb doesn't contain a valid partition table
That’s our 10GB disk. Just for reference here is the lsscsi output after the device is descovered:
root@kerch:~$lsscsi
[0:0:0:0]    disk    VMware   Virtual disk     1.0   /dev/sda
[0:0:1:0]    disk    VMware   Virtual disk     1.0   /dev/sdb
[2:0:0:0]    cd/dvd  NECVMWar VMware IDE CDR10 1.00  /dev/sr0
Add Disk Space to the Root LV
So now that we have a disk (/dev/sdb), let’s add it to the root LV. Checking over the LVM settings, I see the following:
root@kerch:~# pvs
  PV         VG    Fmt  Attr PSize  PFree
  /dev/sda5  vg1   lvm2 a--  15.76g    0
root@kerch:~# vgs
  VG    #PV #LV #SN Attr   VSize  VFree
  vg1    1   2   0 wz--n- 15.76g    0
root@kerch:~# lvs
  LV     VG    Attr     LSize   Pool Origin Data%  Move Log Copy%  Convert
  root   vg1   -wi-ao--  15.07g
  swap_1 vg1   -wi-ao-- 708.00m
So we use a single partition (/dev/sda5) and that partition makes up one volume group (vg1) and the volume group is broken into the root and swap LVs/partitions. So first let’s add /dev/sdb as a physical volume:
root@kerch:~# pvcreate /dev/sdb
  Writing physical volume data to disk "/dev/sdb"
  Physical volume "/dev/sdb" successfully created
Now let’s add that physical volume to the volume group:
root@kerch:~# vgextend vg1 /dev/sdb
  Volume group "vg1" successfully extended
Now let’s give all the free space (10GB) from the volume group to the logical volume:
root@kerch:~# lvextend -l +100%FREE /dev/vg1/root
  Extending logical volume root to 25.06 GiB
  Logical volume root successfully resized
Now let’s resize the existing file system:
root@kerch:~# resize2fs /dev/mapper/vg1-root
resize2fs 1.42.5 (29-Jul-2012)
Filesystem at /dev/mapper/vg1-root is mounted on /; on-line resizing required
old_desc_blocks = 1, new_desc_blocks = 2
Performing an on-line resize of /dev/mapper/vg1-root to 6569984 (4k) blocks.
The filesystem on /dev/mapper/vg1-root is now 6569984 blocks long.
And now we have space on the VM:
root@kerch:~# df -h
Filesystem              Size  Used Avail Use% Mounted on
rootfs                   25G   15G  9.4G  61% /
/dev/mapper/vg1-root     25G   15G  9.4G  61% /
Backup Zabbix MySQL Database
So let’s backup the database, before we make any changes. First let’s stop the zabbix server service:
root@kerch:~# service zabbix-server stop
I was able to get back about 2GB just by optimizing the tables:
mysql> use zabbix;
Reading table information for completion of table and column names
You can turn off this feature to get a quicker startup with -A

Database changed
mysql> optimize table history_uint;
+---------------------+----------+----------+----------+
| Table               | Op       | Msg_type | Msg_text |
+---------------------+----------+----------+----------+
| zabbix.history_uint | optimize | status   | OK       |
+---------------------+----------+----------+----------+
1 row in set (1 min 52.94 sec)
mysql> optimize table history;
+----------------+----------+----------+----------+
| Table          | Op       | Msg_type | Msg_text |
+----------------+----------+----------+----------+
| zabbix.history | optimize | status   | OK       |
+----------------+----------+----------+----------+
1 row in set (1 min 11.95 sec)
After that df showed 13GB used instead of 15GB:
elatov@kerch:~$df -h | grep tfs
rootfs                   25G   13G   11G  54% /
Now let’s dump the db:
root@kerch:~# mysqldump -u root -p zabbix > zabbix.sql
We can also dump each table just in case:
root@kerch:/opt/work/zabbix-db# mysqldump -u root -p zabbix history > history.sql
root@kerch:/opt/work/zabbix-db# mysqldump -u root -p zabbix history_uint > history_uint.sql
root@kerch:/opt/work/zabbix-db# mysqldump -u root -p zabbix history_str > history_str.sql
root@kerch:/opt/work/zabbix-db# mysqldump -u root -p zabbix history_text > history_text.sql
root@kerch:/opt/work/zabbix-db# mysqldump -u root -p zabbix acknowledges > acknowledges.sql
root@kerch:/opt/work/zabbix-db# mysqldump -u root -p zabbix alerts > alerts.sql
root@kerch:/opt/work/zabbix-db# mysqldump -u root -p zabbix auditlog > auditlog.sql
root@kerch:/opt/work/zabbix-db# mysqldump -u root -p zabbix events > events.sql
root@kerch:/opt/work/zabbix-db# mysqldump -u root -p zabbix trends > trends.sql
root@kerch:/opt/work/zabbix-db# mysqldump -u root -p zabbix trends_uint > trends_uint.sql
root@kerch:/opt/work/zabbix-db# mysqldump -u root -p zabbix service_alarms > service_alarms.sql
root@kerch:/opt/work/zabbix-db# mysqldump -u root -p zabbix housekeeper > housekeeper.sql
Here are all my tables dumped:
elatov@kerch:/opt/work/zabbix-db$du -ha -d 1
92K	./auditlog.sql
53M	./trends.sql
209M	./history_str.sql
3.8G	./zabbix.sql
2.1G	./history_uint.sql
8.9M	./events.sql
4.0K	./service_alarms.sql
4.0K	./acknowledges.sql
4.0K	./history_text.sql
4.0K	./housekeeper.sql
1.4G	./history.sql
87M	./trends_uint.sql
4.0K	./alerts.sql
7.5G	.
Partition Zabbix MySQL Tables
Now let’s partition the tables. As a quick check ensure that that partitioning is supported:
mysql> show variables like 'have_partitioning';
+-------------------+-------+
| Variable_name     | Value |
+-------------------+-------+
| have_partitioning | YES   |
+-------------------+-------+
1 row in set (0.00 sec)
Index Changes
Modify the index:
mysql> use zabbix;
Reading table information for completion of table and column names
You can turn off this feature to get a quicker startup with -A

Database changed
mysql> Alter table history_text drop primary key, add index (id), drop index history_text_2, add index history_text_2 (itemid, id);
Query OK, 0 rows affected (0.01 sec)
Records: 0  Duplicates: 0  Warnings: 0

mysql> Alter table history_log drop primary key, add index (id), drop index history_log_2, add index history_log_2 (itemid, id);
Query OK, 250807 rows affected (0.82 sec)
Records: 250807  Duplicates: 0  Warnings: 0
Stored Procedures
Add the following stored procedures (taken from here):
DELIMITER $$
CREATE PROCEDURE `partition_create`(SCHEMANAME VARCHAR(64), TABLENAME VARCHAR(64), PARTITIONNAME VARCHAR(64), CLOCK INT)
BEGIN
        /*
           SCHEMANAME = The DB schema in which to make changes
           TABLENAME = The table with partitions to potentially delete
           PARTITIONNAME = The name of the partition to create
        */
        /*
           Verify that the partition does not already exist
        */

        DECLARE RETROWS INT;
        SELECT COUNT(1) INTO RETROWS
        FROM information_schema.partitions
        WHERE table_schema = SCHEMANAME AND TABLE_NAME = TABLENAME AND partition_name = PARTITIONNAME;

        IF RETROWS = 0 THEN
                /*
                   1. Print a message indicating that a partition was created.
                   2. Create the SQL to create the partition.
                   3. Execute the SQL from #2.
                */
                SELECT CONCAT( "partition_create(", SCHEMANAME, ",", TABLENAME, ",", PARTITIONNAME, ",", CLOCK, ")" ) AS msg;
                SET @SQL = CONCAT( 'ALTER TABLE ', SCHEMANAME, '.', TABLENAME, ' ADD PARTITION (PARTITION ', PARTITIONNAME, ' VALUES LESS THAN (', CLOCK, '));' );
                PREPARE STMT FROM @SQL;
                EXECUTE STMT;
                DEALLOCATE PREPARE STMT;
        END IF;
END$$
DELIMITER ;
Here is the 2nd procedure:
DELIMITER $$
CREATE PROCEDURE `partition_drop`(SCHEMANAME VARCHAR(64), TABLENAME VARCHAR(64), DELETE_BELOW_PARTITION_DATE BIGINT)
BEGIN
        /*
           SCHEMANAME = The DB schema in which to make changes
           TABLENAME = The table with partitions to potentially delete
           DELETE_BELOW_PARTITION_DATE = Delete any partitions with names that are dates older than this one (yyyy-mm-dd)
        */
        DECLARE done INT DEFAULT FALSE;
        DECLARE drop_part_name VARCHAR(16);

        /*
           Get a list of all the partitions that are older than the date
           in DELETE_BELOW_PARTITION_DATE.  All partitions are prefixed with
           a "p", so use SUBSTRING TO get rid of that character.
        */
        DECLARE myCursor CURSOR FOR
                SELECT partition_name
                FROM information_schema.partitions
                WHERE table_schema = SCHEMANAME AND TABLE_NAME = TABLENAME AND CAST(SUBSTRING(partition_name FROM 2) AS UNSIGNED) < DELETE_BELOW_PARTITION_DATE;
        DECLARE CONTINUE HANDLER FOR NOT FOUND SET done = TRUE;

        /*
           Create the basics for when we need to drop the partition.  Also, create
           @drop_partitions to hold a comma-delimited list of all partitions that
           should be deleted.
        */
        SET @alter_header = CONCAT("ALTER TABLE ", SCHEMANAME, ".", TABLENAME, " DROP PARTITION ");
        SET @drop_partitions = "";

        /*
           Start looping through all the partitions that are too old.
        */
        OPEN myCursor;
        read_loop: LOOP
                FETCH myCursor INTO drop_part_name;
                IF done THEN
                        LEAVE read_loop;
                END IF;
                SET @drop_partitions = IF(@drop_partitions = "", drop_part_name, CONCAT(@drop_partitions, ",", drop_part_name));
        END LOOP;
        IF @drop_partitions != "" THEN
                /*
                   1. Build the SQL to drop all the necessary partitions.
                   2. Run the SQL to drop the partitions.
                   3. Print out the table partitions that were deleted.
                */
                SET @full_sql = CONCAT(@alter_header, @drop_partitions, ";");
                PREPARE STMT FROM @full_sql;
                EXECUTE STMT;
                DEALLOCATE PREPARE STMT;

                SELECT CONCAT(SCHEMANAME, ".", TABLENAME) AS `table`, @drop_partitions AS `partitions_deleted`;
        ELSE
                /*
                   No partitions are being deleted, so print out "N/A" (Not applicable) to indicate
                   that no changes were made.
                */
                SELECT CONCAT(SCHEMANAME, ".", TABLENAME) AS `table`, "N/A" AS `partitions_deleted`;
        END IF;
END$$
DELIMITER ;
Here is the 3rd one:
DELIMITER $$
CREATE PROCEDURE `partition_maintenance`(SCHEMA_NAME VARCHAR(32), TABLE_NAME VARCHAR(32), KEEP_DATA_DAYS INT, HOURLY_INTERVAL INT, CREATE_NEXT_INTERVALS INT)
BEGIN
        DECLARE OLDER_THAN_PARTITION_DATE VARCHAR(16);
        DECLARE PARTITION_NAME VARCHAR(16);
        DECLARE LESS_THAN_TIMESTAMP INT;
        DECLARE CUR_TIME INT;

        CALL partition_verify(SCHEMA_NAME, TABLE_NAME, HOURLY_INTERVAL);
        SET CUR_TIME = UNIX_TIMESTAMP(DATE_FORMAT(NOW(), '%Y-%m-%d 00:00:00'));
        IF DATE(NOW()) = '2014-04-01' THEN
                SET CUR_TIME = UNIX_TIMESTAMP(DATE_FORMAT(DATE_ADD(NOW(), INTERVAL 1 DAY), '%Y-%m-%d 00:00:00'));
        END IF;
        SET @__interval = 1;
        create_loop: LOOP
                IF @__interval > CREATE_NEXT_INTERVALS THEN
                        LEAVE create_loop;
                END IF;

                SET LESS_THAN_TIMESTAMP = CUR_TIME + (HOURLY_INTERVAL * @__interval * 3600);
                SET PARTITION_NAME = FROM_UNIXTIME(CUR_TIME + HOURLY_INTERVAL * (@__interval - 1) * 3600, 'p%Y%m%d%H00');
                CALL partition_create(SCHEMA_NAME, TABLE_NAME, PARTITION_NAME, LESS_THAN_TIMESTAMP);
                SET @__interval=@__interval+1;
        END LOOP;

        SET OLDER_THAN_PARTITION_DATE=DATE_FORMAT(DATE_SUB(NOW(), INTERVAL KEEP_DATA_DAYS DAY), '%Y%m%d0000');
        CALL partition_drop(SCHEMA_NAME, TABLE_NAME, OLDER_THAN_PARTITION_DATE);

END$$
DELIMITER ;
And here is the last one:
DELIMITER $$
CREATE PROCEDURE `partition_verify`(SCHEMANAME VARCHAR(64), TABLENAME VARCHAR(64), HOURLYINTERVAL INT(11))
BEGIN
        DECLARE PARTITION_NAME VARCHAR(16);
        DECLARE RETROWS INT(11);
        DECLARE FUTURE_TIMESTAMP TIMESTAMP;

        /*
         * Check if any partitions exist for the given SCHEMANAME.TABLENAME.
         */
        SELECT COUNT(1) INTO RETROWS
        FROM information_schema.partitions
        WHERE table_schema = SCHEMANAME AND TABLE_NAME = TABLENAME AND partition_name IS NULL;

        /*
         * If partitions do not exist, go ahead and partition the table
         */
        IF RETROWS = 1 THEN
                /*
                 * Take the current date at 00:00:00 and add HOURLYINTERVAL to it.  This is the timestamp below which we will store values.
                 * We begin partitioning based on the beginning of a day.  This is because we don't want to generate a random partition
                 * that won't necessarily fall in line with the desired partition naming (ie: if the hour interval is 24 hours, we could
                 * end up creating a partition now named "p201403270600" when all other partitions will be like "p201403280000").
                 */
                SET FUTURE_TIMESTAMP = TIMESTAMPADD(HOUR, HOURLYINTERVAL, CONCAT(CURDATE(), " ", '00:00:00'));
                SET PARTITION_NAME = DATE_FORMAT(CURDATE(), 'p%Y%m%d%H00');

                -- Create the partitioning query
                SET @__PARTITION_SQL = CONCAT("ALTER TABLE ", SCHEMANAME, ".", TABLENAME, " PARTITION BY RANGE(`clock`)");
                SET @__PARTITION_SQL = CONCAT(@__PARTITION_SQL, "(PARTITION ", PARTITION_NAME, " VALUES LESS THAN (", UNIX_TIMESTAMP(FUTURE_TIMESTAMP), "));");

                -- Run the partitioning query
                PREPARE STMT FROM @__PARTITION_SQL;
                EXECUTE STMT;
                DEALLOCATE PREPARE STMT;
        END IF;
END$$
DELIMITER ;
Running the Stored Procedure to Partition Tables
Here is the actual command to run the procedure:
mysql> CALL partition_maintenance('zabbix', 'history', 28, 24, 14);
+-----------------------------------------------------------+
| msg                                                       |
+-----------------------------------------------------------+
| partition_create(zabbix,history,p201408080000,1407564000) |
+-----------------------------------------------------------+
1 row in set (50.37 sec)
..
..
+-----------------------------------------------------------+
| msg                                                       |
+-----------------------------------------------------------+
| partition_create(zabbix,history,p201408200000,1408600800) |
+-----------------------------------------------------------+
1 row in set (50.45 sec)

+----------------+--------------------+
| table          | partitions_deleted |
+----------------+--------------------+
| zabbix.history | N/A                |
+----------------+--------------------+
1 row in set (50.45 sec)

Query OK, 0 rows affected, 1 warning (50.45 sec)
To help the ease the process, there is one more procedure to do the maintenance across all the tables. Here it is:
DELIMITER $$
CREATE PROCEDURE `partition_maintenance_all`(SCHEMA_NAME VARCHAR(32))
BEGIN
                CALL partition_maintenance(SCHEMA_NAME, 'history', 28, 24, 14);
                CALL partition_maintenance(SCHEMA_NAME, 'history_log', 28, 24, 14);
                CALL partition_maintenance(SCHEMA_NAME, 'history_str', 28, 24, 14);
                CALL partition_maintenance(SCHEMA_NAME, 'history_text', 28, 24, 14);
                CALL partition_maintenance(SCHEMA_NAME, 'history_uint', 28, 24, 14);
                CALL partition_maintenance(SCHEMA_NAME, 'trends', 730, 24, 14);
                CALL partition_maintenance(SCHEMA_NAME, 'trends_uint', 730, 24, 14);
END$$
DELIMITER ;
After that’s in place we can run the following to do the necessary maintenace on the DB:
mysql> CALL partition_maintenance_all('zabbix');
+----------------+--------------------+
| table          | partitions_deleted |
+----------------+--------------------+
| zabbix.history | N/A                |
+----------------+--------------------+
1 row in set (0.01 sec)

+---------------------------------------------------------------+
| msg                                                           |
+---------------------------------------------------------------+
| partition_create(zabbix,history_log,p201408080000,1407564000) |
+---------------------------------------------------------------+
1 row in set (0.77 sec)
..
..
---------------------------------------------------------------+
| msg                                                           |
+---------------------------------------------------------------+
| partition_create(zabbix,trends_uint,p201408200000,1408600800) |
+---------------------------------------------------------------+
1 row in set (4 min 54.11 sec)

+--------------------+--------------------+
| table              | partitions_deleted |
+--------------------+--------------------+
| zabbix.trends_uint | N/A                |
+--------------------+--------------------+
1 row in set (4 min 54.12 sec)

Query OK, 0 rows affected, 1 warning (4 min 54.12 sec)
After it’s all said and done, I was using 9.3GB (vs the 15GB I was at when I started):
elatov@kerch:/opt$df -h
Filesystem              Size  Used Avail Use% Mounted on
rootfs                   25G  9.3G   15G  40% /
And the MySQL DB went down to 5GB:
elatov@kerch:~$sudo du -ha -d 0 /var/lib/mysql/zabbix
5.0G	/var/lib/mysql/zabbix
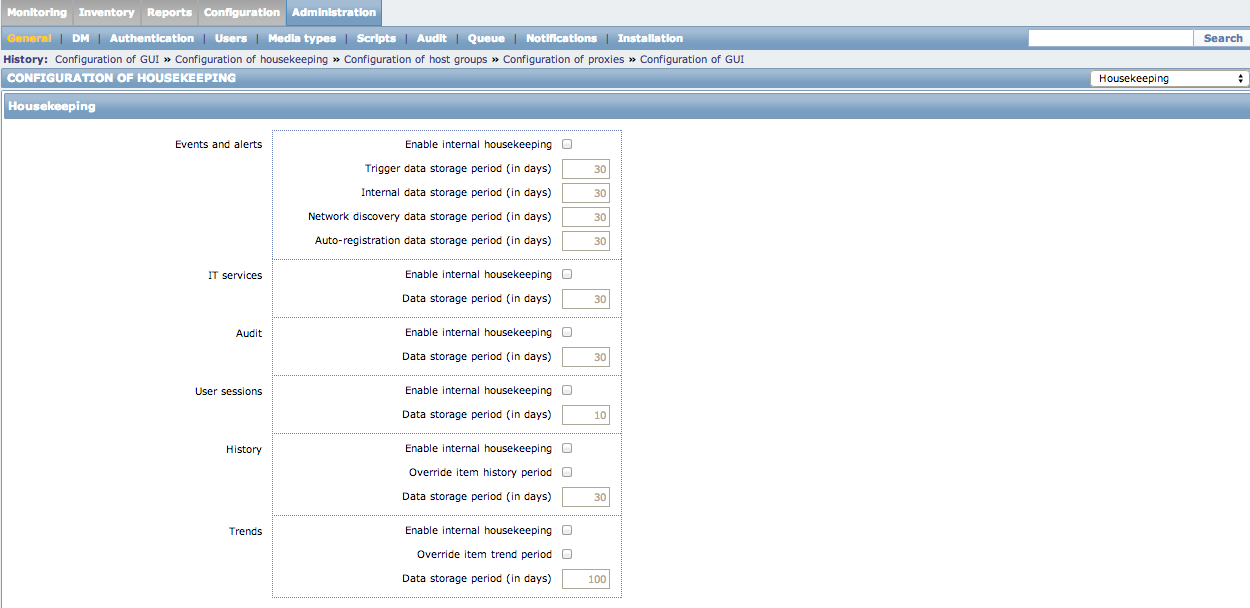
Disable Zabbix HouseKeeping
I ended up doing two things, I set the engine of the table to be BlackHole:
mysql> use zabbix;
Reading table information for completion of table and column names
You can turn off this feature to get a quicker startup with -A

Database changed
mysql> ALTER TABLE housekeeper ENGINE = BLACKHOLE;
Query OK, 8 rows affected (0.00 sec)
Records: 8  Duplicates: 0  Warnings: 0
And I also went into the Zabbix Web Management and under the Administration -> General -> Housekeeping, I made sure all of the options were unchecked:
Remove Disk Space from LV
So now that I am in a good place, I can remove the disk that I initially added to get out of this situation. We first have to resize the filesystem and then we can resize the Logical Volume. I was using ext4 as my file system and unfortunately ext4 shrinking is not supported. If you try to shrink the filesystem on the fly, you will get the following warning:
root@kerch:~# resize2fs /dev/mapper/vg1-root
resize2fs 1.42.5 (29-Jul-2012)
Filesystem at /dev/mapper/vg1-root is mounted on /; on-line resizing required
resize2fs: On-line shrinking not supported
So I booted from a Debian Live CD and then I installed the LVM utilities:
user@debian:~$ sudo su -
root@debian:~$ apt-get update
root@debian:~$ apt-get install lvm2
Then I initialized the LVM volumes:
root@debian:~# pvscan
  PV /dev/sda5   VG vg1   lvm2 [15.76 GiB / 0  Free]
  PV /dev/sdb    VG vg1    lvm2 [10.00 GiB / 0   Free]
  Total: 2 [25.75 GiB] / in use: 2 [25.75 GiB] / in no VG: 0 [0   ]
Now let’s do a file system check before making any changes:
root@debian:~# e2fsck -f /dev/mapper/vg1-root
e2fsck 1.42.5 (29-Jul-2012)
Pass 1: Checking inodes, blocks, and sizes
Pass 2: Checking directory structure
Pass 3: Checking directory connectivity
Pass 4: Checking reference counts
Pass 5: Checking group summary information
/dev/mapper/vg1-root: 147284/1643376 Files (0.2% non-contiguous), 2562503/6569984 blocks
Then let’s resize the file system (My original filesystem was 15GB so I shrank it to 14GB just to make sure I don’t overlap with the Logical volumes…. after I remove the other disk, I will rerun resize2fs to put it back to 15GB):
root@debian:~# resize2fs -p /dev/mapper/vg1-root 14G
resize2fs 1.42.5 (29-Jul-2012)
Resizing the filesystem on /dev/mapper/vg1-root to 3670016 (4k) blocks.
Begin pass 2 (max = 1178051)
Relocating blocks             XXXXXXXXXXXXXXXXXXXXXXXXXXXXXXXXXXXXXXXX
Begin pass 3 (max = 201)
Scanning inode table          XXXXXXXXXXXXXXXXXXXXXXXXXXXXXXXXXXXXXXXX
Begin pass 4 (max = 15156)
Updating inode references     XXXXXXXXXXXXXXXXXXXXXXXXXXXXXXXXXXXXXXXX
The filesystem on /dev/mapper/vg1-root is now 3670016 blocks long.
Now let’s figure out the segments of the LV:
root@kerch:~# lvdisplay -m /dev/mapper/vg1-root
  --- Logical volume ---
  LV Path                /dev/vg1/root
  LV Name                root
  VG Name                vg1
  LV UUID                7zpqxO-VOvK-U96N-Gxe4-TwEO-NQ4K-FVROFp
  LV Write Access        read/write
  LV Creation host, time kerch, 2013-12-08 08:54:43 -0700
  LV Status              available
  # open                 1
  LV Size                25.06 GiB
  Current LE             6416
  Segments               2
  Allocation             inherit
  Read ahead sectors     auto
  - currently set to     256
  Block device           254:0

  --- Segments ---
  Logical extent 0 to 3856:
    Type		linear
    Physical volume	/dev/sda5
    Physical extents	0 to 3856

  Logical extent 3857 to 6415:
    Type		linear
    Physical volume	/dev/sdb
    Physical extents	0 to 2558
We can see that /dev/sda5 is 0 to 3856 and /dev/sdb is 3857 to 6415 and the size of the 2nd segment is 2558 so let’s reduce our LV by the size_of_segment + 1 (2558 - 1 = 2559).
root@debian:~# lvreduce -l -2559 /dev/mapper/vg1-root
  WARNING: Reducing active and open logical volume to 15.07 GiB
  THIS MAY DESTROY YOUR DATA (filesystem etc.)
Do you really want to reduce root? [y/n]: y
  Reducing logical volume root to 15.07 GiB
  Logical volume root successfully resized.
Now let’s make sure the file system is still okay:
root@debian:~# e2fsck -f /dev/mapper/vg1-root
e2fsck 1.42.5 (29-Jul-2012)
Pass 1: Checking inodes, blocks, and sizes
Pass 2: Checking directory structure
Pass 3: Checking directory connectivity
Pass 4: Checking reference counts
Pass 5: Checking group summary in_ormation
/dev/mapper/vg1-root: 147284/915712 files (0.2% non-contiguous), 2515899/3670016 blocks
Now let’s check if the disk is still in use:
root@debian:~# pvs -o+pv_used
  PV         VG    Fmt  Attr PSize  PFree  Used
  /dev/sda5  vg1 lvm2 a--  15.76g     0      15.76g
  /dev/sdb   vg1  lvm2 a--  10.00g 10.00g     0
And it’s not. Now let’s remove the disk from the volume group:
root@debian:~# vgreduce vg1 /dev/sdb
  Removed "/dev/sdb" from volume group "vg1"
And finally let’s remove the disk from LVM completely:
root@debian:~# pvremove /dev/sdb
  Labels on physical volume "/dev/sdb" successfully wiped
Now let’s resize the filesystem to it’s maximum size (and one last fsck):
root@debian:~# resize2fs -p /dev/mapper/vg1-root
resize2fs 1.42.5 (29-Jul-2012)
Resizing the filesystem on /dev/mapper/vg1-root to 3949568 (4k) blocks.
Begin pass 1 (max = 9)
Extending the inode table     XXXXXXXXXXXXXXXXXXXXXXXXXXXXXXXXXXXXXXXX
The filesystem on /dev/mapper/vg1-root is now 3949568 blocks long.

root@debian:~# e2fsck -f /dev/mapper/vg1-root
e2fsck 1.42.5 (29-Jul-2012)
Pass 1: Checking inodes, blocks, and sizes
Pass 2: Checking directory structure
Pass 3: Checking directory connectivity
Pass 4: Checking reference counts
Pass 5: Checking group summary in_ormation
/dev/mapper/vg1-root: 147284/989296 files (0.2% non-contiguous), 2520516/3949578 blocks
And let’s make sure we can mount it:
root@debian:~# mkdir /a
root@debian:~# mount /dev/mapper/vg1-root /a
[ 1655.981943] EXT4-fs (dm-0): mounted filesystem with ordered data mode. Opts: (null)
root@debian:~# df -h -t ext4
Filesystem              Size       Used Avail    Use%    Mounted on
/dev/mapper/vg1-root   15G  9.4G  4.7G   67%      /a
That should be it. Reboot from the live cd and the OS should boot back up without issues (and you should be back to the original state but using less space).
Remove the VMDK from the VM
If you want to remove the disk live, just run the following commands within the VM:
root@kerch:~# blockdev --flushbufs /dev/sdb
root@kerch:~# echo 1 > /sys/block/sdb/device/delete
NOTE you can also use this path if you want: /sys/class/scsi_device/0\:0\:1\:0/device/delete
Then detach the VMDK from the VM from the ESXi side:
~ # vim-cmd vmsvc/device.diskremove 6 0 1 n
To be a 100% safe you can power off the VM first and then remove the disk. After it’s removed from the VM and you are sure you don’t need it, you can run the following to completely delete the VMDK:
~ # vmkfstools -U /vmfs/volumes/datastore1/VM1/VM1-1.vmdk
Schedule Auto Partitioning of the Zabbix Database
The maintenance stored procedures create enough parititions for the duration that you specify. So if you set yours for 14 days then after 2 weeks you will run out of partitions and zabbix won’t be able to store new data. So we need to automatically run the maintenance store procedure. There are two options for scheduling the execution of the store procedures:
- MySQL event scheduler
- Cron
Checking the status of my MySQL instance, I didn’t see the event scheduler turned on:
mysql> SHOW VARIABLES LIKE 'event_scheduler';
+-----------------+-------+
| Variable_name   | Value |
+-----------------+-------+
| event_scheduler | OFF   |
+-----------------+-------+
1 row in set (0.00 sec)
So I decided to go with the cron option (check out this site for an event-scheduler example), we just need to run the following from cron:
mysql -h localhost -u zabbix -ppassword zabbix -e "CALL partition_maintenance_all('zabbix');"
Since I was creating 2 weeks worth of partitions, I decided to run the above command weekly. This is done by just adding a file into the /etc/cron.weekly directory:
elatov@kerch:~$cat /etc/cron.weekly/zab-part
#!/bin/sh
/usr/bin/mysql -h localhost -u zabbix -ppassword zabbix -e "CALL partition_maintenance_all('zabbix');"
This will actually send an email with any output from the script (I wanted to see the output to make sure the partitions are getting cleared out appropriately), if you don’t want the output of the command, just make the file look like this:
elatov@kerch:~$cat /etc/cron.weekly/zab-part
#!/bin/sh
/usr/bin/mysql -h localhost -u zabbix -ppassword zabbix -e "CALL partition_maintenance_all('zabbix');" >/dev/null 2>&1
And make it executable:
elatov@kerch:~$ sudo chmod +x /etc/cron.weekly/zab-part
Also make sure anacron is installed:
elatov@kerch:~$dpkg -l | grep anacron
ii  anacron     2.3-19   amd64  cron-like program that doesn't go by time
That should be it.