Install Debian 7 On MacMini Late 2006
A very old Mac Mini came into my hands, in fact it was so old that the latest version of Mac OS X that it could run was 10.6 and I couldn’t even update it to 10.9. So I decided to install Debian on the machine in the hopes of using it as a media server later on. Here are the steps I took to install Debian 7.6 on the MacMini1,1.
Reset Local Mac OS X User’s Password
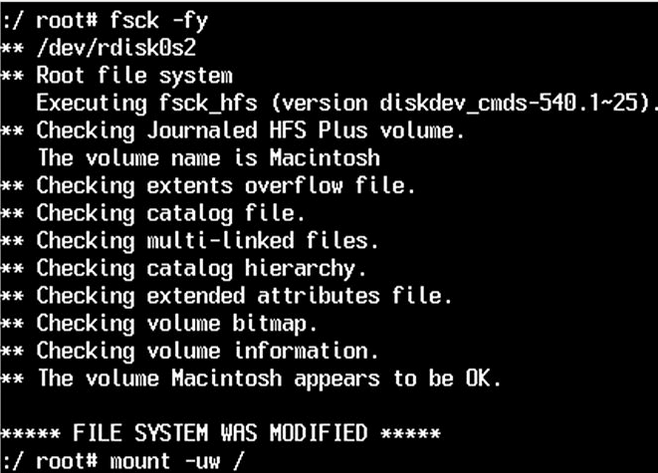
I didn’t even have the login information for the local admin user. To reset the password on Mac OS X 10.6 we can do the following. Power on the MacMini and as soon as you hear the boot chime hold Apple+S (or some refer to it as Command+S), this will force the machine to boot into single-user mode. It will ask you to run a file system check and to remount the file system with read/write permission. The commands for that are as follows:
/sbin/fsck -y
/sbin/mount -uw /
Here is how that looks like:
After that, we can run the following to launch the user Directory service:
launchctl load /System/Library/LaunchDaemons/com.apple.DirectoryServices.plist
Then run the following to see a list of available users on the system:
ls /Users
Then finally run the following to set a desired password for a user of your choice:
dscl . -passwd /Users/USER PASSWORD
After that you should be all set, just reboot into regular mode:
reboot
Download and Burn the Debian ISO
I just grabbed the net-boot ISO:
elatov@fed:~$ls -l downloads/*.iso
-rw-r----- 1 elatov elatov 290455552 Sep 20 09:55 downloads/debian-7.6.0-i386-netinst.iso
And burned it onto an empty CD using my Fedora Laptop:
elatov@fed:~$wodim dev=/dev/sr0 --devices
wodim: Overview of accessible drives (1 found) :
-------------------------------------------------------------------------
 0  dev='/dev/sr0'	rwrw-- : 'MATSHITA' 'DVD+-RW UJ892'
-------------------------------------------------------------------------
So my /dev/sr0 drive will be able to handle the burning of a blank CD. Now for the actual command to burn the ISO:
elatov@fed:~$wodim -v dev=/dev/sr0 speed=4 -eject downloads/debian-7.6.0-i386-netinst.iso
Download and Copy rEFIt ISO Disk Image onto a USB drive
While the CD was burning I went to the Mac and first made sure the password was reset. Then I installed the rEFIt image on my USB Drive, so I can boot from it later. I could’ve probably used the diskutility to complete this, but I decided to go with the command line. I just grabbed the ISO disk image and ran the following:
gunzip -d rEFIt-0.14.cdr.gz
hdiutil convert -format UDRW -o refit.dmg rEFIt-0.14.cdr
sudo dd if=refit.dmg of=/dev/disk1
As soon as the dd finished the volume auto mounted and I saw the rEFIt icon.
Mute the Boot Chime from OS X
While I was in OS X, I took the chance to silence the boot chime, here is the command for that:
$ sudo nvram SystemAudioVolume=%80
You can confirm the setting by running the following:
$ sudo nvram -p | grep Audio
SystemAudioVolume	%80
After that I rebooted and I didn’t hear the boot chime.
Use DiskUtility to Create a Partition for Debian
Just fire up DiskUtility and resize the partition (I covered this in a previous post)
Boot from the Debian CD and Install Debian on the Free Space
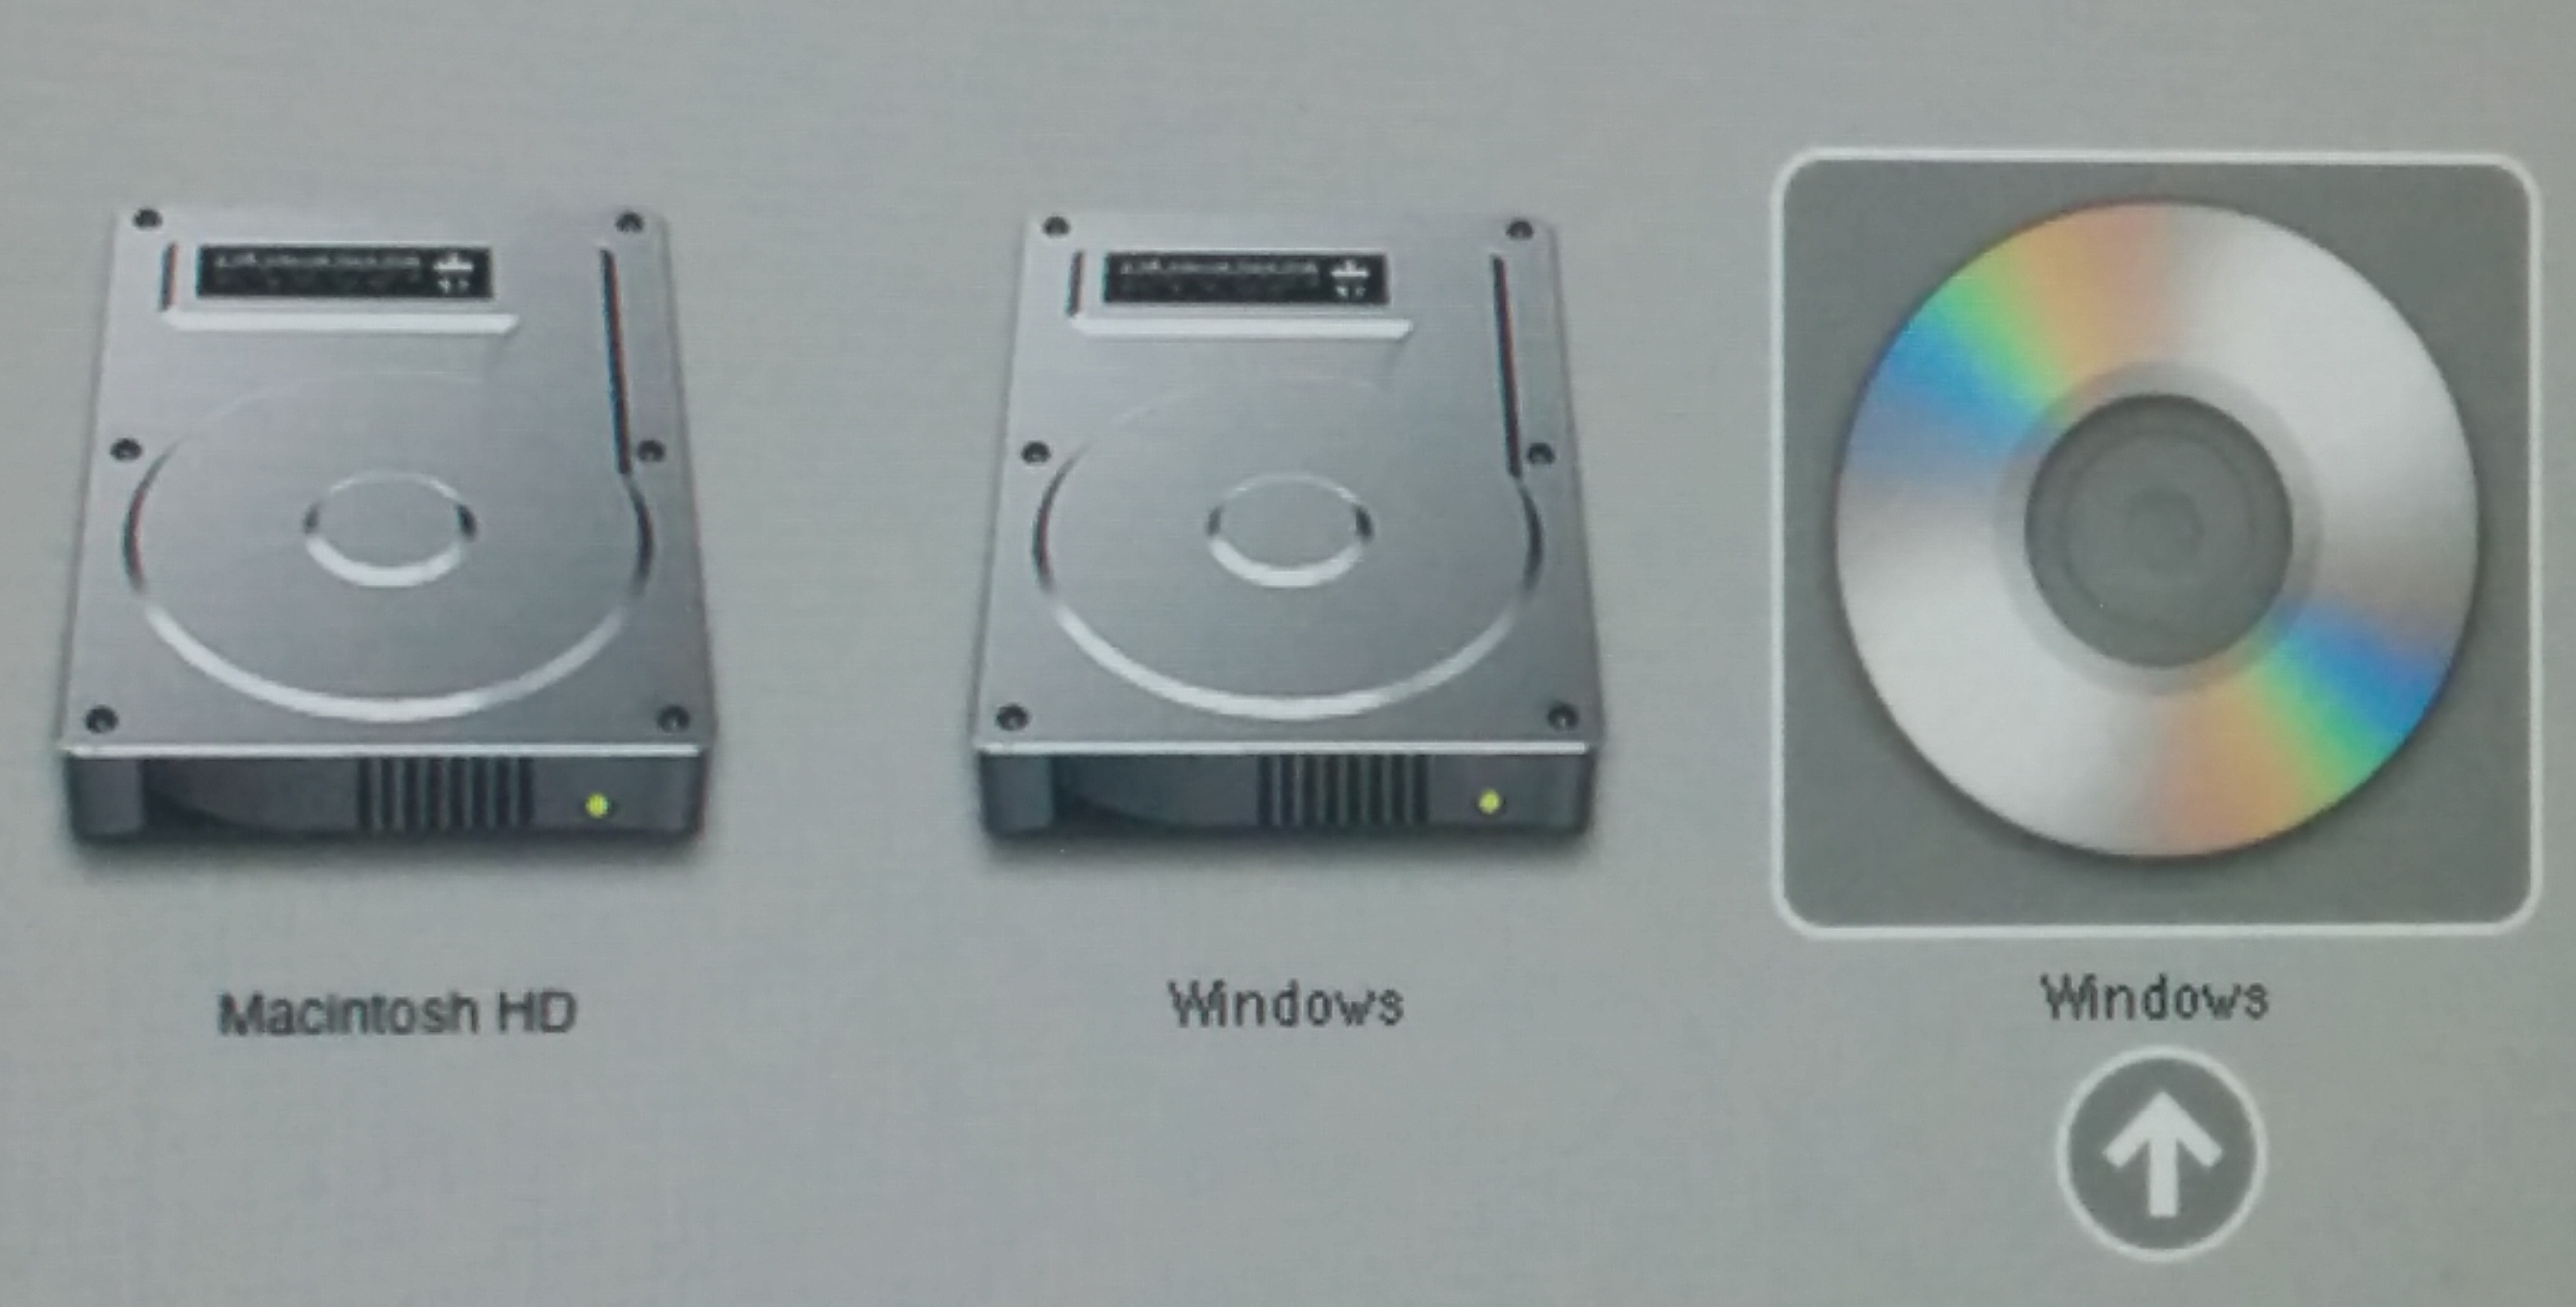
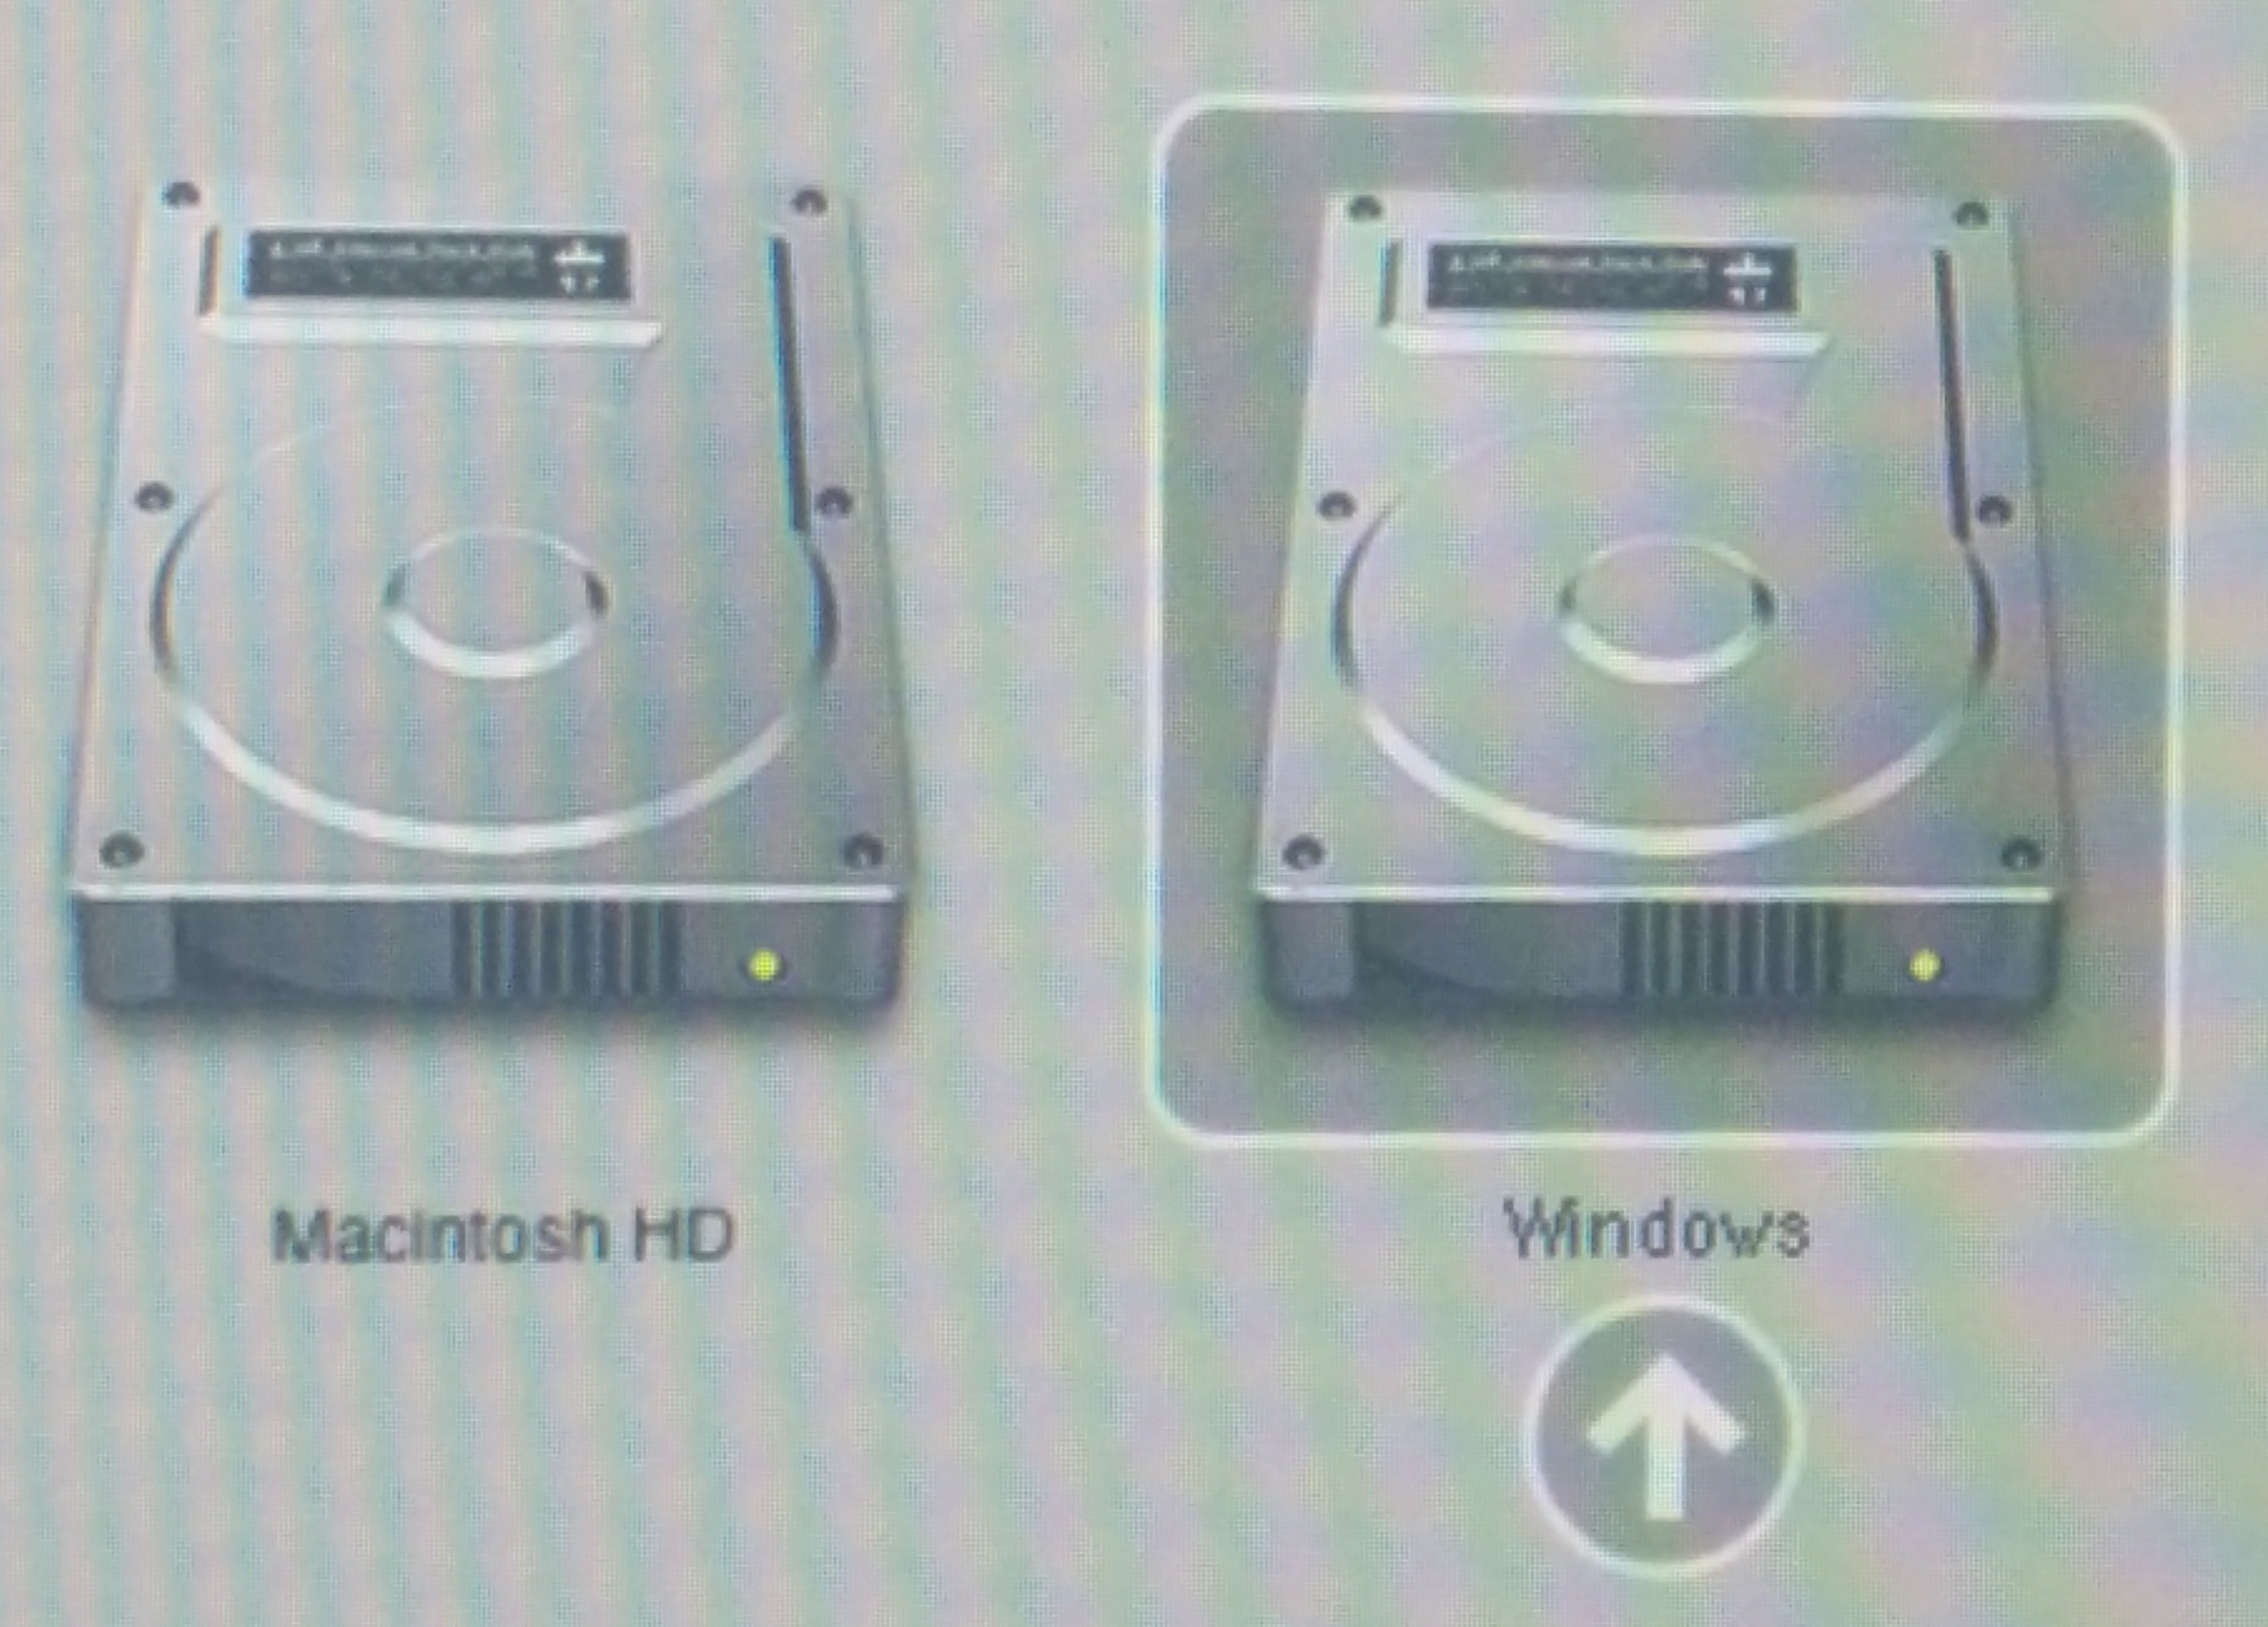
I decided to dual boot just in case I ever needed to reboot into Mac OS for updates or firmware updates. So reboot from Mac OS X and hold down the Alt key and it will show you the boot manager. On the boot manager the Debian CD will show up with a title of Windows:
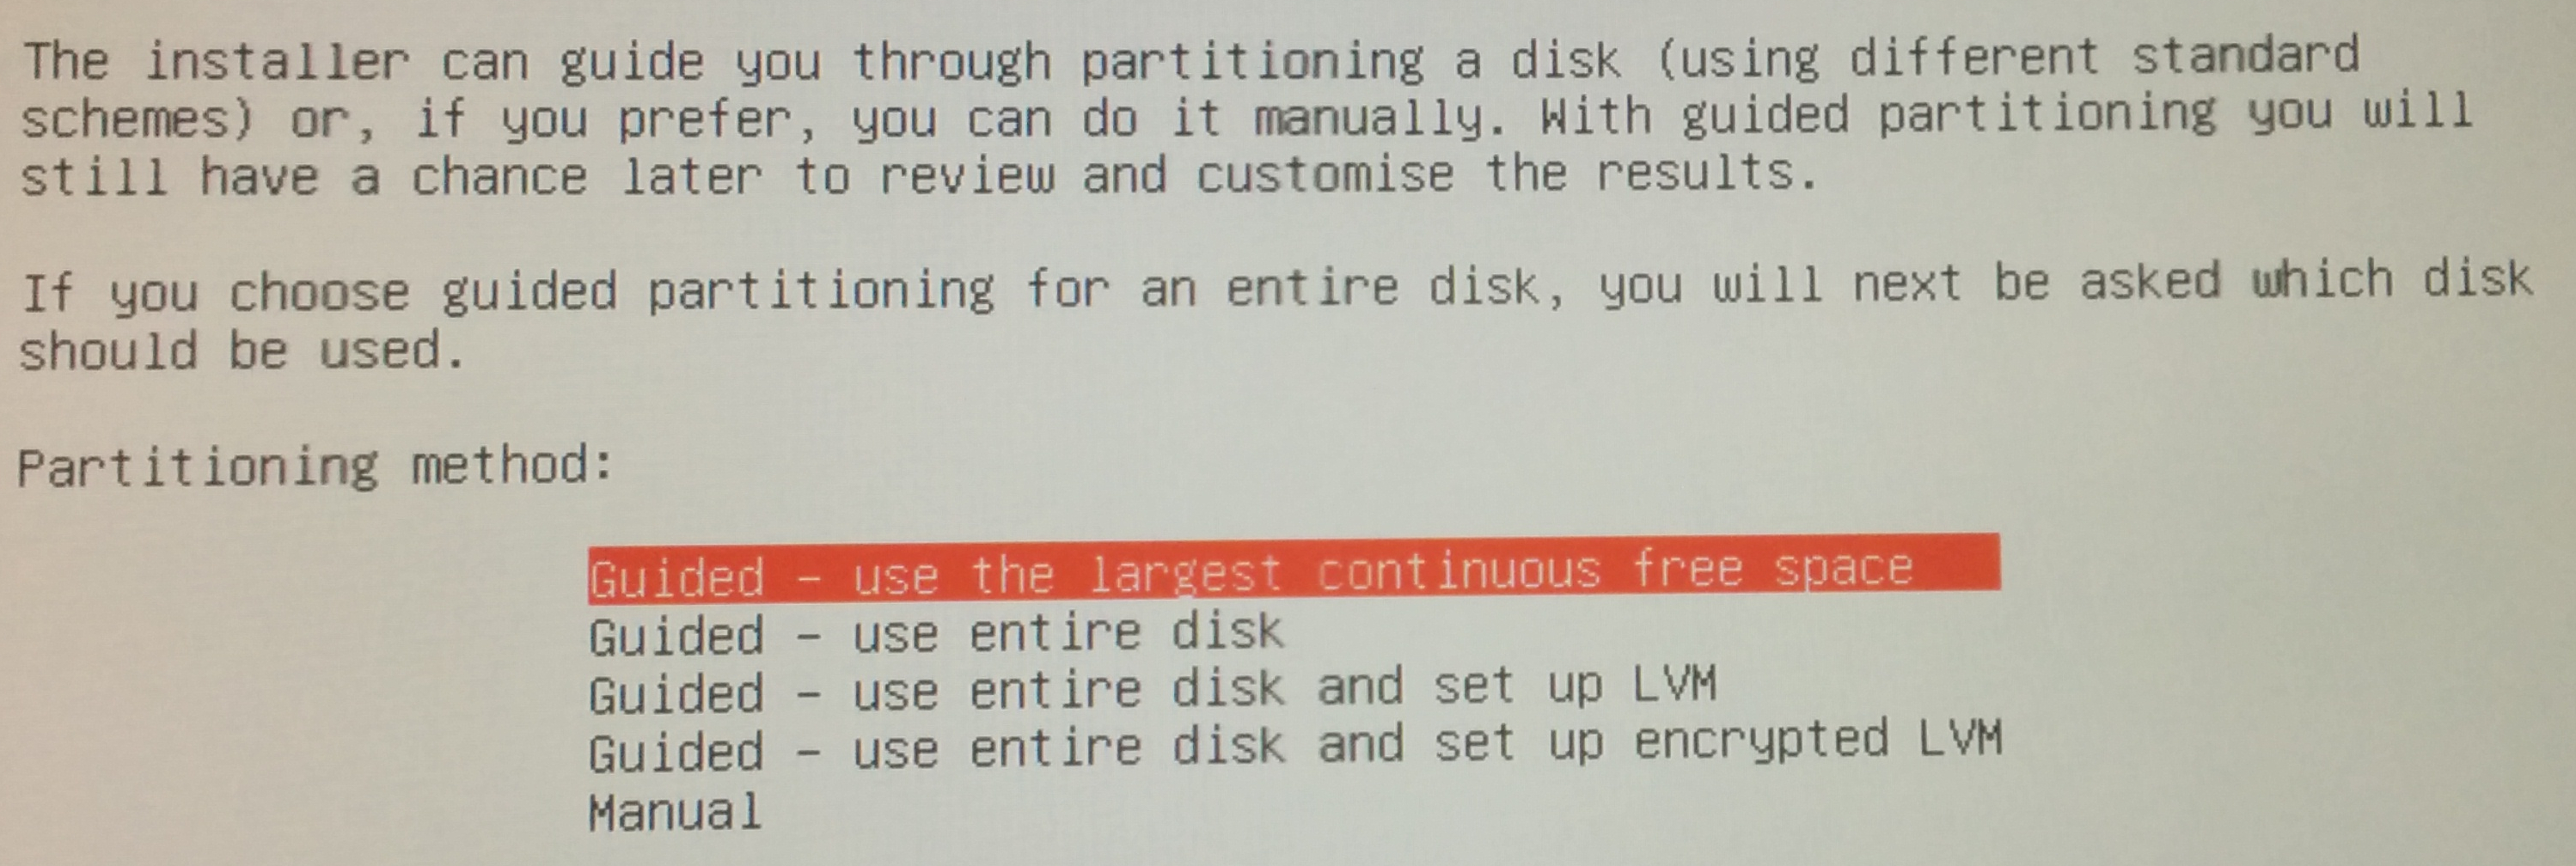
If you select the CD, it will start the Debian Installer. Just fill out everything as you normally would. I selected the “Guided - use the largest continuous free space”:
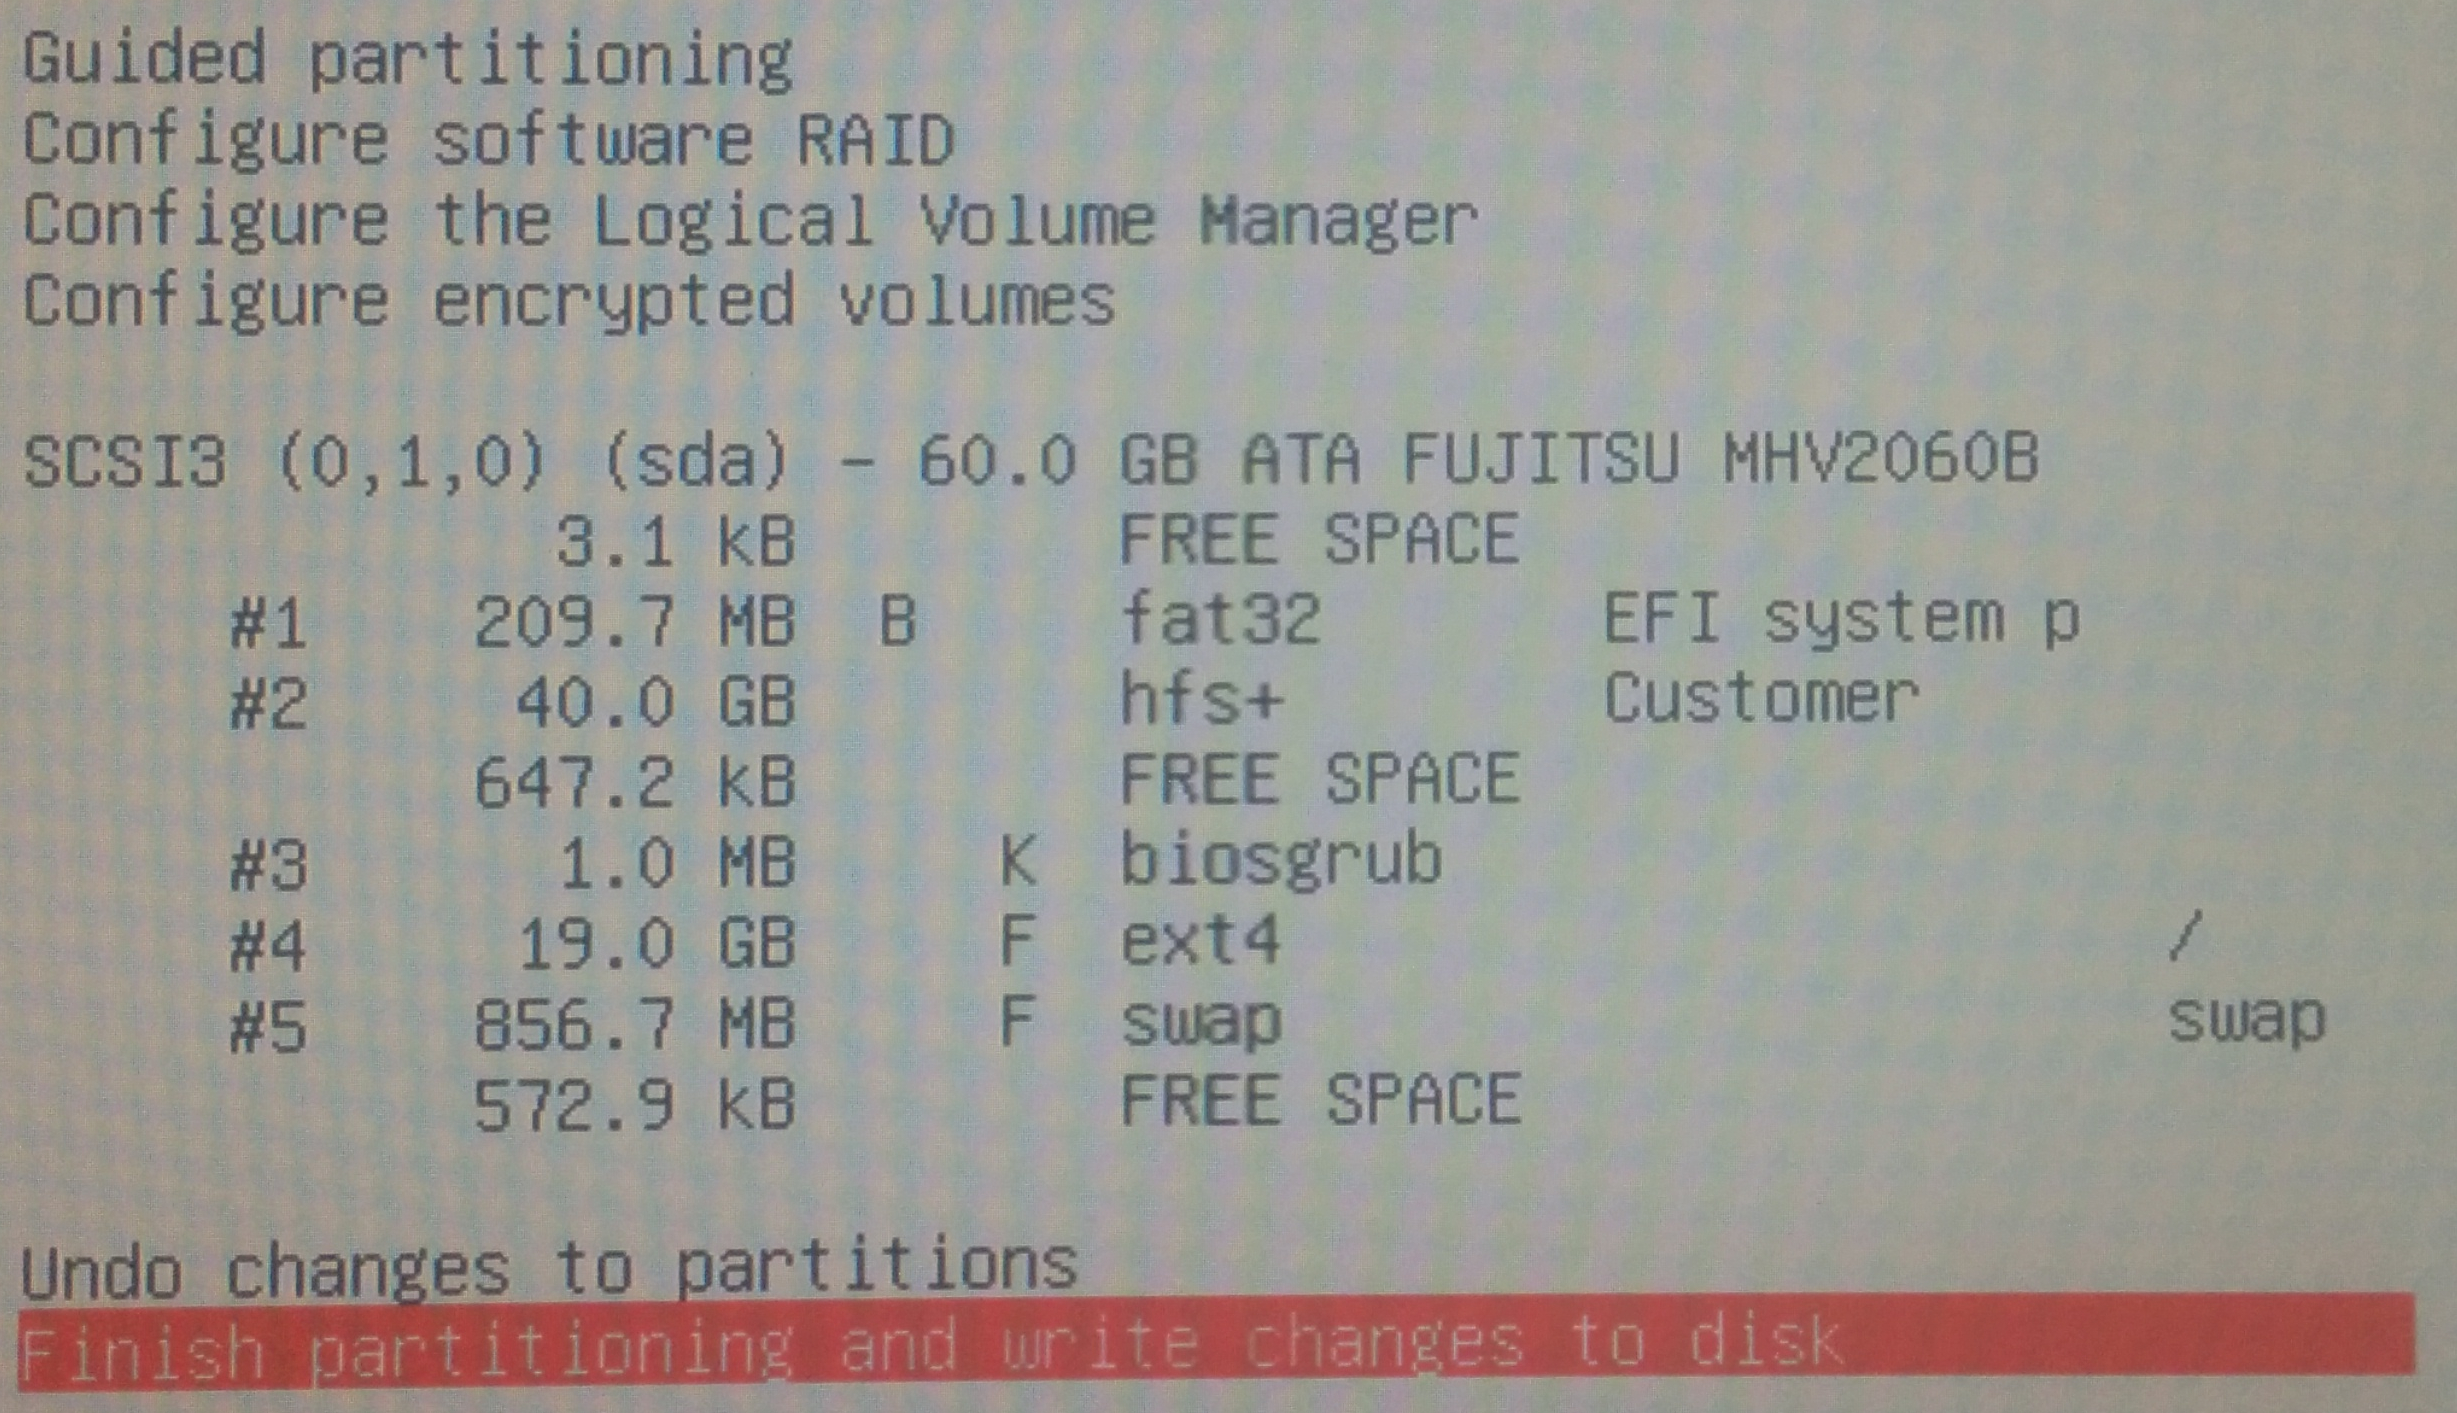
After selecting that it created the following partitions:
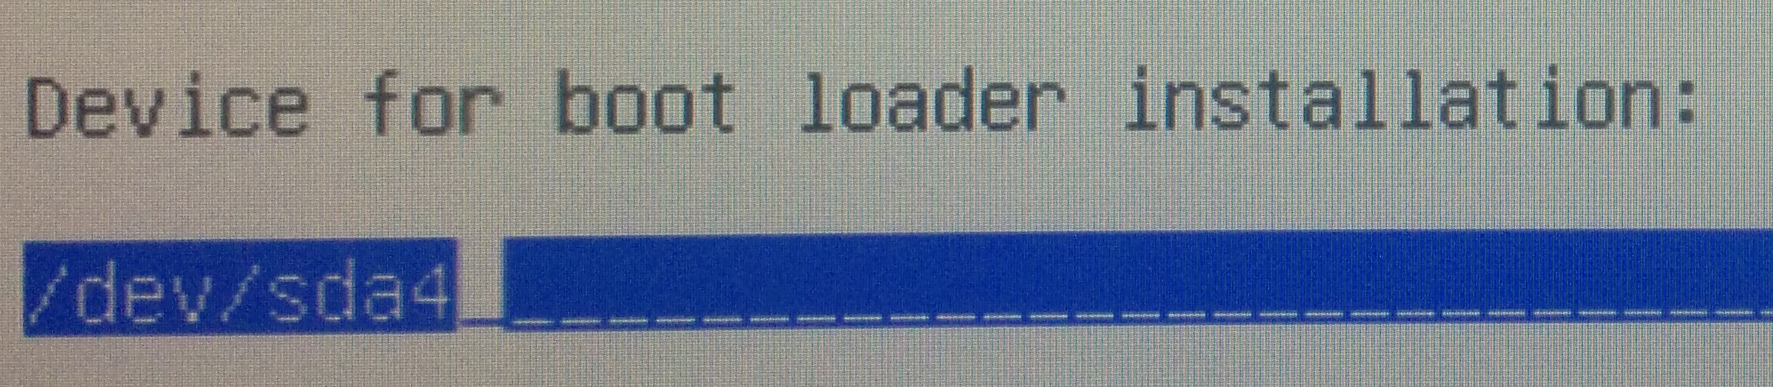
It will also ask you where to install GRUB and I selected the fourth partition (/dev/sda4):
After the install is finished it will eject the CD and reboot. Before rebooting insert the USB drive that has rEFIt on it.
Sync MBR with GPT
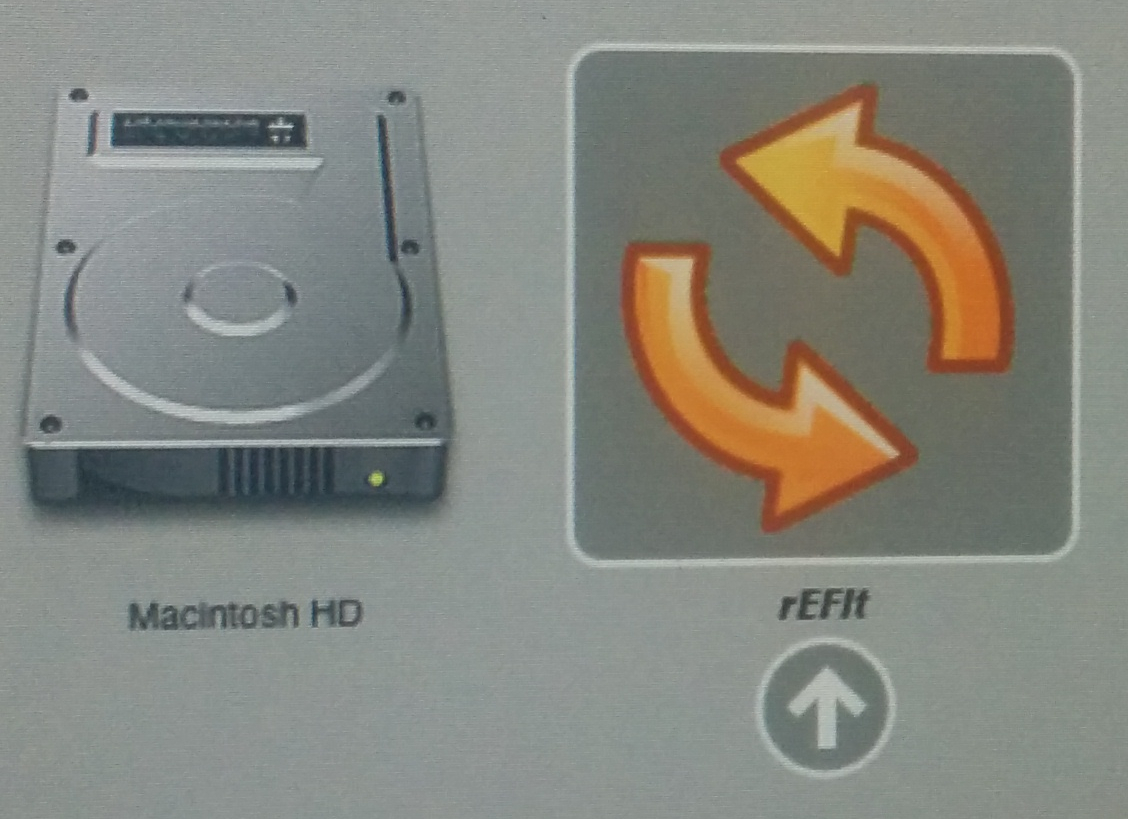
When the Mac is rebooting keep pressing the Alt key until you see the boot manager, since you have the USB stick plugged in, you will see the rEFIt icon:
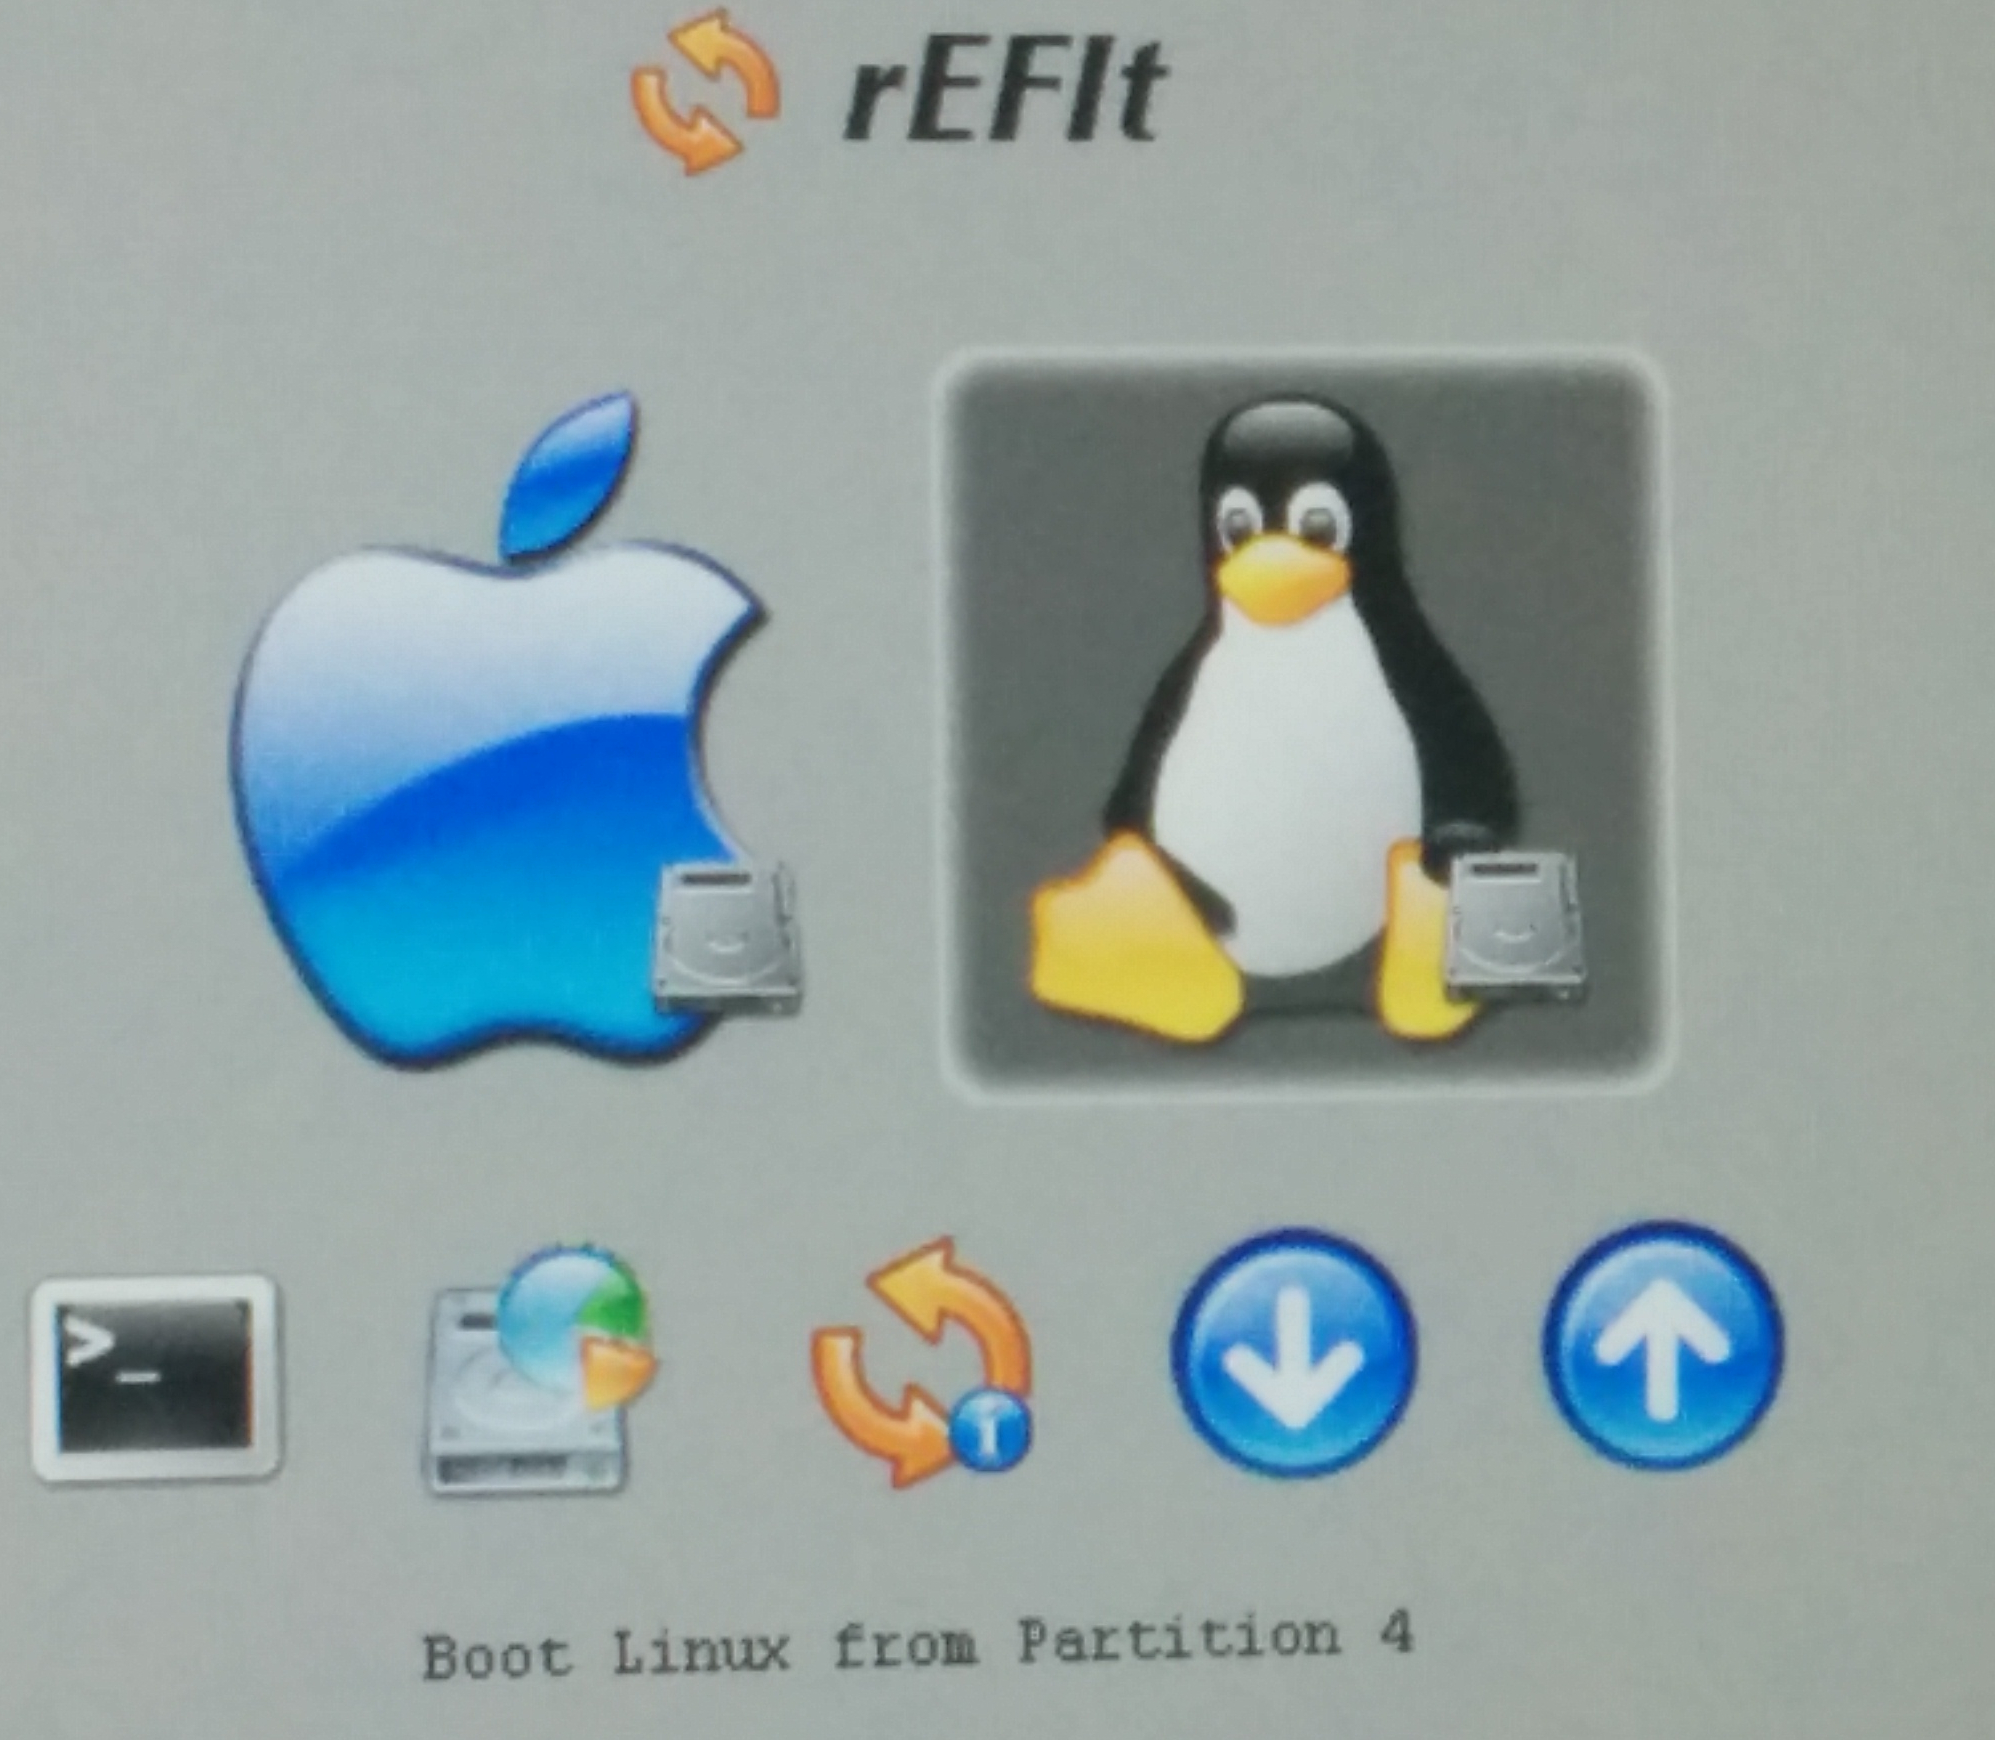
After booting from the rEFIt USB stick, you will see both your OS X and Linux Boot Disks:
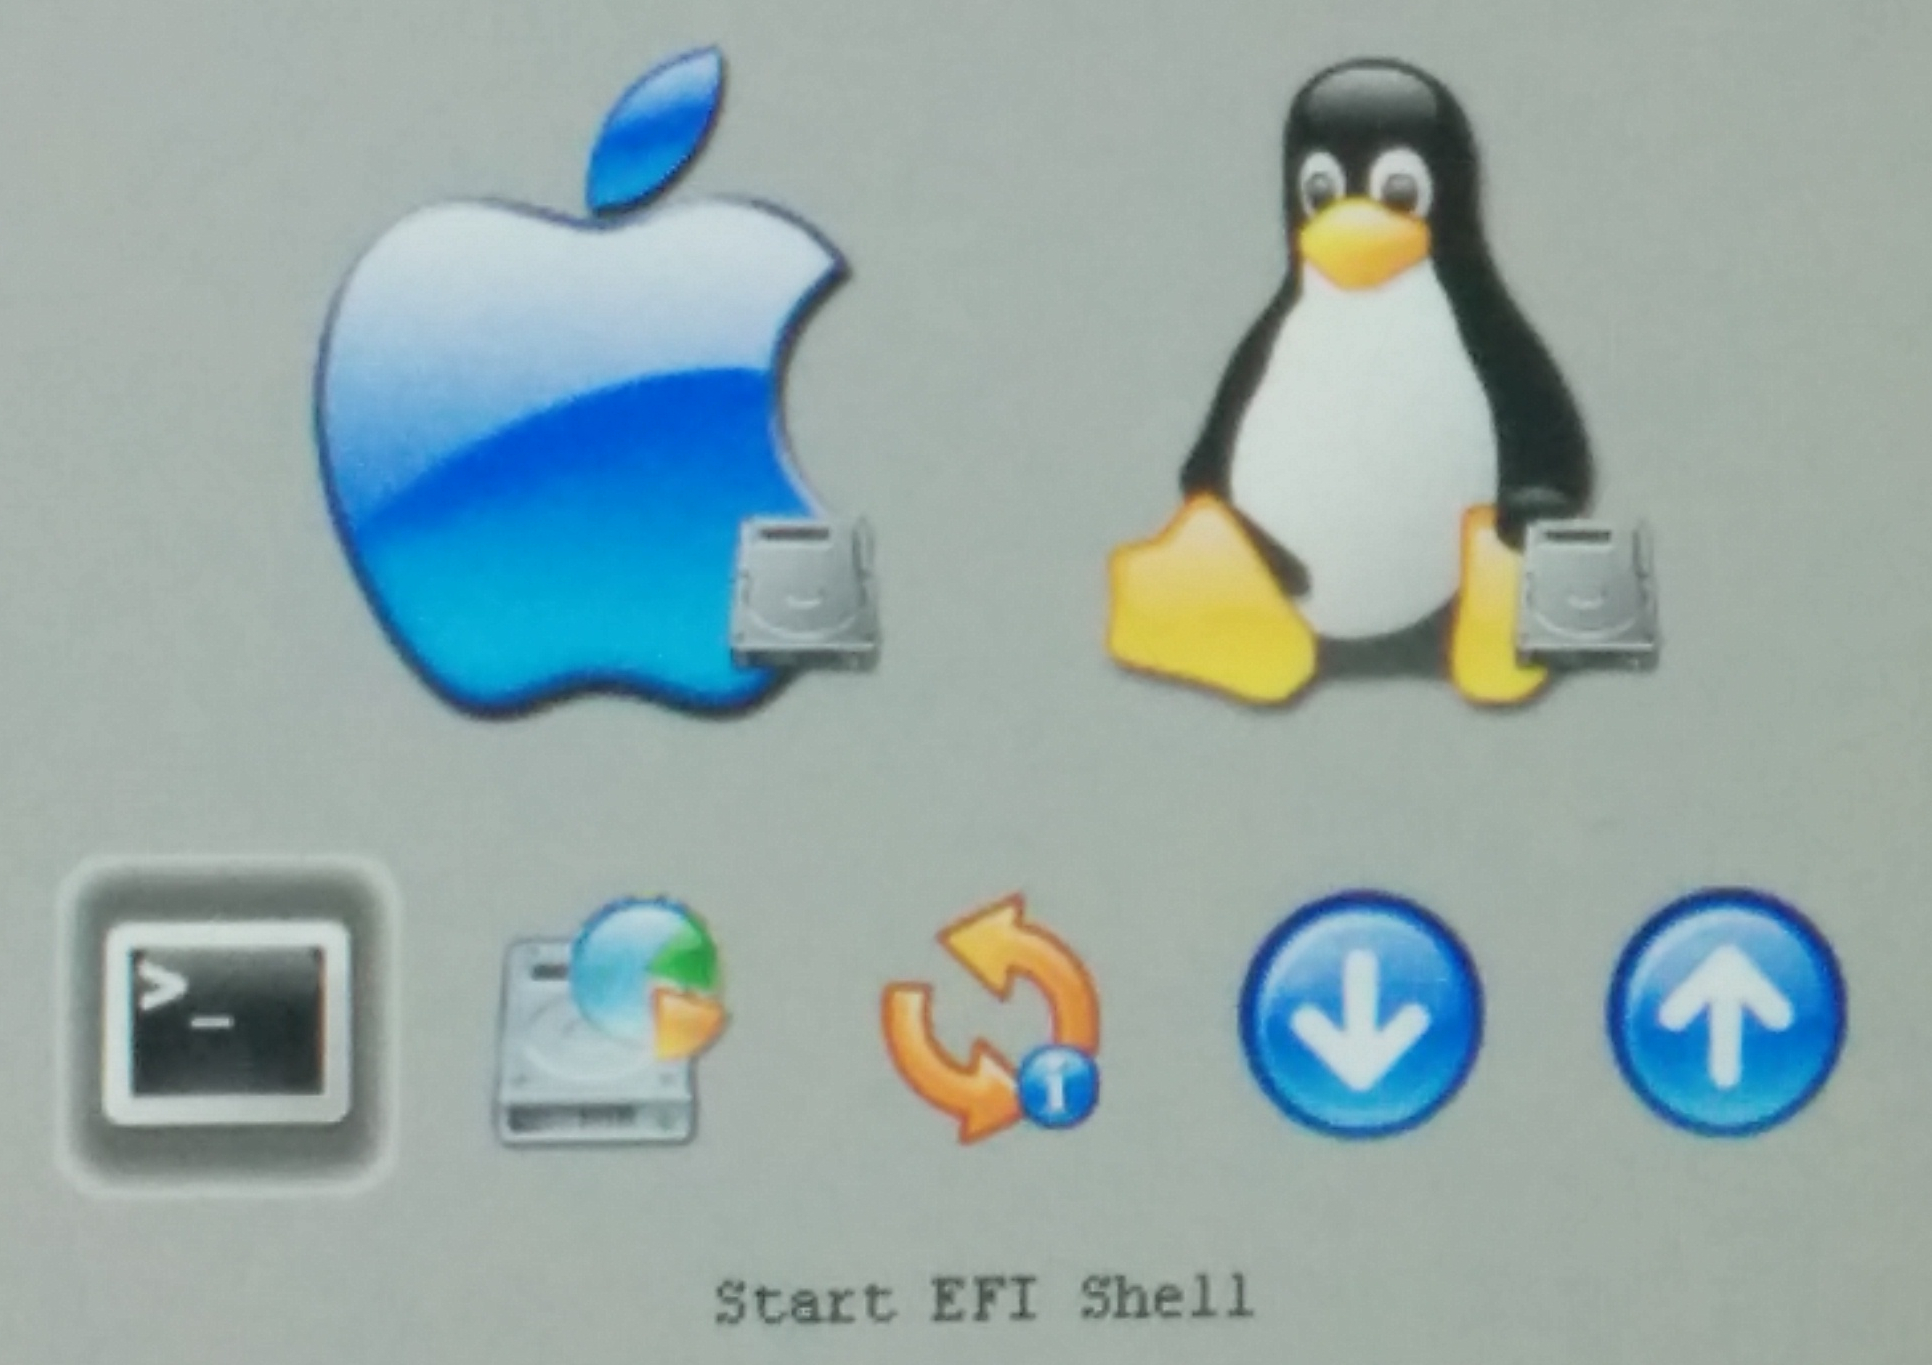
Scroll down and select the shell:
After the shell is started just run gptsync.efi, here is how it will look like:
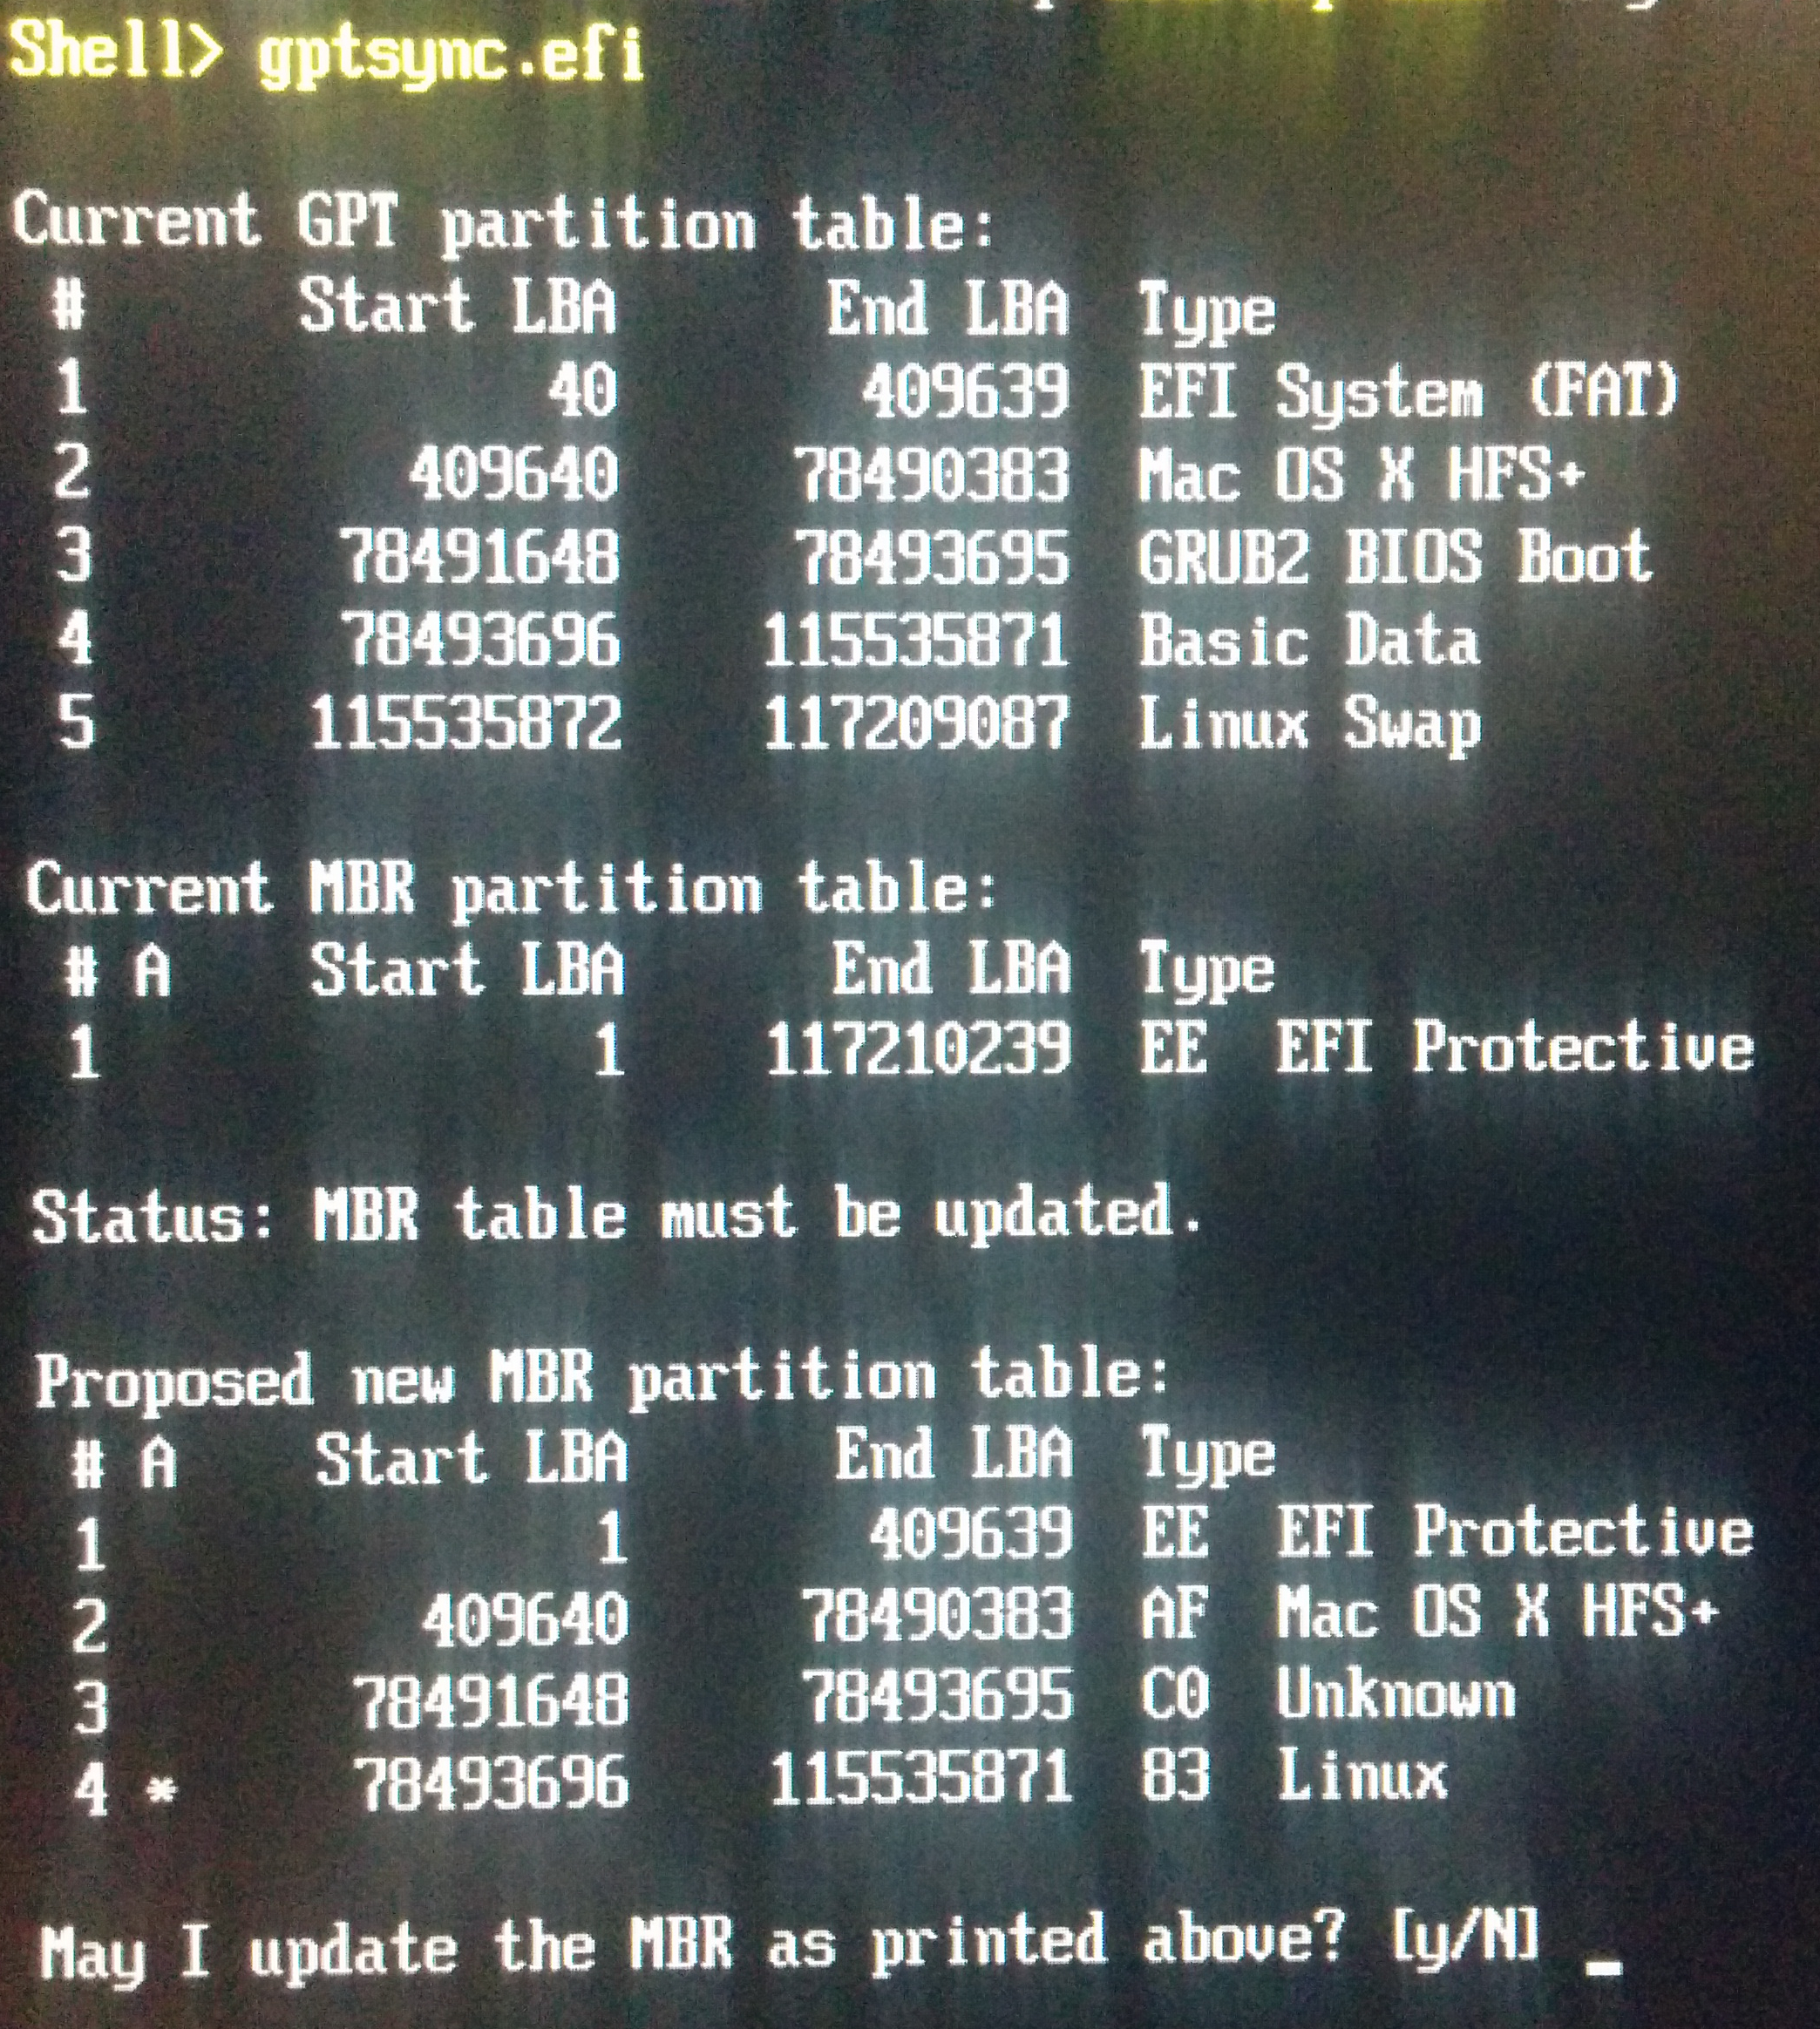
Here is the full output, just for reference:
shell>gptsync.efi

Current GPT partition table:
 #     Start LBA     End LBA 	Type
 1            40      409639	 EFI System (FAT)
 2        409640    78490383	 Mac OS X HFS+
 3      78491648    78493695	 GRUB2 BIOS Boot
 4      78493696   115535871	 Basic Data
 5     115535872   117209087     Linux Swap

Current MBR partition tab:
 # A   Start LBA     End LBA  Type
 1             1   117210239  EE EFI Protective

 Status: MRB Table must be updated

Proposed new MBR partition table:
 # Ą   Start LBA     End LBA 	 Type
 1             1       409639 	EE EFI Protective
 2        409640     78490383 	AF Mac OS X HFS+
 3      78491648     78493695 	C0 Unknown
 4      78493696    115535871 	83 Linux

May I update the MBR as printed above? [y/N] Yes

Writing new MBR...
MBR updated successfully!

* Hit any key to continue *
Type exit to leave the rEFIt shell.
Reboot into Debian
Reboot from the rEFIt USB disk and eject the USB disk, then hold down the Alt key and now you will see the new Windows Disk which is the Debian GRUB Boot loader:
Upon selecting the Windows boot disk, you will see the GRUB menu with the Debian entry:
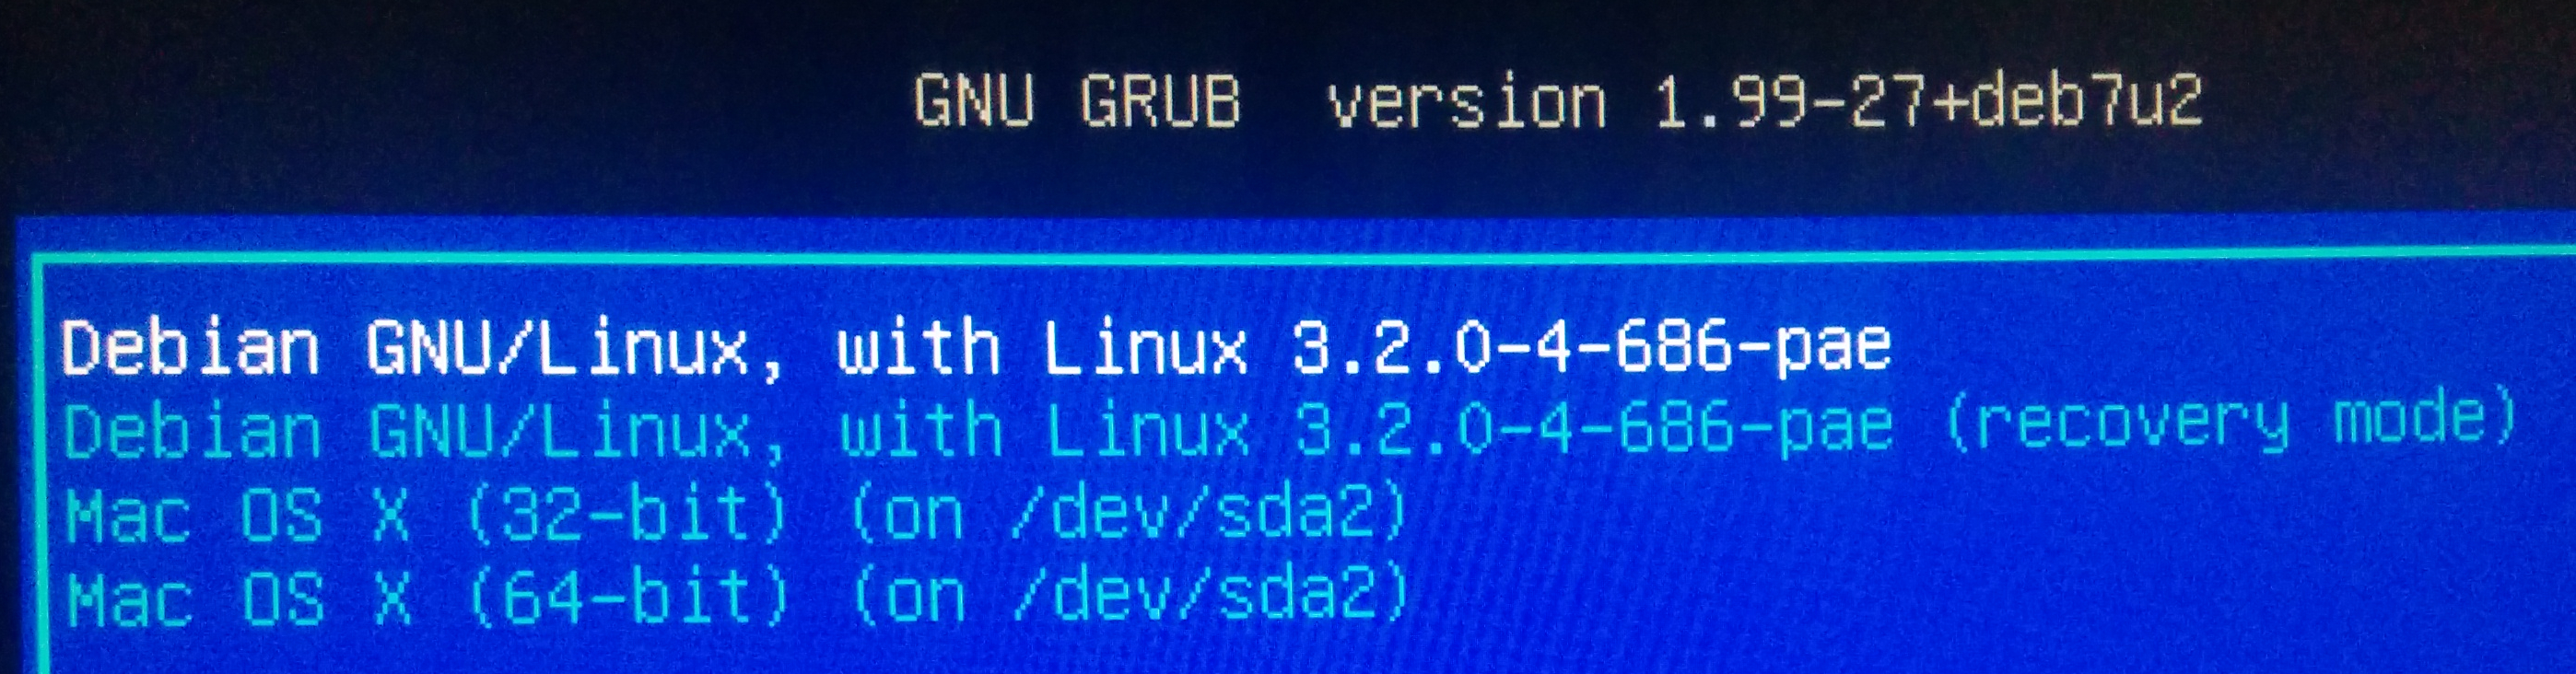
After that Debian will boot up normally.
Set Debian as the default boot disk
If you don’t want to keep pushing the Alt key to boot into Debian, we can bless our Debian paritition from Mac OS X. First list all the partitions to figure out which partition we need to bless:
$ diskutil list
/dev/disk0
   #:                       TYPE NAME                    SIZE       IDENTIFIER
   0:      GUID_partition_scheme                        *60.0 GB    disk0
   1:                        EFI                         209.7 MB   disk0s1
   2:                  Apple_HFS Macintosh HD            40.0 GB    disk0s2
   3: 21686148-6449-6E6F-744E-65656445                   1.0 MB     disk0s3
   4:       Microsoft Basic Data                         19.0 GB    disk0s4
   5:                 Linux Swap                         856.7 MB   disk0s5
It’s still partition 4, so let’s just run the following to bless that guy:
$ sudo bless --device /dev/disk0s4 --setBoot --legacy --verbose
..
...
Setting EFI NVRAM:
	efi-boot-device='<array><dict><key>IOEFIDevicePathType</key><string>HardwareMemoryMapped</string><key>EndingAddress</key><integer size="64">0xfff9ffff</integer><key>MemoryType</key><integer size="32">0xb</integer><key>StartingAddress</key><integer size="64">0xffe00000</integer></dict><dict><key>Guid</key><string>2B0585EB-D8B8-49A9-8B8C-E21B01AEF2B7</string><key>IOEFIDevicePathType</key><string>MediaFirmwareVolumeFilePath</string></dict><dict><key>IOEFIBootOption</key><string>HD</string></dict></array>'
Setting EFI NVRAM:
	IONVRAM-DELETE-PROPERTY='efi-boot-file'
Setting EFI NVRAM:
	IONVRAM-DELETE-PROPERTY='efi-boot-mkext'
Old boot-args: (null)
	Got token: (null)
	Preserving: (null)
Setting EFI NVRAM:
	boot-args='(null)'
Then after that if you reboot, it will automatically boot into Debian.
Create a Recovery 10.7 USB Disk
Although this won’t help with this old Mac Mini, but I noticed that it’s installed on this Mac, so I thought it would come in handy. Starting with 10.7 the image is included with the Mountain Lion Install App. So I first copied the DMG from the Application Folder onto a USB stick:
$ rsync -avzP /Applications/ Install Mac OS X Mountain Lion.app/Resources/Shared Support/InstallESD.dmg /Volumes/Untitled/.
Then plug that USB disk into a Linux box and we can start the conversion. I ran into this page which mentions that the InstallESD.dmg file is not a valid DMG file and we have to use 7zip to extract it. So let’s extract that file:
$7z x InstallESD.dmg

7-Zip [64] 9.20  Copyright (c) 1999-2010 Igor Pavlov  2010-11-18
p7zip Version 9.20 (locale=en_US.UTF-8,Utf16=on,HugeFiles=on,2 CPUs)

Processing archive: InstallESD.dmg

Extracting  Resources
Extracting  Resources/ar.lproj
Extracting  Resources/ar.lproj/Localizable.strings
Extracting  Resources/ar.lproj/VolumeCheck.strings
Extracting  Resources/ca.lproj
Extracting  Resources/ca.lproj/Localizable.strings
....
Extracting  Resources/zh_TW.lproj/Localizable.strings
Extracting  Resources/zh_TW.lproj/VolumeCheck.strings
Extracting  InstallMacOSX.pkg
Extracting  InstallMacOSX.pkg/Bom
Extracting  InstallMacOSX.pkg/Payload
Extracting  InstallMacOSX.pkg/Scripts
Extracting  InstallMacOSX.pkg/PackageInfo
Extracting  InstallMacOSX.pkg/InstallESD.dmg
Extracting  Distribution
Extracting  [TOC].xml

Everything is Ok

Folders: 32
Files: 67
Size:       4180898338
Compressed: 4179961589
Now we can convert the actual DMG into an ISO:
$cd InstallMacOSX.pkg/
$dmg2img -v -i InstallESD.dmg -o InstallESD.iso

dmg2img v1.6.2 is derived from dmg2iso by vu1tur (to@vu1tur.eu.org)

InstallESD.dmg --> InstallESD.iso

reading property list, 971484 bytes from address 4167740795 ...
partition 0: begin=195, size=430, decoded=284
partition 1: begin=914, size=430, decoded=284
partition 2: begin=1632, size=430, decoded=284
partition 3: begin=2367, size=430, decoded=284
partition 4: begin=3088, size=430, decoded=284
partition 5: begin=3801, size=961128, decoded=647284
partition 6: begin=965212, size=430, decoded=284

decompressing:
opening partition 0 ...         [2] 100.00%  ok
opening partition 1 ...         [2] 100.00%  ok
opening partition 2 ...         [2] 100.00%  ok
opening partition 3 ...         [2] 100.00%  ok
opening partition 4 ...         [2] 100.00%  ok
opening partition 5 ...     [16177] 100.00%  ok

Archive successfully decompressed as InstallESD.iso

You should be able to mount the image [as root] by:
Now we can use dd to install that ISO on a USB Stick:
$sudo dd if=InstallMacOSX.pkg/InstallESD.iso of=/dev/sdb bs=1M
4397+1 records in
4397+1 records out
4611469312 bytes (4.6 GB) copied, 1009.75 s, 4.6 MB/s
Plugging that into another Mac that handle OS 10.7 and you can use it for recovery tools. Also if you wanted to, you could use DiskUtility in Mac OS X to perform the same procedure. The steps are laid out here.