Writing Better Puppet Modules
After playing around with puppet I realized that it’s inevitable that I will have to write a puppet module. To get started check out this page (there is a good 3-part blog series here as well). The module should break down into 5 files (just my opinion… every one seems to have their own patterns… check out the note about best practices from Building a Functional Puppet Workflow Part 1: Module Structure):
- init.pp (main class)
- params.pp (defines the default parameters of the class)
- install.pp (install the software)
- config.pp (configures the software)
- service.pp (ensures the service is started)
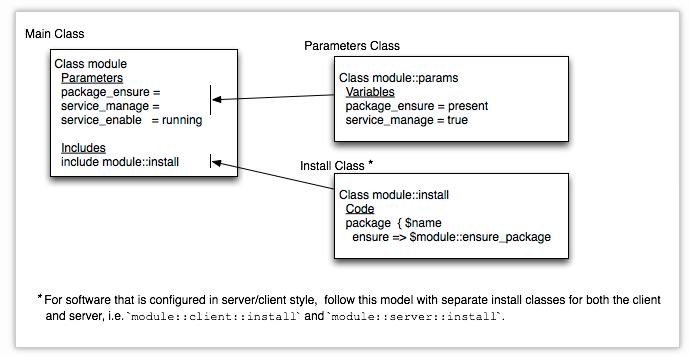
From the first link here is a pretty good diagram of the way all the files interact with each other:
Puppet Class Ordering
You will also notice that there are different methods to do ordering of the class execution. For example from here:
class ntp(
   $version = "present",
   $ntpservers = ["1.pool.ntp.org", "2.pool.ntp.org"],
   $enable = true,
   $start = true
) {
   class{'ntp::install': } ->
   class{'ntp::config': } ~>
   class{'ntp::service': } ->
   Class["ntp"]
}
Or even the first guide that I mentioned has the following:
Best practices recommend basing your requires, befores, and other ordering-related dependencies on classes rather than resources. Class-based ordering allows you to shield the implementation details of each class from the other classes. You can do things like:
file { 'configuration':
  ensure  => present,
  require => Class['module::install'],
}
and from the same guide, you can use containment and anchoring. Here is anchoring:
Anchor['module::begin'] ->
  Class['module::install'] ->
  Class['module::config']  ->
  Class['module::service'] ->
Anchor['module::end']
and here is containement:
class { 'ssh::server::install': } ->
class { 'ssh::server::config': } ~>
class { 'ssh::server::service': }

contain ssh::server::install
contain ssh::server::config
contain ssh::server::service
I usually take the first approach, as it makes the most sense to me.
Puppet Module Template/Skeleton
If you decide to use the first approach you can grab a skeleton/template of a puppet module from here, you can just install it with the following commands:
git clone https://github.com/garethr/puppet-module-skeleton
cd puppet-module-skeleton
find skeleton -type f | git checkout-index --stdin --force --prefix="$HOME/.puppet/var/puppet-module/" --
Then creating a module from a template will look like this:
elatov@fed:~$puppet module generate test-test
Notice: Generating module at /home/elatov/test-test
test-test
test-test/.fixtures.yml
test-test/.gitignore
test-test/.rspec
test-test/.travis.yml
test-test/CHANGELOG
test-test/CONTRIBUTING.md
test-test/CONTRIBUTORS
test-test/Gemfile
test-test/Guardfile
test-test/LICENSE
test-test/Modulefile
test-test/README.markdown
test-test/Rakefile
test-test/files
test-test/files/.gitkeep
test-test/lib
test-test/lib/puppet
test-test/lib/puppet/provider
test-test/lib/puppet/provider/.gitkeep
test-test/lib/puppet/type
test-test/lib/puppet/type/.gitkeep
test-test/manifests
test-test/manifests/config.pp
test-test/manifests/init.pp
test-test/manifests/install.pp
test-test/manifests/params.pp
test-test/manifests/service.pp
test-test/metadata.json
test-test/templates
test-test/templates/.gitkeep
test-test/tests
test-test/tests/init.pp
Now you can import that directory (rename it from test-test to just test) into geppetto and modify the 5 files that were mentioned before. I even put together a skeleton to create a bare minimum puppet module that includes a client/server setup. Here are the files the template creates:
elatov@fed:~$puppet module generate t-test
Notice: Generating module at /home/elatov/t-test
t-test
t-test/Modulefile
t-test/files
t-test/manifests
t-test/manifests/client
t-test/manifests/client/config.pp
t-test/manifests/client/install.pp
t-test/manifests/client/service.pp
t-test/manifests/client.pp
t-test/manifests/init.pp
t-test/manifests/params.pp
t-test/manifests/server
t-test/manifests/server/config.pp
t-test/manifests/server/install.pp
t-test/manifests/server/service.pp
t-test/manifests/server.pp
t-test/metadata.json
t-test/templates
It doesn’t contain any module tests or anything like that.
Puppet init.pp Manifest
Here is how the default init.pp looks like for me:
elatov@fed:~$cat module/manifests/init.pp
# == Class: module
#
# Full description of class module here.
#
# === Parameters
#
# [*sample_parameter*]
#   Explanation of what this parameter affects and what it defaults to.
#
class module (
  ## Packages
  $package_name		= $module::params::module_package_name,

  ## Services
  $service_name		= $module::params::module_service_name,

  ## Dirs
  $config_dir		= $module::params::module_config_dir,
  $service_dir		= $module::params::module_service_dir,
  $home			= $module::params::module_home,

  ## Conf Files
  $config_file		= $module::params::module_config_file,
  $service_file		= $module::params::module_service_file,

  ## settings
  $module_settings	= $module::params::module_settings,
) inherits module::params {

  # validate parameters here
  validate_hash($settings)
  validate_string($package_name)

  class { 'module::install': } ->
  class { 'module::config': } ~>
  class { 'module::service': } ->
  Class['module']
}
From the puppet documentation:
The main class of any module must share the name of the module and be located in the init.pp file. The name and location of the main module class is extremely important, as it guides the autoloader behavior. The main class of a module is its interface point and ought to be the only parameterized class if possible. Limiting the parameterized classes to just the main class allows you to control usage of the entire module with the inclusion of a single class. This class should provide sensible defaults so that a user can get going with include module.
So upon including that class it will grab the defaults from the params.pp file, unless the class is instantiated and parameters are passed to the class at which point the parameters are overwritten. After that, we validate to make sure the variables are of the intended data types (you need the stdlib module for those functions) and then we call the classes in the appropriate order. Also note that we inherit from the params class, since the variables are actually defined there.
Puppet params.pp Manifest
Here is how mine looks like by default:
elatov@fed:~$cat module/manifests/params.pp
# == Class module::params
#
# This class is meant to be called from module
# It sets variables according to platform
#
class module::params {

	$module_settings = {
			   'user' 	=> 'test',
			   'host'	=> $::hostname,
			   }

	case $::osfamily {
		'Debian': {
			$module_package_name		= 'module'
			$module_service_name		= 'module'
			$module_config_dir		= '/etc/default'
			$module_service_dir		= '/etc/init.d'
			$module_home			= '/usr/local/module'
			$module_config_file		= 'module.sysconf.init'
			$module_service_file		= 'module.init'
		}
		'RedHat': {
			$module_package_name		= 'module'
			$module_service_name		= 'module'
			$module_config_dir		= '/etc/sysconfig'
			$module_home			= '/usr/local/module'

			if $::operatingsystemmajrelease >= 7 {
				$module_service_dir  	= '/usr/lib/systemd/system'
				$module_config_file  	= 'module.sysconf.systemd'
				$module_service_file 	= 'module.service'
			}else{
				$module_service_dir	= '/etc/init.d'
				$module_config_file	= 'module.sysconf.init'
				$module_service_file	= 'module.init'
			}
		}
		default: {
			fail("${::operatingsystem} not supported")
		}
	}
}
This figures out all the necessary configurations and where all the files will go depending on the OS. I also use a hash for all the settings, so if you ened to override the settings for the software you are installing, you can pass in a hash and the template will parse them appropriately. There is a move to use hiera and ENC (External Node Classifiers) for these, but I am still just learning and I don’t use those yet. There is actually a pretty good discuss in When to Hiera (Aka: How Do I Module?). From that post here are some pros and cons of using the params class pattern:
Pros:
- All conditional logic is in a single class
- You always know which class to seek out if you need to change any of the logic used to determine a variable’s value
- You can use the include function because parameters for each class will be defaulted to the values that came out of the params class
- If you need to override the value of a particular parameter, you can still use the parameterized class declaration syntax to do so
- Anyone using Puppet version 2.6 or higher can use it (i.e. anyone who’s been using Puppet since about 2010).
Cons:
- Conditional logic is repeated in every module
- You will need to use inheritance to inherit parameter values in each subclass
- It’s another place to look if you ALSO use Hiera inside the module
- Data is inside the manifest, so business logic is also inside params.pp
Then it goes into some alternatives, like how to use hiera. Hopefully I will cover that my self at a later time.
Puppet install.pp Manifest
Here is how the default one looks like for me:
elatov@fed:~$cat module/manifests/install.pp
# == Class module::install
#
class module::install  {

  ensure_packages ($module::package_name,{ 'ensure'=> 'present' })
}
Depends on the stdlib module (in my case any ways). From the puppet page:
The install class must be located in the install.pp file, and should contain all of the resources related to getting the software the module manages onto the node.
Puppet config.pp manifest
Here is my default one that I use:
elatov@fed:~$cat module/manifests/config.pp
# == Class module::config
#
# This class is called from module
#
class module::config {

  ensure_resource ('user',$module::settings['user'],{ 'ensure'=> 'present' })

  if $module::service_file =~ /(?i:service)/ {
    file { $module::service_file:
      ensure  => "present",
      path    => "${module::service_dir}/${module::service_file}",
      mode    => '0644',
      content => template("module/${module::service_file}.erb"),
    }~>
    exec { "${module_name}-reload-systemd":
      path    		=> ["/bin","/usr/bin"],
      command 		=> "systemctl daemon-reload",
      refreshonly 	=> true,
    }
  }

  if $module::service_file =~ /(?i:init)/ {
    file { $module::service_file:
      ensure  => 'present',
      path    => "${module::service_dir}/module",
      mode    => '0755',
      content => "puppet:///modules/module/${module::service_file}",
    }
  }


  file { $module::config_dir:
    ensure  => 'directory',
  }

  file { $module::config_file:
    ensure  => 'present',
    path    => "${module::config_dir}/module",
    content => template("module/${module::config_file}.erb"),
    require => File [$module::config_dir],
  }
}
From the puppet page:
The resources related to configuring the installed software should be placed in a config class. The config class must be named module::config and must be located in the config.pp file.
It checks what config file is assigned and puts it in the correct location. This is mostly cause I have machines using systemd and SysV init.
Puppet service.pp Manifest
Another easy one:
elatov@fed:~$cat module/manifests/service.pp
# == Class module::service
#
# This class is meant to be called from module
# It ensure the service is running
#
class module::service {

  service { $module::service_name:
    ensure     => running,
    enable     => true,
    hasstatus  => true,
    hasrestart => true,
  }
}
Puppet Templates in Manifests
This deserves a topic of it’s own cause so advanced. But for now here is a sample of the template I used for setting up the subsonic configuration file:
SUBSONIC_ARGS="--host=<%= subsonic_settings['host'] %> --max-memory=<%= subsonic_settings['max_memory'] %>"
SUBSONIC_USER=<%= subsonic_settings['user'] %>
But each of the configuration files are unique per software, so you will have to modify them accordingly. Sometimes instead of templates I end up using augeas and I will do a post on that later.
Using the Puppet Module
After filling out the necessary information ,and you will probably have to change some logic (every software is a snow flake and is very unique), you can install and configure the software by just instantiating the class/module in your node configuration:
class {'module':}
Or you can override some settings by passing in some parameters:
class {'module':
	package_name => 'other_package_name',
}