Uploading an OVF to vCloud Director
I was trying to upload an OVF into vCloud director and gave me some grief. Throughout my troubleshooting I tried many things (a couple unncessary), but in the end I was able to import it.
Import Error
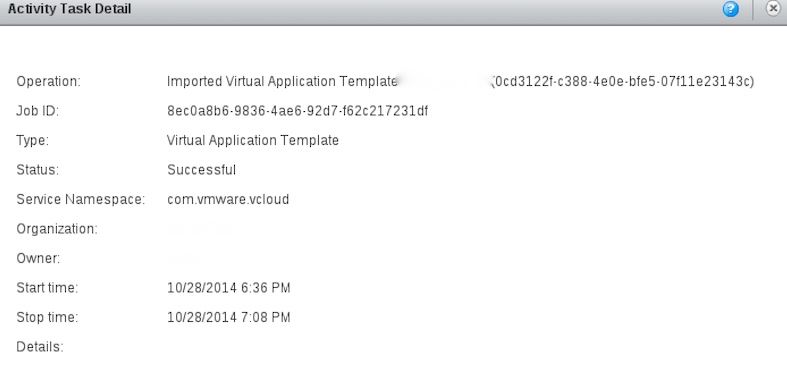
After waiting a whole hour of importing (now I know why) vCloud gave me the following error:
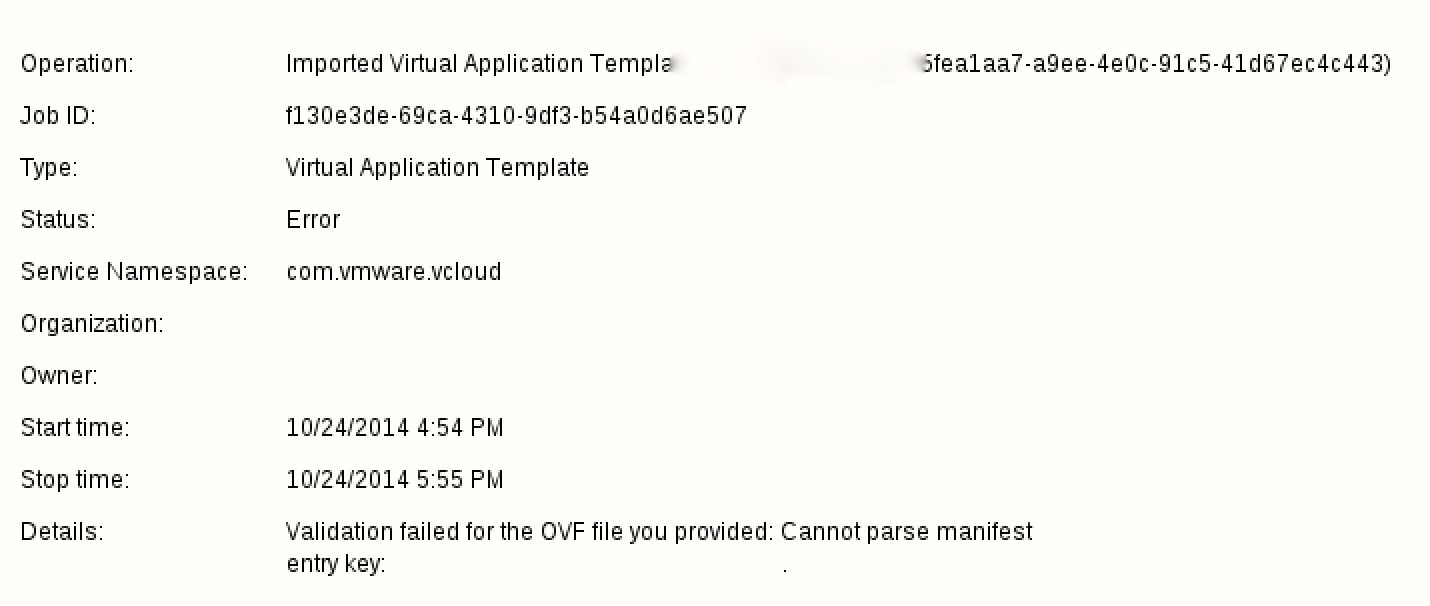
The error was a little vauge and it was actually missing the most important part of the error. It just had this:
Validation failed for the OVF file you provided: Cannot parse manifest entry key:
Modifying the OVF file
At this point I went to vCloud Director and exported another template to see how their OVF looked like and here is how it looked like:
~$ ovftool ovas/descriptor.ovf
OVF version:   1.0
VirtualApp:    false
Name:          TEMPLATE

Download Size:  354.44 MB

Deployment Sizes:
  Flat disks:   20.00 GB
  Sparse disks: Unknown

Networks:
  Name:        01-Direct

  Name:        02-Direct

Virtual Machines:
  Name:               TEMPLATE
  Operating System:   slesguest
  Virtual Hardware:
    Families:         vmx-07
    Number of CPUs:   2
    Cores per socket: 1
    Memory:           8.00 GB

    Disks:
      Index:          0
      Instance ID:    2000
      Capacity:       20.00 GB
      Disk Types:     SCSI-lsilogic

    NICs:
      Adapter Type:   E1000
      Connection:     01-Direct

      Adapter Type:   E1000
      Connection:     02-Direct
Mine looked slightly different (had a video card with 3D support, the virtual hardware was set at 11, SATA controller for the CD drive and other settings), so I went ahead and removed any extraneous settings and left the bare minimum. Here is what I ended up with:
$ cat Template.ovf
<?xml version="1.0" encoding="UTF-8"?>
<!--Generated by VMware ovftool 4.0.0 (build-2060496), UTC time: 2014-10-31T17:39:32.918779Z-->
<Envelope vmw:buildId="build-2060496" xmlns="http://schemas.dmtf.org/ovf/envelope/1" xmlns:cim="http://schemas.dmtf.org/wbem/wscim/1/common" xmlns:ovf="http://schemas.dmtf.org/ovf/envelope/1" xmlns:rasd="http://schemas.dmtf.org/wbem/wscim/1/cim-schema/2/CIM_ResourceAllocationSettingData" xmlns:vmw="http://www.vmware.com/schema/ovf" xmlns:vssd="http://schemas.dmtf.org/wbem/wscim/1/cim-schema/2/CIM_VirtualSystemSettingData" xmlns:xsi="http://www.w3.org/2001/XMLSchema-instance">
  <References>
    <File ovf:href="Template-disk1.vmdk" ovf:id="file1" ovf:size="10971932672"/>
  </References>
  <DiskSection>
    <Info>Virtual disk information</Info>
    <Disk ovf:capacity="120" ovf:capacityAllocationUnits="byte * 2^30" ovf:diskId="vmdisk1" ovf:fileRef="file1" ovf:format="http://www.vmware.com/interfaces/specifications/vmdk.html#streamOptimized" ovf:populatedSize="21584740352"/>
  </DiskSection>
  <VirtualSystem ovf:id="vm">
    <Info>A virtual machine</Info>
    <Name>Template</Name>
    <OperatingSystemSection ovf:id="94" vmw:osType="ubuntu64Guest">
      <Info>The kind of installed guest operating system</Info>
    </OperatingSystemSection>
    <VirtualHardwareSection>
      <Info>Virtual hardware requirements</Info>
      <System>
        <vssd:ElementName>Virtual Hardware Family</vssd:ElementName>
        <vssd:InstanceID>0</vssd:InstanceID>
        <vssd:VirtualSystemIdentifier>Template</vssd:VirtualSystemIdentifier>
        <vssd:VirtualSystemType>vmx-07</vssd:VirtualSystemType>
      </System>
      <Item>
        <rasd:AllocationUnits>hertz * 10^6</rasd:AllocationUnits>
        <rasd:Description>Number of Virtual CPUs</rasd:Description>
        <rasd:ElementName>4 virtual CPU(s)</rasd:ElementName>
        <rasd:InstanceID>1</rasd:InstanceID>
        <rasd:ResourceType>3</rasd:ResourceType>
        <rasd:VirtualQuantity>4</rasd:VirtualQuantity>
      </Item>
      <Item>
        <rasd:AllocationUnits>byte * 2^20</rasd:AllocationUnits>
        <rasd:Description>Memory Size</rasd:Description>
        <rasd:ElementName>4096MB of memory</rasd:ElementName>
        <rasd:InstanceID>2</rasd:InstanceID>
        <rasd:ResourceType>4</rasd:ResourceType>
        <rasd:VirtualQuantity>4096</rasd:VirtualQuantity>
      </Item>
      <Item>
        <rasd:Address>0</rasd:Address>
        <rasd:Description>SCSI Controller</rasd:Description>
        <rasd:ElementName>scsiController0</rasd:ElementName>
        <rasd:InstanceID>4</rasd:InstanceID>
        <rasd:ResourceSubType>lsilogic</rasd:ResourceSubType>
        <rasd:ResourceType>6</rasd:ResourceType>
      </Item>
      <Item>
        <rasd:AddressOnParent>0</rasd:AddressOnParent>
        <rasd:ElementName>disk0</rasd:ElementName>
        <rasd:HostResource>ovf:/disk/vmdisk1</rasd:HostResource>
        <rasd:InstanceID>5</rasd:InstanceID>
        <rasd:Parent>4</rasd:Parent>
        <rasd:ResourceType>17</rasd:ResourceType>
      </Item>
    </VirtualHardwareSection>
  </VirtualSystem>
</Envelope>
And ovftool was parsing the configuration just fine:
$ ovftool Template.ovf
OVF version:   1.0
VirtualApp:    false
Name:          Template

Download Size:  10.22 GB

Deployment Sizes:
  Flat disks:   120.00 GB
  Sparse disks: 20.10 GB

Virtual Machines:
  Name:               Template
  Operating System:   ubuntu64guest
  Virtual Hardware:
    Families:         vmx-08
    Number of CPUs:   4
    Cores per socket: 1
    Memory:           4.00 GB

    Disks:
      Index:          0
      Instance ID:    5
      Capacity:       120.00 GB
      Disk Types:     SCSI-lsilogic
Even after that the import failed.
Deploying an OVF directly to an ESXi host
I had access to a local ESXi machine so I went ahead and deployed the OVF on that machine. Here is what I saw:
$ovftool -ds=Datastore1 Template.ovf vi://root@1.1.1.81
Opening OVF source: Template.ovf
Enter login information for target vi://1.1.1.81/
Username: root
Password: ********
Opening VI target: vi://root@1.1.1.81:443/
Deploying to VI: vi://root@1.1.1.81:443/
Transfer Completed
Warning:
- No manifest file found.
- No manifest entry found for: 'Template.ovf'.
Completed successfully
We can see that the error is similar ( No manifest entry found for) to the one we see in vCloud director (but the ESXi host treated it as a warning and moved on). And we also see that it doesn’t have a manifest entry for the actual OVF file (this part was missing from the vCloud error). So I added a shasum of the OVF file into the manifest and then the error went away:
$ cat Template.mf
SHA1(Template-disk1.vmdk)= 307ec99f12cb2734a99b82cbb5ef8f4f671da705
SHA1(Template.ovf)= 45a355d39a67bab1b5b0add6791acd0ee7e2c9c9
$ ovftool -ds=Datastore1 Template.ovf vi://root@1.1.1.81
Opening OVF source: Template.ovf
The manifest validates
Enter login information for target vi://1.1.1.81/
Username: root
Password: ********
Opening VI target: vi://root@1.1.1.81:443/
Deploying to VI: vi://root@1.1.1.81:443/
Transfer Completed
Completed successfully
Another Import Error
So then I tried uploading that OVF to vCloud and now I received a different error:
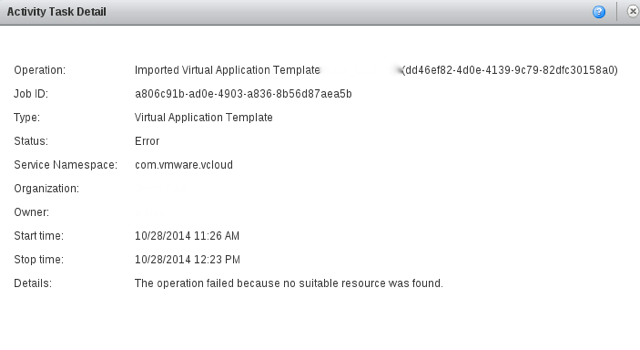
This time I saw:
The operation failed because no suitable resource was found
I ran into a couple of links that describe the issue:
- VMware Communities
- vCloud Director 5.1 Release Notes
- the operation failed because no suitable resource was found
A couple described a known Bug with vCloud 5.1 and the other mentioned that it’s a space issue on the destination datatore. The OVA expanded all the way to 120GB and I really need 20GB. So I decided to shrink the VMDK on the template VM and then uploading the resulted OVA from the new template.
Shinking VMDK on a Linux Mint VM
This process was surprisingly long but here are the steps I took to achieve my end goal. First, since I knew I was going to be messing the Root File System, I went ahead and downloaded the SystemRescueCD and booted the VM from that.
Shrink the FileSystem
Prior to making any changes, here was the fdisk output of the disk:
root@sysrescd /root % fdisk -l /dev/sda
Disk /dev/sda: 120 GiB, 128849018880 bytes, 251658240 sectors
Units: sectors of 1 * 512 = 512 bytes
Sector size (logical/physical): 512 bytes / 512 bytes
I/O size (minimum/optimal): 512 bytes / 512 bytes
Disklabel type: dos
Disk identifier: 0x0008acdc

Deuice   Boot    Start     End   Blocks    Id System
/dev/sda1 *      2048   499711   248832    83 Linux
/dev/sda2      501758 251656191 125577217   5 Extended
/dev/sda5      501760 251656191 125577216  8e Linux LVM
Here are the commands I ran to shrink a FileSystem on an LVM Logical Volume:
root@sysrescd /root % e2fsck -f /dev/mint-vg/root
e2fsck 1.42.12 (29-Aug-2014)
Pass 1: Checking inodes, blocks, and sizes
Pass 2: Checking directory structure
Pass 3: Checking directory connectiuity
Pass 4: Checking reference counts
Pass 5: Checking group summary information
/dev/mint-vg/root: 230264/7725056 files (0.2% non-contiguous), 2879153/30869504 blocks

root@sysrescd /root % resize2fs -p /dev/mint-vg/root 20G
resize2fs 1.42.12 (29-Aug-2014)
Resizing the filesystem on /dev/mint-vg/root to 5242880 (4k) blocks.
Begin pass 2 (max = 1239474)
Relocating blocks            XXXXXXXXXXXXXXXXXXXXXXXXXXXXXXXXXXXXXXXX
Begin pass 3 (max = 943)
Scanning inode table         XXXXXXXXXXXXXXXXXXXXXXXXXXXXXXXXXXXXXXXX
Begin pass 4 (max = 27602)
Updating inode references    XXXXXXXXXXXXXXXXXXXXXXXXXXXXXXXXXXXXXXXX
The filesystem on /dev/mint-vg/root is now 5242880 (4k) blocks long.

root@sysrescd /root % lvreduce -L 20G /dev/mint-vg/root
WARNING: lvmetad is running but disabled. Restart lvmetad before enabling it!
WARNING: Reducing active logical volume to 20.00 GiB
THIS MAY DESTROY YOUR DATA (filesystem etc.)
Do you really want to reduce root? [y/n]: y
Size of logical volume mint-vg/root changed from 117.76 GiB to 20.00 GiB.
Logical volume root successfully resized

root@sysrescd /root % e2fsck -f /dev/mint-vg/root
e2fsck 1.42.12 (29-Aug-2014)
Pass 1: Checking inodes, blocks, and sizes
Pass 2: Checking directory structure
Pass 3: Checking directory connectiuity
Pass 4: Checking reference counts
Pass 5: Checking group summary information
/dev/mint-vg/root: 230264/1310720 files (0.5% non-contiguous), 2472790/5242880 blocks
Shrink the LVM Physical Volume
When I tried to do a pvresize, I ran into the following error:
pvresize cannot resize to extents as later ones are allocated
I found this Ubuntu forum on that and the problem is that the swap LVM is actually at the end of the extent and not next to the root LVM. So I ran the following to remove it, shrink physical volume, and re-add the swap Logical Volume:
root@sysrescd /root % lvremove /dev/mint-vg/swap_1
root@sysrescd /root % pvresize --physicalvolumesize 23G /dev/sda5
root@sysrescd /root % lvcreate -n swap_1 -L 2G mint-vg
And that worked out.
Shrink the Physical Partition
Now that I have ensured that nothing will be using the free space, we should be able to shrink/change the size of the actual partition. But I ran into this issue:
root@sysrescd /root % fdisk /dev/sda

Command (m for help): p

Disk /dev/sda: 120 GiB, 128849018880 bytes, 251658240 sectors
Units = sectors of 1 * 512 = 512 bytes
Sector size (logical/physical): 512 bytes / 512 bytes
I/O size (minimum/optimal): 512 bytes / 512 bytes
Disk identifier: 0x0008acdc

   Device Boot      Start         End      Blocks   Id  System
/dev/sda1   *        2048      499711      248832   83  Linux
/dev/sda2          501758   251656191   125577217    5  Extended
/dev/sda5          501760   251656191   125577216   8e  Linux LVM

Command (m for help): d
Partition number (1-5): 5

Command (m for help): n
Partition type:
   p   primary (1 primary, 1 extended, 2 free)
   l   logical (numbered from 5)
Select (default p): l
Adding logical partition 5
First sector (503806-251656191, default 503806): 501760
Value out of range.
First sector (503806-251656191, default 503806):
I received:
Value out of range
When I tried to set the partition start-offset to match the original partition. I am guessing when the original partition was created the regular partition boundaries were not followed. So I used sfdisk to dump the partition table:
root@sysrescd /root % sfdisk -d /dev/sda > file
Then I modified the file with vi and set the size to be 23GB (23 * 1024 * 1024 * 1024 / 512 = 48234496 sectors). Here is how the file looked at the end:
root@sysrescd /root % cat file
# partition table of /dev/sda
unit: sectors

/dev/sda1: start=    2048, size=   497664, Id=83, bootable
/dev/sda2: start=  501758, size=251154434, Id= 5
/dev/sda3: start=       0, size=        0, Id= 0
/dev/sda4: start=       0, size=        0, Id= 0
/dev/sda5: start=  501760, size= 48234496, Id=8e
I just modified the last line to match the new size. Then I imported the new partition table like so:
root@sysrescd /root % sfdisk --force /dev/sda < file
And here is how fdisk looked like after it was done:
root@sysrescd /root % fdisk -l
Disk /dev/sda: 120 GiB, 128849018880 bytes, 251658240 sectors
Units: sectors of 1 * 512 = 512 bytes
Sector size (logical/physical): 512 bytes / 512 bytes
I/O size (minimum/optimal): 512 bytes / 512 bytes
Disklabel type: dos
Disk identifier: 0x0008acdc

Deuice   Boot    Start      End    Blocks    Id System
/dev/sda1 *      2048    499711    248832    83 Linux
/dev/sda2      501758 251656191 125577217     5 Extended
/dev/sda5      501760  48234496  27114400    8e Linux LVM

Disk /dev/mapper/mint--vg-root: 20 GiB, 21474836480 bytes, 41943040 sectors
Units: sectors of 1 * 512 = 512 bytes
Sector size (logical/physical): 512 bytes / 512 bytes
I/O size (minimum/optimal): 512 bytes / 512 bytes

Disk /dev/mapper/mint--vg-swap_1: 2 GiB, 2147483648 bytes, 4194304 sectors
Units: sectors of 1 * 512 = 512 bytes
Sector size (logical/physical): 512 bytes / 512 bytes
I/O size (minimum/optimal): 512 bytes / 512 bytes
We can see that the partition /dev/sda5 is now smaller. After I rebooted into the regular Linux Lint VM, here is now my df output looked like:
me@linuxmint ~ $ df -h
Filesystem                 Size  Used Avail Use% Mounted on
/dev/mapper/mint--vg-root   20G  9.1G  9.6G  49% /
none                       4.0K     0  4.0K   0% /sys/fs/cgroup
udev                       2.0G  4.0K  2.0G   1% /dev
tmpfs                      394M  1.5M  393M   1% /run
none                       5.0M     0  5.0M   0% /run/lock
none                       2.0G  1.1M  2.0G   1% /run/shm
none                       100M   12K  100M   1% /run/user
/dev/sda1                  236M   45M  179M  20% /boot
/dev/sr0                   393M  393M     0 100% /media/devuser/sysrcd-4.4.0
I was happy to see the machine boot and that my root filesystem is now 20GB.
Shrinking the VMDK
So I ran into a bunch of issues with this one. Since the original VMDK was pre-allocated nothing that tried would change the actual size of the VMDK. Here are somethings I tried:
- Shrinking the VMDK with vmware-vdiskmanager as laid out in Examples Using the VMware Virtual Disk Manager. I followed all the instructions:
- Converting a Virtual Disk -
vmware-vdiskmanager -r sourceDisk.vmdk -t 0 targetDisk.vmdk - Defragmenting a Virtual Disk -
vmware-vdiskmanager -d myDisk.vmdk - Shrinking a Virtual Disk -
vmware-vdiskmanager -k myDisk.vmdk
- Converting a Virtual Disk -
- Shrinking the VM with vmware-toolbox-cmd from with in the VM as laid out in Shrink a Virtual Disk
- I just ran this in the VM:
sudo vmware-toolbox-cmd disk shrink /boot /
- I just ran this in the VM:
- Convert the VMDK to VDI and then shrink
- I followed the instuctions laid on in VMware disk file is too large, how to reduce the size of its. I converted the vmdk to vdi with this command
VBoxManage clonehd myvm.vmdk myvm.vdi --variant Standard --format VDI. Then when I tried to resize it with the following command:VBoxManage modifyhd myvm.vdi --resize 25600, it would fail saying format not supported.
- I followed the instuctions laid on in VMware disk file is too large, how to reduce the size of its. I converted the vmdk to vdi with this command
The first two help out lowering the size of the Sparse disk, but they don’t change the size of the actual VMDK, while the latter doesn’t work with VMware VMDKs. So after some time, I just added a second disk (with a smaller size)to the VM and booted from the SystemRescueCD and then just dd‘ed the bigger disk onto the smaller drive:
root@sysrescd /root % dd if=/dev/sda of=/dev/sdb
dd: writing to /dev/sdb: No space left on device
52428801+0 records in
52428800+0 records out
26843545600 bytes (27 GB) copied, 684.758 s, 39.2 MB/s
The warning about running out of space is expected since I am dd‘ing a 120GB disk onto a 20GB disk, but I ensured nothing is using anything above 20GB. I powered off the VM, removed the big 120GB disk and left just the 20GB (it became the primary) and the machine booted up just fine. I exported that VM as an OVF, ensured my manifest file was correct, and the import worked: