DD-WRT on ASUS RT-AC68U Router
Got myself a new router, didn’t really need one, but got one just for the heck of it. So of course the first thing I did is put DD-WRT on it.
DD-WRT Firmware for the ASUS RT-AC68U
Looking over the following thread, it looks like at the time of writing (Nov 1st 2014) the 24461 firmware seems pretty stable.
With the ASUS router it’s a two step process to get DD-WRT on it, first we flash it with the BrainSlayer Firmware (.trx file) and then we update to the lastest Kong Build of DD-WRT (.bin file). For the Kong DD-WRT build I grabbed the 25015M version (other people had luck with it) .
DD-WRT Install Process
There is a pretty good youtube video on how to install DD-WRT on the RT-AC66U Router. The process they went through was like this:
- Enable Telnet on the Router
- Telnet into the router
- Flash the NVRAM –
mtd-erase -d nvram - Then reboot the router –
reboot - Re-open the admin page (http://192.168.1.1)
- Upload the initial dd-wrt firmware (Brainslayer) Administration -> Firmware Upgrade upload the trx file
- Enable telnet in dd-wrt
- Telnet back into the router, flash the nvram –
clear nvram / erase nvram - Reboot –
reboot - Upload the K3 Firmware bin file under Administration -> Firmware upgrade
There are also good instructions here and there is also a reddit page on it as well.
Flash the NVRAM on the ASUS Router
Here is what I did to clear the NVRAM on the Stock Install:
elatov@crbook:~$telnet 192.168.1.1
Trying 192.168.1.1...
Connected to 192.168.1.1.
Escape character is '^]'.
RT-AC68U login: admin
Password:

ASUSWRT RT-AC68U_3.0.0.4 Tue Jul 15 09:23:33 UTC 2014
admin@RT-AC68U:/tmp/home/root# df -Ph
Filesystem                Size      Used Available Capacity Mounted on
/dev/root                26.4M     26.4M         0 100% /
devtmpfs                124.7M         0    124.7M   0% /dev
tmpfs                   124.9M      3.9M    121.0M   3% /tmp
/dev/mtdblock4           62.8M      1.7M     61.1M   3% /jffs
admin@RT-AC68U:/tmp/home/root# uname  -a
Linux RT-AC68U 2.6.36.4brcmarm #1 SMP PREEMPT Tue Jul 15 17:34:10 CST 2014 armv7l GNU/Linux
admin@RT-AC68U:/tmp/home/root# mtd-erase2 nvram
admin@RT-AC68U:/tmp/home/root# reboot
admin@RT-AC68U:/tmp/home/root# Connection closed by foreign host
We can see that the router actually runs AsusWRT, I actually ran into a custom version of AsusWRT, it’s called AsusWRT Merlin:
It looks pretty cool and a lot of people prefer to run that on the ASUS routers, cause the firmware is so close to the manufacturer one (the performance seems good). If I ever get tired of DD-WRT, I will definitely give AsusWRT Merlin a try.
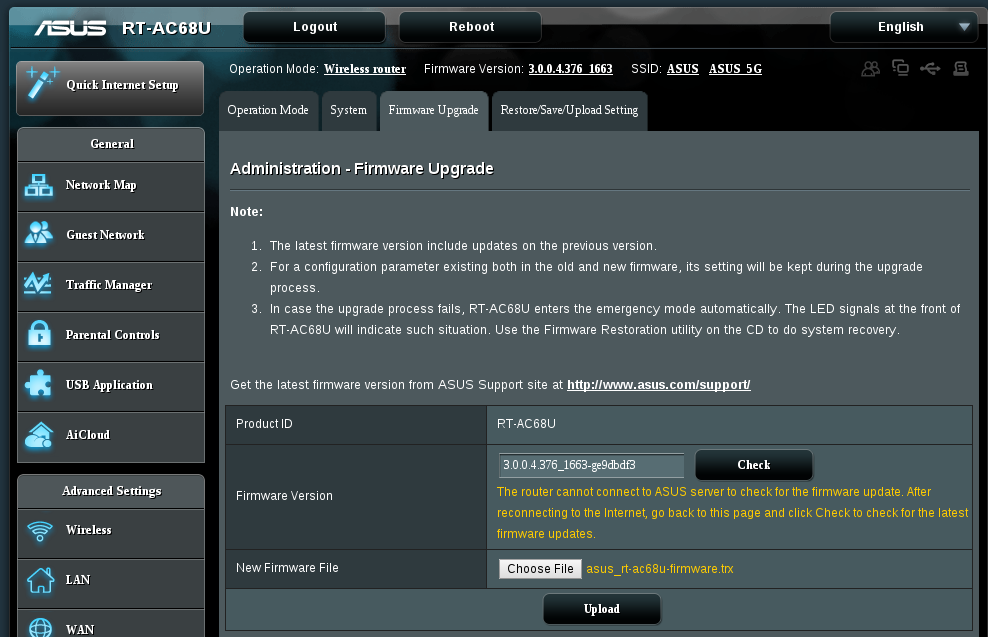
Flash the Router with the BrainSlayer Firmware
After the router rebooted (after I flashed the NVRAM), I went back to the Management console (http://192.168.1.1) and navigated to Administration -> Firmware Upgrade and uploaded the asus_rt-ac68u-firmware.trx file:
Upon hitting upload the upgrade will start and after it’s done you will see the following:

As I saw the firmware upgrade is finished, I telnet‘ed into the router and saw that dd-wrt is already installed (so I went ahead and rebooted the router):
elatov@fed:~$telnet 192.168.1.1
Trying 192.168.1.1...
Connected to 192.168.1.1.
Escape character is '^]'.

DD-WRT v24-sp2 std (c) 2014 NewMedia-NET GmbH
Release: 06/23/14 (SVN revision: 24461)

DD-WRT login: root
Password:
==========================================================

 ____  ___    __        ______ _____         ____  _  _
 | _ \| _ \   \ \      / /  _ \_   _| __   _|___ \| || |
 || | || ||____\ \ /\ / /| |_) || |   \ \ / / __) | || |_
 ||_| ||_||_____\ V  V / |  _ < | |    \ V / / __/|__   _|
 |___/|___/      \_/\_/  |_| \_\|_|     \_/ |_____|  |_|

					   DD-WRT v24-sp2
				   http://www.dd-wrt.com

==========================================================


BusyBox v1.22.1 (2014-06-23 04:49:23 CEST) built-in shell (ash)
Enter 'help' for a list of built-in commands.

root@DD-WRT:~# reboot
root@DD-WRT:~# Connection closed by foreign host.
Clear the NVRAM in DD-WRT
After it rebooted, I pointed my browser to 192.168.1.1 and saw the initial DD-WRT set password page:
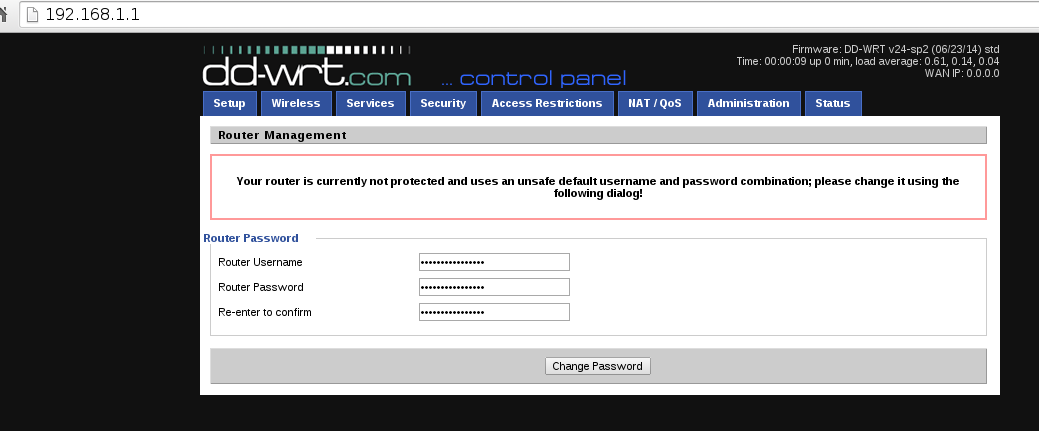
I set the password, telnet‘ed again into the router, and cleared the NVRAM:
elatov@fed:~$telnet 192.168.1.1
Trying 192.168.1.1...
Connected to 192.168.1.1.
Escape character is '^]'.

DD-WRT v24-sp2 std (c) 2014 NewMedia-NET GmbH
Release: 06/23/14 (SVN revision: 24461)

DD-WRT login: root
Password:
==========================================================

 ____  ___    __        ______ _____         ____  _  _
 | _ \| _ \   \ \      / /  _ \_   _| __   _|___ \| || |
 || | || ||____\ \ /\ / /| |_) || |   \ \ / / __) | || |_
 ||_| ||_||_____\ V  V / |  _ < | |    \ V / / __/|__   _|
 |___/|___/      \_/\_/  |_| \_\|_|     \_/ |_____|  |_|

					   DD-WRT v24-sp2
				   http://www.dd-wrt.com

==========================================================


BusyBox v1.22.1 (2014-06-23 04:49:23 CEST) built-in shell (ash)
Enter 'help' for a list of built-in commands.

root@DD-WRT:~# df -Ph
Filesystem                Size      Used Available Capacity Mounted on
rootfs                   25.0M     25.0M         0 100% /
/dev/root                25.0M     25.0M         0 100% /
root@DD-WRT:~# uname -a
Linux DD-WRT 3.10.44 #2763 SMP Sun Jun 22 04:03:42 CEST 2014 armv7l GNU/Linux
root@DD-WRT:~# erase nvram
erase[1572864]
root@DD-WRT:~# reboot
root@DD-WRT:~# Connection closed by foreign host.
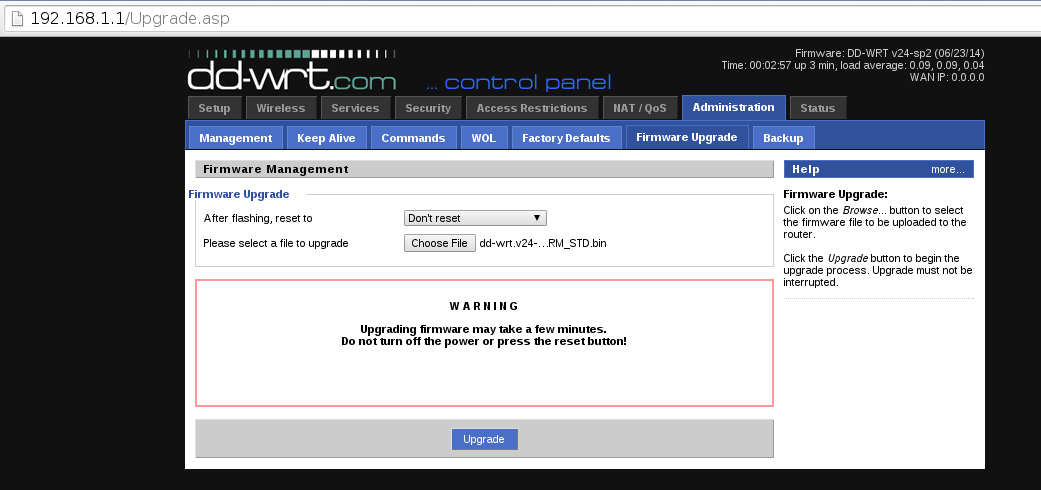
Install the Kong DD-WRT Build
After the rebooted finished, I went back to the Admin Console (http://192.168.1.1) and navigated to Administration -> Firmware Upgrade to apply the DD-WRT Kong Build. I uploaded the dd-wrt.v24-K3_AC_ARM_STD.bin file and I chose Don’t Reset:
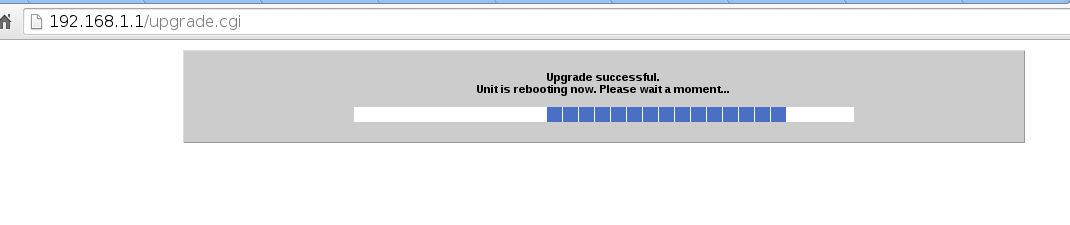
After I hit upgrade the uploaded started and after it finished I saw the “Upgrade Successful” message:
After it rebooted (after applying the new dd-wrt build), I logged into router one more time and reset the NVRAM just for good measure:
elatov@fed:~$telnet 192.168.1.1
Trying 192.168.1.1...
Connected to 192.168.1.1.
Escape character is '^]'.

DD-WRT v24-sp2 kongac (c) 2014 NewMedia-NET GmbH
Release: 09/13/14 (SVN revision: 25015M)

DD-WRT login: root
Password:
==========================================================

 ____  ___    __        ______ _____         ____  _  _
 | _ \| _ \   \ \      / /  _ \_   _| __   _|___ \| || |
 || | || ||____\ \ /\ / /| |_) || |   \ \ / / __) | || |_
 ||_| ||_||_____\ V  V / |  _ < | |    \ V / / __/|__   _|
 |___/|___/      \_/\_/  |_| \_\|_|     \_/ |_____|  |_|

					   DD-WRT v24-sp2
				   http://www.dd-wrt.com

==========================================================


BusyBox v1.22.1 (2014-09-13 23:35:28 CEST) built-in shell (ash)
Enter 'help' for a list of built-in commands.

root@DD-WRT:~# erase nvram
erase[1572864]
root@DD-WRT:~# reboot
root@DD-WRT:~# Connection closed by foreign host.
After it was done, here is what I saw on the system settings page of DD-WRT:

Install a Later Version of iproute2
I was using fwbuilder to push my firewall to the DD-WRT router (check out my previous post on the setup) and I wanted to keep that. I realized the ip utility (which is part of iproute2 software) is limited, I could only get routes from the utility and nothing else:
root@DD-WRT:~# /usr/sbin/ip addr show
root@DD-WRT:~# /usr/sbin/ip rule ls
root@DD-WRT:~# /usr/sbin/ip route ls
default via 10.10.10.1 dev vlan2
10.0.0.0/24 dev vlan3  proto kernel  scope link  src 10.0.0.1
10.10.0/23 dev vlan2  proto kernel  scope link  src 10.10.10.1
127.0.0.0/8 dev lo  scope link
192.168.1.0/24 dev br0  proto kernel  scope link  src 192.168.1.1
But the fwbuilder script actually uses the ip addr functionality for some of it’s components. There are actually a bunch of forums on this:
- Does ‘ip rule’ work in latest DD-WRT builds?
- Dual WAN, selected traffic over second WAN (help needed!)
- /usr/sbin/ip not working in 18777
- ‘ip rule’ command broken in 21676 mega
- WZR-HP-G450H iproute2 tools
One of them provides an ip binary but it’s built for MIPS architecture and this new router runs on ARM. So I started to look elsewhere. At first I checked out the Optware on K3-AC-ARM and that recommended using an openwrt repository:
“builds >23453 will use openwrt packages”. The repository now in use is the OpenWRT imx6 repository, http://downloads.openwrt.org/snapshots/trunk/imx6/packages/
After trying that repository I wasn’t able to run the opkg binary. I then ran into Kong 24500 for Arm Routers and from that forum:
The build is based on 24500 but I added a few patches which show up in svn in later revisions. I just didn’t want to sync anything from >24500 since I did all my testing with 24500 and only added fixes for things I found. This time I tested a lot more services and features.
No uClibc anymore, thus any app that has been compiled for uClibc won’t work now. A new repo with apps compiled against musl is up and you can install them through opkg. I removed ipkg and added a script that installs opkg for you. Before it was required to have one partition mounted to /jffs and one to /opt, now /opt is enough (/jffs is still recommended as it is the default location for override configs and storage space for things like webserver etc.). Bootstrap script will install opkg to /opt. Thus, if you already have a partition that is mounted to /opt, run the script “bootstrap”.
It looks there was a recent move to MUSL-ARM based packages and away from uClibc. More information on that here as well. So when I used this repository:
http://downloads.openwrt.org/snapshots/trunk/imx6/
It wouldn’t run cause they are build against the uClibc library. There is also a bootstrap file on the router to setup the right repository. Here is what I did to install the right version of optware on the Asus RT-AC68U Router:
root@DD-WRT:~# mkdir /jffs/opt
root@DD-WRT:~# mount --bind /jffs/opt /opt
root@DD-WRT:~# bootstrap
Bootstrap is checking prerequisites...

You did not enable USB automount.
Echo optpart /dev/mtdblock/4 on /opt type jffs2 (rw,relatime)
Found a valid partition: /opt.

Proceed with download and install of opkg? (y/n) [default=n]: y
Connecting to www.desipro.de (82.165.77.220:80)
opkg.ipk             100% |**********************************************************| 56268   0:00:00 ETA
Bootstrap complete. You can now use opkg to install additional packages.
root@DD-WRT:~# which opkg
/opt/bin/opkg
root@DD-WRT:~# opkg update
Downloading http://www.desipro.de/bcm53xx-musl/packages/Packages.gz.
Updated list of available packages in /opt/var/opkg-lists/kongac.
And here is what I ran to install the iproute2 package:
root@DD-WRT:~# opkg -f /opt/etc/opkg.conf install ip
Installing ip (3.15.0-1) to root...
Downloading http://www.desipro.de/bcm53xx-musl/packages/ip_3.15.0-1_bcm53xx.ipk.
Installing libc (1.1.3-1) to root...
Downloading http://www.desipro.de/bcm53xx-musl/packages/libc_1.1.3-1_bcm53xx.ipk.
Installing libgcc (4.9-linaro-1) to root...
Downloading http://www.desipro.de/bcm53xx-musl/packages/libgcc_4.9-linaro-1_bcm53xx.ipk.
Installing libnl-tiny (0.1-3) to root...
Downloading http://www.desipro.de/bcm53xx-musl/packages/libnl-tiny_0.1-3_bcm53xx.ipk.
Configuring libgcc.
Configuring libc.
Configuring libnl-tiny.
Configuring ip.
After I installed the right one I saw the binary point to the /lib/ld-musl-arm.so.1 file:
root@DD-WRT:~# /opt/usr/bin/readelf -l /opt/usr/sbin/ip

Elf file type is EXEC (Executable file)
Entry point 0xa8b4
There are 6 program headers, starting at offset 52

Program Headers:
  Type           Offset   VirtAddr   PhysAddr   FileSiz MemSiz  Flg Align
  PHDR           0x000034 0x00008034 0x00008034 0x000c0 0x000c0 R E 0x4
  INTERP         0x0000f4 0x000080f4 0x000080f4 0x00016 0x00016 R   0x1
	  [Requesting program interpreter: /lib/ld-musl-arm.so.1]
  LOAD           0x000000 0x00008000 0x00008000 0x283dc 0x283dc R E 0x8000
  LOAD           0x0283dc 0x000383dc 0x000383dc 0x01d3b 0x045e8 RW  0x8000
  DYNAMIC        0x0283e4 0x000383e4 0x000383e4 0x000f0 0x000f0 RW  0x4
  GNU_STACK      0x000000 0x00000000 0x00000000 0x00000 0x00000 RW  0x10
While the non-working ones pointed to the uClibc:
$readelf -l opkg

Elf file type is EXEC (Executable file)
Entry point 0x12c00
There are 6 program headers, starting at offset 52

Program Headers:
  Type           Offset   VirtAddr   PhysAddr   FileSiz MemSiz  Flg Align
  PHDR           0x000034 0x00010034 0x00010034 0x000c0 0x000c0 R E 0x4
  INTERP         0x0000f4 0x000100f4 0x000100f4 0x00014 0x00014 R   0x1
	  [Requesting program interpreter: /lib/ld-uClibc.so.0]
  LOAD           0x000000 0x00010000 0x00010000 0x1d9c8 0x1d9c8 R E 0x10000
  LOAD           0x01e000 0x0003e000 0x0003e000 0x00a60 0x00c48 RW  0x10000
  DYNAMIC        0x01e008 0x0003e008 0x0003e008 0x00100 0x00100 RW  0x4
  GNU_STACK      0x000000 0x00000000 0x00000000 0x00000 0x00000 RW  0x10
Just for reference here are the repository settings for the MUSL-ARM packages:
root@DD-WRT:~# cat /opt/etc/opkg.conf
src/gz kongac http://www.desipro.de/bcm53xx-musl/packages
dest root /opt
dest ram /tmp
lists_dir ext /opt/var/opkg-lists
option overlay_root /overlay
After installing a newer version of iproute2, here is the output of ip:
root@DD-WRT:~# /opt/usr/sbin/ip -4 a
1: lo: <LOOPBACK,MULTICAST,UP,LOWER_UP> mtu 65536 qdisc noqueue state UNKNOWN group default
	inet 127.0.0.1/8 brd 127.255.255.255 scope host lo
	   valid_lft forever preferred_lft forever
5: vlan2@eth0: <BROADCAST,MULTICAST,UP,LOWER_UP> mtu 1500 qdisc pfifo_fast state UP group default qlen 1000
	inet 10.10.10.1/23 brd 10.10.10.255 scope global vlan2
	   valid_lft forever preferred_lft forever
8: vlan3@eth0: <BROADCAST,MULTICAST,UP,LOWER_UP> mtu 1500 qdisc noqueue state UP group default
	inet 10.0.0.1/24 brd 10.0.0.255 scope global vlan3
	   valid_lft forever preferred_lft forever
9: br0: <BROADCAST,MULTICAST,UP,LOWER_UP> mtu 1500 qdisc noqueue state UP group default
	inet 169.254.255.1/16 brd 169.254.255.255 scope global br0:0
	   valid_lft forever preferred_lft forever
	inet 192.168.1.1/24 brd 192.168.1.255 scope global br0
	   valid_lft forever preferred_lft forever
Then on the fwbuilder side, I just pointed to the correct path of the ip utility:
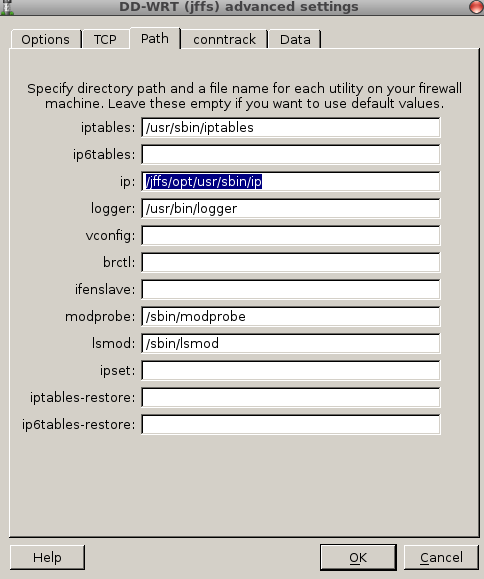
And then fwbuilder pushed the same settings without any issues.
VLAN configs
For some reason I had some issues with this one. In my previous post I ended using the t flag to signify that a VLAN will be tagged on a specific port (I basically ran this):
nvram set vlan1ports="4t 3 2 1 8*"
nvram set vlan3ports="4t 8"
nvram set port4vlans="1 3 18 19"
But that didn’t work on this version of the router/dd-wrt. Here were the defaults, before I made any changes:
root@DD-WRT:~# nvram show | grep vlan.port
size: 30373 bytes (35163 left)
vlan2ports=0 5u
vlan1ports=1 2 3 4 5*
root@DD-WRT:~# nvram show | grep port.vlan
size: 30373 bytes (35163 left)
port5vlans=1 2 16
port3vlans=1
port1vlans=1
port4vlans=1
port2vlans=1
port0vlans=2
root@DD-WRT:~# nvram show | grep vlan.hw
size: 30373 bytes (35163 left)
vlan2hwname=et0
vlan1hwname=et0
I then read over the following pages:
The last one has a nice picture to remind me how the networking worked on the dd-wrt Router:
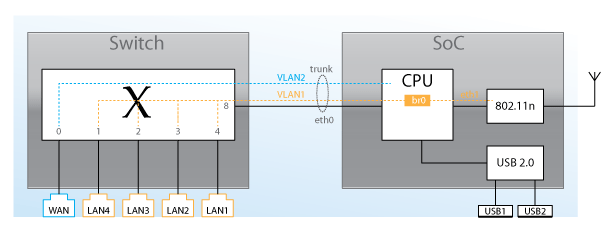
But the first two links used the 16 parameter on the (portvlans setttings), which is the equivilant of the tagged option checked on the GUI. So in the end, I ended up with the following config (notice I didn’t even set the vlan3ports… but it still worked out):
root@DD-WRT:~# cat /proc/vlan* | grep VID
vlan1  VID: 1	 REORDER_HDR: 1  dev->priv_flags: 4001
vlan2  VID: 2	 REORDER_HDR: 1  dev->priv_flags: 1
vlan3  VID: 3	 REORDER_HDR: 1  dev->priv_flags: 1
root@DD-WRT:~# nvram show | grep vlan.ports
size: 34420 bytes (31116 left)
vlan2ports=0 5u
vlan1ports=1 2 3 4 5*
root@DD-WRT:~# nvram show | grep port.vlan
size: 34420 bytes (31116 left)
port5vlans=1 2 3 16
port3vlans=1
port1vlans=1
port4vlans=1 3 16
port2vlans=1
port0vlans=2
root@DD-WRT:~# nvram show | grep vlan3
mdhcpd=vlan3>On>100>50>3600
size: 34420 bytes (31116 left)
vlan3_netmask=255.255.255.0
vlan3_txq=0
vlan3_ipaddr=10.0.0.1
vlan3_mtu=1500
vlan3_multicast=0
vlan3_nat=1
vlan3_bridged=0
and that allowed me to use tagged vlans (trunk port) on the 4th port, just like before.