vCloud Air Testing
I decided to play around with vCloud Air (VMware’s solution for a public cloud).
Basic Network Connectivity
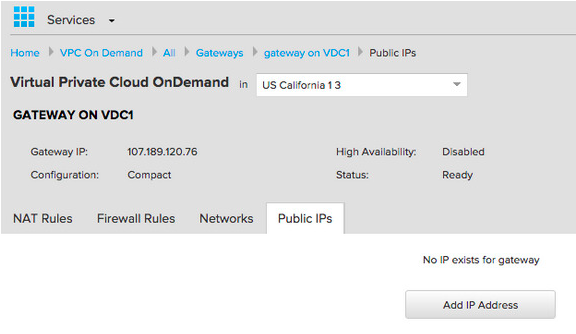
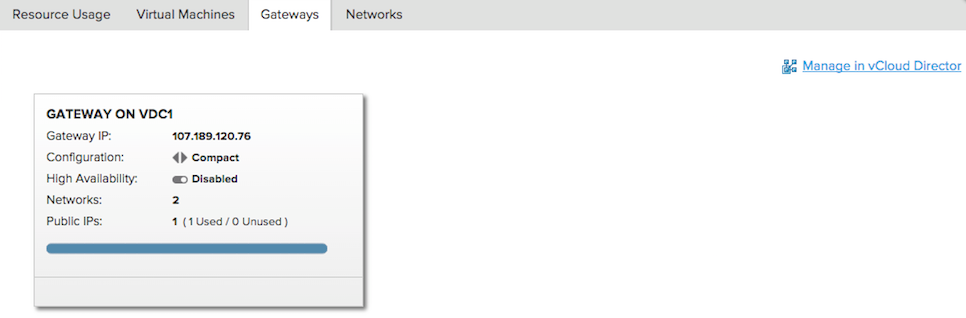
By default most of the traffic is blocked and no NAT is configured so you can’t reach the external network. First let’s get a public IP. In vCloud air go to Gateways -> GATEWAY ON VDC1 -> Public IPs and initially it will look like this:
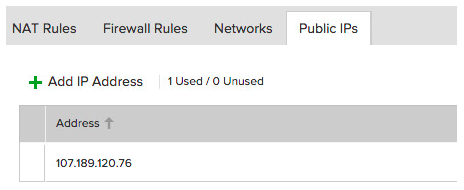
Then click on Add IP Address and it will warn you about getting charged and after that it will allocate the IP and you will see the following:
Now let’s create the SNAT, so any machine can reach the internet. Go to Gateways -> GATEWAY ON VDC1 -> NAT Rules -> Add a NAT Rule and fill out the following:
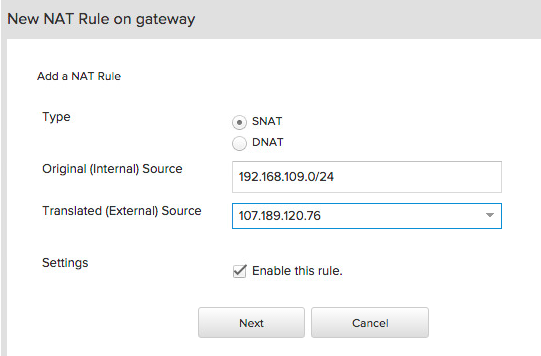
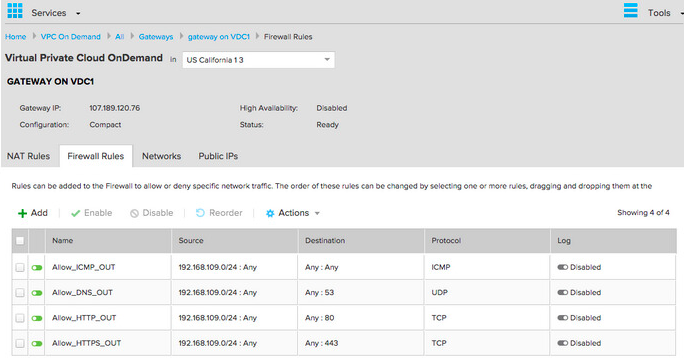
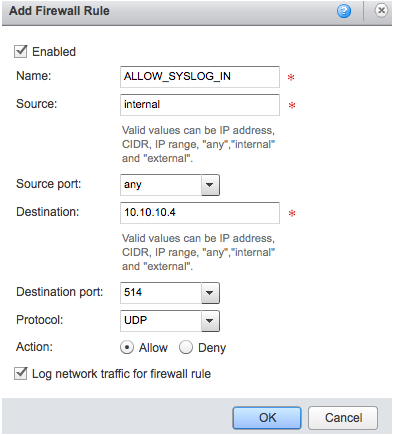
This is also referred to as IP Masquerading. The firewall is pretty restrictive as well, so go to Gateways -> GATEWAY ON VDC1 -> Firewall Rules and the following basic rules:
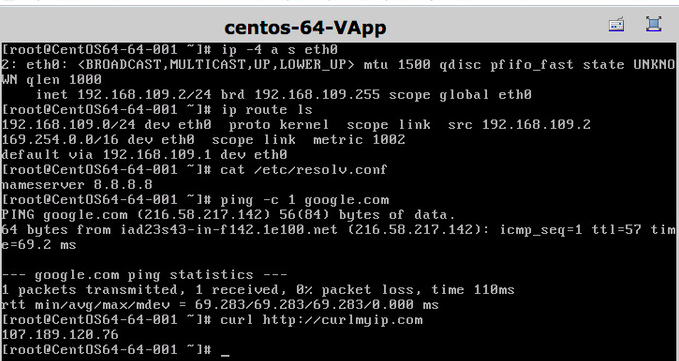
I spun up a test VM and made sure everything was working as expected:
###Adding a second Organization Network
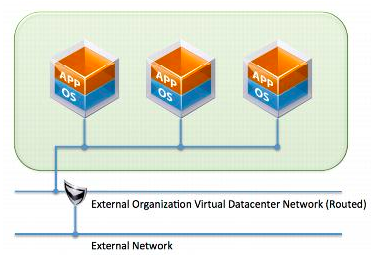
vCloud Director offers many different networking options, most of them are covered in vApp Design Considerations. By default there is Direct - External Organization Virtual Datacenter Network (Routed) network created, from the same page:
5.4.1.5. Direct - External Organization Virtual Datacenter Network (Routed) If the same example vApp with three virtual machines is connected to an organization virtual datacenter network that has a routed connection to an external network, the vApp is connected to an organization virtual datacenter network and is deployed there with the organization virtual datacenter networkâs IP addressing. The Edge Gateway device then provides a routed connection between the organization virtual datacenter network and the external network. This scenario is shown in the following figure.
Figure 11. Direct Connection to a Routed External Organization Virtual Datacenter Network
And it looks like this in vCloud Director (Navigate to Administration -> Virtual Datacenters -> VCD1 -> Org VDC Networks):

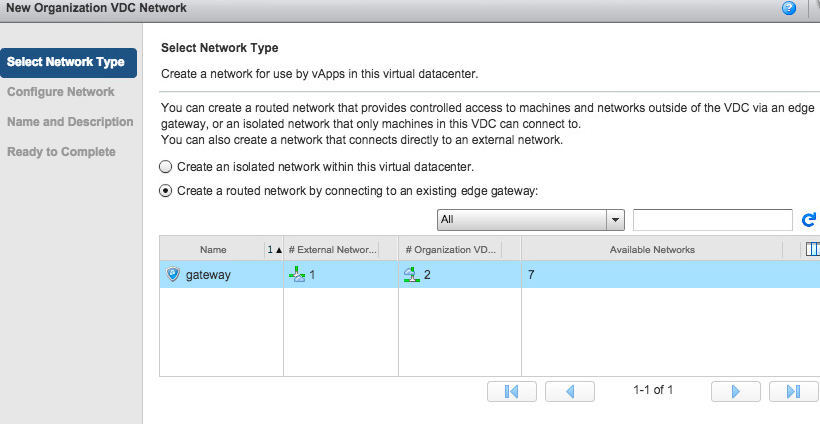
So let’s another routed network just to have two different subnets that we’ll connect to each other. So click the green + and it will start the wizard. Choose the routed option:
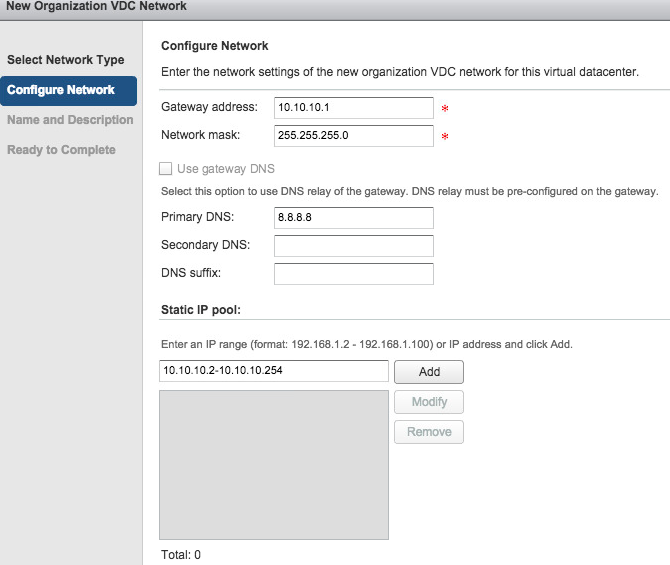
I then added the following network details on the next page:
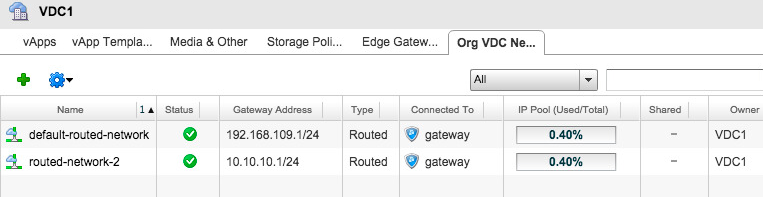
And after that you will have two networks:
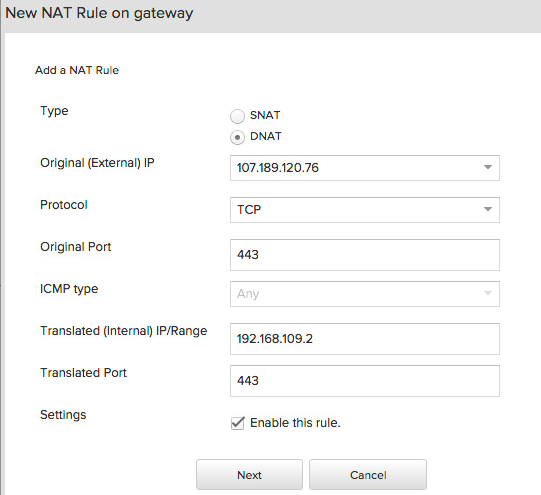
###DNAT to an Internal Web Server Let’s add a DNAT (or a port forward) from Public IP port 443 to the Internal portal IP port 443. So in vCloud Air navigate to Gateways -> GATEWAY ON VDC1 -> NAT Rules -> Add a NAT Rule and add the following DNAT:
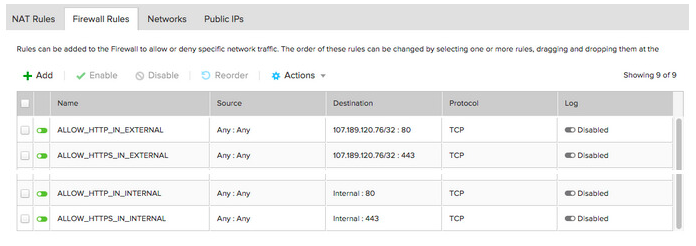
On the next page if you are really organized you can also add a similar rule for 80. Also don’t forget to allow the firewall to access port 80 and 443 on the public IP and the internal network. I ended up created the following rules to allow that traffic:
A quick test with telnet showed that I can reach the internal machine. So from my laptop I ran the following:
~$telnet 107.189.120.76 80
Trying 107.189.120.76...
telnet: Unable to connect to remote host: Connection refused
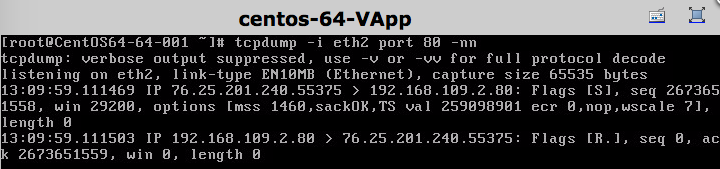
And on my test VM running a tcpdump showed the following:
###Establishing the IPSec Tunnel To Local Environment
There is a pretty good KB on the process from VMware: Configuring IPsec VPN within VMware vCloud Air to a remote network and there is a pretty good diagram that represents all the networks:
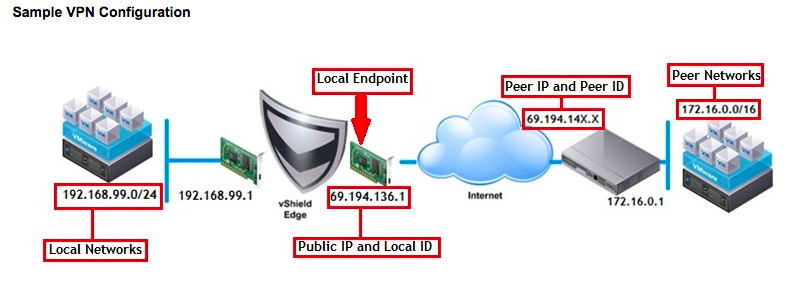
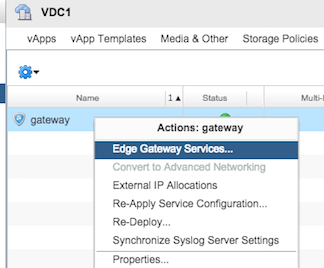
My local networks is the second routed network which is the 10.10.10.0/24 network and my peer network is the 192.168.1.0/16 network which is the internal network at home. So to start this configuration from vCloud Air go to Gateways -> GATEWAY ON VDC1, then click on Manage in vCloud director:
Once in vCloud Director go to Administration -> Virtual Datacenters -> VCD1 -> Edge Gateways and right click on the default GW to choose Edge Gateway Services:
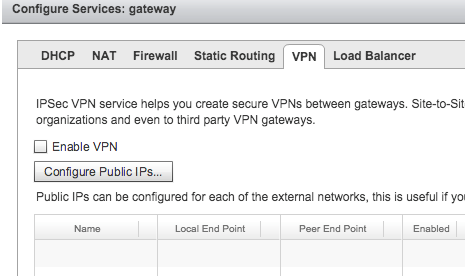
Then go to the VPN tab and click Enable VPN and then Add:
After clicking Add the wizard will start, here are the configurations I ended up using:
| Option | Value | Description |
|---|---|---|
| Local Network | 10.10.10.0/24 | This is the vCloud network (2nd Routed Network) we want the remote site to have access to |
| Peer Networks | 192.168.1.0/16 | This is the network we want to access at the remote site |
| Local Endpoint | 107.189.120.76 (drop down) | This is the Public IP of the Local End Point on the vCloud Air Side |
| Local ID | 107.189.120.76 | This can be anything, but it helps to set the IP to keep track of the configuration |
| Peer ID | 192.168.1.248 | This can be anything as well, but they recommend to either set it to the Public IP of the Remote End Point or if it’s NAT’ed to be the Private IP of the Remote End Point |
| Peer IP | XX.XX.XX.XX | This is the Public IP of the Remote End Point |
| Encryption Protocol | AES | You can use AES 256, 3DES, or AES, I tried AES 256 but StrongSwan could establish a tunnel to that for some reason so ended up using AES |
| Shared Key | Left it as the generated one | We will have to use that key on the remote VPN side to ensure we can authenticate with each end point to establish the VPN Tunnel |
| MTU | 1500 | Left the Default |
Firewall Configuration in vCloud for VPN Connections
I ended up adding the following rules to ensure the VPN connection is established and to allow traffic from and to the internal networks across the VPN tunnel:
| Name | Source | Destination | Protocol | Description |
|---|---|---|---|---|
| ALLOW_IP_SEC ESP_AH_UDP | XX.XX.XX.XX/32:Any | 107.189.120.76/32:Any | ANY | This is so we can establish the IPSec Tunnel between the two endpoints The following is necessary: -IP Protocol ID 50 (ESP) -IP Protocol ID 51 (AH) - UDP Port 4500 - UDP Port 500 (IKE) Since the only IP protocol allowed in the vCloud UI is ICMP, I decided to use Any to make sure I cover all of the above |
| ALLOW_VPN_TRAFFIC_L_TO_R | 192.168.1.0/16:Any | 10.10.10.0/24:Any | ANY | This might be overkill but I am allowing anything from the Internal network to the vCloud second routed network. |
| ALLOW_VPN_TRAFFIC_R_TO_L | 10.10.10.0/24:Any | 192.168.1.0/16:Any | ANY | This might be overkill but I am allowing anything from the vCloud 2nd routed network to the Internal network. But if you are planning to connect to internal webapps then 80 and 443 should be added here |
Strongswan Configuration
After we configure the VPN configuration on the vCloud side we now can configure the VPN on our machine that will act the Remote End point. I was using CentOS as my test machine and strongswan isn’t available in the default repositories so I had to enable the EPEL repos to get StrongSwan:
[root@swan ~]# yum install http://ftp.nluug.nl/pub/os/Linux/distr/fedora-epel/7/x86_64/e/epel-release-7-5.noarch.rpm
[root@swan ~]# yum search strongswan
Loaded plugins: fastestmirror
Loading mirror speeds from cached hostfile
 * base: mirror.hmc.edu
 * epel: mirrors.syringanetworks.net
 * extras: mirror.hostduplex.com
 * updates: mirrors.xmission.com
=========================== N/S matched: strongswan ============================
strongswan-charon-nm.x86_64 : NetworkManager plugin for Strongswan
strongswan-libipsec.x86_64 : Strongswan's libipsec backend
strongswan.x86_64 : An OpenSource IPsec-based VPN and TNC solution
strongswan-tnc-imcvs.x86_64 : Trusted network connect (TNC)'s IMC/IMV
                            : functionality
[root@swan ~]# yum install strongswan
After it's installed I confirmed the version:
[root@swan ~]# strongswan version
Linux strongSwan U5.3.2/K3.10.0-229.11.1.el7.x86_64
Institute for Internet Technologies and Applications
University of Applied Sciences Rapperswil, Switzerland
See 'strongswan --copyright' for copyright information.
Here is the configuration I ended up using:
[root@swan ~]# cat /etc/strongswan/ipsec.conf
# ipsec.conf - strongSwan IPsec configuration file basic configuration
config setup
        # strictcrlpolicy=yes
        # uniqueids = no
        #charondebug="ike 4, knl 3, enc 1, cfg 1"
conn vcloud_to_strongswan
        # Use the Share Private Key for authentication
        authby=secret
        # Upon Authenticating Start the VPN
        auto=start
        # Identifier of the local machine (Used the internal IP of the VPN server, but can be anything)
        leftid=192.168.1.248
        # strongSwan address/ IP used for connection
        left=192.168.1.248
        # networks behind strongSwan
        leftsubnet=192.168.1.0/16
        # Identifier of the Remote Endpoint (Used the Public IP of vCloud, but can be anything)
        rightid=107.189.120.76
        # vCloud Air Edge outside address
        right=107.189.120.76
        # networks behind vCloud Air Edge
        rightsubnet=10.10.10.0/24
        # Phase 1: AES, modp1024 = DH group 2
        ike=aes128-sha1-modp1024
        # SA lifetime of 28800 seconds
        ikelifetime=28800
        # IKEv2, always use PFS
        keyexchange=ike
        # Phase 2: AES, SHA1, DH Group 2
        esp=aes128-sha1-modp1024
        # no kbytes rekeying
        lifebytes=0
        # no packets rekeying
        lifepackets=0
        # SA lifetime of 3600 seconds
        lifetime=1h
        # Establish a VPN Tunnel
        type=tunnel
We also need to create an ipsec.secrets file which has the PSK. Here is what I ended up with:
[root@swan ~]# cat /etc/strongswan/ipsec.secrets
# /etc/ipsec.secrets - strongSwan IPsec secrets file
192.168.1.248 107.189.120.76 : PSK "XXXXXX5gB3wsQ4M8rh5a"
I used the format of:
LOCAL_IP PEER_IP : PSK “SHARED_KEY”.
The Shared Key is copied from the vCloud configuration. Then starting the tunnel, I saw the following in the logs:
[root@swan ~]# tail -f /var/log/messages
Sep  3 19:03:27 swan strongswan: charon (17329) started after 80 ms
Sep  3 19:03:27 swan charon: 10[CFG] received stroke: add connection 'vcloud_to_strongswan'
Sep  3 19:03:27 swan charon: 10[CFG] added configuration 'vcloud_to_strongswan'
Sep  3 19:03:27 swan charon: 06[CFG] received stroke: initiate 'vcloud_to_strongswan'
Sep  3 19:03:27 swan charon: 06[IKE] initiating IKE_SA vcloud_to_strongswan[1] to 107.189.120.76
Sep  3 19:03:27 swan charon: 06[ENC] generating IKE_SA_INIT request 0 [ SA KE No N(NATD_S_IP) N(NATD_D_IP) N(HASH_ALG) ]
Sep  3 19:03:27 swan charon: 06[NET] sending packet: from 192.168.1.248[500] to 107.189.120.76[500] (1268 bytes)
Sep  3 19:03:28 swan charon: 02[NET] received packet: from 107.189.120.76[500] to 192.168.1.248[500] (248 bytes)
Sep  3 19:03:28 swan charon: 02[ENC] parsed IKE_SA_INIT response 0 [ SA KE No V ]
Sep  3 19:03:28 swan charon: 02[ENC] received unknown vendor ID: 4f:45:76:79:5c:6b:67:7a:57:71:5c:73
Sep  3 19:03:28 swan charon: 02[IKE] authentication of '192.168.1.248' (myself) with pre-shared key
Sep  3 19:03:28 swan charon: 02[IKE] establishing CHILD_SA vcloud_to_strongswan
Sep  3 19:03:28 swan charon: 02[ENC] generating IKE_AUTH request 1 [ IDi N(INIT_CONTACT) IDr AUTH SA TSi TSr N(MOBIKE_SUP) N(NO_ADD_ADDR) N(EAP_ONLY) ]
Sep  3 19:03:28 swan charon: 02[NET] sending packet: from 192.168.1.248[500] to 107.189.120.76[500] (348 bytes)
Sep  3 19:03:28 swan charon: 03[NET] received packet: from 107.189.120.76[500] to 192.168.1.248[500] (204 bytes)
Sep  3 19:03:28 swan charon: 03[ENC] parsed IKE_AUTH response 1 [ IDr AUTH SA TSi TSr ]
Sep  3 19:03:28 swan charon: 03[IKE] authentication of '107.189.120.76' with pre-shared key successful
Sep  3 19:03:28 swan charon: 03[IKE] IKE_SA vcloud_to_strongswan[1] established between 192.168.1.248[192.168.1.248]...107.189.120.76[107.189.120.76]
Sep  3 19:03:28 swan charon: 03[IKE] scheduling reauthentication in 28070s
Sep  3 19:03:28 swan charon: 03[IKE] maximum IKE_SA lifetime 28610s
Sep  3 19:03:28 swan charon: 03[IKE] CHILD_SA vcloud_to_strongswan{1} established with SPIs c0e1c0aa_i c3cee26c_o and TS 192.168.0.0/24 === 10.10.10.0/24
And I could check the status of the VPN like so:
[root@swan ~]# strongswan status
Security Associations (1 up, 0 connecting):
vcloud_to_strongswan[3]: ESTABLISHED 27 seconds ago, 192.168.1.248[192.168.1.248]...107.189.120.76[107.189.120.76]
vcloud_to_strongswan{2}:  INSTALLED, TUNNEL, reqid 2, ESP in UDP SPIs: cd674835_i 45888900_o
vcloud_to_strongswan{2}:   192.168.0.0/24 === 10.10.10.0/24
[root@swan ~]# strongswan statusall
Status of IKE charon daemon (strongSwan 5.3.2, Linux 3.10.0-229.11.1.el7.x86_64, x86_64):
  uptime: 69 seconds, since Sep 03 19:03:27 2015
  malloc: sbrk 1589248, mmap 0, used 453488, free 1135760
  worker threads: 11 of 16 idle, 5/0/0/0 working, job queue: 0/0/0/0, scheduled: 7
  loaded plugins: charon aes des rc2 sha1 sha2 md4 md5 random nonce x509 revocation constraints acert pubkey pkcs1 pkcs8 pkcs12 pgp dnskey sshkey pem openssl fips-prf gmp xcbc cmac hmac ctr ccm curl attr kernel-netlink resolve socket-default farp stroke vici updown eap-identity eap-md5 eap-gtc eap-mschapv2 eap-tls eap-ttls eap-peap xauth-generic xauth-eap xauth-pam xauth-noauth dhcp
Listening IP addresses:
  192.168.1.248
Connections:
vcloud_to_strongswan:  192.168.1.248...107.189.120.76  IKEv1/2
vcloud_to_strongswan:   local:  [192.168.1.248] uses pre-shared key authentication
vcloud_to_strongswan:   remote: [107.189.120.76] uses pre-shared key authentication
vcloud_to_strongswan:   child:  192.168.0.0/24 === 10.10.10.0/24 TUNNEL
Security Associations (1 up, 0 connecting):
vcloud_to_strongswan[3]: ESTABLISHED 33 seconds ago, 192.168.1.248[192.168.1.248]...107.189.120.76[107.189.120.76]
vcloud_to_strongswan[3]: IKEv1 SPIs: 4f90c2bffe7eaa85_i 62a326409ab9f1d2_r*, pre-shared key reauthentication in 7 hours
vcloud_to_strongswan[3]: IKE proposal: AES_CBC_128/HMAC_SHA1_96/PRF_HMAC_SHA1/MODP_1024
vcloud_to_strongswan{2}:  INSTALLED, TUNNEL, reqid 2, ESP in UDP SPIs: cd674835_i 45888900_o
vcloud_to_strongswan{2}:  AES_CBC_128/HMAC_SHA1_96, 0 bytes_i, 0 bytes_o, rekeying in 45 minutes
vcloud_to_strongswan{2}:   192.168.0.0/24 === 10.10.10.0/24
To allow traffic to traverse the CentOS machine make sure your FORWARD iptables chain is set to allowed and you set the ip_forward sysctl option to 1:
[root@swan ~]# iptables -L FORWARD
Chain FORWARD (policy ACCEPT)
target     prot opt source               destination
[root@swan ~]# sysctl -p
net.ipv4.ip_forward = 1
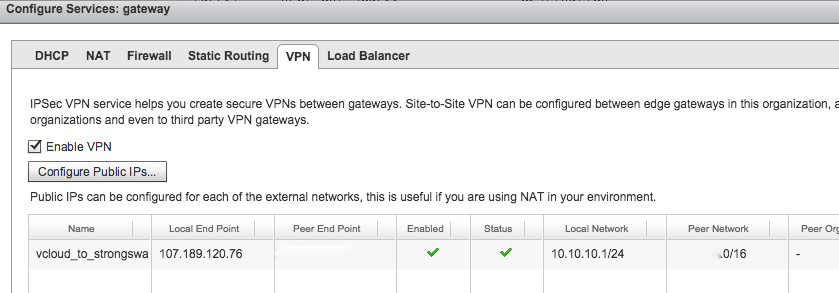
After all the above is done, if you go back to vCloud Director you will see the VPN connection is good:
vCloud Air Load Balancing
I decided to try out the LB functionality of vCloud Air. So I created two VMs and installed Apache on both:

Configure LB Pool Members
Then in vCloud Director navigate to Administration -> Virtual Datacenters -> VDC1 -> Edge Gateways right click on gateway and choose Edge Gateway Services:
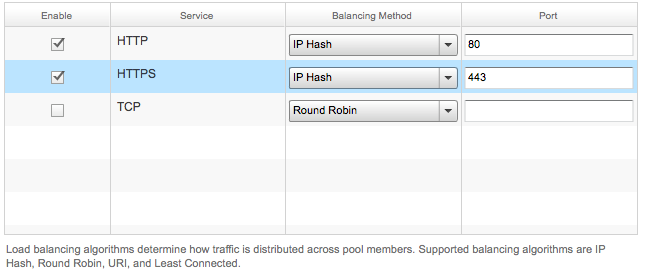
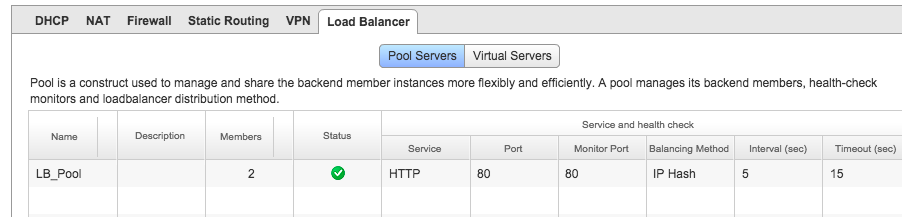
Then go to the Load Balancer tab and click Add under the Pool Servers subsection. For services I ended up using IP Hash for balancing:
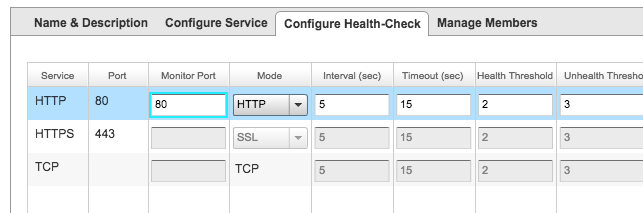
Then for monitoring I just used port monitoring of port 80:
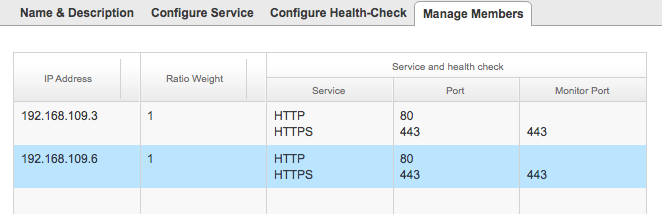
and I added both of the members to the pool:
After it’s done you will see the following under the Pool subsection:
Configure LB Virtual Servers
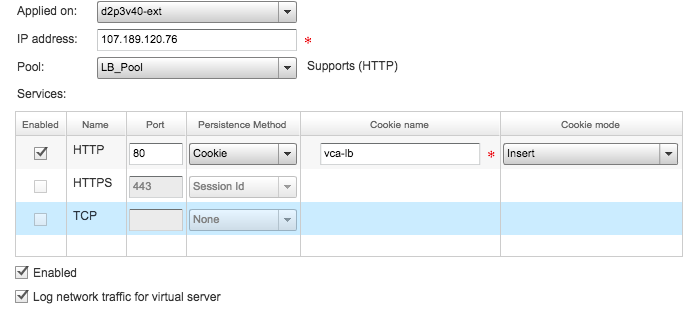
Now let’s configure the Virtual VIP of the cluster. So go to the Virtual Servers subsection of the Load Balancer Tab, click add and configure the following:
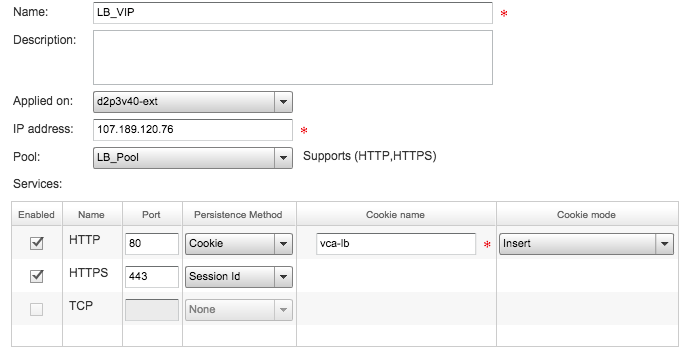
Looking over Introduction to Gateway Services: Load Balancing they use the Public IP for the VIP and that makes sense. If we really wanted we could assign a private IP to the VIP and then do a DNAT at the firewall to go from Public_IP:443 to Private_VIP:443 (but I think that would cause all the traffic to come from the Internal IP and the IP Hash balancing algorithm won’t help).
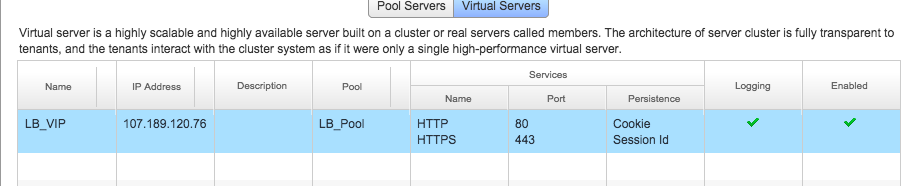
After it’s done you will see the following under the Virtual Servers Subsection:
Testing out Load Balancing
I did a quick curl and I saw the following:
elatov@macair:~$curl -I http://107.189.120.76/index.html
HTTP/1.1 200 OK
Date: Sun, 04 Oct 2015 01:08:55 GMT
Server: Apache/2.2.15 (CentOS)
Last-Modified: Sun, 04 Oct 2015 01:08:53 GMT
ETag: "bfce6-f-5213d0a533a1b"
Accept-Ranges: bytes
Content-Length: 15
Connection: close
Content-Type: text/html; charset=UTF-8
Set-Cookie: vca-lb=LB_VIP_9_HTTP_192.168.109.5; path=/
Cache-control: private
We can see our cookie (vca-lb) is getting set and we know which IP we went to. Trying the same command from another IP, I saw the following:
elatov@ccl:~$curl -I http://107.189.120.76/index.html
HTTP/1.1 200 OK
Date: Sun, 04 Oct 2015 01:13:16 GMT
Server: Apache/2.2.15 (CentOS)
Last-Modified: Sun, 04 Oct 2015 01:11:11 GMT
ETag: "bfe3e-15-5213d1287d208"
Accept-Ranges: bytes
Content-Length: 21
Connection: close
Content-Type: text/html; charset=UTF-8
Set-Cookie: vca-lb=LB_VIP_9_HTTP_192.168.109.7; path=/
Cache-control: private
I also logged from two different machines and the persistence stuck. Another thing we can try and to shutdown the apache services on one machines and to see if the load balancer will switch it over. So on one of CentOS machines that you know you were forwarded to (by checking the curl output) run the following:
sudo service httpd stop
And in the logs (instructions on configuring remote syslog is below) pretty instantly you will see the LB take that guy out of rotation:
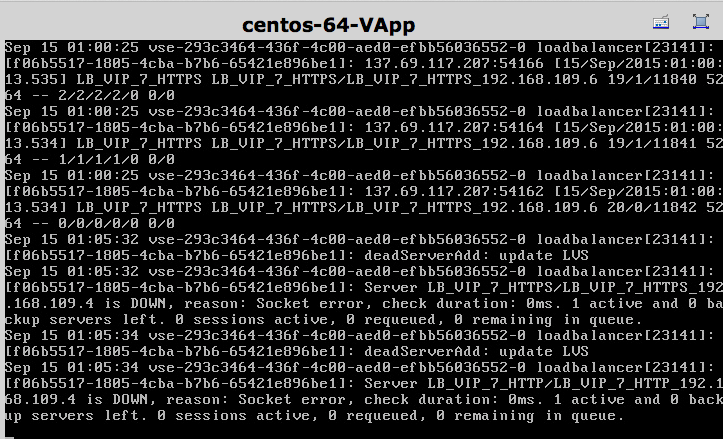
And upon visiting the webserver I was forwarded to only live node. Then on the dead machine I started the service back up:
sudo service httpd start
and in the logs I saw the following:
And was well with the world.
Monitoring traffic
We can also check out the LB logs by enabling logs for the LB configuration and then configure a syslog server which can receive syslog messages. Here is the checkbox from the LB configuration:
Since I had a Centos machine in my testing environment, I decided to make it a syslog server. So on the CentOS machine install rsyslog:
yum -y install rsyslog
Then enable the configuration to act as syslog server (this is done by modifying the /etc/rsyslog.conf file to have the following):
$ModLoad imudp
$UDPServerRun 514
Then allow UDP 514 to the Syslog server on the machine it self:
iptables -L -n -v | grep 514
0   0   ACCEPT  udp --      *       *       0.0.0.0/0           0.0.0.0/0       state NEW udp dpt:514
And also at the vCloud Air level as well:
Enable Sending Syslog to a Remote Machine in vCloud Air
It looks like we need to use the Rest API to enable the syslog server. All of the instructions are laid out in Manage the System Logs for an Edge Gateway. I also ran into a cool cli (vmware/vca-cli), so I went ahead and installed it on my MAC:
elatov@macair:~$sudo port install py27-pip

elatov@macair:~$sudo port select --set pip pip27
Selecting 'pip27' for 'pip' succeeded. 'pip27' is now active.
elatov@macair:~$which pip
/opt/local/bin/pip
elatov@macair:~$pip -V
pip 7.1.2 from /opt/local/Library/Frameworks/Python.framework/Versions/2.7/lib/python2.7/site-packages (python 2.7)

elatov@macair:~$sudo pip install vca-cli

elatov@macair:~$sudo ln -s /opt/local/Library/Frameworks/Python.framework/Versions/2.7/bin/vca /usr/local/bin/

elatov@macair:~$vca -v
vca-cli version 14 (pyvcloud: 14)
Now let's login and try to get the IP of Edge Gateway:
elatov@macair:~$vca login elatov@test.com
Password:
User 'elatov@test.com' logged in, profile 'default'
Password encrypted and saved in local profile. Use --do-not-save-password to disable it.

elatov@macair:~$vca instance
Available instances for user 'elatov@test.com', profile 'default':
| Service Group   | Region            | Plan                           | Instance Id                          | Selected   |
|-----------------+-------------------+--------------------------------+--------------------------------------+------------|
| SVC_GROUP      | us-california-1-3 | Virtual Private Cloud OnDemand | INSTANCE_ID |            |
Then we can use that instance and get it's gateway information:

elatov@macair:~$vca instance use --instance INSTANCE_ID
Using instance:org 'INSTANCE_ID':'INSTANCE_ID', profile 'default'
Using VDC 'VDC1', profile 'default'
Here is the actual command to complete the setup:

elatov@macair:~$ $ vca gateway
Available gateways in 'VDC1', profile 'default':
| Name    | External IPs   | DHCP   | Firewall   | NAT   | VPN   | Routed Networks                          | Syslog   | Uplinks     | Selected   |
|---------+----------------+--------+------------+-------+-------+------------------------------------------+----------+-------------+------------|
| gateway | 107.189.120.76 | Off    | On         | On    | On    | routed-network-2, default-routed-network |          | d2p3v40-ext | *          |

elatov@macair:~$ $ vca gateway set-syslog --gateway gateway --ip 10.10.10.4
| Start Time          | Duration      | Status   |
|---------------------+---------------+----------|
| 2015-09-14 18:37:58 | 0 mins 5 secs | success  |

elatov@macair:~$ $ vca gateway
Available gateways in 'VDC1', profile 'default':
| Name    | External IPs   | DHCP   | Firewall   | NAT   | VPN   | Routed Networks                          | Syslog     | Uplinks     | Selected   |
|---------+----------------+--------+------------+-------+-------+------------------------------------------+------------+-------------+------------|
| gateway | 107.189.120.76 | Off    | On         | On    | On    | routed-network-2, default-routed-network | 10.10.10.4 | d2p3v40-ext | *          |
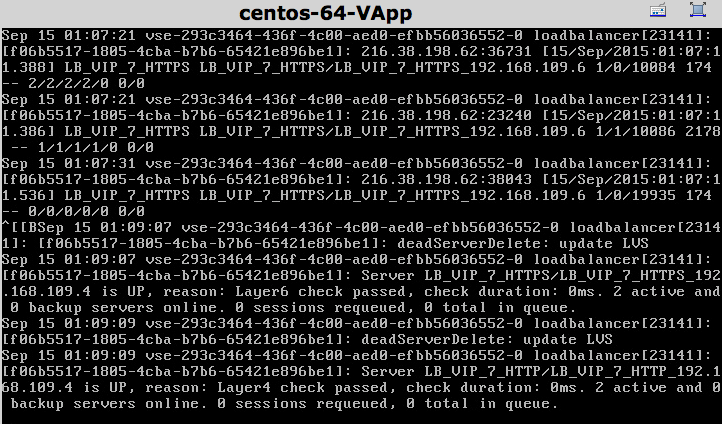
Then I went to the Remote Syslog server and I saw that the Load Balancer was taking two different IPs and forwarding it to two different Web Servers:
Use the vCloud Rest API with CURL
If you don’t want to install the cli, you can just use curl. To use curl we need to first get an authentication code, and that’s done by POST’ing to a specific location your creds that are base64 encoded. Here is a quick example:
# this is base 64 encoding the creds
> $echo -n "elatov@test.com:YOU_PASSWORD" | openssl base64
a2FyaW0uZWxhdG92QHJzYS5jb206UEBzc3cwcmQx
> $ curl -i -X POST -H "Accept: application/json;version=5.7" -H "Authorization: Basic a2FyaW0uZWxhdG92QHJzYS5jb206UEBzc3cwcmQx" https://vca.vmware.com/api/iam/login
HTTP/1.1 201 Created
Date: Mon, 14 Sep 2015 22:14:45 GMT
Server: Apache-Coyote/1.1
vchs-authorization: eyJhbGciOiJSUzI1NiJ9.eyJhdWQiOlsibm9uZSJdLCJzY29wZSI6WyIxIl0sImdyYW50X3R5cGUiOiJpbXBsaWNpdCIsInN1YiI6IjAzNTI1MDkzLWMwNGUtNDAxOS04NDBjLTU3MmVkM2ZiNDUwZiIsImVtYWlsIjoia2FyaW0uZWxhdG92QHJzYS5jb20iLCJ1c2VyX2lkIjoiMDM1MjUwOTMtYzA0ZS00MDE5LTg0MGMtNTcyZWQzZmI0NTBmIiwidXNlcl9uYW1lIjoia2FyaW0uZWxhdG92QHJzYS5jb20iLCJjb21wYW55X2lkIjoiYTlmOTdhNmQtZGI0Ni00NjExLWEzMzItNmUyMTlmOGY2YWE1IiwiY29tcGFueV9uYW1lIjoiS2FyaW0gRWxhdG92IiwiY3VzdG9tZXJfbnVtYmVyIjoiMTMwMjMwNzQ5MyIsInZlcnNpb24iOiIxLjAiLCJzZ19pZCI6WyJhY2VhYjQyMS0zMDdkLTQzMDUtYWM4MC1hMzZmYjAxOGQzOGQiXSwicGxhbnMiOltdLCJleHAiOjE0NDIyNjk3ODUsImlhdCI6MTQ0MjI2ODg4NSwiaXNzIjoiaHR0cHM6Ly9pYW0udmNocy52bXdhcmUuY29tL29hdXRoL3Rva2VuIiwiY2xpZW50X2lkIjoidmNoc19zYyIsImp0aSI6IjlhM2M0YmY0LTRkZTgtNDcwYS1hMjM4LTE4ZDMxOTQwNWEyZiJ9.VPCs9XFklkdOw9hFhaW5rJyUJseO-RXhYUs5SbSnrU-DznFtI0RUXVDvnbvlsdAF3-Xas2Y_dkA01vFXGq1JQecpwlQTHMfrmEPlA9OfeyKbnJ9kQKs-BE-bvzjIzEh3upoEzFS3V3PuQ2JTeffibqDotaexOvcFzjWIwwAiiYbJ4Fdty0Q0RvWiUeccxaOWmH-Vf6wohQz2pZ69FLaRF3pa7XLTx3gjG4SbObfq6I6Whr69e6Sw46U2skfOg7wEKtILCZysw5S74erhYILsnhXdfzltCDt9XauFwGVEifyeveBVhtspMvM-L3tx0zRUSXwYoRMMpoeZnxc_APGFlA
Content-Type: application/json; version=5.7
Content-Length: 60
Via: 1.1 iam_up
Set-Cookie: ROUTEID=.12; path=/; Domain=.vchs.vmware.com
Via: 1.1 vca.vmware.com
Connection: close
{"serviceGroupIds":["aceab421-307d-4305-ac80-a36fb018d38d"]}
Then we can use that vchs-authorization header to get the rest of the information, for example:
$curl -i -X GET -H "Accept: application/json;version=5.7" -H "Authorization: Bearer eyJhbGciOiJSUzI1NiJ9.eyJhdWQiOlsibm9uZSJdLCJzY29wZSI6WyIxIl0sImdyYW50X3R5cGUiOiJpbXBsaWNpdCIsInN1YiI6IjAzNTI1MDkzLWMwNGUtNDAxOS04NDBjLTU3MmVkM2ZiNDUwZiIsImVtYWlsIjoia2FyaW0uZWxhdG92QHJzYS5jb20iLCJ1c2VyX2lkIjoiMDM1MjUwOTMtYzA0ZS00MDE5LTg0MGMtNTcyZWQzZmI0NTBmIiwidXNlcl9uYW1lIjoia2FyaW0uZWxhdG92QHJzYS5jb20iLCJjb21wYW55X2lkIjoiYTlmOTdhNmQtZGI0Ni00NjExLWEzMzItNmUyMTlmOGY2YWE1IiwiY29tcGFueV9uYW1lIjoiS2FyaW0gRWxhdG92IiwiY3VzdG9tZXJfbnVtYmVyIjoiMTMwMjMwNzQ5MyIsInZlcnNpb24iOiIxLjAiLCJzZ19pZCI6WyJhY2VhYjQyMS0zMDdkLTQzMDUtYWM4MC1hMzZmYjAxOGQzOGQiXSwicGxhbnMiOltdLCJleHAiOjE0NDIyNjk3ODUsImlhdCI6MTQ0MjI2ODg4NSwiaXNzIjoiaHR0cHM6Ly9pYW0udmNocy52bXdhcmUuY29tL29hdXRoL3Rva2VuIiwiY2xpZW50X2lkIjoidmNoc19zYyIsImp0aSI6IjlhM2M0YmY0LTRkZTgtNDcwYS1hMjM4LTE4ZDMxOTQwNWEyZiJ9.VPCs9XFklkdOw9hFhaW5rJyUJseO-RXhYUs5SbSnrU-DznFtI0RUXVDvnbvlsdAF3-Xas2Y_dkA01vFXGq1JQecpwlQTHMfrmEPlA9OfeyKbnJ9kQKs-BE-bvzjIzEh3upoEzFS3V3PuQ2JTeffibqDotaexOvcFzjWIwwAiiYbJ4Fdty0Q0RvWiUeccxaOWmH-Vf6wohQz2pZ69FLaRF3pa7XLTx3gjG4SbObfq6I6Whr69e6Sw46U2skfOg7wEKtILCZysw5S74erhYILsnhXdfzltCDt9XauFwGVEifyeveBVhtspMvM-L3tx0zRUSXwYoRMMpoeZnxc_APGFlA" https://vca.vmware.com/api/sc/plans
HTTP/1.1 200 OK
Date: Mon, 14 Sep 2015 22:20:46 GMT
Server: Apache-Coyote/1.1
X-TraceId: 6ddd4045-866b-4188-8ab9-35f5584ed1b1-55e611db-142259
X-TraceUrl: /insight/services/traces/6ddd4045-866b-4188-8ab9-35f5584ed1b1-55e611db-142259?type=json
X-insight-endpoint-name: default
X-insight-application-name: localhost|ROOT
X-insight-server-name: 6ddd4045-866b-4188-8ab9-35f5584ed1b1
X-insight-source: HTTP
Content-Type: application/json; class="com".vmware.vchs.sc.restapi.model.planlisttype; version=5.7;charset=UTF-8
Content-Length: 4428
Via: 1.1 vca.vmware.com
Connection: close


$curl -i -X GET -H "Accept: application/json;version=5.7" -H "Authorization: Bearer eyJhbGciOiJSUzI1NiJ9.eyJhdWQiOlsibm9uZSJdLCJzY29wZSI6WyIxIl0sImdyYW50X3R5cGUiOiJpbXBsaWNpdCIsInN1YiI6IjAzNTI1MDkzLWMwNGUtNDAxOS04NDBjLTU3MmVkM2ZiNDUwZiIsImVtYWlsIjoia2FyaW0uZWxhdG92QHJzYS5jb20iLCJ1c2VyX2lkIjoiMDM1MjUwOTMtYzA0ZS00MDE5LTg0MGMtNTcyZWQzZmI0NTBmIiwidXNlcl9uYW1lIjoia2FyaW0uZWxhdG92QHJzYS5jb20iLCJjb21wYW55X2lkIjoiYTlmOTdhNmQtZGI0Ni00NjExLWEzMzItNmUyMTlmOGY2YWE1IiwiY29tcGFueV9uYW1lIjoiS2FyaW0gRWxhdG92IiwiY3VzdG9tZXJfbnVtYmVyIjoiMTMwMjMwNzQ5MyIsInZlcnNpb24iOiIxLjAiLCJzZ19pZCI6WyJhY2VhYjQyMS0zMDdkLTQzMDUtYWM4MC1hMzZmYjAxOGQzOGQiXSwicGxhbnMiOltdLCJleHAiOjE0NDIyNzExODUsImlhdCI6MTQ0MjI3MDI4NSwiaXNzIjoiaHR0cHM6Ly9pYW0udmNocy52bXdhcmUuY29tL29hdXRoL3Rva2VuIiwiY2xpZW50X2lkIjoidmNoc19zYyIsImp0aSI6IjVmMmViMzc3LTE4ZWMtNDZmNy04YTk2LWY1YWVmYjBiZTY1NiJ9.f21e_PuuBdHamZe8F8IBz_kaCU64i1B6q9NPZKelLQ_Vg5oI4KIVLsS03GWVjRbtR32pOGgZtHh7x2usqUcVZ9QAxQI9_lcjnO7fcYt6JBAOA8N2OaaKiYOz-hnDukcdvVB5RhWnpysaa43RkCEs73WXgQ_8_b6_UB0xxrgxP5ZSbfJldSToExoGnb_KX65DhfgrMKY-6Oip5zA63qUnl8XAT1Ro2Ffj9YqJ9S7-jXDEAsoMz8vqzg44bW2v3rtXWYDr6Z9Sr_eY1NwHTYji09FFJQquao98iB_6SJA2bWEfX-hbgJslHRtr6VjVH98UuNwGYsuPIucyDo7b8Sxjrg" https://vca.vmware.com/api/sc/instances
HTTP/1.1 200 OK
Date: Mon, 14 Sep 2015 22:38:38 GMT
Server: Apache-Coyote/1.1
X-TraceId: 6ddd4045-866b-4188-8ab9-35f5584ed1b1-55e611db-142400
X-TraceUrl: /insight/services/traces/6ddd4045-866b-4188-8ab9-35f5584ed1b1-55e611db-142400?type=json
X-insight-endpoint-name: default
X-insight-application-name: localhost|ROOT
X-insight-server-name: 6ddd4045-866b-4188-8ab9-35f5584ed1b1
X-insight-source: HTTP
Content-Type: application/json; class="com".vmware.vchs.sc.restapi.model.instancelisttype; version=5.7;charset=UTF-8
Content-Length: 1028
Via: 1.1 vca.vmware.com
Connection: close
{"instances":[{"link":[],"description":"Create virtual machines, and easily scale up or down as your needs change.","region":"us-california-1-3.vchs.vmware.com","instanceVersion":"1.0","planId":"region:us-california-1-3.vchs.vmware.com:planID:c65d5821-aa97-4141-915a-7d7eab0a9d51","serviceGroupId":"aceab421-307d-4305-ac80-a36fb018d38d","apiUrl":"https://us-california-1-3.vchs.vmware.com/api/compute/api/org/INSTANCE_ID","dashboardUrl":"https://us-california-1-3.vchs.vmware.com/api/compute/compute/ui/index.html?orgName=INSTANCE_ID&serviceInstanceId=INSTANCE_ID&servicePlan=c65d5821-aa97-4141-915a-7d7eab0a9d51","instanceAttributes":"{\"orgName\":\"INSTANCE_ID\",\"sessionUri\":\"https://us-california-1-3.vchs.vmware.com/api/compute/api/sessions\",\"apiVersionUri\":\"https://us-california-1-3.vchs.vmware.com/api/compute/api/versions\"}","id":"INSTANCE_ID","name":"Virtual Private Cloud OnDemand"}]}
Now to actually get to your vcloud instance we have to use another URL and more information (username@ORG: Password) in the encoded base64 authorization header: The ORG is seen in the last output: "orgName":"INSTANCE_ID"
and to get a list of available URLs that we have access to, we can query the session URL, also seen in the above output: “sessionUri":"https://us-california-1-3.vchs.vmware.com/api/compute/api/sessions",
Here is the example of authenticating to the compute services:
$ echo -n "elatov@test.com@INSTANCE_ID:PASSWORD" | base64
a2FyaW0uZWxhdG92QHJzYS5jb21ANjVlODFiMmQtNmQ1MC00ZmFhLWJjODgtNDhlMWQ5ZGNhZTM0OlBAc3N3MHJkMQ==

$curl -i -X POST -H "Accept: application/*+xml;version=5.11" -H "Authorization: Basic a2FyaW0uZWxhdG92QHJzYS5jb21ANjVlODFiMmQtNmQ1MC00ZmFhLWJjODgtNDhlMWQ5ZGNhZTM0OlBAc3N3MHJkMQ==" https://us-california-1-3.vchs.vmware.com/api/compute/api/sessions
HTTP/1.1 200 OK
Date: Tue, 15 Sep 2015 00:15:46 GMT
Via: 1.1 Repose (Repose/6.2.2.0)
X-VMWARE-VCLOUD-REQUEST-EXECUTION-TIME: 341
Date: Tue, 15 Sep 2015 00:15:47 GMT
Expires: Thu, 01 Jan 1970 00:00:00 GMT
x-vcloud-authorization: 0c5b264bb9044f7dac8dbe1143bdf75c
X-VMWARE-VCLOUD-REQUEST-ID: 171327f4-54b9-4923-969d-e2f130315d48
Set-Cookie: vcloud_session_id=0c5b264bb9044f7dac8dbe1143bdf75c; Secure; Path=/; HttpOnly
Content-Type: application/vnd.vmware.vcloud.session+xml;version=5.11
Content-Length: 1995
Connection: close
Server: Jetty(9.2.z-SNAPSHOT)
<?xml version="1.0" encoding="UTF-8"?>
<Session xmlns="http://www.vmware.com/vcloud/v1.5" org="INSTANCE_ID" roles="Account Administrator" user="elatov@test.com" userId="urn:vcloud:user:484de998-16ac-441d-b6cb-1c6a0acf2589" href="https://us-california-1-3.vchs.vmware.com/api/compute/api/session" type="application/vnd.vmware.vcloud.session+xml" xmlns:xsi="http://www.w3.org/2001/XMLSchema-instance" xsi:schemaLocation="http://www.vmware.com/vcloud/v1.5 http://us-california-1-3.vchs.vmware.com/api/compute/api/v1.5/schema/master.xsd">
    <Link rel="down" href="https://us-california-1-3.vchs.vmware.com/api/compute/api/org/" type="application/vnd.vmware.vcloud.orgList+xml"/>
    <Link rel="remove" href="https://us-california-1-3.vchs.vmware.com/api/compute/api/session"/>
    <Link rel="down" href="https://us-california-1-3.vchs.vmware.com/api/compute/api/admin/" type="application/vnd.vmware.admin.vcloud+xml"/>
    <Link rel="down" href="https://us-california-1-3.vchs.vmware.com/api/compute/api/org/INSTANCE_ID" name="INSTANCE_ID" type="application/vnd.vmware.vcloud.org+xml"/>
    <Link rel="down" href="https://us-california-1-3.vchs.vmware.com/api/compute/api/query" type="application/vnd.vmware.vcloud.query.queryList+xml"/>
    <Link rel="entityResolver" href="https://us-california-1-3.vchs.vmware.com/api/compute/api/entity/" type="application/vnd.vmware.vcloud.entity+xml"/>
    <Link rel="down:extensibility" href="https://us-california-1-3.vchs.vmware.com/api/compute/api/extensibility" type="application/vnd.vmware.vcloud.apiextensibility+xml"/>
    <Link rel="down" href="https://us-california-1-3.vchs.vmware.com/api/compute/api/vchs/query?type=edgeGateway" type="application/vnd.vmware.vchs.query.records+xml"/>
    <Link rel="down" href="https://us-california-1-3.vchs.vmware.com/api/compute/api/vchs/query?type=orgVdcNetwork" type="application/vnd.vmware.vchs.query.records+xml"/>
</Session>
Now we have to use another Header to include the x-vcloud-authorization, for example let’s get the ORG information:
$curl -i -X GET -H "Content-type: application/*+xml;" -H "Accept: application/*+xml;version=5.11" -H "x-vcloud-authorization: 0c5b264bb9044f7dac8dbe1143bdf75c" https://us-california-1-3.vchs.vmware.com/api/compute/api/org/
HTTP/1.1 200 OK
Date: Tue, 15 Sep 2015 00:18:43 GMT
Via: 1.1 Repose (Repose/6.2.2.0)
X-VMWARE-VCLOUD-REQUEST-EXECUTION-TIME: 9
Vary: Accept-Encoding, User-Agent
Date: Tue, 15 Sep 2015 00:18:43 GMT
x-vcloud-authorization: 0c5b264bb9044f7dac8dbe1143bdf75c
X-VMWARE-VCLOUD-REQUEST-ID: adff8f91-36e3-4ae5-8788-fc61211d448f
Content-Type: application/vnd.vmware.vcloud.orglist+xml;version=5.11
Content-Length: 616
Connection: close
Server: Jetty(9.2.z-SNAPSHOT)
<?xml version="1.0" encoding="UTF-8"?>
<OrgList xmlns="http://www.vmware.com/vcloud/v1.5" href="https://us-california-1-3.vchs.vmware.com/api/compute/api/org/" type="application/vnd.vmware.vcloud.orgList+xml" xmlns:xsi="http://www.w3.org/2001/XMLSchema-instance" xsi:schemaLocation="http://www.vmware.com/vcloud/v1.5 http://us-california-1-3.vchs.vmware.com/api/compute/api/v1.5/schema/master.xsd">
    <Org href="https://us-california-1-3.vchs.vmware.com/api/compute/api/org/INSTANCE_ID" name="INSTANCE_ID" type="application/vnd.vmware.vcloud.org+xml"/>
</OrgList>
For the syslog setup, first query your gateway to find out it’s gateway-id:
$curl -i -X GET -H "Content-type: application/*+xml;" -H "Accept: application/*+xml;version=5.11" -H "x-vcloud-authorization: 755132f383b94fc6bb6bc1eddc30e135" https://us-california-1-3.vchs.vmware.com/api/compute/api/vchs/query?type=edgeGateway
HTTP/1.1 200 OK
Date: Tue, 15 Sep 2015 14:52:33 GMT
Via: 1.1 Repose (Repose/6.2.2.0)
Vary: Accept-Encoding, User-Agent
Date: Tue, 15 Sep 2015 14:52:33 GMT
x-vcloud-authorization: 755132f383b94fc6bb6bc1eddc30e135
X-VMWARE-VCLOUD-REQUEST-ID: af5e28e1-cc95-43a3-8974-72462adbc3f7
Content-Type: application/vnd.vmware.vchs.query.records+xml;version=1.0
Content-Length: 2462
Connection: close
Server: Jetty(9.2.z-SNAPSHOT)
<?xml version="1.0" encoding="UTF-8" standalone="yes"?>
<vcloud_1_5:QueryResultRecords xmlns:vcloud_1_5="http://www.vmware.com/vcloud/v1.5" xmlns:ovf_001="http://schemas.dmtf.org/ovf/envelope/1" xmlns:ovf_002="http://schemas.dmtf.org/wbem/wscim/1/cim-schema/2/CIM_VirtualSystemSettingData" xmlns:ns4="http://schemas.dmtf.org/wbem/wscim/1/common" xmlns:ovf_003="http://schemas.dmtf.org/wbem/wscim/1/cim-schema/2/CIM_ResourceAllocationSettingData" xmlns:ovf_004="http://schemas.dmtf.org/ovf/environment/1" xmlns:nws_1_0="http://www.vmware.com/vcloud/networkservice/1.0" xmlns:nws_ipam_1_0="http://www.vmware.com/vcloud/networkservice/ipam/1.0" xmlns:nws_common_1_0="http://www.vmware.com/vcloud/networkservice/common/1.0" totalRecords="1">
<nws_1_0:VchsEdgeGatewayRecord externalIpAddress="107.189.120.76" gatewayBackingConfig="compact" numberOfExternalIpAddressesAllocated="1" numberOfExternalIpAddressesUsed="1" vdcId="bd6fc4f7-ffef-428b-aca9-275063c5693b" vdcName="VDC1" gatewayStatus="READY" haStatus="Disabled" isBusy="false" name="gateway" numberOfExtNetworks="1" numberOfOrgNetworks="2" vdc="https://us-california-1-3.vchs.vmware.com/api/compute/api/vdc/bd6fc4f7-ffef-428b-aca9-275063c5693b" href="https://us-california-1-3.vchs.vmware.com/api/compute/api/admin/edgeGateway/bc541a07-6705-4741-b783-cabec6aa8964">
<vcloud_1_5:Link rel="edgeGateway:getServices" href="https://us-california-1-3.vchs.vmware.com/api/compute/api/admin/edgeGateway/bc541a07-6705-4741-b783-cabec6aa8964"/>
<vcloud_1_5:Link rel="vchs:orgVdcNetworks" href="https://us-california-1-3.vchs.vmware.com/api/compute/api/vchs/query?type=orgVdcNetwork&edgeGatewayId=bc541a07-6705-4741-b783-cabec6aa8964&vdcId=bd6fc4f7-ffef-428b-aca9-275063c5693b"/>
<vcloud_1_5:Link rel="externalIpUsage" href="https://us-california-1-3.vchs.vmware.com/api/compute/api/admin/edgeGateway/bc541a07-6705-4741-b783-cabec6aa8964/externalIpUsage"/>
<vcloud_1_5:Link rel="manageExternalIpAddresses" href="https://us-california-1-3.vchs.vmware.com/api/compute/api/admin/edgeGateway/bc541a07-6705-4741-b783-cabec6aa8964/action/manageExternalIpAddresses"/>
<vcloud_1_5:Link rel="vcdUI:edgeGateway" href="https://us-california-1-3.vchs.vmware.com/compute/cloud//org/INSTANCE_ID/#/OrgVdcGatewayList?orgVdc=bd6fc4f7-ffef-428b-aca9-275063c5693b" name="OrgVdcVGatewayList"/>
</nws_1_0:VchsEdgeGatewayRecord>
</vcloud_1_5:QueryResultRecords>
So from the above output our gateway URL is the following:
<vcloud_1_5:Link rel="edgeGateway:getServices" href="https://us-california-1-3.vchs.vmware.com/api/compute/api/admin/edgeGateway/bc541a07-6705-4741-b783-cabec6aa8964"/>
Looking over SyslogServerType it has the following table:
| CRUD | Operation | Description | Since | Deprecated |
|---|---|---|---|---|
| as input | POST /admin/edgeGateway/{id}/action/configureSyslogServerSettings | Configure Syslog server settings for the org vdc edge gateway | 5.11 |
So let’s try to update that, in the body we have to include the following XML (from the same page):
<SyslogServerSettings xmlns="http://www.vmware.com/vcloud/v1.5">
    <TenantSyslogServerSettings>
        <SyslogServerIp> IpAddressType </SyslogServerIp>
    </TenantSyslogServerSettings>
</SyslogServerSettings>
So I created the following XML:
$cat data.xml
<SyslogServerSettings xmlns="http://www.vmware.com/vcloud/v1.5">
    <TenantSyslogServerSettings>
        <SyslogServerIp>10.10.10.5</SyslogServerIp>
    </TenantSyslogServerSettings>
</SyslogServerSettings>
And then POST’ed it:
$curl -i -X POST -H "Content-type: application/*+xml;" -H "Accept: application/*+xml;version=5.11" -H "x-vcloud-authorization: 755132f383b94fc6bb6bc1eddc30e135" -d "@data.xml" https://us-california-1-3.vchs.vmware.com/api/compute/api/admin/edgeGateway/bc541a07-6705-4741-b783-cabec6aa8964/action/configureSyslogServerSettings
HTTP/1.1 202 Accepted
Date: Tue, 15 Sep 2015 15:11:07 GMT
Location: https://us-california-1-3.vchs.vmware.com:443/api/compute/api/task/0efd7887-510f-4372-b30b-747cd5fdac45
Via: 1.1 Repose (Repose/6.2.2.0)
X-VMWARE-VCLOUD-REQUEST-EXECUTION-TIME: 205
Date: Tue, 15 Sep 2015 15:11:08 GMT
x-vcloud-authorization: 755132f383b94fc6bb6bc1eddc30e135
X-VMWARE-VCLOUD-REQUEST-ID: 15c790b6-5433-4fd3-a9b3-d0d7a6422878
Content-Type: application/vnd.vmware.vcloud.task+xml;version=5.11
Content-Length: 1263
Connection: close
Server: Jetty(9.2.z-SNAPSHOT)
<?xml version="1.0" encoding="UTF-8"?>
<Task xmlns="http://www.vmware.com/vcloud/v1.5" cancelRequested="false" expiryTime="2015-12-14T15:11:07.939Z" operation="NETWORK_CONFIGURE_GATEWAY_SYSLOGSERVER_SETTINGS EdgeGateway (bc541a07-6705-4741-b783-cabec6aa8964)" operationName="networkConfigureEdgeGatewaySyslogServerSettings" serviceNamespace="com.vmware.vcloud" startTime="2015-09-15T15:11:07.939Z" status="queued" name="task" id="urn:vcloud:task:0efd7887-510f-4372-b30b-747cd5fdac45" href="https://us-california-1-3.vchs.vmware.com/api/compute/api/task/0efd7887-510f-4372-b30b-747cd5fdac45" type="application/vnd.vmware.vcloud.task+xml" xmlns:xsi="http://www.w3.org/2001/XMLSchema-instance" xsi:schemaLocation="http://www.vmware.com/vcloud/v1.5 http://us-california-1-3.vchs.vmware.com/api/compute/api/v1.5/schema/master.xsd">
    <User href="https://us-california-1-3.vchs.vmware.com/api/compute/api/admin/user/484de998-16ac-441d-b6cb-1c6a0acf2589" name="elatov@test.com" type="application/vnd.vmware.admin.user+xml"/>
    <Organization href="https://us-california-1-3.vchs.vmware.com/api/compute/api/org/INSTANCE_ID" name="INSTANCE_ID" type="application/vnd.vmware.vcloud.org+xml"/>
    <Details/>
</Task>
Then you can query the edge gateway to confirm the change has taken place:
$curl -i -X GET -H "Content-type: application/*+xml;" -H "Accept: application/*+xml;version=5.11" -H "x-vcloud-authorization: 755132f383b94fc6bb6bc1eddc30e135" https://us-california-1-3.vchs.vmware.com/api/compute/api/admin/edgeGateway/bc541a07-6705-4741-b783-cabec6aa8964 | grep -i SyslogServer -A 4
  % Total    % Received % Xferd  Average Speed   Time    Time     Time  Current
                                 Dload  Upload   Total   Spent    Left  Speed
100 26195    0 26195    0     0  36390      0 --:--:-- --:--:-- --:--:-- 36432
    <Link rel="edgeGateway:configureSyslogServerSettings" href="https://us-california-1-3.vchs.vmware.com/api/compute/api/admin/edgeGateway/bc541a07-6705-4741-b783-cabec6aa8964/action/configureSyslogServerSettings" type="application/vnd.vmware.vcloud.SyslogSettings+xml"/>
    <Link rel="edgeGateway:reapplyServices" href="https://us-california-1-3.vchs.vmware.com/api/compute/api/admin/edgeGateway/bc541a07-6705-4741-b783-cabec6aa8964/action/reapplyServices"/>
    <Link rel="edgeGateway:syncSyslogSettings" href="https://us-california-1-3.vchs.vmware.com/api/compute/api/admin/edgeGateway/bc541a07-6705-4741-b783-cabec6aa8964/action/syncSyslogServerSettings"/>
    <Description>gateway</Description>
    <Configuration>
        <GatewayBackingConfig>compact</GatewayBackingConfig>
        <GatewayInterfaces>
--
        <SyslogServerSettings>
            <TenantSyslogServerSettings>
                <SyslogServerIp>10.10.10.5</SyslogServerIp>
            </TenantSyslogServerSettings>
        </SyslogServerSettings>
    </Configuration>
</EdgeGateway>
If you already have syslog configured and you start changing the configuration you will see that the syslog client is restarted upon making the above changes: