Messing Around with Kubernetes
Kubernetes
With the popularity of containers, Google came out with a nice management system of containers: kubernetes. From the kubernetes page, here is nice description of what it is:
Kubernetes is an open-source platform for automating deployment, scaling, and operations of application containers across clusters of hosts, providing container-centric infrastructure.
With Kubernetes, you are able to quickly and efficiently respond to customer demand:
- Deploy your applications quickly and predictably.
- Scale your applications on the fly.
- Seamlessly roll out new features.
- Optimize use of your hardware by using only the resources you need.
I also ended up going through the Scalable Microservices with Kubernetes class from udacity, I really liked how they put everything together (from microservices to containers to kubernetes).
Kubernetes Master Components
I would say the Kubernetes architecture breaks down into two parts: Kubernetes Master and Kubernetes Nodes. The Kubernetes Master consists of the following (taken from Kubernetes Components):
- kube-apiserver exposes the Kubernetes API; it is the front-end for the Kubernetes control plane. It is designed to scale horizontally
- etcd is used as Kubernetes’ backing store. All cluster data is stored here. Proper administration of a Kubernetes cluster includes a backup plan for etcd’s data.
- kube-controller-manager is a binary that runs controllers, which are the background threads that handle routine tasks in the cluster. Logically, each controller is a separate process, but to reduce the number of moving pieces in the system, they are all compiled into a single binary and run in a single process. These controllers include:
- Node Controller: Responsible for noticing & responding when nodes go down.
- Replication Controller: Responsible for maintaining the correct number of pods for every replication controller object in the system.
- Endpoints Controller: Populates the Endpoints object (i.e., join Services & Pods).
- Service Account & Token Controllers: Create default accounts and API access tokens for new namespaces.
- kube-scheduler watches newly created pods that have no node assigned, and selects a node for them to run on.
Kubernetes Node Components
The nodes are where the actual containers run on, they consist of the following (taken from Kubernetes Components):
- kubelet is the primary node agent. It:
- Watches for pods that have been assigned to its node (either by apiserver or via local configuration file) and:
- Mounts the pod’s required volumes
- Downloads the pod’s secrets
- Run the pod’s containers via docker (or, experimentally, rkt).
- Periodically executes any requested container liveness probes.
- Reports the status of the pod back to the rest of the system, by creating a “mirror pod” if necessary.
- Reports the status of the node back to the rest of the system.
- kube-proxy enables the Kubernetes service abstraction by maintaining network rules on the host and performing connection forwarding.
- docker is of course used for actually running containers.
Kubernetes Architecture Diagrams
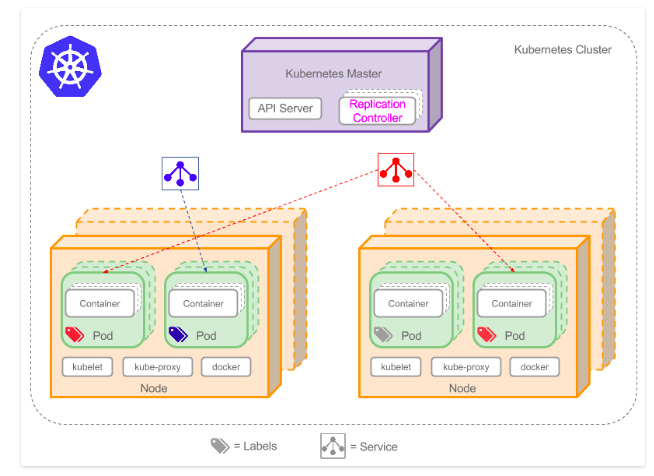
I ran into a couple of nice diagrams that describe the above. From Learn the Kubernetes Key Concepts in 10 Minutes:
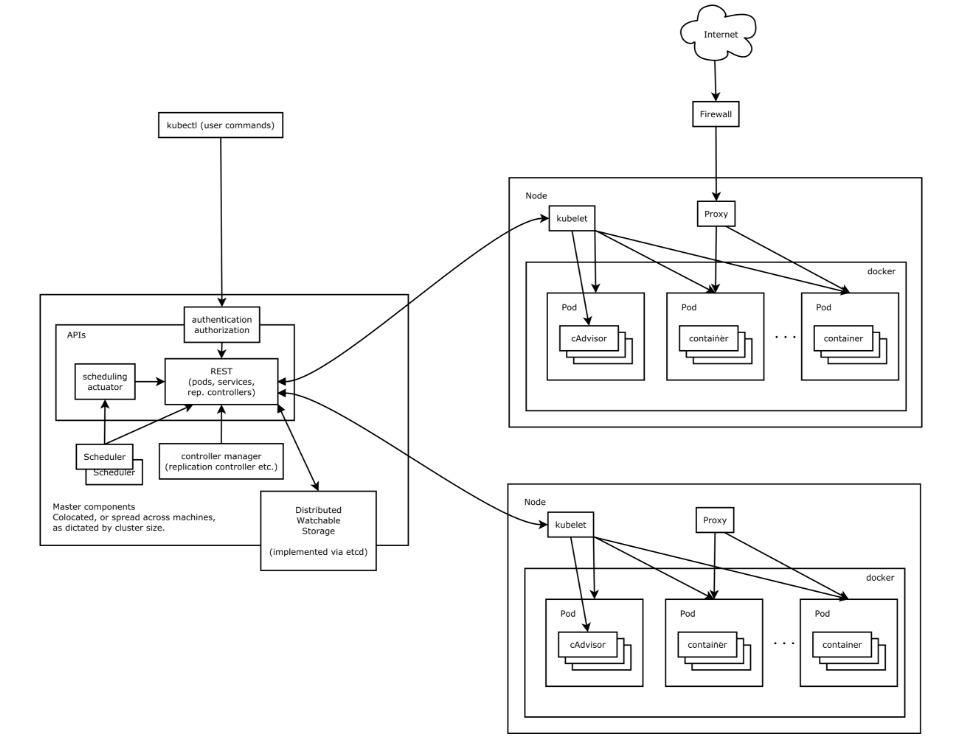
And from Kubernetes architecture:
Load Balancing in Kubernetes has a pretty nice overview of the kubernetes architecture:

Kubernetes Components
When deploying a container there are a couple of components, I will cover just the basics (taken from the User Guide):
- Node - A node is a physical or virtual machine running Kubernetes, onto which pods can be scheduled.
- Pod - A pod is a co-located group of containers and volumes.
- Service - A service defines a set of pods and a means by which to access them, such as single stable IP address and corresponding DNS name.
- Volume - A volume is a directory, possibly with some data in it, which is accessible to a Container as part of its filesystem. Kubernetes volumes build upon Docker Volumes, adding provisioning of the volume directory and/or device.
- Secret - A secret stores sensitive data, such as authentication tokens, which can be made available to containers upon request.
You can also check out the above diagrams to see how they fit into the whole architecture.
Let’s actually start playing with it. CoreOS provides a couple of vagrant boxes which have all of the above components preconfigured for us, so let’s use that.
Deploy the “CoreOS With Kubernetes” Vagrant Box
I already had Virtualbox running from my previous setup on my Fedora box. So let’s just install vagrant:
sudo dnf install vagrant
Next let’s clone the sample repo from coreos:
$ git clone https://github.com/coreos/coreos-kubernetes.git
$ cd coreos-kubernetes/single-node/
Let’s power on the machine:
vagrant up
I was running a later version of Virtualbox, so I followed the instructions laid out in this github page to add support for Virtualbox 5.0:
Step 1: Copy the version_4_3.rb file in %vagrant_install_dir%\embedded\gems\gems\vagrant-1.7.2\plugins\providers\virtualbox\driver to version_5_0.rb and edit the class name of the copied file to be “version_5_0”
Step 2: Modify the “meta.rb” file in the virtualbox\driver folder by adding ,5.0” => Version_5_0 to the driver_map hashmap (line 48).
Step 3: Modify the plugin.rb file in the providers\virtualbox directory (up one directory from where we were) and add the following line under line 47: autoload :Version_5_0, File.expand_path(“../driver/version_5_0”, FILE)
Here is the vagrant up:
[elatov@fed single-node]$ vagrant up
Bringing machine 'default' up with 'virtualbox' provider...
==> default: Box 'coreos-stable' could not be found. Attempting to find and install...
    default: Box Provider: virtualbox
    default: Box Version: >= 962.0.0
==> default: Loading metadata for box 'http://stable.release.core-os.net/amd64-usr/current/coreos_production_vagrant.json'
    default: URL: http://stable.release.core-os.net/amd64-usr/current/coreos_production_vagrant.json
==> default: Adding box 'coreos-stable' (v1068.8.0) for provider: virtualbox
    default: Downloading: https://stable.release.core-os.net/amd64-usr/1068.8.0/coreos_production_vagrant.box
    default: Calculating and comparing box checksum...
==> default: Successfully added box 'coreos-stable' (v1068.8.0) for 'virtualbox'!
==> default: Importing base box 'coreos-stable'...
==> default: Matching MAC address for NAT networking...
==> default: Checking if box 'coreos-stable' is up to date...
==> default: Setting the name of the VM: single-node_default_1469479748035_80532
==> default: Clearing any previously set network interfaces...
==> default: Preparing network interfaces based on configuration...
    default: Adapter 1: nat
    default: Adapter 2: hostonly
==> default: Forwarding ports...
    default: 22 => 2222 (adapter 1)
==> default: Running 'pre-boot' VM customizations...
==> default: Booting VM...
==> default: Waiting for machine to boot. This may take a few minutes...
    default: SSH address: 127.0.0.1:2222
    default: SSH username: core
    default: SSH auth method: private key
    default: Warning: Connection timeout. Retrying...
==> default: Machine booted and ready!
==> default: Configuring and enabling network interfaces...
==> default: Running provisioner: file...
==> default: Running provisioner: shell...
    default: Running: inline script
==> default: Running provisioner: file...
==> default: Running provisioner: shell...
    default: Running: inline script
We will see the new vboxnet interface created:
[elatov@fed single-node]$ ip -4 a s vboxnet0
4: vboxnet0: <BROADCAST,MULTICAST,UP,LOWER_UP> mtu 1500 qdisc fq_codel state UP group default qlen 1000
    inet 172.17.4.1/24 brd 172.17.4.255 scope global vboxnet0
       valid_lft forever preferred_lft forever
We can ssh into the VM, make sure the OS is up, and ensure docker is running all the containers:
[elatov@fed single-node]$ vagrant ssh
CoreOS stable (1068.8.0)
Last login: Mon Jul 25 20:52:52 2016 from 10.0.2.2
Failed Units: 1
  update-engine.service
core@localhost ~ $ docker ps
CONTAINER ID        IMAGE                                      COMMAND                  CREATED              STATUS                  PORTS               NAMES
c66b57798fa2        quay.io/coreos/hyperkube:v1.3.2_coreos.0   "/hyperkube controlle"   1 seconds ago        Up Less than a second                       k8s_kube-controller-manager.cd764b42_kube-controller-manager-172.17.4.99_kube-system_b069bb3f4d64c53dc09e3b79cb385abf_17585c46
19d591888763        quay.io/coreos/hyperkube:v1.3.2_coreos.0   "/hyperkube apiserver"   2 seconds ago        Up 2 seconds                                k8s_kube-apiserver.69ddbcf_kube-apiserver-172.17.4.99_kube-system_f177f943887b049cb4df2ebb28992c85_2d13d5ce
3cd0352e7f57        quay.io/coreos/hyperkube:v1.3.2_coreos.0   "/hyperkube scheduler"   8 seconds ago        Up 8 seconds                                k8s_kube-scheduler.5f81cd31_kube-scheduler-172.17.4.99_kube-system_4036f30f648d3243a81a0503e74b6504_cb202430
2f132cb91da9        gcr.io/google_containers/pause-amd64:3.0   "/pause"                 About a minute ago   Up About a minute                           k8s_POD.d8dbe16c_kube-proxy-172.17.4.99_kube-system_400e70e83d54781f2a92f3fed27b536d_bf001469
ca2a9e621c0d        gcr.io/google_containers/pause-amd64:3.0   "/pause"                 About a minute ago   Up About a minute                           k8s_POD.d8dbe16c_kube-controller-manager-172.17.4.99_kube-system_b069bb3f4d64c53dc09e3b79cb385abf_118595c3
f5b91de731db        gcr.io/google_containers/pause-amd64:3.0   "/pause"                 About a minute ago   Up About a minute                           k8s_POD.d8dbe16c_kube-apiserver-172.17.4.99_kube-system_f177f943887b049cb4df2ebb28992c85_96543f75
c10bef8a73f7        gcr.io/google_containers/pause-amd64:3.0   "/pause"                 About a minute ago   Up About a minute                           k8s_POD.d8dbe16c_kube-scheduler-172.17.4.99_kube-system_4036f30f648d3243a81a0503e74b6504_60790215
Configure Kubectl
Let’s get kubectl:
$ curl -O https://storage.googleapis.com/kubernetes-release/release/v1.2.4/bin/linux/amd64/kubectl
Then prepare the binary:
$ chmod +x kubectl
$ sudo mv kubectl /usr/local/bin/kubectl
Now let’s configure kubectl so it knows what cluster to connect to:
$ cd coreos-kubernetes/single-node/
$ export KUBECONFIG="${KUBECONFIG}:$(pwd)/kubeconfig"
$ kubectl config use-context vagrant-single
And you can query your cluster:
[elatov@fed single-node]$ kubectl get node
NAME          STATUS    AGE
172.17.4.99   Ready     6m
If you ever want to check out the system namespace (this will list the components that we talked about above… api-server, scheduler…etc) you can run the following:
[elatov@fed single-node]$ kubectl  get pod --namespace=kube-system
NAME                                    READY     STATUS    RESTARTS   AGE
heapster-v1.1.0-3647315203-8q7b5        2/2       Running   0          1h
kube-apiserver-172.17.4.99              1/1       Running   0          1h
kube-controller-manager-172.17.4.99     1/1       Running   0          1h
kube-dns-v15-oznro                      3/3       Running   0          1h
kube-proxy-172.17.4.99                  1/1       Running   0          1h
kube-scheduler-172.17.4.99              1/1       Running   0          1h
kubernetes-dashboard-v1.1.0-3nfk3       1/1       Running   0          1h
And also check some of the kubernetes cluster end points:
[elatov@fed single-node]$ kubectl cluster-info
Kubernetes master is running at https://172.17.4.99:443
Heapster is running at https://172.17.4.99:443/api/v1/proxy/namespaces/kube-system/services/heapster
KubeDNS is running at https://172.17.4.99:443/api/v1/proxy/namespaces/kube-system/services/kube-dns
kubernetes-dashboard is running at https://172.17.4.99:443/api/v1/proxy/namespaces/kube-system/services/kubernetes-dashboard
Check out the logs from each of the components:
[elatov@fed single-node]$ kubectl logs --namespace=kube-system kubernetes-dashboard-v1.1.0-3nfk3
Starting HTTP server on port 9090
Creating API server client for https://10.3.0.1:443
Successful initial request to the apiserver, version: v1.3.2+coreos.0
Creating in-cluster Heapster client
Query the Kubernetes API server
If you want to query the API, it’s protected by ssl certs, so you can run the following:
[elatov@fed single-node]$ curl --cert ssl/ca.pem --key ssl/ca-key.pem https://172.17.4.99 -k
{
  "paths": [
    "/api",
    "/api/v1",
    "/apis",
    "/apis/apps",
    "/apis/apps/v1alpha1",
    "/apis/autoscaling",
    "/apis/autoscaling/v1",
    "/apis/batch",
    "/apis/batch/v1",
    "/apis/batch/v2alpha1",
    "/apis/extensions",
    "/apis/extensions/v1beta1",
    "/apis/policy",
    "/apis/policy/v1alpha1",
    "/apis/rbac.authorization.k8s.io",
    "/apis/rbac.authorization.k8s.io/v1alpha1",
    "/healthz",
    "/healthz/ping",
    "/logs/",
    "/metrics",
    "/swaggerapi/",
    "/ui/",
    "/version"
  ]
}
You can keep going and list available logs:
[elatov@fed single-node]$ curl --cert ssl/ca.pem --key ssl/ca-key.pem https://172.17.4.99/logs/ -k
<pre>
<a href="alternatives.log">alternatives.log</a>
<a href="apt/">apt/</a>
<a href="bootstrap.log">bootstrap.log</a>
<a href="btmp">btmp</a>
<a href="dmesg">dmesg</a>
<a href="dpkg.log">dpkg.log</a>
<a href="faillog">faillog</a>
<a href="fsck/">fsck/</a>
<a href="lastlog">lastlog</a>
<a href="wtmp">wtmp</a>
</pre>
You can even check out the log contents:
[elatov@fed single-node]$ curl --cert ssl/ca.pem --key ssl/ca-key.pem https://172.17.4.99/logs/bootstrap.log -k | tail
Setting up debian-archive-keyring (2014.3) ...
Setting up libstdc++6:amd64 (4.9.2-10) ...
Setting up libapt-pkg4.12:amd64 (1.0.9.8.3) ...
Setting up libusb-0.1-4:amd64 (2:0.1.12-25) ...
Setting up libreadline6:amd64 (6.3-8+b3) ...
Setting up netbase (5.3) ...
Setting up inetutils-ping (2:1.9.2.39.3a460-3) ...
Setting up gnupg (1.4.18-7+deb8u1) ...
Setting up apt (1.0.9.8.3) ...
Processing triggers for libc-bin (2.19-18+deb8u4) ...
Deploy Test Nginx Pod
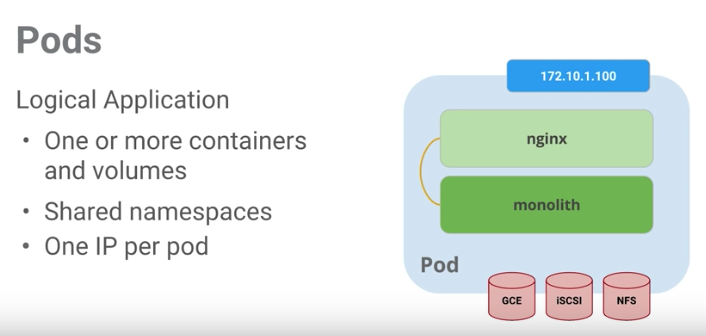
Now let’s deploy a pod on the kubernetes cluster. This setup covers the basics. Here is nice diagram (from the udacity class that I watched) of a pod:
I decided to just deploy an nginx server with a replica. Here is the config:
[elatov@fed single-node]$ cat run-my-nginx.yaml
apiVersion: extensions/v1beta1
kind: Deployment
metadata:
  name: my-nginx
spec:
  replicas: 2
  template:
    metadata:
      labels:
        run: my-nginx
    spec:
      containers:
      - name: my-nginx
        image: nginx
        ports:
        - containerPort: 80

[elatov@fed single-node]$ kubectl create -f run-my-nginx.yaml
deployment "my-nginx" created
At this point you can check the status of the pod:
[elatov@fed single-node]$ kubectl get pod                                                                                     [49/1909]
NAME                        READY     STATUS    RESTARTS   AGE
my-nginx-2494149703-ff3gr   1/1       Running   0          2m
my-nginx-2494149703-mc4o7   1/1       Running   0          2m
If you want more information you can use the describe arguement.
[elatov@fed single-node]$ kubectl describe pod
Name:           my-nginx-2494149703-ff3gr
Namespace:      default
Node:           172.17.4.99/172.17.4.99
Start Time:     Mon, 25 Jul 2016 15:06:24 -0600
Labels:         pod-template-hash=2494149703,run=my-nginx
Status:         Running
IP:             10.2.69.6
Controllers:    ReplicaSet/my-nginx-2494149703
Containers:
  my-nginx:
    Container ID:       docker://79f2e91d08894d355daee8f03d4f0f43cb7c05eda09a8e2427c4b29bfaac6c5a
    Image:              nginx
    Image ID:           docker://sha256:0d409d33b27e47423b049f7f863faa08655a8c901749c2b25b93ca67d01a470d
    Port:               80/TCP
    QoS Tier:
      memory:           BestEffort
      cpu:              BestEffort
    State:              Running
      Started:          Mon, 25 Jul 2016 15:07:37 -0600
    Ready:              True
    Restart Count:      0
    Environment Variables:
Conditions:
  Type          Status
  Initialized   True
  Ready         True
  PodScheduled  True
Volumes:
  default-token-rvoun:
    Type:       Secret (a volume populated by a Secret)
    SecretName: default-token-rvoun
Events:
  FirstSeen     LastSeen        Count   From                    SubobjectPath                   Type            Reason          Messag$
  ---------     --------        -----   ----                    -------------                   --------        ------          -------
  2m            2m              1       {default-scheduler }                                    Normal          Scheduled       Success
fully assigned my-nginx-2494149703-ff3gr to 172.17.4.99
  1m            1m              1       {kubelet 172.17.4.99}   spec.containers{my-nginx}       Normal          Pulling         pulling
 image "nginx"
  1m            1m              1       {kubelet 172.17.4.99}   spec.containers{my-nginx}       Normal          Pulled          Success
fully pulled image "nginx"
  1m            1m              1       {kubelet 172.17.4.99}   spec.containers{my-nginx}       Normal          Created         Created
 container with docker id 79f2e91d0889
  1m            1m              1       {kubelet 172.17.4.99}   spec.containers{my-nginx}       Normal          Started         Started
 container with docker id 79f2e91d0889
Name:           my-nginx-2494149703-mc4o7
Namespace:      default
Node:           172.17.4.99/172.17.4.99
Start Time:     Mon, 25 Jul 2016 15:06:24 -0600
Labels:         pod-template-hash=2494149703,run=my-nginx
Status:         Running
IP:             10.2.69.3
Controllers:    ReplicaSet/my-nginx-2494149703
Containers:
  my-nginx:
    Container ID:       docker://69c611d1e3b6022aa2536fdd70c7f62e9b7c9a134953ea1edf22c60eac122162
    Image:              nginx
    Image ID:           docker://sha256:0d409d33b27e47423b049f7f863faa08655a8c901749c2b25b93ca67d01a470d
    Port:               80/TCP
    QoS Tier:
      cpu:              BestEffort
      memory:           BestEffort
    State:              Running
      Started:          Mon, 25 Jul 2016 15:07:35 -0600
    Ready:              True
    Restart Count:      0
    Environment Variables:
Conditions:
  Type          Status
  Initialized   True
  Ready         True
  PodScheduled  True
Volumes:
  default-token-rvoun:
    Type:       Secret (a volume populated by a Secret)
    SecretName: default-token-rvoun
Events:
  FirstSeen     LastSeen        Count   From                    SubobjectPath                   Type            Reason          Message
  ---------     --------        -----   ----                    -------------                   --------        ------          -------
  2m            2m              1       {default-scheduler }                                    Normal          Scheduled       Success
fully assigned my-nginx-2494149703-mc4o7 to 172.17.4.99
  2m            2m              1       {kubelet 172.17.4.99}   spec.containers{my-nginx}       Normal          Pulling         pulling
 image "nginx"
  1m            1m              1       {kubelet 172.17.4.99}   spec.containers{my-nginx}       Normal          Pulled          Success
fully pulled image "nginx"
  1m            1m              1       {kubelet 172.17.4.99}   spec.containers{my-nginx}       Normal          Created         Created
 container with docker id 69c611d1e3b6
  1m            1m              1       {kubelet 172.17.4.99}   spec.containers{my-nginx}       Normal          Started         Started
 container with docker id 69c611d1e3b6
Expose Nginx Pod with a Service
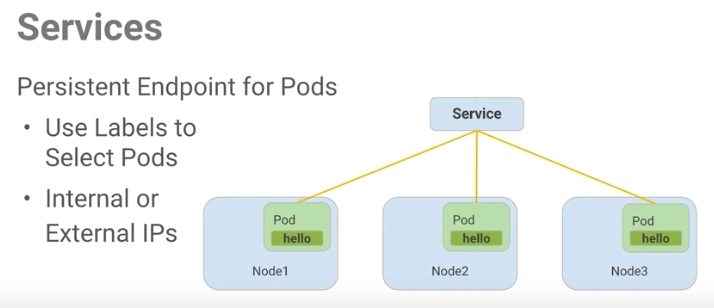
At this point the machines are deployed, but you can’t reach the machines externally, so we have to expose an IP for the this pod. This is accomplished by creating a service in kubernetes and associate it with our created pod. Here is another nice diagram (from the class) describing a kubernetes service:
We can create another config file for that:
[elatov@fed single-node]$ cat nginx-svc.yaml
apiVersion: v1
kind: Service
metadata:
  name: my-nginx
  labels:
    run: my-nginx
spec:
  ports:
  - port: 80
    protocol: TCP
  selector:
    run: my-nginx

[elatov@fed single-node]$ kubectl create -f nginx-svc.yaml
service "my-nginx" created
[elatov@fed single-node]$ kubectl get svc
NAME         CLUSTER-IP   EXTERNAL-IP   PORT(S)   AGE
kubernetes   10.3.0.1     <none>        443/TCP   18m
my-nginx     10.3.0.55    <none>        80/TCP    11s
We can then check out the endpoints for that container:
[elatov@fed single-node]$ kubectl describe svc my-nginx
Name:                   my-nginx
Namespace:              default
Labels:                 run=my-nginx
Selector:               run=my-nginx
Type:                   ClusterIP
IP:                     10.3.0.55
Port:                   <unset> 80/TCP
Endpoints:              10.2.69.3:80,10.2.69.6:80
Session Affinity:       None
No events.
You can also ssh into kubernetes node and confirm the iptables rules in place:
core@localhost ~ $ sudo iptables -L -n -v -t nat | grep -E 'my-nginx.*:80'
    0     0 DNAT       tcp  --  *      *       0.0.0.0/0            0.0.0.0/0            /* default/my-nginx: */ tcp to:10.2.69.3:80
    0     0 DNAT       tcp  --  *      *       0.0.0.0/0            0.0.0.0/0            /* default/my-nginx: */ tcp to:10.2.69.6:80
    0     0 KUBE-SVC-BEPXDJBUHFCSYIC3  tcp  --  *      *       0.0.0.0/0            10.3.0.55            /* default/my-nginx: cluster IP */ tcp dpt:80
At this point from the kubernetes node we can reach the container:
[elatov@fed single-node]$ vagrant ssh
CoreOS stable (1068.8.0)
Last login: Mon Jul 25 21:24:31 2016 from 10.0.2.2
Failed Units: 1
  update-engine.service
core@localhost ~ $ curl http://10.2.69.3
<!DOCTYPE html>
<html>
<head>
<title>Welcome to nginx!</title>
<style>
but let’s see if can expose it to our machine that is running the Virtualbox host. So let’s use the NodePort Spec, first let’s update the config file and then apply it:
[elatov@fed single-node]$ cat nginx-svc.yaml
apiVersion: v1
kind: Service
metadata:
  name: my-nginx
  labels:
    run: my-nginx
spec:
  type: NodePort
  ports:
  - port: 80
    nodePort: 30080
    protocol: TCP
  selector:
    run: my-nginx
[elatov@fed single-node]$ kubectl apply -f nginx-svc.yaml
service "my-nginx" configured
Now from the machine I can query the kubernetes cluster IP and use the defined port:
[elatov@fed single-node]$ curl http://172.17.4.99:30080
<!DOCTYPE html>
<html>
<head>
<title>Welcome to nginx!</title>
<style>
You will also now see the NodePort option on the service:
[elatov@fed single-node]$ kubectl describe svc my-nginx
Name:                   my-nginx
Namespace:              default
Labels:                 run=my-nginx
Selector:               run=my-nginx
Type:                   NodePort
IP:                     10.3.0.55
Port:                   <unset> 80/TCP
NodePort:               <unset> 30080/TCP
Endpoints:              10.2.69.3:80,10.2.69.6:80
Session Affinity:       None
No events.
On the kubernetes machine it self you will see it listening on that port:
core@localhost ~ $ netstat -lnt | grep 30080
tcp6       0      0 :::30080                :::*                    LISTEN
core@localhost ~ $ sudo lsof -i tcp:30080
COMMAND    PID USER   FD   TYPE DEVICE SIZE/OFF NODE NAME
hyperkube 2445 root    3u  IPv6  60356      0t0  TCP *:30080 (LISTEN)
You can also check out the logs from the nodes:
[elatov@fed single-node]$ kubectl logs my-nginx-2494149703-ff3gr
10.2.69.1 - - [25/Jul/2016:21:32:32 +0000] "GET / HTTP/1.1" 200 612 "-" "curl/7.40.0" "-"
[elatov@fed single-node]$ kubectl logs my-nginx-2494149703-mc4o7
10.2.69.1 - - [25/Jul/2016:21:18:08 +0000] "GET / HTTP/1.1" 200 612 "-" "curl/7.47.1" "-"
10.2.69.1 - - [25/Jul/2016:21:24:35 +0000] "GET / HTTP/1.1" 200 612 "-" "curl/7.47.1" "-"
We can also setup a port-forward to our Virtualbox machine:
┌─[elatov@macair] - [/Users/elatov] - [2016-07-25 08:18:52]
└─[0] <> ssh -L 30080:172.17.4.99:30080 fed
Last login: Mon Jul 25 20:18:06 2016 from 192.168.1.117
[elatov@fed ~]$
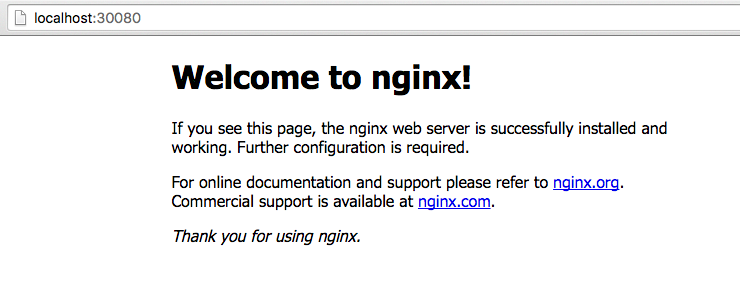
And now I can reach my container on my local browser:
Open Shell to Container with kubectl
From our Virtualbox host let’s run kubectl to get a shell into our container (this is assuming bash is available on the container image… the nginx one does):
[elatov@fed single-node]$ kubectl get pods
NAME                        READY     STATUS    RESTARTS   AGE
my-nginx-2494149703-ff3gr   1/1       Running   0          4d
my-nginx-2494149703-mc4o7   1/1       Running   0          4d
[elatov@fed single-node]$ kubectl exec -ti my-nginx-2494149703-ff3gr -- bash
root@my-nginx-2494149703-ff3gr:/# ps -ef | grep ng
root         1     0  0 Jul25 ?        00:00:00 nginx: master process nginx -g daemon off;
nginx        6     1  0 Jul25 ?        00:00:00 nginx: worker process
root        15     7  0 18:31 ?        00:00:00 grep ng
root@my-nginx-2494149703-ff3gr:/# df -Ph
Filesystem      Size  Used Avail Use% Mounted on
overlay          16G  2.5G   13G  17% /
tmpfs          1003M     0 1003M   0% /dev
tmpfs          1003M     0 1003M   0% /sys/fs/cgroup
/dev/sda9        16G  2.5G   13G  17% /etc/hosts
tmpfs          1003M   12K 1003M   1% /run/secrets/kubernetes.io/serviceaccount
shm              64M     0   64M   0% /dev/shm
From the class they recommend using the alpine image for your base docker images.
We can even modify our index page:
root@my-nginx-2494149703-ff3gr:~# cd /usr/share/nginx/html/
root@my-nginx-2494149703-ff3gr:/usr/share/nginx/html# sed -i 's/Welcome to nginx/Testing with Nginx/' index.html
Now from our Virtualbox Host:
[elatov@fed ~]$ curl http://172.17.4.99:30080
<!DOCTYPE html>
<html>
<head>
<title>Testing with Nginx!</title>
<style>