Running a Windows VM in Virtualbox in a VMware Gentoo VM
Installing Gentoo as a VM on a VMWare/ESXi Host
One might think: why would anyone do this? but the primary reason was to have a VM that I could RDP to while it’s on a VPN. And I admit that this is a bit of an overkill, but I just wanted to try it out to see how it work out :). Gentoo provides really good instructions on how to install it:
On top of that, I followed the instructions in these two sites to use LVMs and systemd:
Also, while I was compiling the kernel, I ended up enabling these options which were VMware Specific:
$ zgrep -iE 'VMW|VMX' /proc/config.gz
# CONFIG_VMWARE_VMCI is not set
# CONFIG_VMWARE_PVSCSI is not set
CONFIG_VMXNET3=y
CONFIG_DRM_VMWGFX=y
CONFIG_DRM_VMWGFX_FBCON=y
But they are not really necessary for the VM to boot up. If you want more detail on the install check out my old post on installing Gentoo in Virtualbox. After that’s done you should have a Gentoo VM running on your ESXi host.
Installing phpVirtualBox
Initially I wanted to just to boot up headless machines and the easiest way to do is with phpVirtualBox. The install is pretty easy (and it’s covered in: Gentoo Wiki:phpVirtualBox). First accept installing unstable packages:
$ cat /etc/portage/package.accept_keywords/*virt*
app-emulation/phpvirtualbox ~amd64
app-emulation/virtualbox-bin ~amd64
app-emulation/virtualbox-modules ~amd64
And here are the USE flags I used:
$ cat /etc/portage/package.use/*virt*
app-emulation/virtualbox-bin rdesktop-vrdp -chm vboxwebsrv
You need to have vboxwebsrv enabled to use phpVirtualBox. And now for the install:
$ emerge phpvirtualbox virtualbox-bin
Systemd Service file
The install only had a SysV init script. So I found a systemd service one at Arch Linux Wiki: PhpVirtualBox. Here is the service file I ended up with:
$ cat /usr/lib/systemd/system/vboxweb.service
[Unit]
Description=VirtualBox Web Service
After=network.target

[Service]
Type=forking
PIDFile=/run/vboxweb/vboxweb.pid
ExecStart=/opt/bin/vboxwebsrv --pidfile /run/vboxweb/vboxweb.pid  --background
User=vbox
Group=vboxusers

[Install]
WantedBy=multi-user.target
Don’t forget to make the user part of the vboxusers group:
$ gpasswd -a vbox vboxusers
Then I enabled the service, started it up, and it started without issues:
$ sudo systemctl enable vboxweb
$ sudo systemctl start vboxweb
$ sudo systemctl status vboxweb
 vboxweb.service - VirtualBox Web Service
   Loaded: loaded (/usr/lib/systemd/system/vboxweb.service; enabled; vendor pres
   Active: active (running) since Sun 2017-05-07 22:43:40 -00; 2h 42min ago
  Process: 1752 ExecStart=/opt/bin/vboxwebsrv --pidfile /run/vboxweb/vboxweb.pid
 Main PID: 1771 (vboxwebsrv)
   CGroup: /system.slice/vboxweb.service
           ├─1771 /opt/VirtualBox/vboxwebsrv --pidfile /run/vboxweb/vboxweb.pid
           ├─1774 /opt/VirtualBox/VBoxXPCOMIPCD
           ├─1779 /opt/VirtualBox/VBoxSVC --auto-shutdown

May 07 22:43:40 gen systemd[1]: Starting VirtualBox Web Service...
May 07 22:43:40 gen vboxwebsrv[1752]: Oracle VM VirtualBox web service Version 5
May 07 22:43:40 gen systemd[1]: Started VirtualBox Web Service.
Using Apache to Host the phpVirtualbox App
Next we can install apache and php so we use the phpVirtualBox application. Here are the USE flags I created for php:
$ cat /etc/portage/package.use/php
dev-lang/php soap gd apache2
And that installed apache2 as well. Then I created the following configuration for apache2:
$ cat /etc/apache2/vhosts.d/99-virtualbox.conf
<VirtualHost *:443>
        ServerName gen.kar.int
        DocumentRoot /var/www/localhost/htdocs/phpvirtualbox
        SSLEngine On
        SSLOptions  StrictRequire
        SSLProtocol all -SSLv2
        SSLCertificateFile /etc/apache2/ssl-data/wild-kar-int.pem
        SSLCertificateKeyFile /etc/apache2/ssl-data/wild-kar-int.key
        <Directory />
                AllowOverride All
        </Directory>
        <Location />
                Options Indexes FollowSymLinks
                SSLRequireSSL
        Require all granted
        </Location>
        ErrorLog /var/log/apache2/virtualbox_error.log
</VirtualHost>
When I tried to start apache2, it failed with the following error:
Invalid Mutex directory in argument file:/run/apache_ssl_mutex
The issue is actually discussed at apache-2.4.3: Invalid Mutex directory. So I manually created the directory:
$ sudo mkdir /run/apache_ssl_mutex
$ sudo chown apache:apache /run/apache_ssl_mutex/
And then I created a tmp.files configuration to create the directory on boot:
$ cat /etc/tmpfiles.d/apache2.conf
d /run/apache_ssl_mutex 0755 apache apache
After that, apache2 started up without issues.
phpVirtualbox logging in issues
I ran into different issues logging into phpVirtualbox and most of them are discussed at Common phpVirtualBox Errors and Issues. To fix my issues, I ended creating a dedicated to login and disabled the auth option:
$ cp /var/www/localhost/htdocs/phpvirtualbox/config.php-example /var/www/localhost/htdocs/phpvirtualbox/config.php
$ grep -E 'noAuth|user|pass' /var/www/localhost/htdocs/phpvirtualbox/config.php
/* Username / Password for system user that runs VirtualBox */
var $username = 'vbox';
var $password = 'password';
var $noAuth = true;
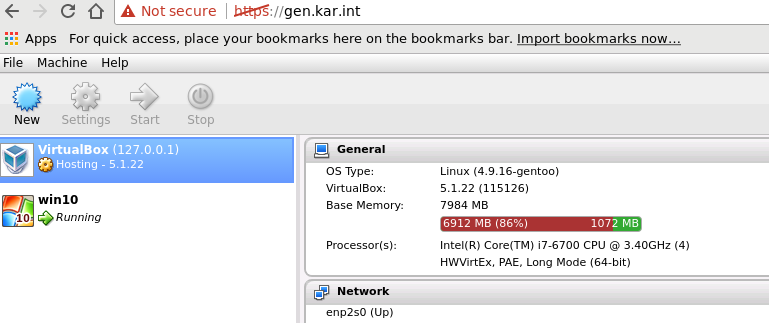
Then after that I was able to login to phpVirtualbox and see the VirtualBox host information:
Enabling VMware Hardware Assisted Virtualization on the Gentoo VM
When I tried to create a VM I noticed that I could not select an operating system that was 64 bit. I ran into these two sites that talk about the issue:
- Why is VirtualBox only showing 32 bit guest versions on my 64 bit host OS
- I have a 64bit host, but can’t install 64bit guests
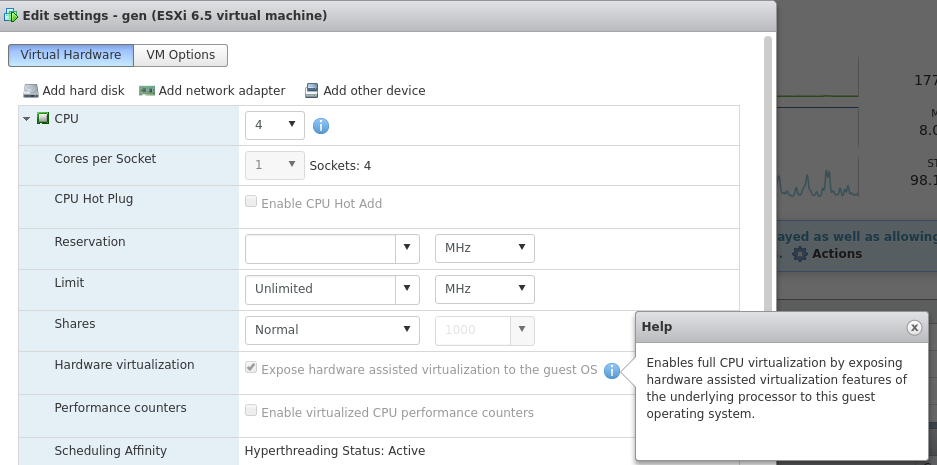
It looks like I need to make sure the VM has the Virtualization Technology passed through to it from the ESXi Host. Luckily with the latest versions of ESXi you can just enable that in the webclient. This is covered in:
- How to Enable Nested ESXi & Other Hypervisors in vSphere 5.1
- Expose VMware Hardware Assisted Virtualization in the vSphere Web Client
So through the webclient I shutdown the Gentoo VM and enabled that option:
After that I was able to create and poweron a VM in VirtualBox that was 64 bit. Just for reference the virtualbox-bin package includes the VirtualBox Guest Additions ISO:
$ ls -l /opt/VirtualBox/additions/VBoxGuestAdditions.iso
-rw-r--r-- 1 root root 59445248 May  7 20:08 /opt/VirtualBox/additions/VBoxGuestAdditions.iso
And I installed that on the Windows VM by adding it to the CD Drive of the VM.
Enabling Shared Clipboard with VirtualBox Remote Display Protocol
Initially I couldn’t copy and paste to the nested Windows VM either using rdesktop or xfreerdp. I thought it was related to these issues:
- Protocol Security Negotiation Failure
- [rdesktop-users] VirtualBox Failed to negotiate protocol, retrying with plain RDP.
- Bug 1002978 - Failed to negotiate protocol, retrying with plain RDP
But then I checked out the logs of the VM on the Gentoo machine and I saw the following in the VBox.log file.
ClipConstructX11: X11 DISPLAY variable not set -- disabling shared clipboard
And that led me to this page: clipboard not working detachable or headless start. It looks like I need to have Xorg running on the Host VM since the clipboard is shared with the Gentoo Machine first and then passed into the VirtualBox VM.
Installing Xorg on Gentoo
I then followed the instructions laid out in: Gentoo Wiki: Xorg/Guide to install Xorg. In the end here is what I ended up having in make.conf:
$ grep -vE '^#|^$' /etc/portage/make.conf
CFLAGS="-march=native -O2 -pipe"
CXXFLAGS="${CFLAGS}"
MAKEOPTS="-j4"
CHOST="x86_64-pc-linux-gnu"
USE="X jpeg truetype zsh-completion -ipv6 -gnome -kde systemd  \
     bindist mmx sse sse2"
INPUT_DEVICES="evdev"
VIDEO_CARDS="vmware"
PORTDIR="/usr/portage"
DISTDIR="${PORTDIR}/distfiles"
PKGDIR="${PORTDIR}/packages"
GENTOO_MIRRORS="http://mirror.usu.edu/mirrors/gentoo/"
And here are the USE flags for the mesa package:
$ cat /etc/portage/package.use/mesa
media-libs/mesa -llvm -video_cards_nouveau -video_cards_radeon -video_cards_radeonsi xa
Then I installed Xorg and icewm:
$ sudo emerge xorg-server icewm
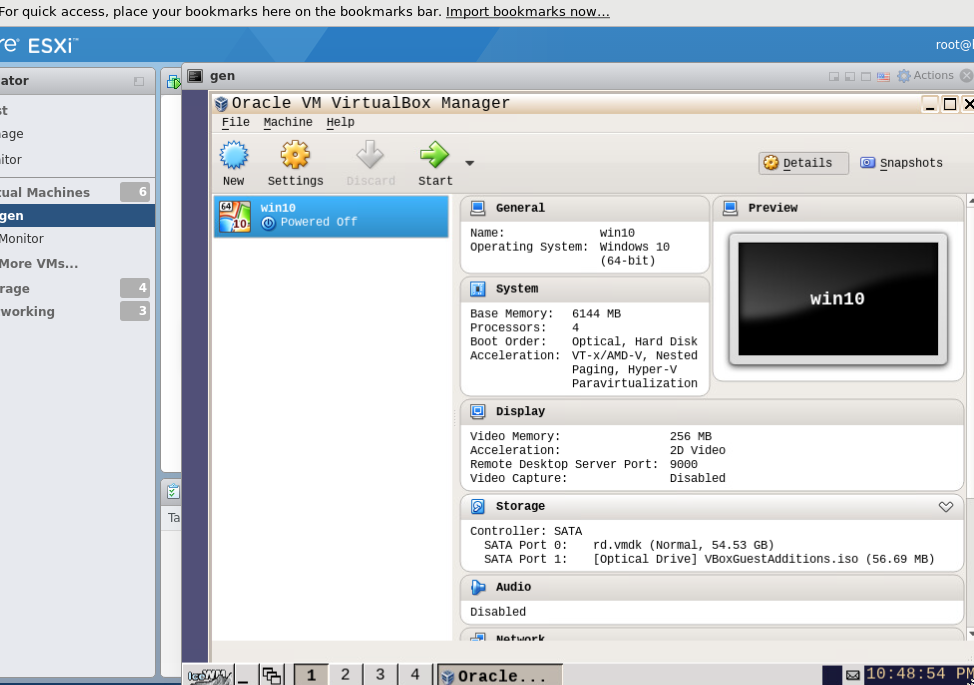
I was then able to login as my test user and execute startx. And just using the keyboard I was able to launch Virtualbox. Here is screenshot of the Gentoo VM Console in the web client with VirtualBox Manager GUI launched:
My mouse wouldn’t work initially. I ran into Mouse Does Not Function Properly in Linux Guests That Use X.Org 7.1 or Higher (5739104) and I installed the vmmouse driver as recommended:
sudo emerge xf86-input-vmmouse
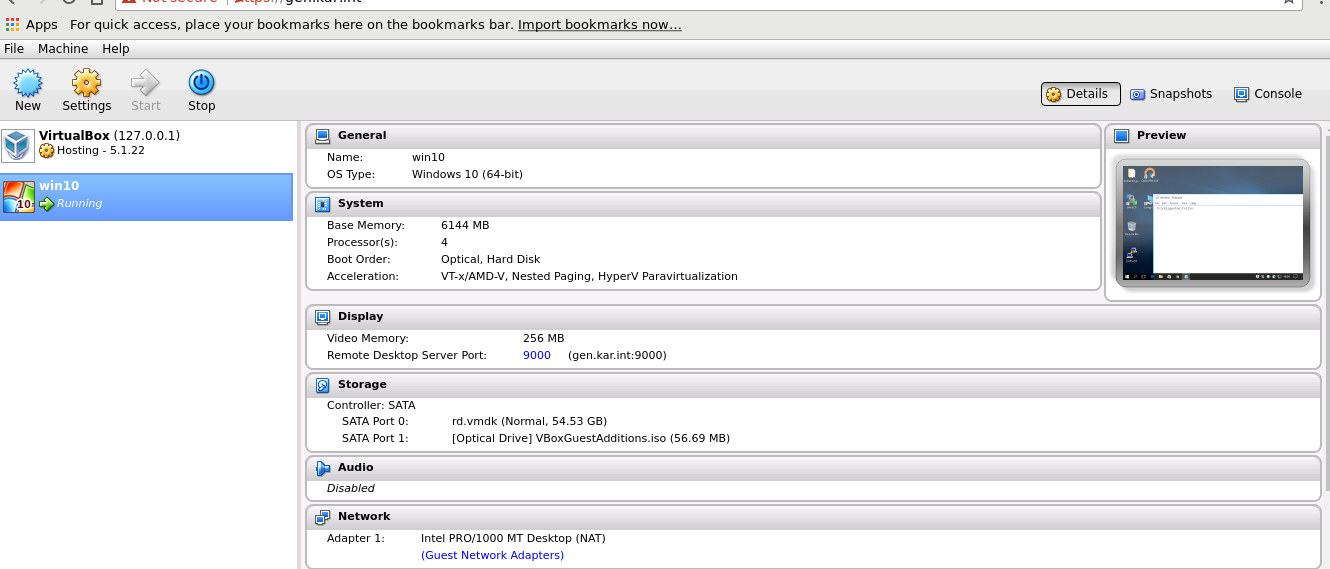
And after that, my mouse started working. Then I launched the VM from icewm using the VirtualBox Manager GUI instead of phpVirtualBox:
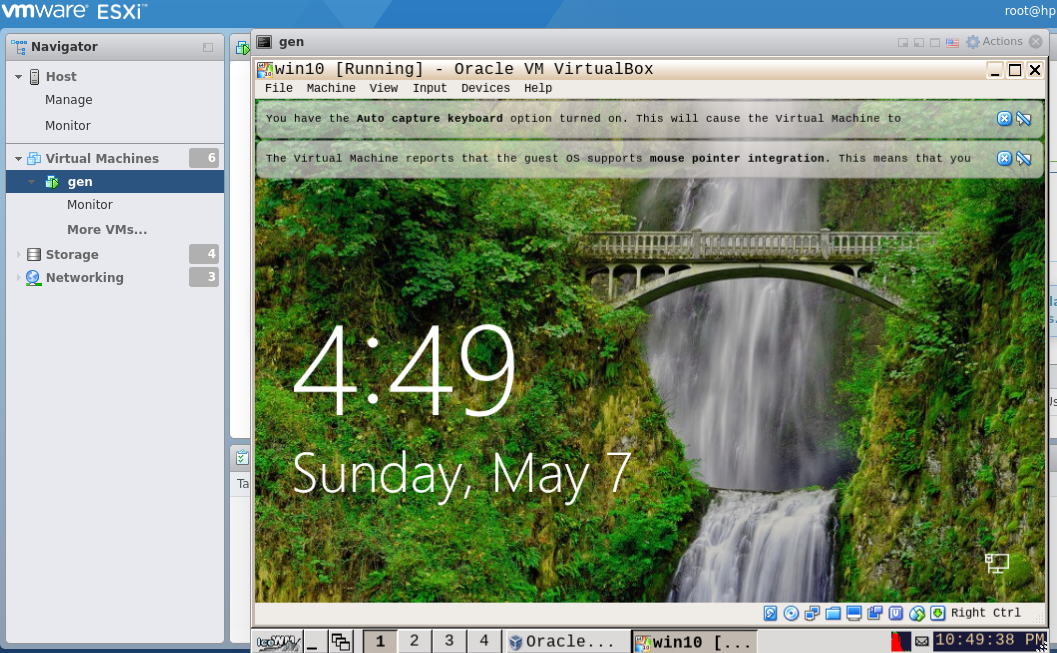
and I saw the following in the logs:
00:04:12.834396 Starting host clipboard service
00:04:12.834423 Shared clipboard: Initializing X11 clipboard backend
00:04:12.835794 Shared clipboard: Starting shared clipboard thread
00:04:12.837744 VMMDev: Guest Additions capability report: (0x0 -> 0x1) seamless: yes, hostWindowMapping: no, graphics: no
It turned out that as long as you have Xorg running the shared clipboard works even if you launch the VM in headless mode via phpVirtualBox:
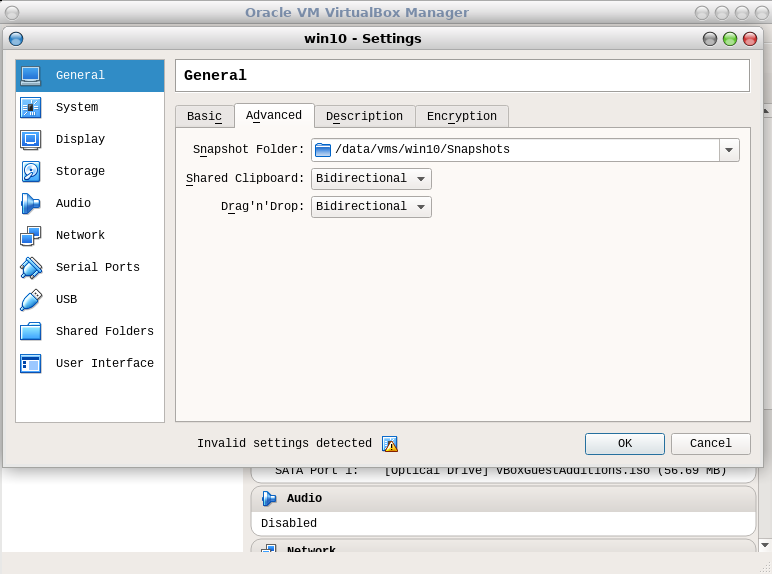
I also noticed that you can enable the shared clipboard on the VM only when using the VirtualBox Manager GUI (under Settings -> General -> Advanced):
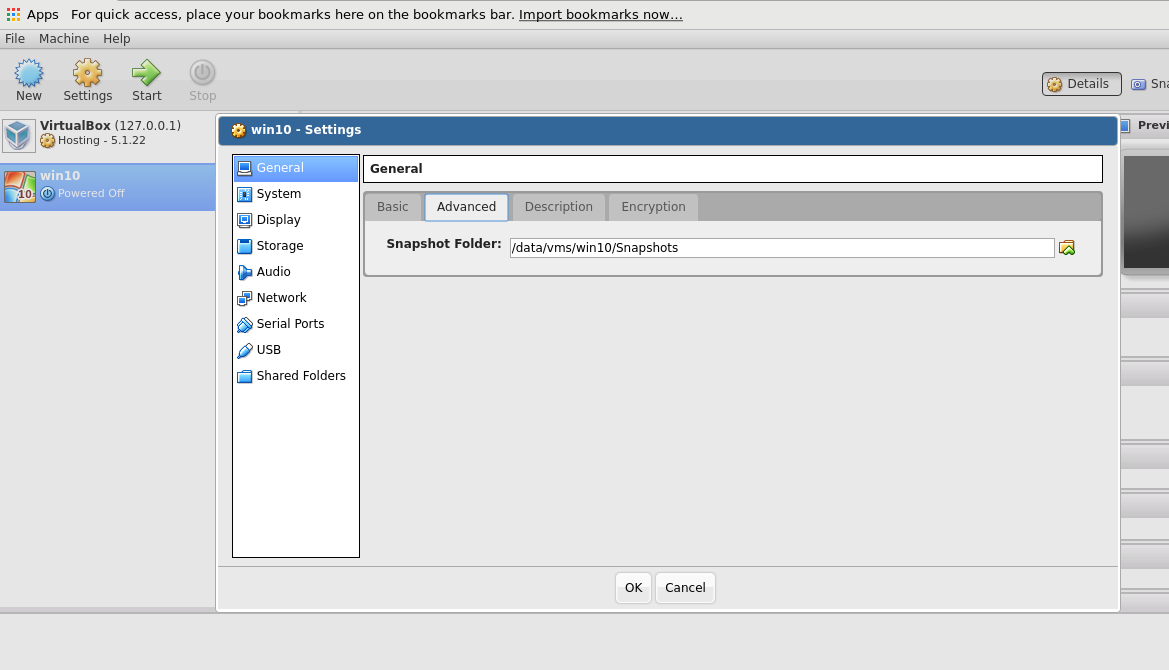
While phpVirtualBox doesn’t even show that option:
And after that I was able to RDP into the VM and used the shared clipboard without issues (rdesktop or xfreerdp).
Increasing the Remote Resolution
When I was initially connecting to the Windows Machine I was only able to get 1024x768 as the Max resolution. Which actually matched the xrandr output on the gentoo VM. After following the instructions laid our in VMware KB 2092210, which was just to add this option into the VMX file:
mks.enable3d = TRUE
and reloading the VMX:
vim-cmd vmsvc/reload <VMID>
I saw that the Gentoo VM had a lot more Resolution options:
<> xrandr -display :0.0 -q
Screen 0: minimum 1 x 1, current 1600 x 1200, maximum 8192 x 8192
Virtual1 connected primary 1600x1200+0+0 (normal left inverted right x axis y axis) 0mm x 0mm
   1440x900      59.89 +
   800x600       60.00 +  60.32
   2560x1600     59.99
   1920x1440     60.00
   1856x1392     60.00
   1792x1344     60.00
   1920x1200     59.88
   1600x1200     60.00*
   1680x1050     59.95
   1400x1050     59.98
   1280x1024     60.02
   1280x960      60.00
   1360x768      60.02
   1280x800      59.81
   1152x864      75.00
   1280x768      59.87
   1024x768      60.00
   640x480       59.94
Virtual2 disconnected (normal left inverted right x axis y axis)
Virtual3 disconnected (normal left inverted right x axis y axis)
Virtual4 disconnected (normal left inverted right x axis y axis)
Virtual5 disconnected (normal left inverted right x axis y axis)
Virtual6 disconnected (normal left inverted right x axis y axis)
Virtual7 disconnected (normal left inverted right x axis y axis)
Virtual8 disconnected (normal left inverted right x axis y axis)
So I would start the Gentoo VM with the Max resolution and then maximize the VirtualBox Screen of the Windows VM and that allowed me to utilize larger Resolutions over Remote Desktop.
You could probably achieve the same thing with Fedora or Ubuntu if you prefer not to mess with Gentoo. I was just remiscing using Gentoo and I wanted to refresh my memory on the process.