Getting Started with Jenkins
I wanted to setup my own Jenkins server and create a simple job. It was actually pretty easy, but I wanted to jot down my notes so I don’t forget about my process.
Deploy Jenkins Server with Docker
Since I had a docker server, I decided to deploy the Jenkins/Master Server on there. On the CoreOS machine, I just created the following docker-compose.yml file:
core ~ # cat jenkins/docker-compose.yml
version: '2'
services:

    jenkins:
       image: jenkins:latest
       container_name: jenkins
       hostname: jenkins.kar.int
       restart: always
       volumes:
        - "./jenkins_home:/var/jenkins_home"
       expose:
        - "8080"
        - "50000"
       ports:
        - "8080:8080"
        - "50000:50000"
       network_mode: "bridge"
And then ran docker-compose up -d to download and start the Jenkins Service. After that I checked out the logs of the container and I saw the following:
core jenkins # docker-compose logs | tail -18
jenkins    | Jun 30, 2017 2:14:51 AM jenkins.install.SetupWizard init
jenkins    | INFO:
jenkins    |
jenkins    | *************************************************************
jenkins    | *************************************************************
jenkins    | *************************************************************
jenkins    |
jenkins    | Jenkins initial setup is required. An admin user has been created and a password generated.
jenkins    | Please use the following password to proceed to installation:
jenkins    |
jenkins    | b419833d3f334dd88ee9d0f00ce07ed4
jenkins    |
jenkins    | This may also be found at: /var/jenkins_home/secrets/initialAdminPassword
jenkins    |
jenkins    | *************************************************************
jenkins    | *************************************************************
jenkins    | *************************************************************
jenkins    |
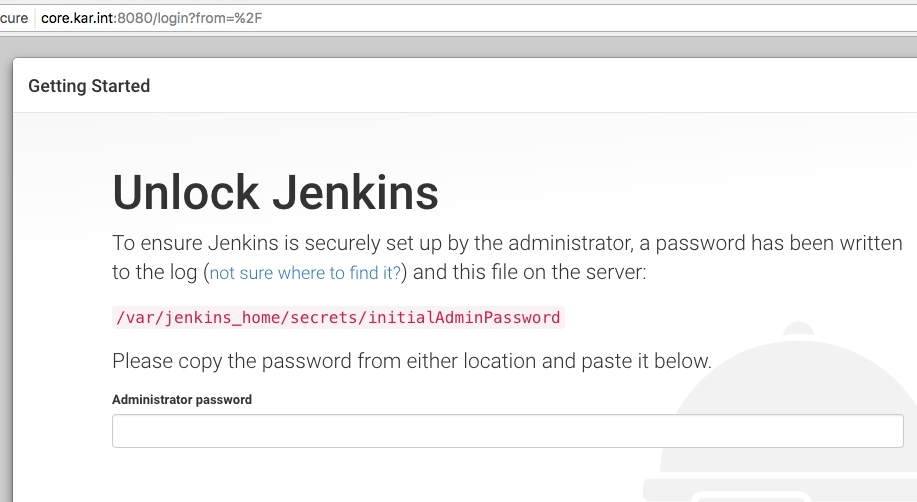
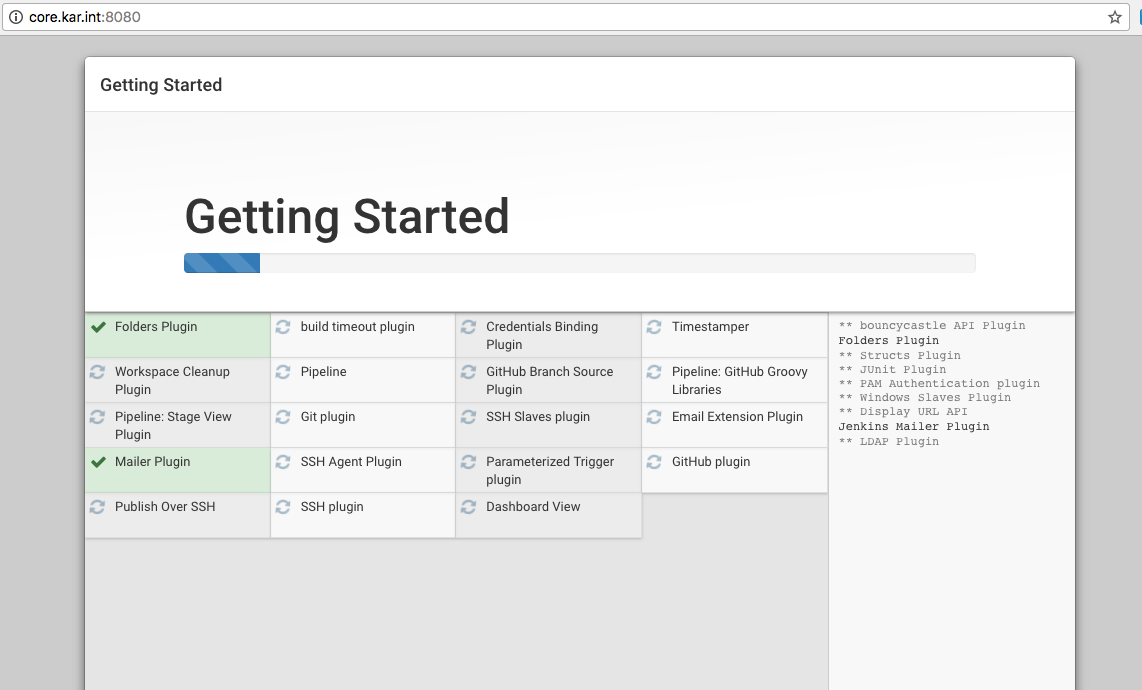
So I pointed my browser to the CoreOS machine on port 8080 and I saw the setup wizard:
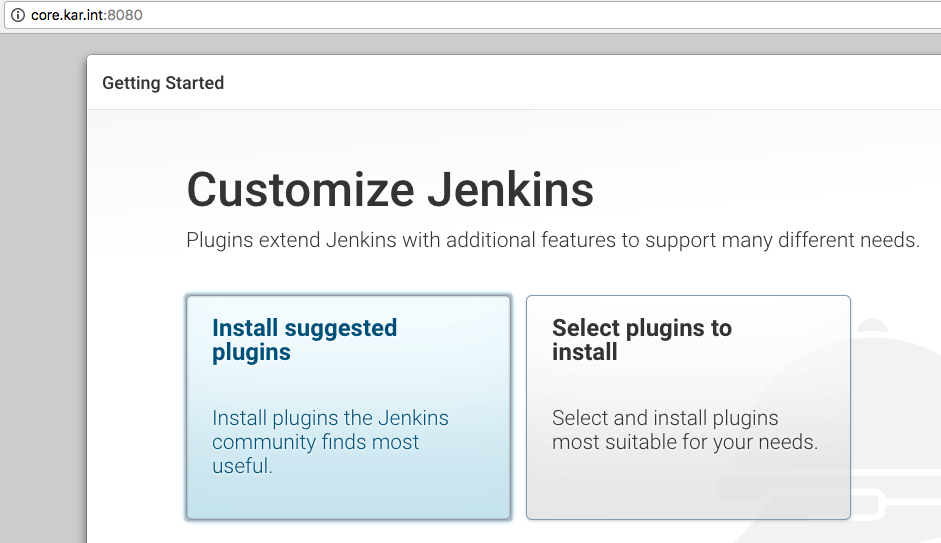
Then I pasted the password to proceed and it asked me to choose what plugins to install:
I decided to customize the plugins just to keep the install minimal:
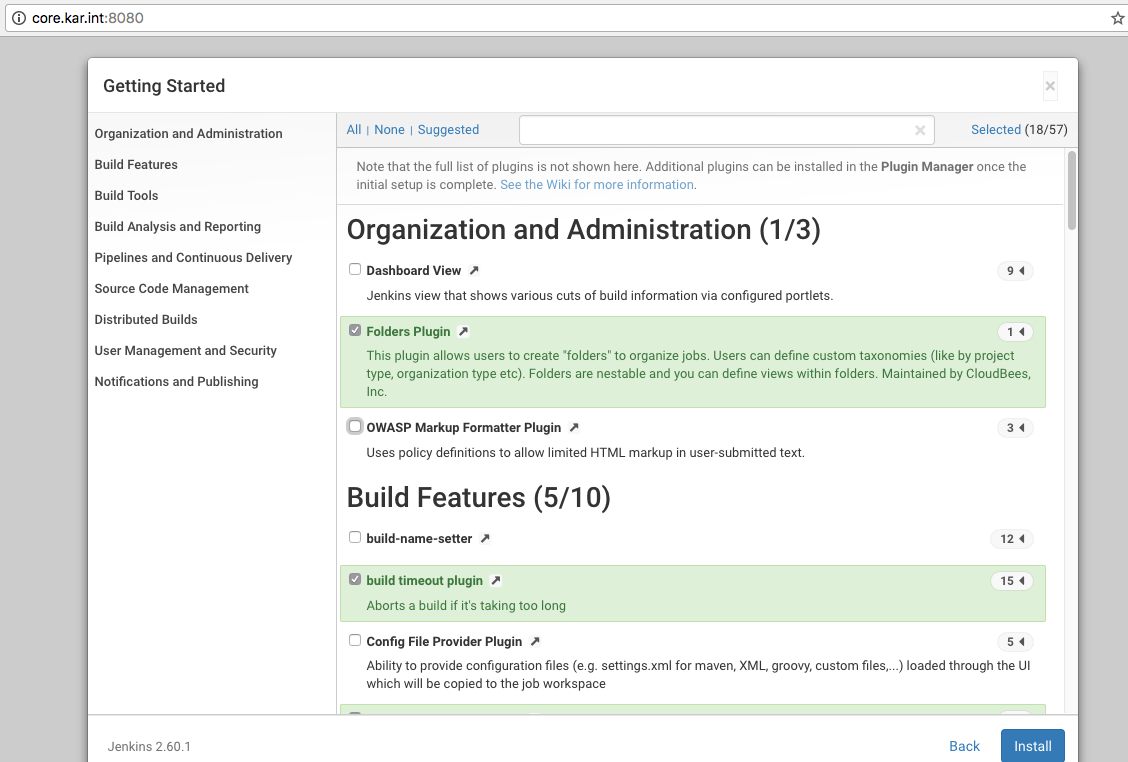
Here are some plugins I chose to enable:
- Green Balls
- Rebuild Plugin
- Pipeline Plugin
- Publish Over SSH Plugin (Didn’t really use this with pipeline)
- SSH Slaves plugin
- Workspace Cleanup Plugin
And after I was done disabling and enabling the plugins, it started installing them (don’t worry you can add additional plugins laters under Manage Jenkins -> Manage Plugins and then use these URLs to safely restart the Jenkins service):
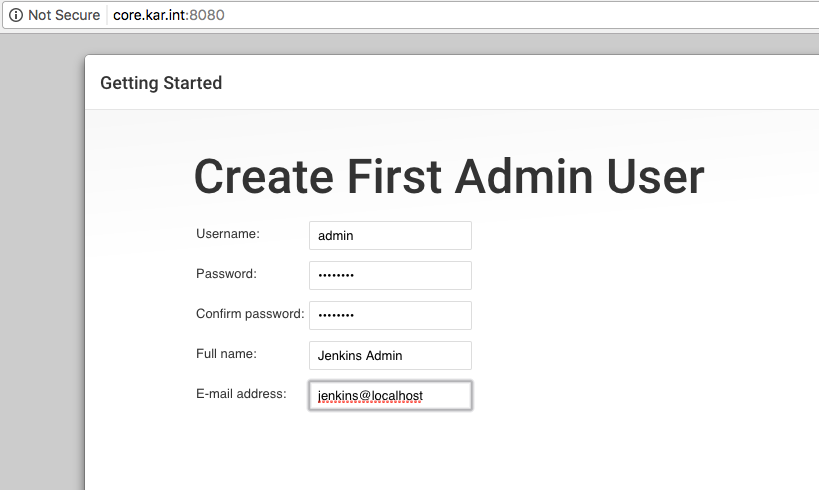
Then it asked me to create the first admin user and I did that:
Adding a Slave Node using SSH
When adding a jenkins slave node, you have a couple of options. I would say the two primary ones are over SSH and Java Web Start. I have used the Java Web Start in the past and it works great, but I decided to try out the SSH method. To use the Java Web Start method, check out these sites:
- Launch slave agent via Java Web Start
- Configure Jenkins Slave and Connect to Master
- jenkins-slave-jnlp
For the SSH method, the How to Connect to Remote SSH Slaves page covers all the steps. Add a node as you normally would (Manage Jenkins -> Manage Nodes -> New Node) and make sure you choose the SSH Launch method:
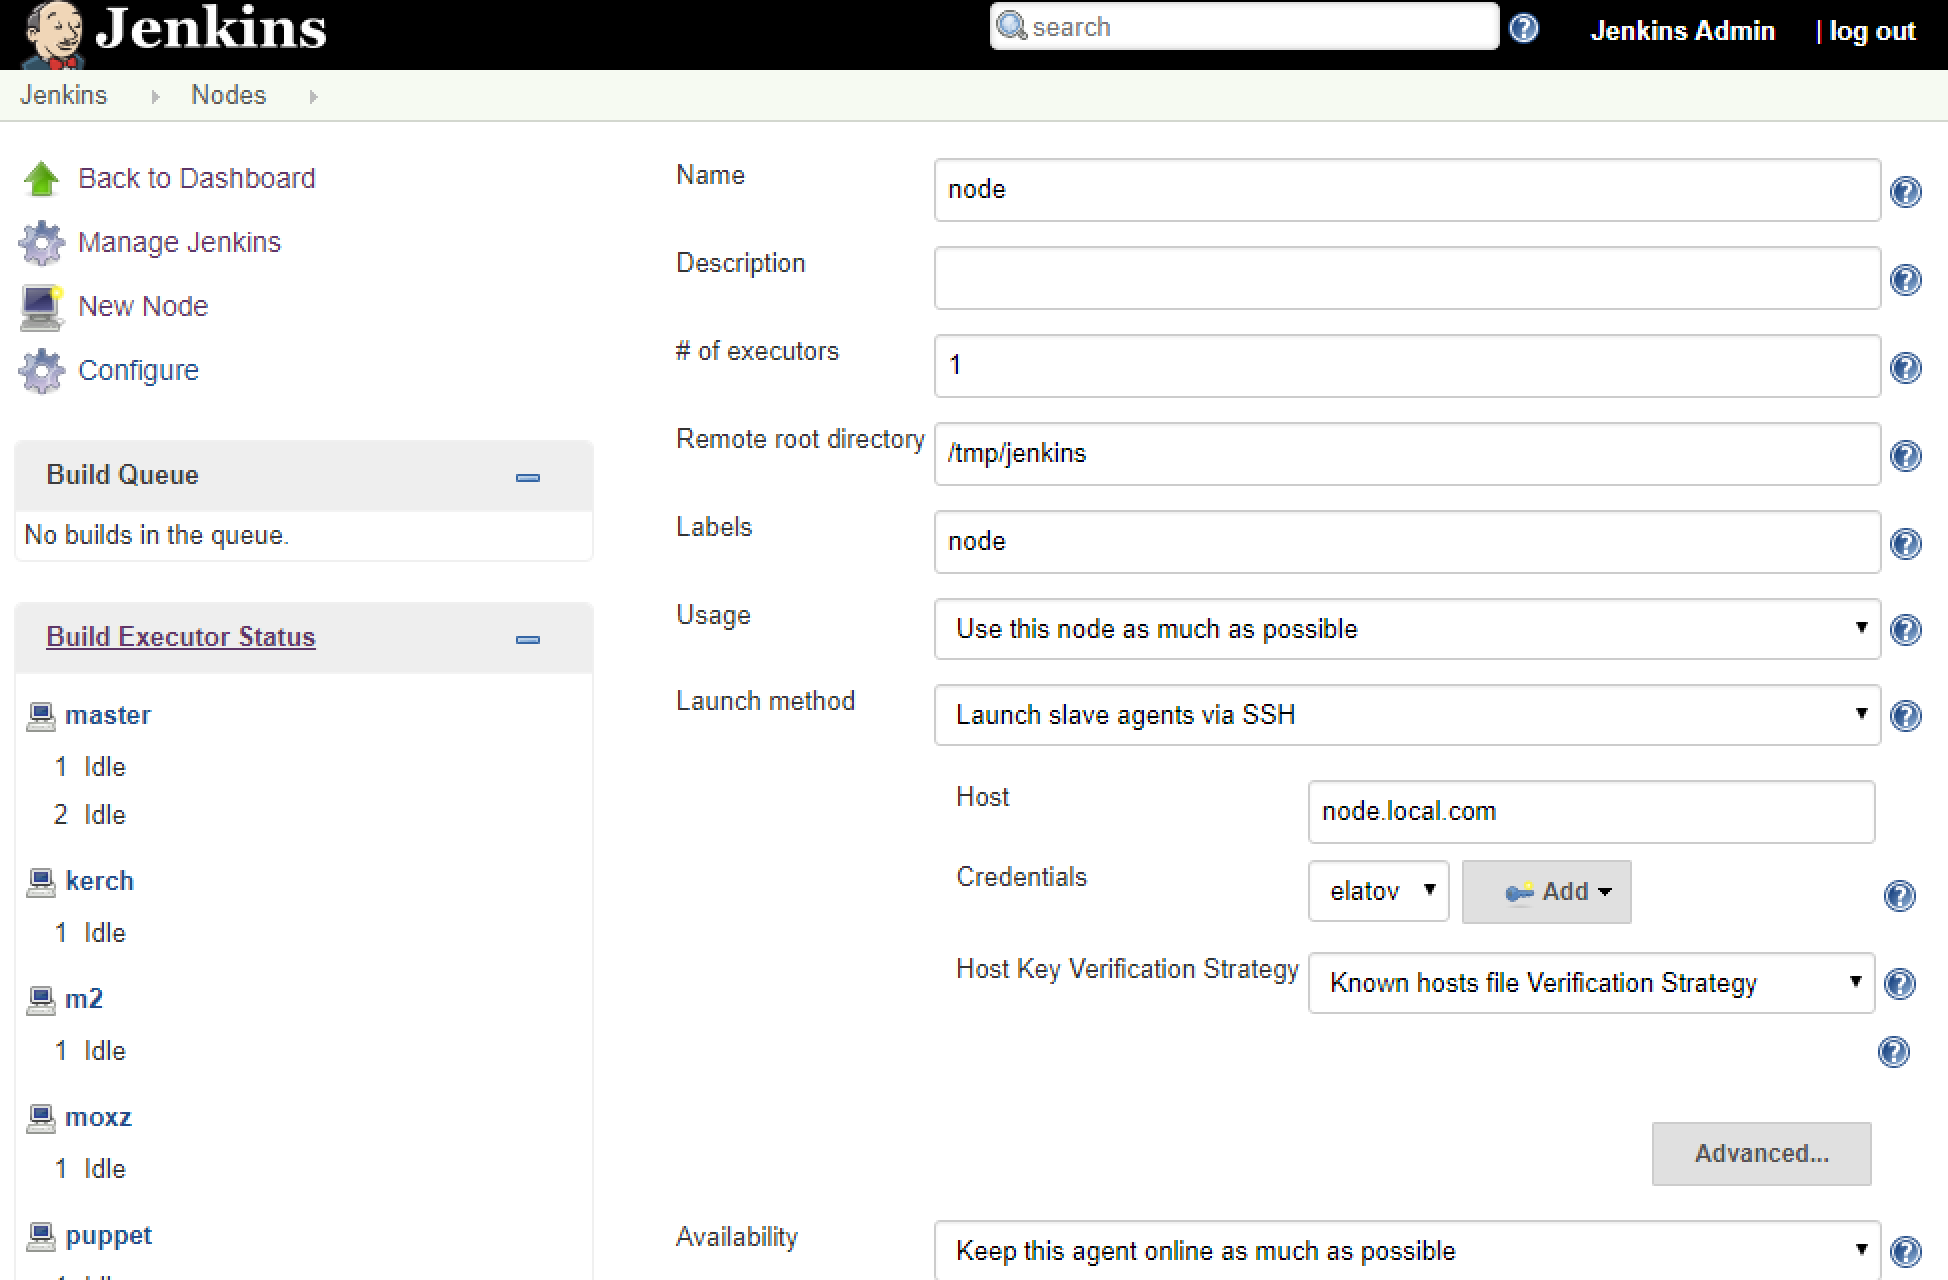
I already had the private keys added as credentials. Before finishing up the install make sure the master has the machine in it’s known_hosts file. So on the CoreOS machine I attached to the container:
core jenkins # docker-compose exec jenkins /bin/bash
jenkins@jenkins:/$ pwd
/
And then just made an SSH connection to the node:
jenkins@jenkins:~$ ssh elatov@puppet
The authenticity of host 'puppet (10.0.0.6)' can't be established.
ECDSA key fingerprint is 37:60:f9:19:25:b3:55:5a:f2:2b:0b:0c:ac:bf:53:7f.
Are you sure you want to continue connecting (yes/no)? yes
Also don’t forget to install java on the slave node:
### debian
sudo apt-get install openjdk-8-jdk-headless
### Centos
sudo yum install java-openjdk-headless
### FreeBSD
sudo pkg install openjdk8
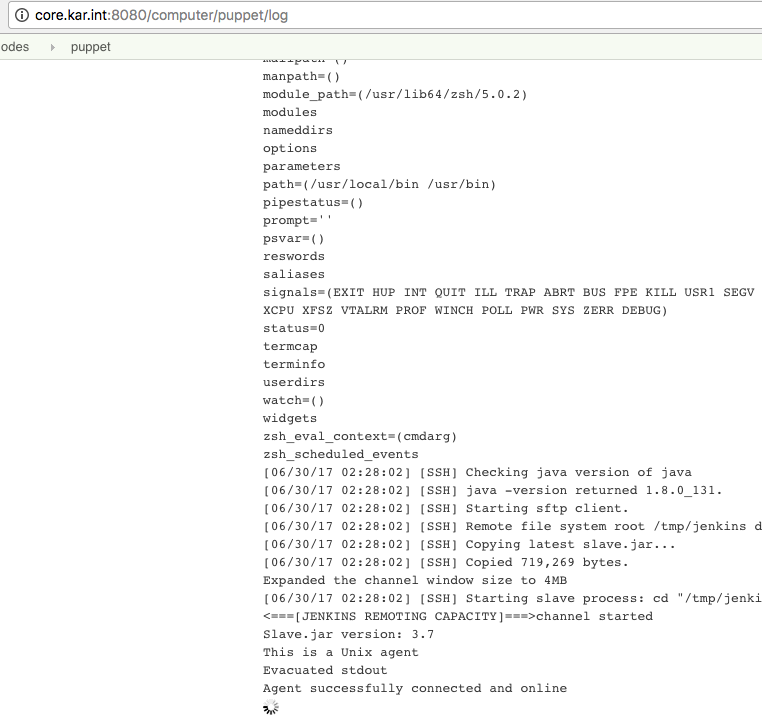
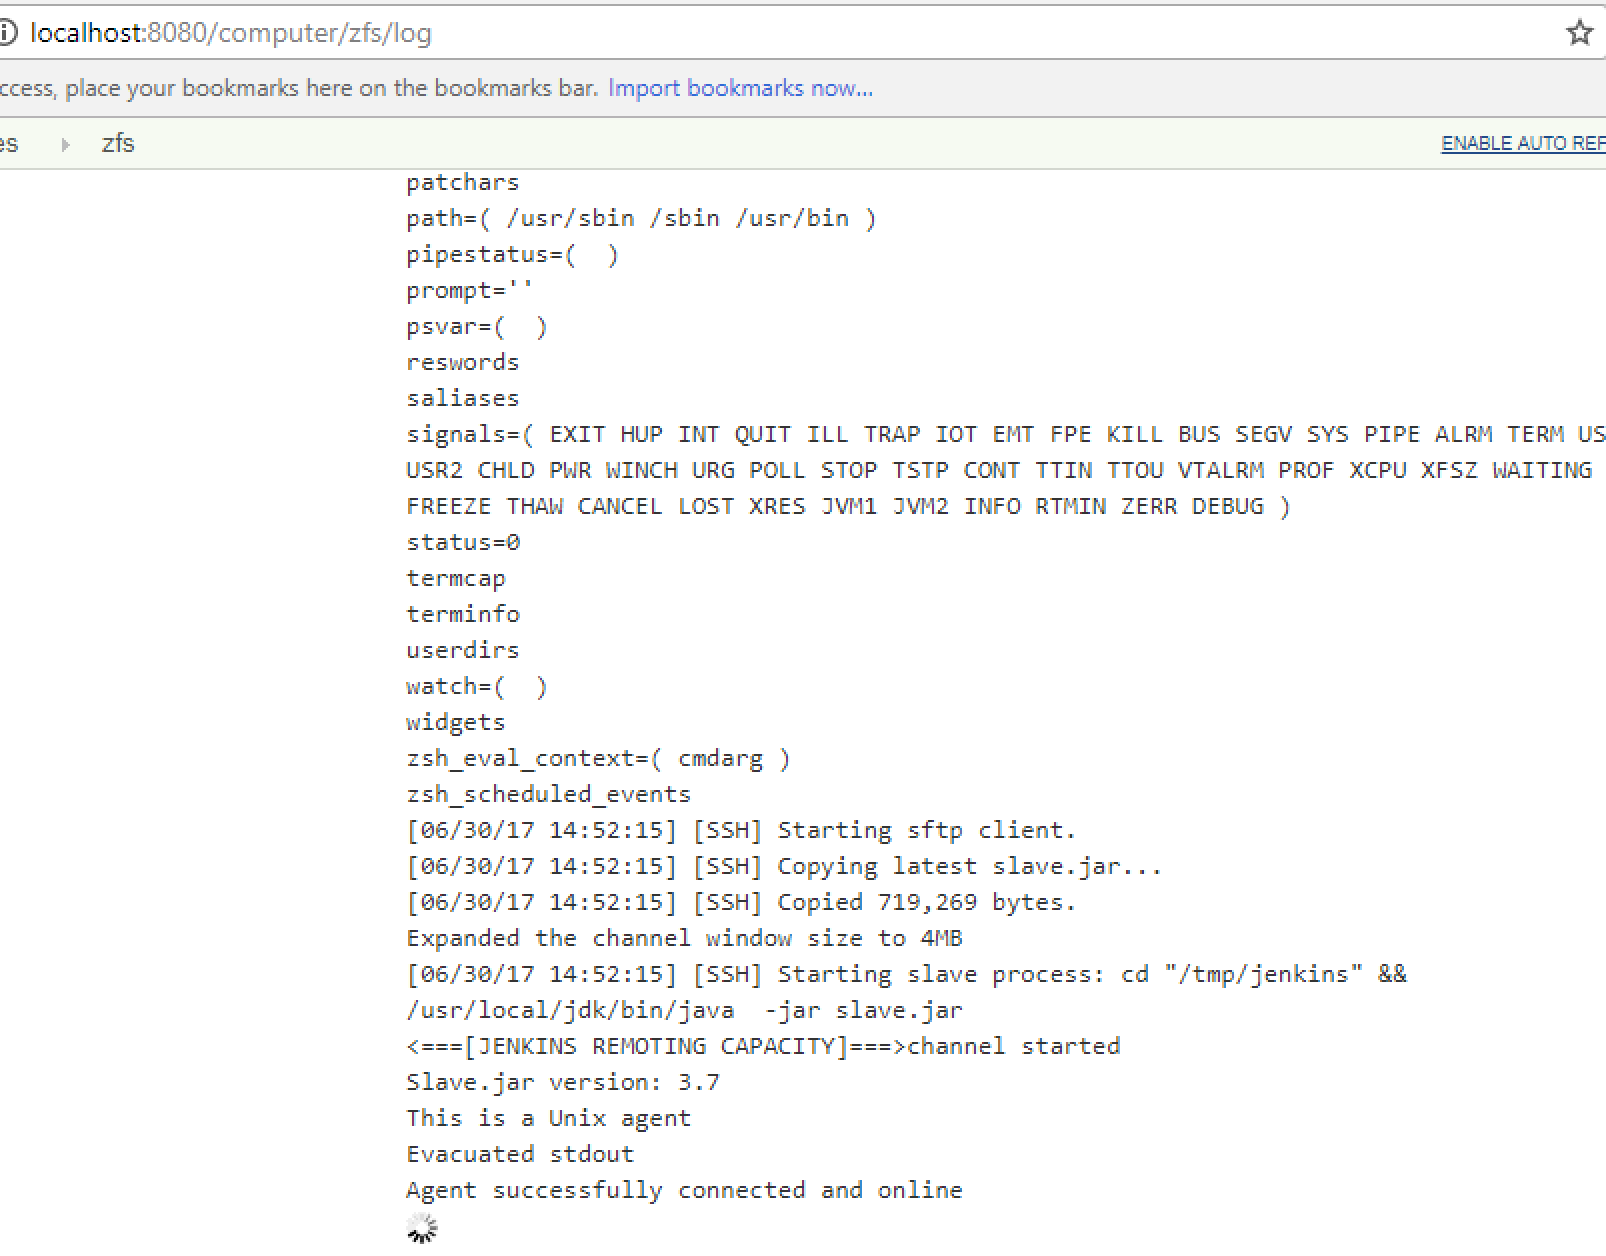
Then after you add the node, you can check out the logs (Manage Jenkins -> Manage Nodes -> YOUR_NODE -> Log), you will see a successful connection:
Installing Oracle Java on OmniOS
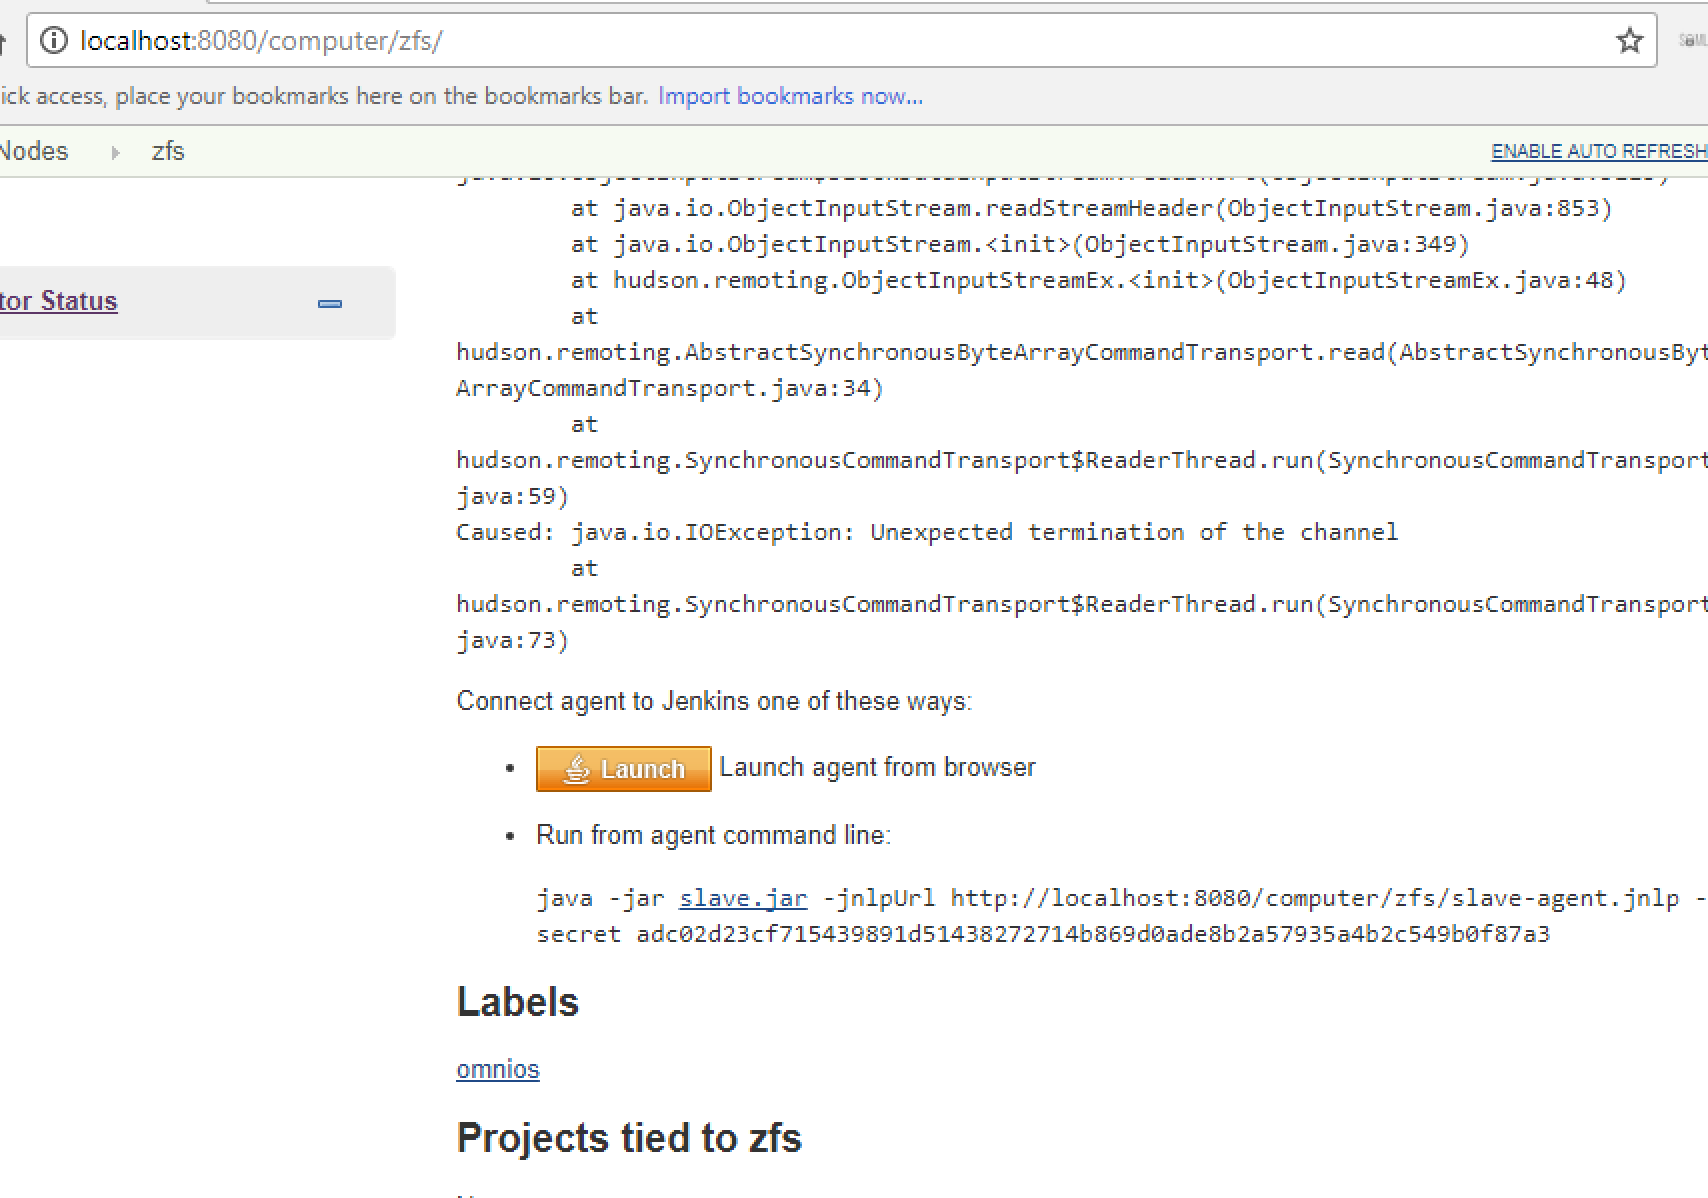
When I was adding an OmniOS node to Jenkins it kept failing to stay connected. And I saw the following in the logs:
jenkins    | SEVERE: I/O error in channel zfs
jenkins    | java.io.IOException: Unexpected termination of the channel
jenkins    |    at hudson.remoting.SynchronousCommandTransport$ReaderThread.run(SynchronousCommandTransport.java:73)
jenkins    | Caused by: java.io.EOFException
jenkins    |    at java.io.ObjectInputStream$PeekInputStream.readFully(ObjectInputStream.java:2638)
jenkins    |    at java.io.ObjectInputStream$BlockDataInputStream.readShort(ObjectInputStream.java:3113)
jenkins    |    at java.io.ObjectInputStream.readStreamHeader(ObjectInputStream.java:853)
jenkins    |    at java.io.ObjectInputStream.<init>(ObjectInputStream.java:349)
jenkins    |    at hudson.remoting.ObjectInputStreamEx.<init>(ObjectInputStreamEx.java:48)
jenkins    |    at hudson.remoting.AbstractSynchronousByteArrayCommandTransport.read(AbstractSynchronousByteArrayCommandTransport.java:34)
jenkins    |    at hudson.remoting.SynchronousCommandTransport$ReaderThread.run(SynchronousCommandTransport.java:59)
As I tested I decided to try the Java Web Start launch method on this node. After I changed the Launch method, I saw the following on the node’s status page:
So then I ran that on the OmniOS machine:
java -jar /tmp/jenkins/slave.jar -jnlpUrl http://core:8080/computer/zfs/slave-agent.jnlp -secret adc02d23cf715439891d51438272714b869d0ade8b2a57935a4b2c549b0f87a3
And then I got another message about the wrong version:
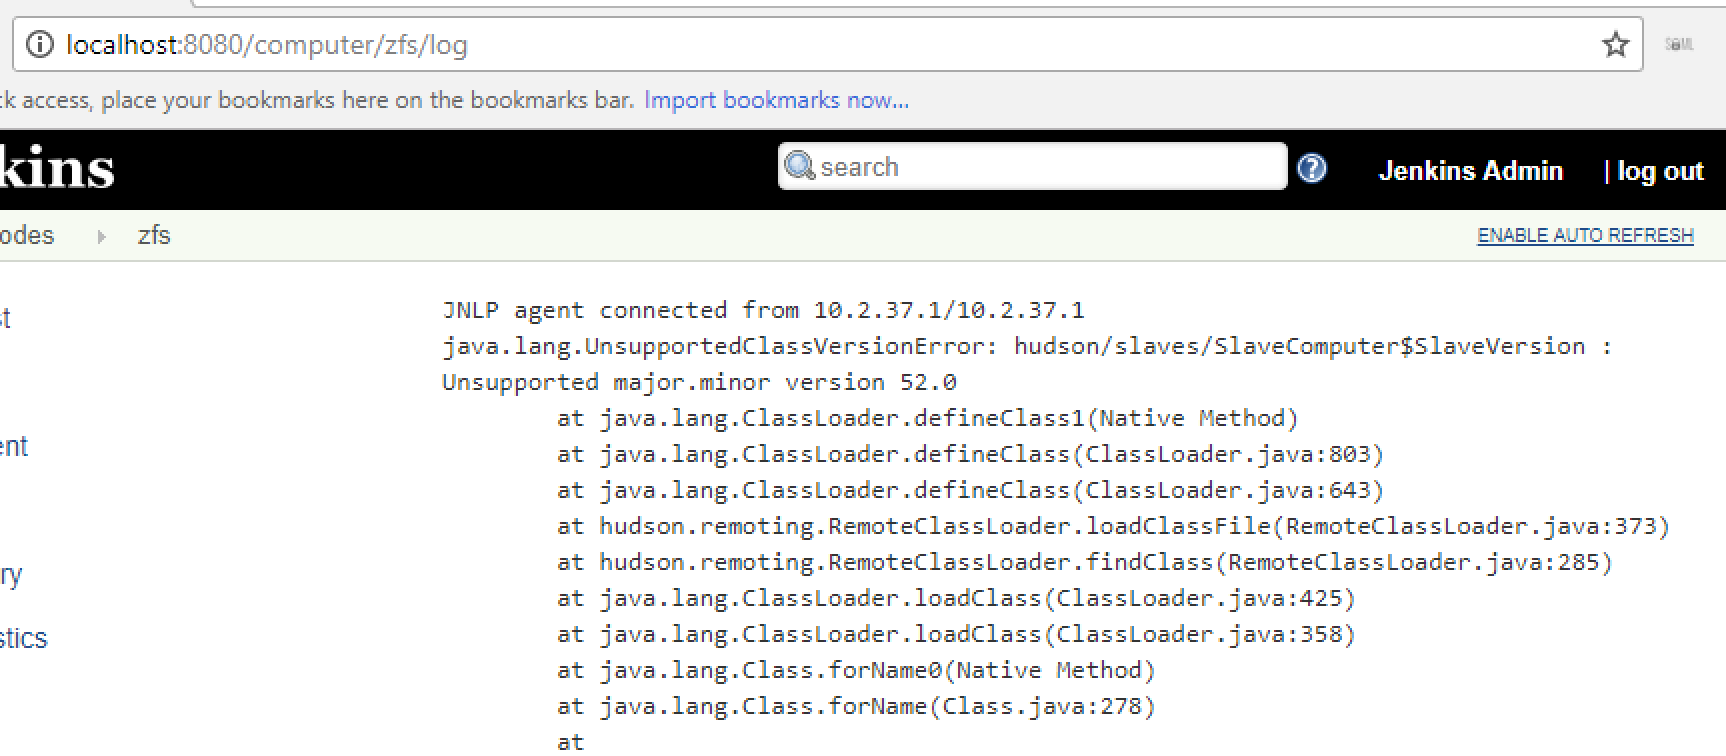
By default the OmniOS machine had the following version of java installed:
<> pkg list | grep java
developer/java/jdk             1.7.0.101.0-0.151022      i--
runtime/java                   1.7.0.101.0-0.151022      i--
So I decided to install the Oracle java. The install instructions are available at Manual JDK 8 Installation Instructions. So I downloaded the archive and copied it to the machine and then ran the following to install it:
tar xvzf jdk-8u131-solaris-x64.tar.gz
mv jdk1.8.0_131 /usr/local/
ln -s /usr/local/jdk1.8.0_131 /usr/local/jdk
and that worked out:
<> /usr/local/jdk/bin/java -version
java version "1.8.0_131"
Java(TM) SE Runtime Environment (build 1.8.0_131-b11)
Java HotSpot(TM) 64-Bit Server VM (build 25.131-b11, mixed mode)
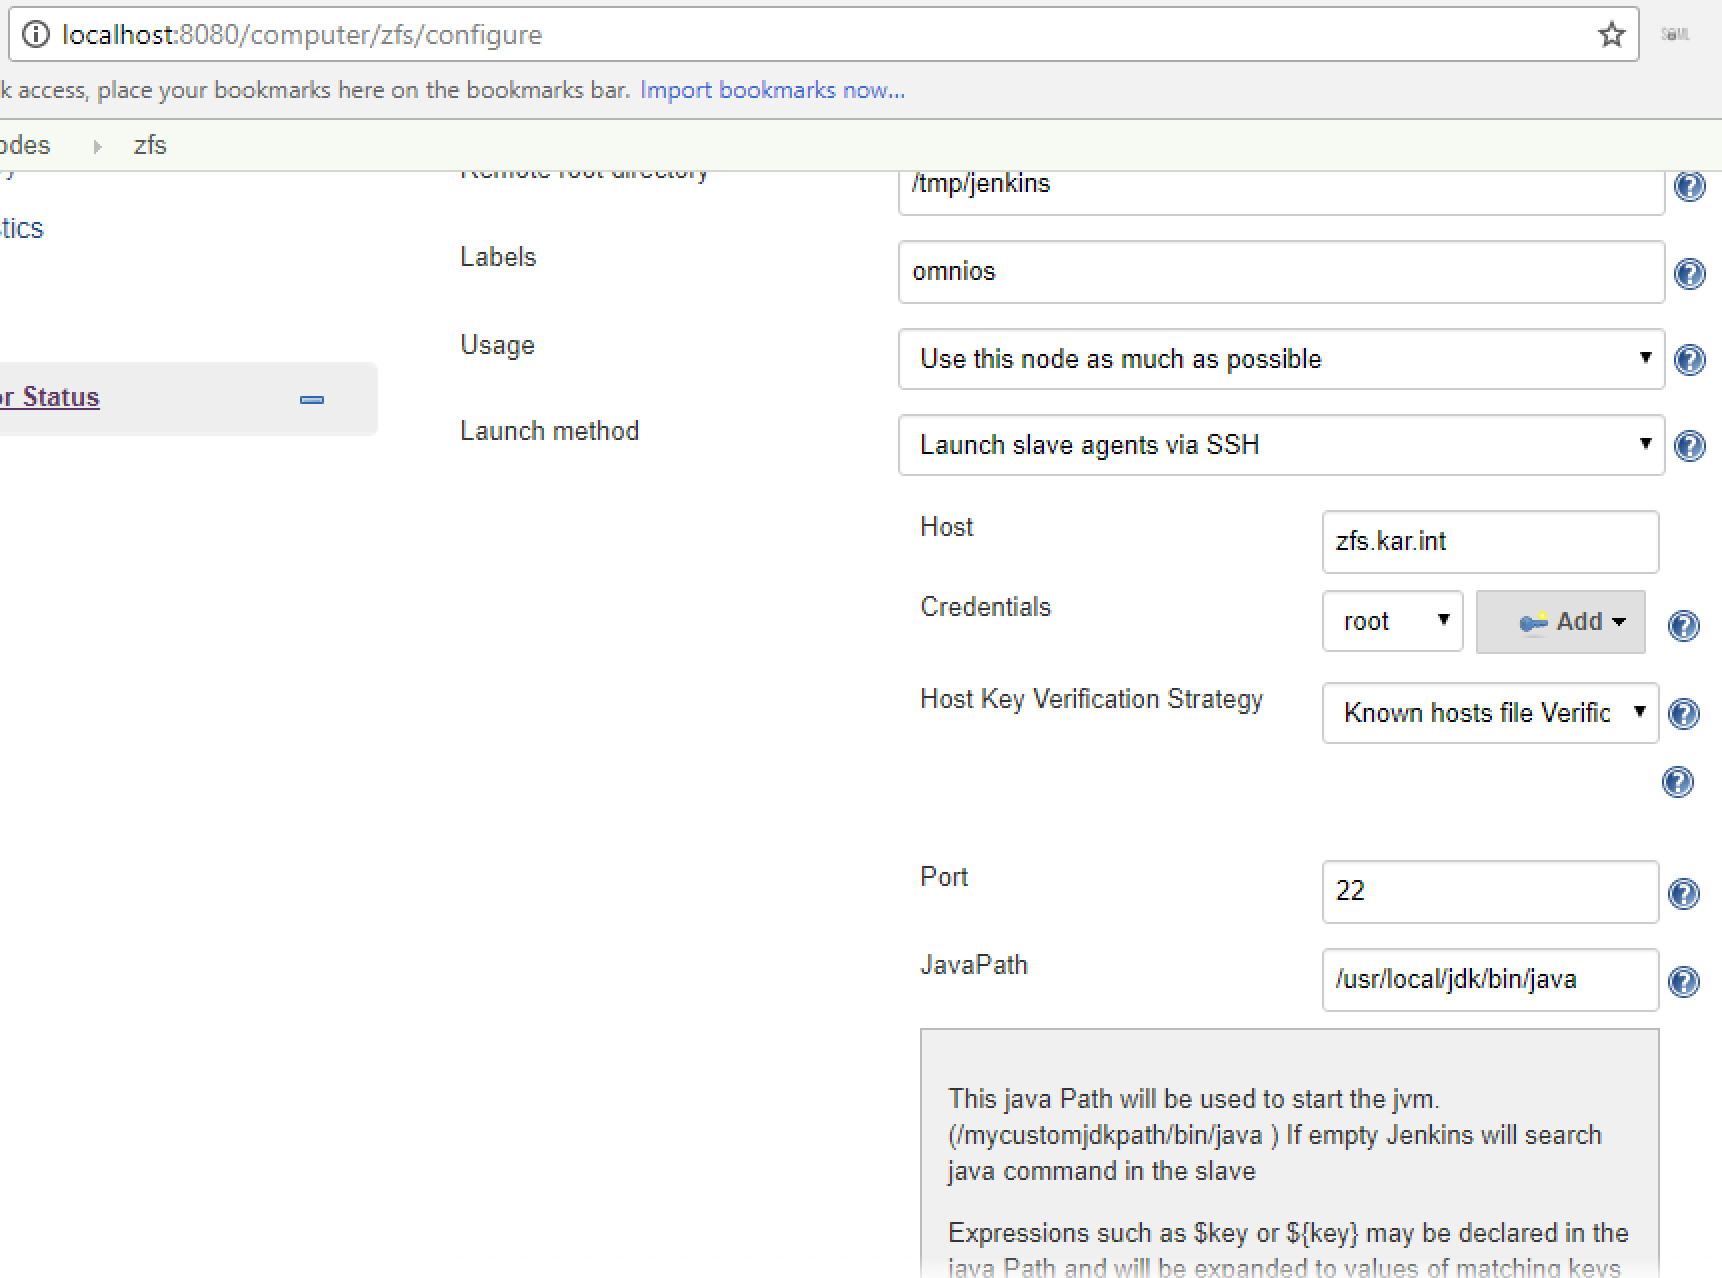
Then when adding the node, I specified the JavaPath option under the Advanced section:
Then the node connected fine without issues using the SSH Launch method:
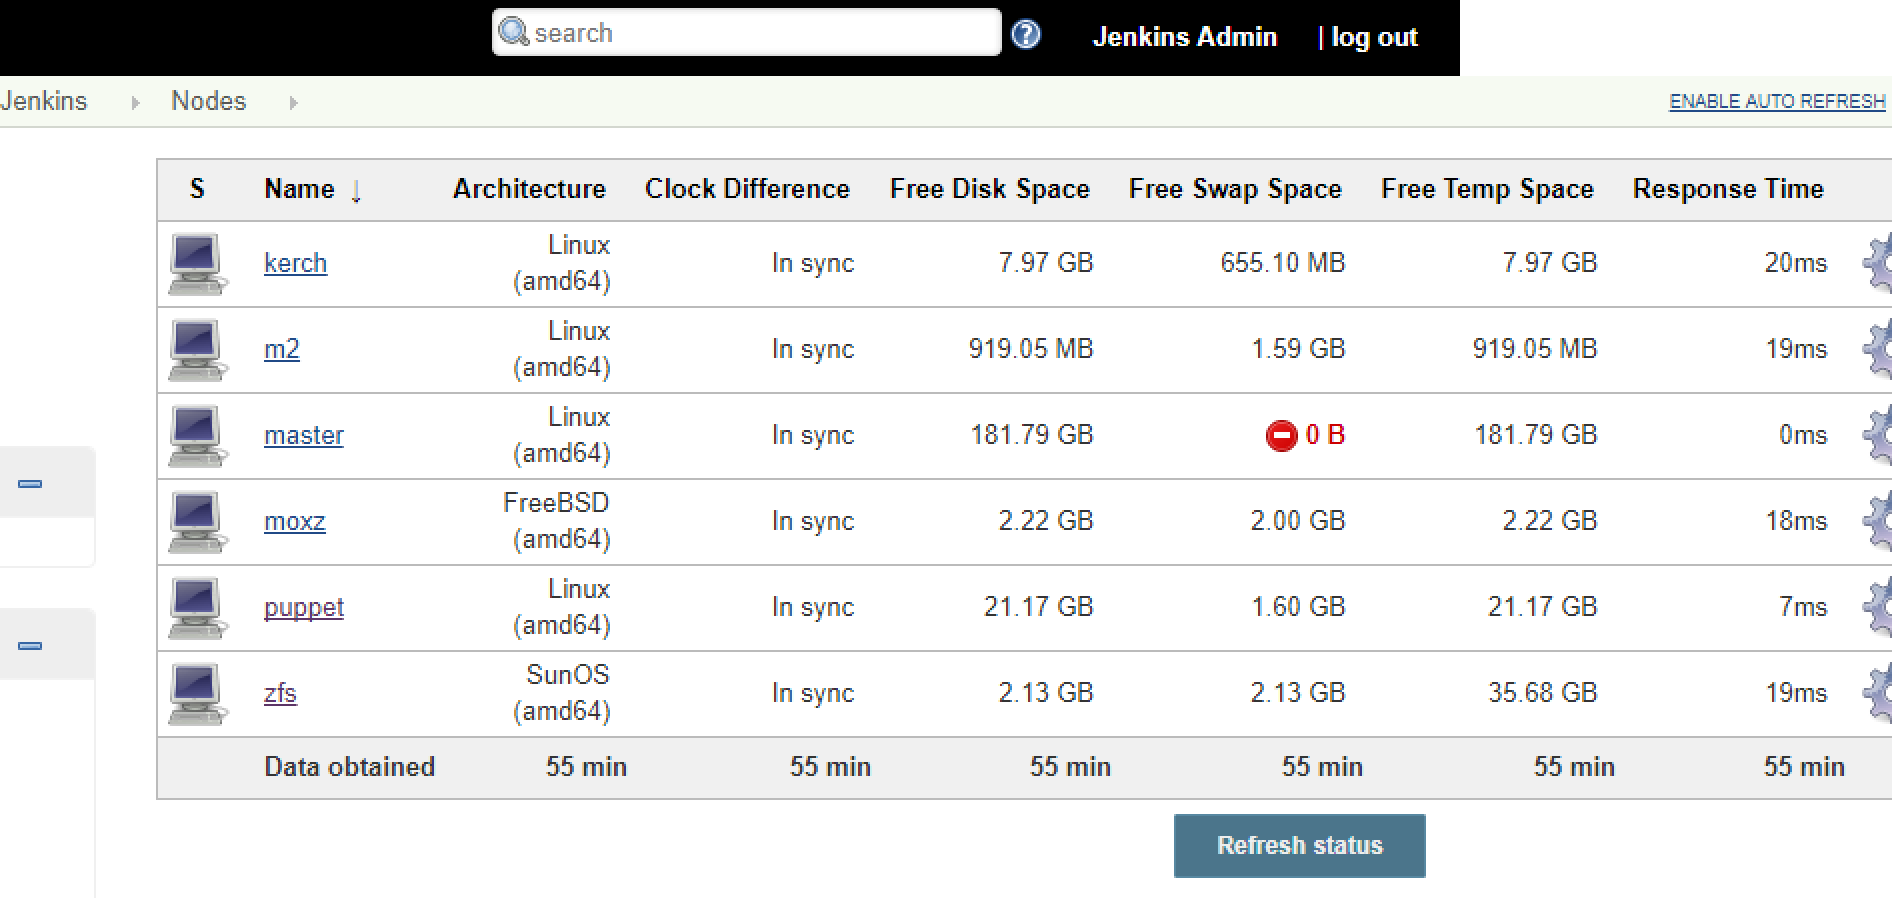
After I was done adding all of my nodes, I saw the following:
Jenkins Freestyle Job
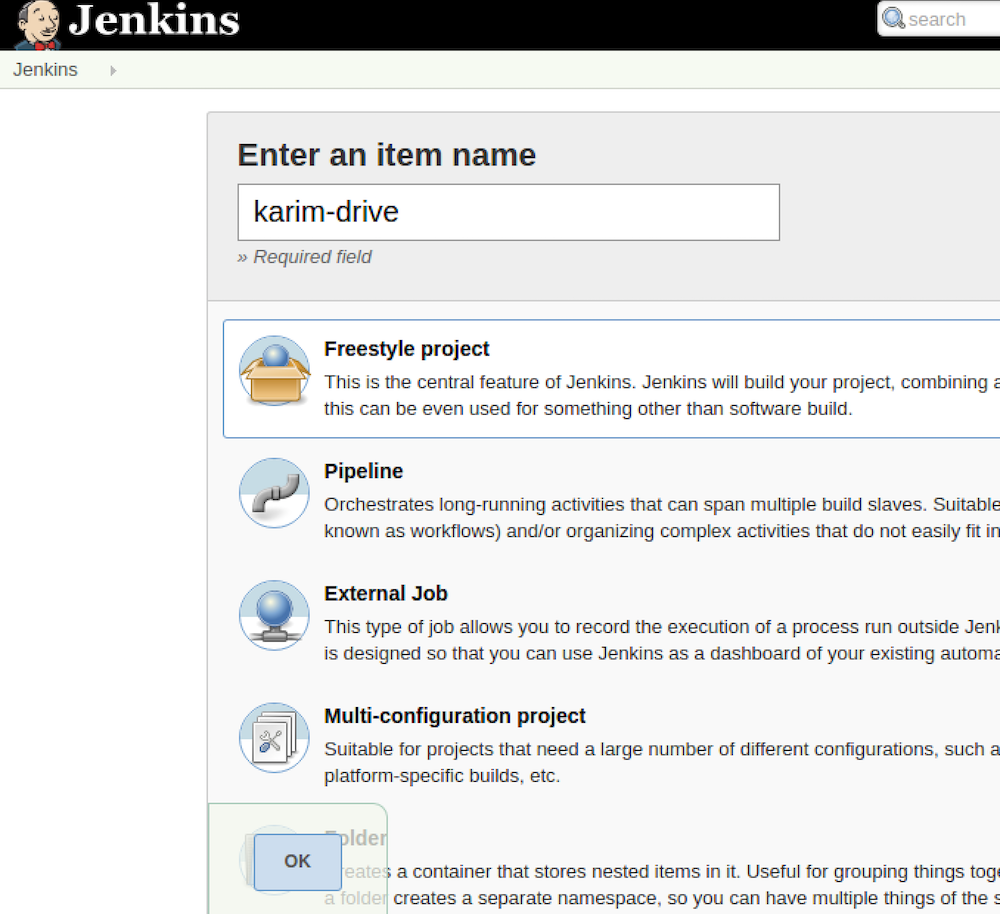
As a test, I wanted to check out this github project: drive and build it. First create a new project, give it a name, and choose the freestyle project:
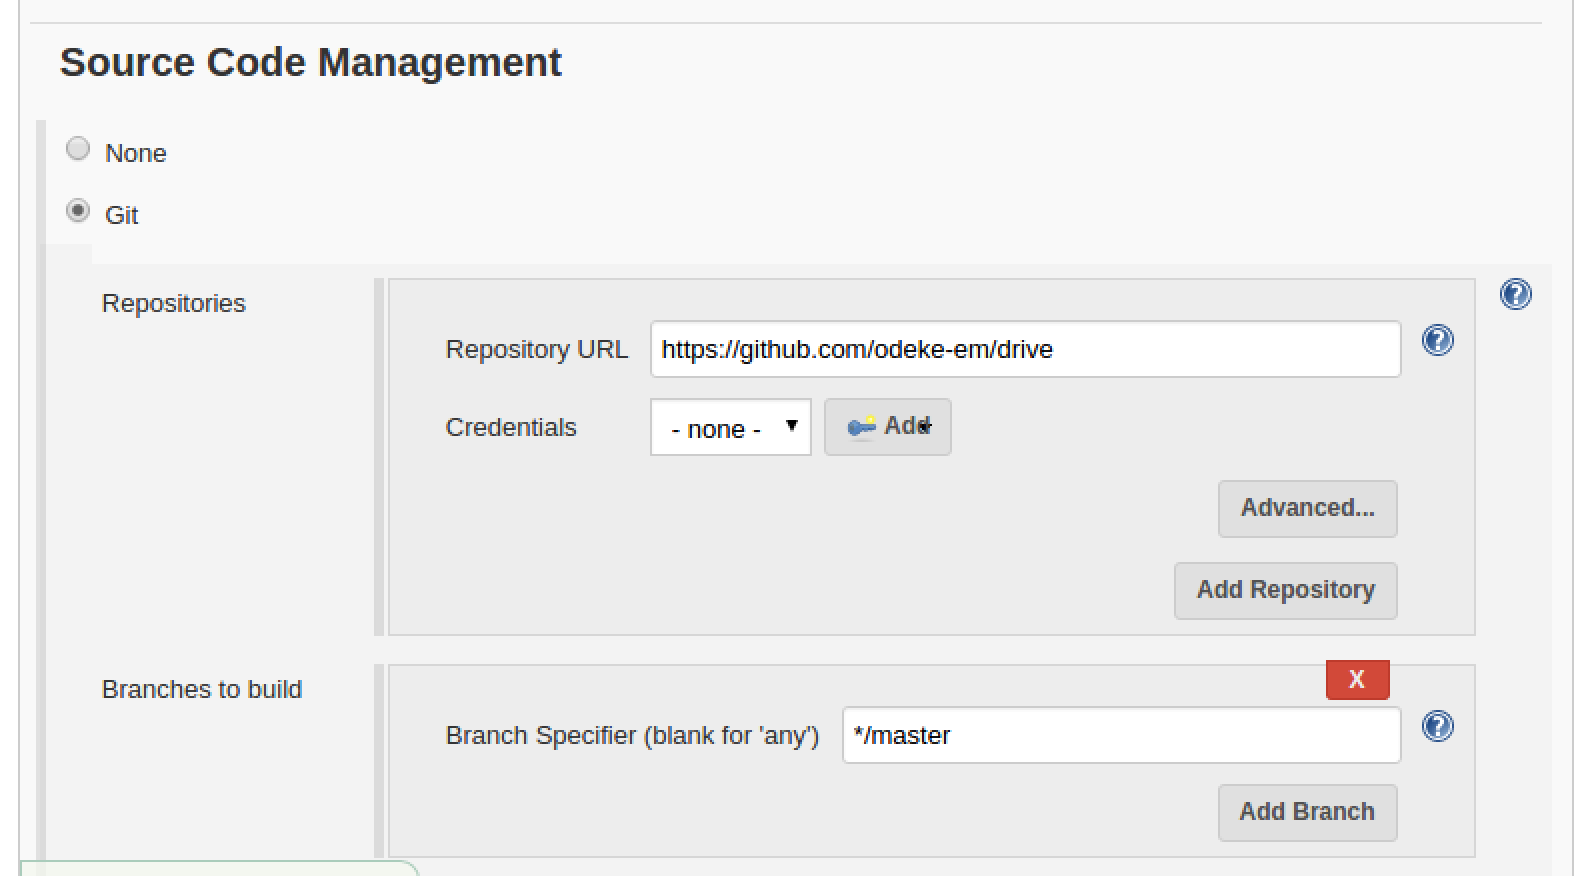
Then under Source Control Management point to the git project:
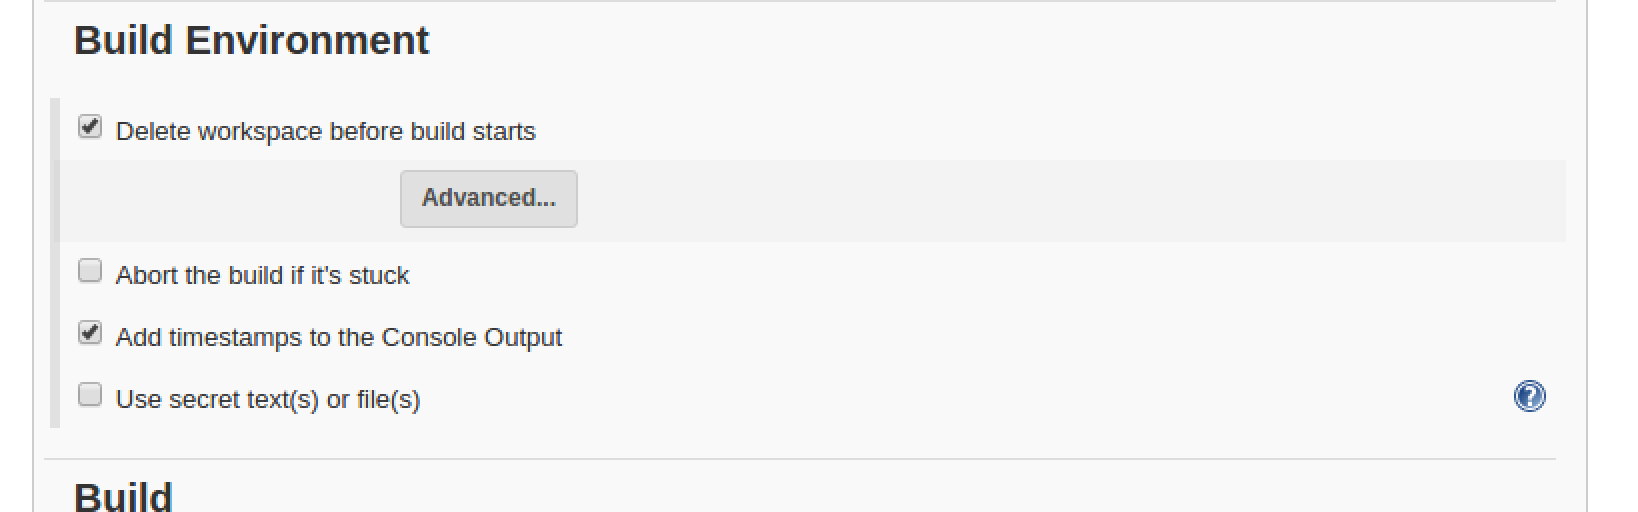
Then I decided to clean up the Build Environment:
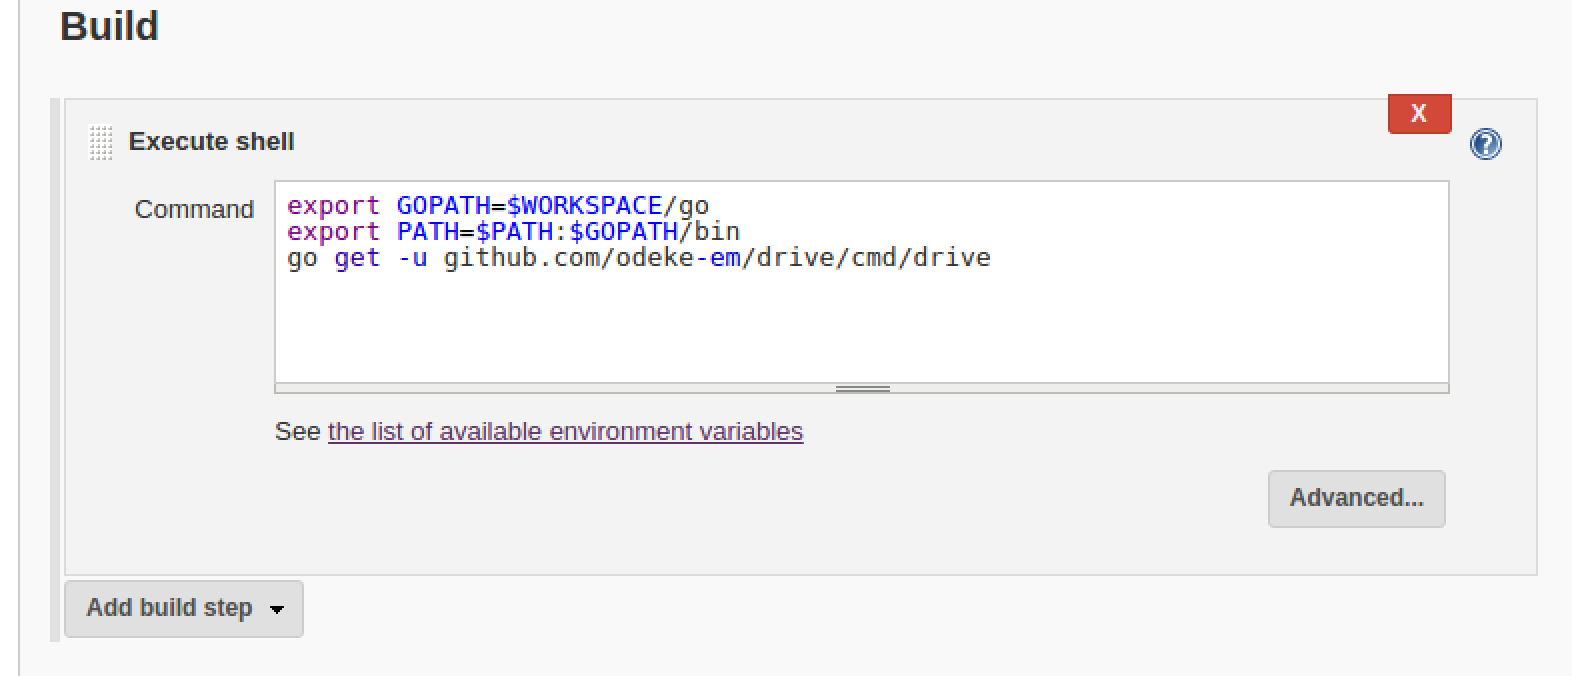
And following the instructions in the git project page, I created the following steps for the Build steps:
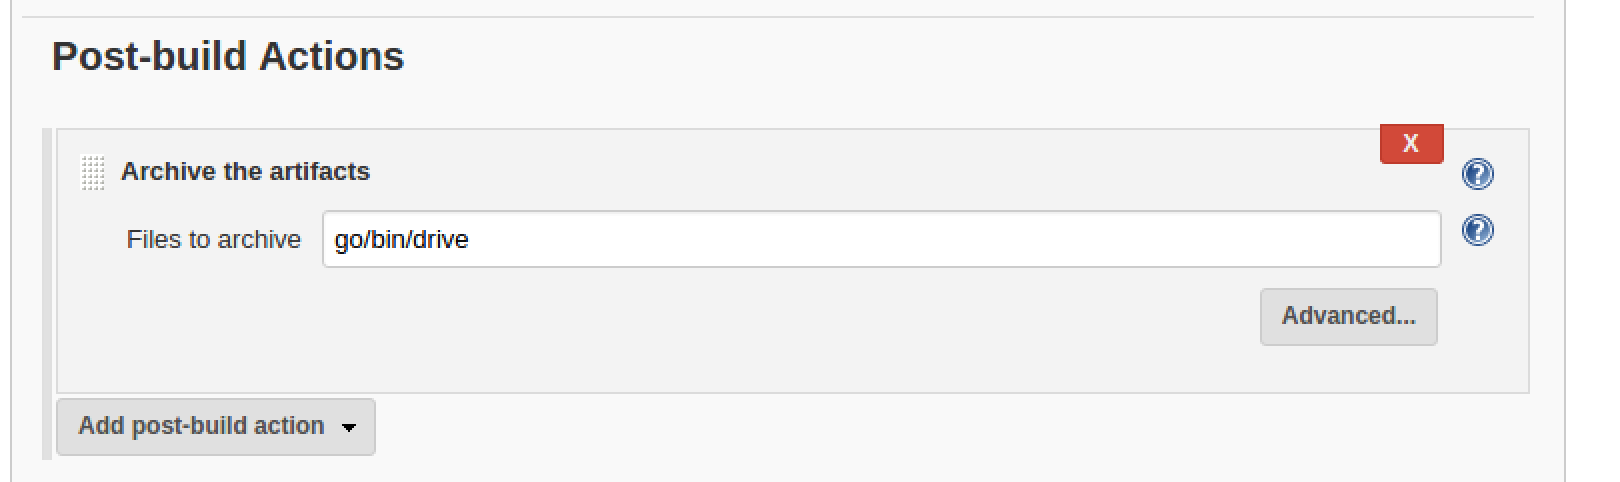
And lastly I decided to keep the built binary as a build artifact:
Jenkins Build Process
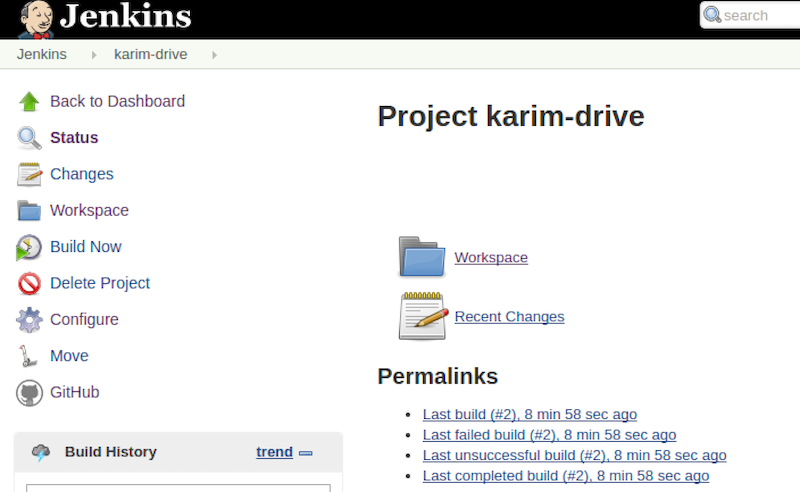
At this point I had a job setup and I decided to build it manually. So go into the job and click Build Now:
After I kicked off a build I received the following error (which I saw in the console output):
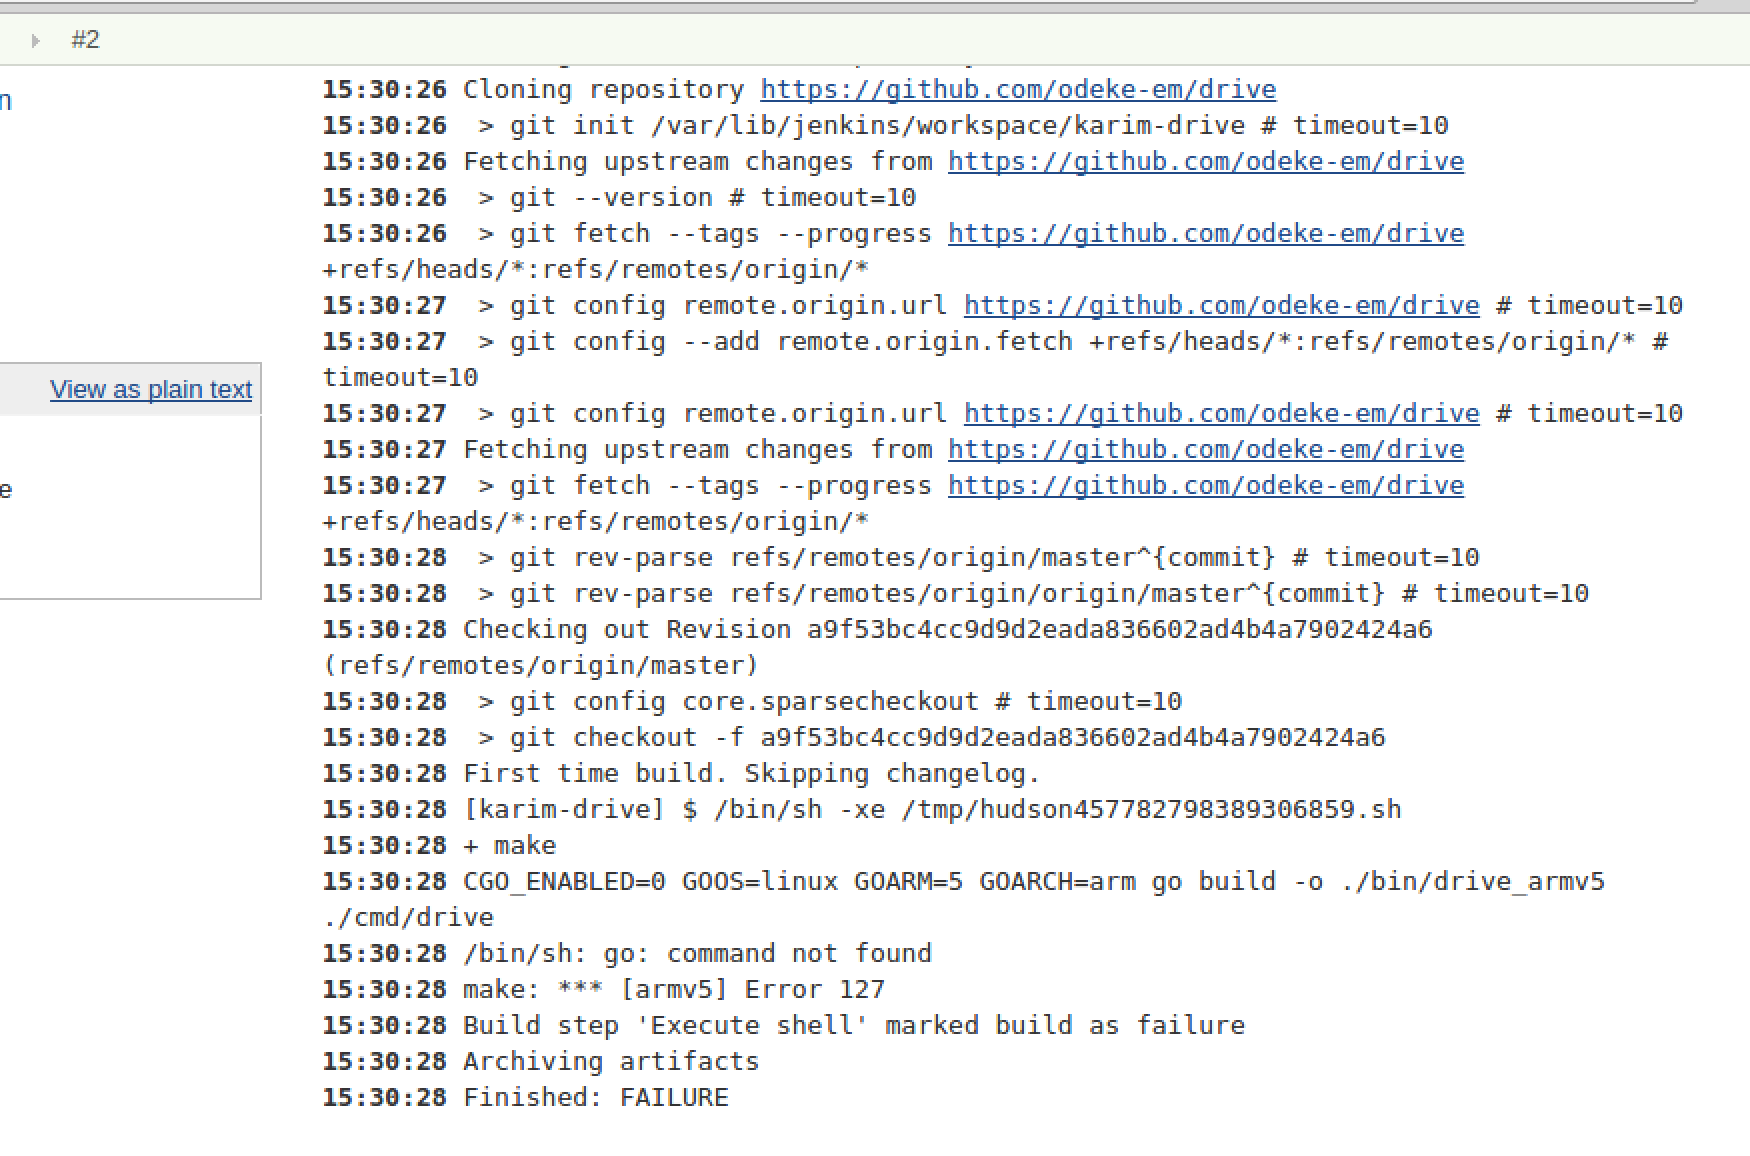
I realized I was missing the go compiler, so I installed it:
$ sudo yum install go
Then the build succeeded:
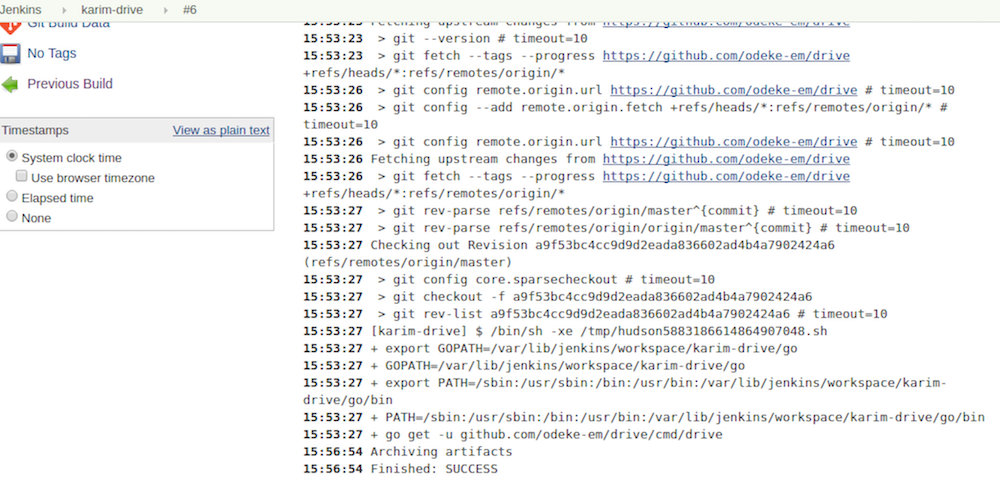
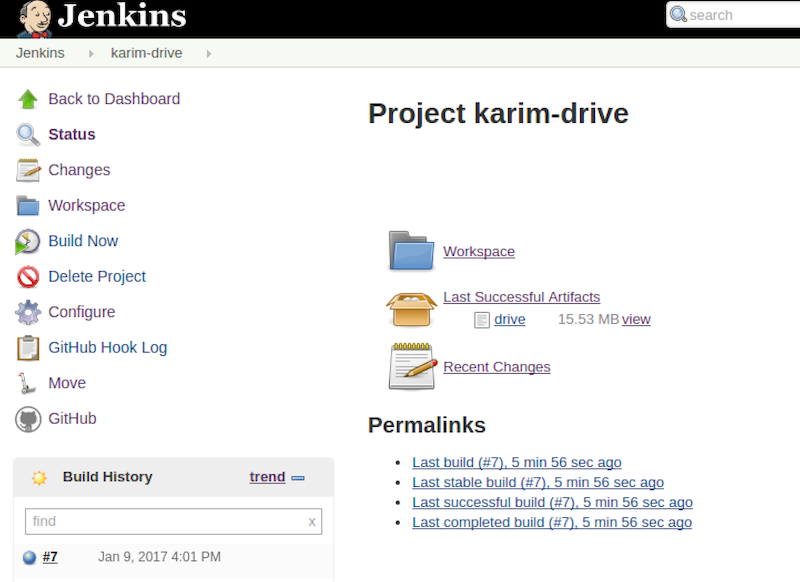
And I saw the artifact in the job dashboard:
Convert Freestyle Job to Pipeline
I wanted to start getting used to pipeline so I decided to convert my simple job to pipeline. Here are some nice examples of pipeline:
I created a new job and instead of choosing Freestyle, I chose Pipeline:

And here was the simple code I used to convert my freestyle job:
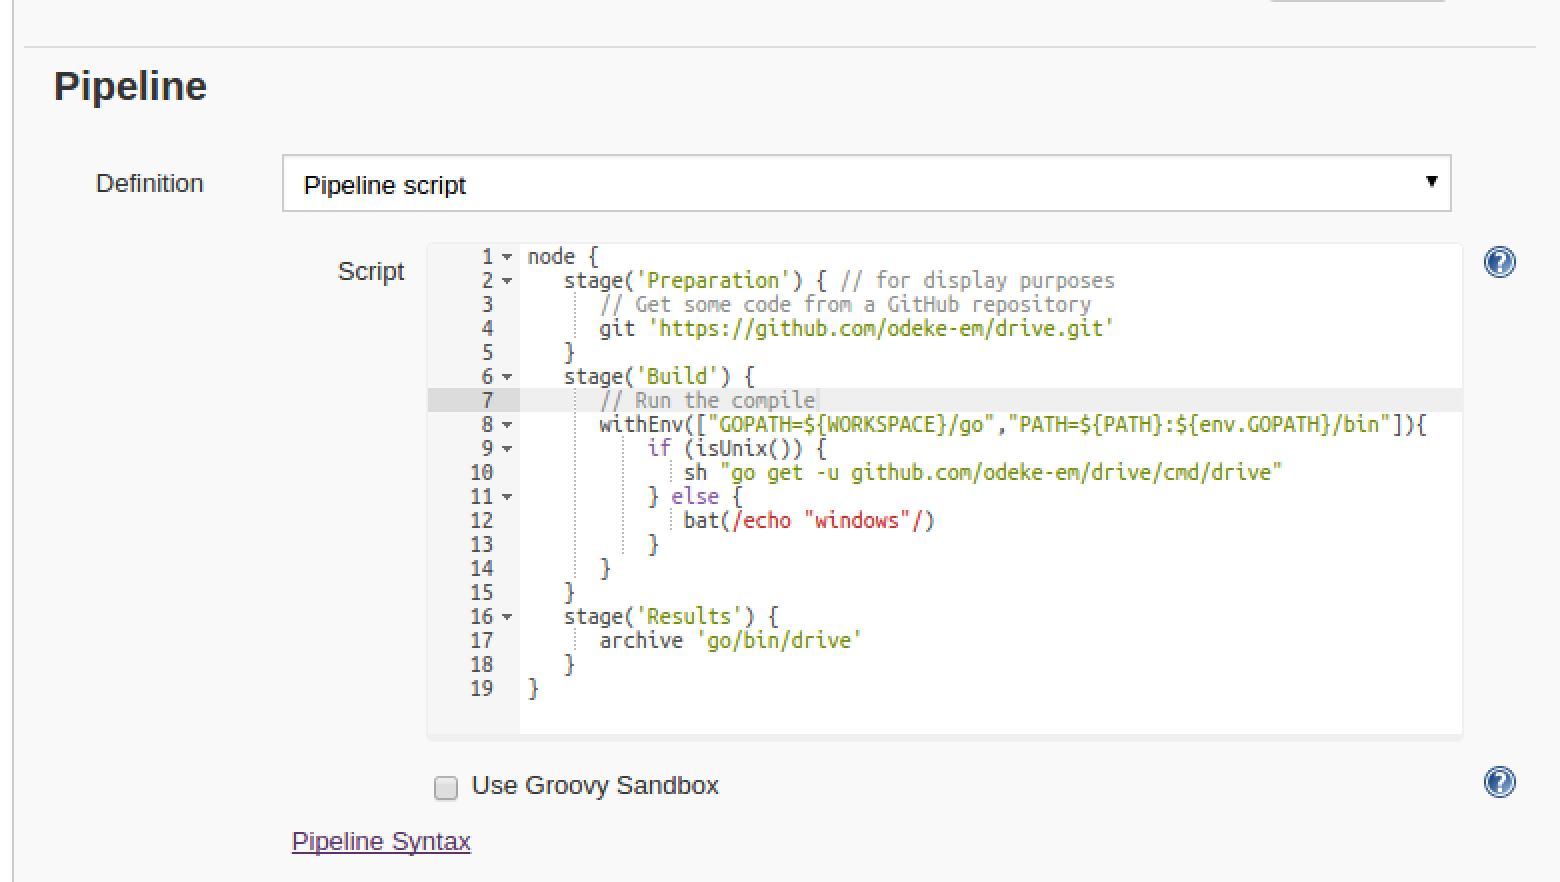
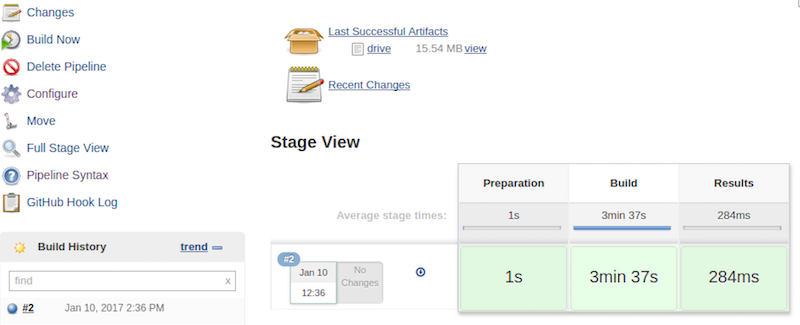
Then running a manual build showed me the stages of the build and it was successful as well:
Expanding the Pipeline Code
After some playing around I ended up writing some more code just to see it’s limits. It’s definitely not perfect but it was a learning experience to see what pipeline is capable of. Here is snippet:
if (ENABLE_FREEBSD_BUILD.toBoolean()){
    node('freebsd') {
        deleteDir()
        String arch = sh (script: "uname -p", returnStdout: true).trim()
        String os_version = sh (script: "uname -r", returnStdout: true)
        String os_ver = os_version.tokenize(".")[0]

        stage('Prepare on FreeBSD'){
            checkout ([
                $class: 'GitSCM',
                userRemoteConfigs: [[url: "https://github.com/odeke-em/drive.git"]],
                branches: [[name: "refs/tags/${DRIVE_VERSION}"]],
                extensions: [[$class: 'CleanBeforeCheckout']],
                poll: false
                ])
        }

        stage("Build on FreeBSD"){
            withEnv(["GOPATH=${WORKSPACE}/go","PATH=${PATH}:${env.GOPATH}/bin"]){
                sh "go get -u github.com/odeke-em/drive/cmd/drive"
                sh "chmod +x ${WORKSPACE}/go/bin/drive"
            }
        }

        stage ("Test on FreeBSD"){
            dir ("/tmp/gdrive"){
                sh "${WORKSPACE}/go/bin/drive pull"
            }
        }

        stage("Archive on FreeBSD"){
            freebsd_archive = "drive-FreeBSD-${os_ver}-${arch}.tar.bz2"
            dir ("${WORKSPACE}/go"){
                sh "mkdir drive && mv bin drive/."
                sh "tar cpvjf ${WORKSPACE}/${freebsd_archive} drive"
            }
            archive freebsd_archive
        }

        stage("Deploy FreeBSD Artifacts to Puppet Node"){
            sh "scp ${freebsd_archive} elatov@puppet:/etc/puppetlabs/code/environments/production/modules/drive/files/jenkins/"
        }
    }
}
I ended up adding the following parameters to the job:

This gave me the option to troubleshoot issues at an “OS” level. So the first if statement checks if the parameter is defined and if so, proceed (had to convert it to boolean first):
if (Boolean.valueOf(ENABLE_FREEBSD_BUILD)){
	    node('freebsd') {
I also clean out the workspace before each build just to make sure none of the previous build impacts this build:
deleteDir()
Next we have variables that I grab from the command line (with shell step) of the slave node to determine it’s architecture type and OS version:
String arch = sh (script: "uname -p", returnStdout: true).trim()
String os_version = sh (script: "uname -r", returnStdout: true)
String os_ver = os_version.tokenize(".")[0]
I also defined a bunch of stage steps (probably went a little overboard), just to make it easier to troubleshoot at which point the build failed:
stage('Prepare on FreeBSD'){
stage("Build on FreeBSD"){
Since I wanted to check out a specific branch I decided to use the checkout step:
checkout ([
	        $class: 'GitSCM',
	        userRemoteConfigs: [[url: "https://github.com/odeke-em/drive.git"]],
	        branches: [[name: "refs/tags/${DRIVE_VERSION}"]],
	        extensions: [[$class: 'CleanBeforeCheckout']],
	        poll: false
	      ])
Then I build the software which we saw above. And since I had a test google drive account checked out on the node, I tested the binary to make sure it’s able to do a pull from google drive in a specific directory:
dir ("/tmp/gdrive"){
	sh "${WORKSPACE}/go/bin/drive pull"
}
I could’ve probably initialized a brand new directory and then do a pull but this fit my needs. Then I tar‘ed up the artifacts and archived them:
freebsd_archive = "drive-FreeBSD-${os_ver}-${arch}.tar.bz2"
dir ("${WORKSPACE}/go"){
	sh "mkdir drive && mv bin drive/."
	sh "tar cpvjf ${WORKSPACE}/${freebsd_archive} drive"
}
archive freebsd_archive
And lastly I deploy/scp the archive to the puppet master:
sh "scp ${freebsd_archive} elatov@puppet:/etc/puppetlabs/code/environments/production/modules/drive/files/jenkins/"
This is under the assumption that each slave node has ssh keys configured to connect to the puppet node.
Another approach to deploying the Artifacts
Another way of accomplishing a similar goal is to either stash or archive the results and then deploy the results from the master rather than from each build node. There is a minor difference between stash and archive and it’s discussed here. Stashes are only available until the build is running, while archives are available after the build. Also a nice note about stashing files:
Note that the stash and unstash steps are designed for use with small files. For large data transfers, use the External Workspace Manager plugin, or use an external repository manager such as Nexus or Artifactory. This is because stashed files are archived in a compressed TAR, and with large files this demands considerable on-master resources, particularly CPU time. There’s not a hard stash size limit, but between 5-100 MB you should probably consider alternatives.
My files were really small so I was okay, but if my files were above 10MB then using artifactory would be recommended. So after I got my files to the master, I could use the following to scp them from there:
node('master'){
	stage("Deploy CentOS Artifacts From Master to Puppet Node"){
		sh "scp ${JENKINS_HOME}/jobs/${JOB_NAME}/builds/${BUILD_NUMBER}/archive/${centos_archive} elatov@puppet:/etc/puppetlabs/code/environments/production/modules/drive/files/jenkins"
		//sh "${JENKINS_HOME}/jobs/${JOB_NAME}/builds/${BUILD_NUMBER}/stash/${centos_archive} elatov@puppet:/etc/puppetlabs/code/environments/production/modules/drive/files/jenkins/"
	}
}
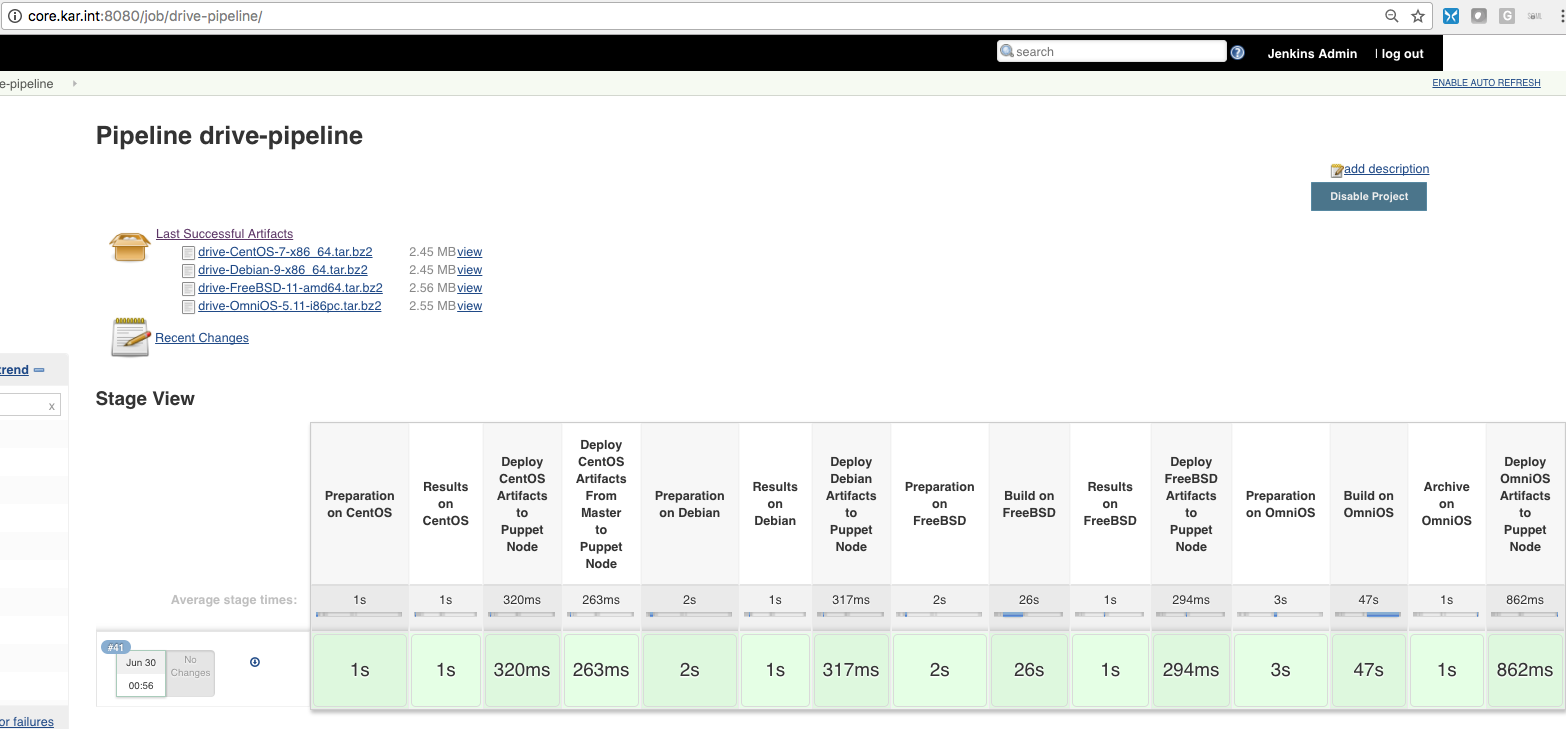
This would save me the trouble of setting up the SSH keys across all the build nodes (but it would put more burden on the master node). After my job ran successfully here all the crazy stages :) (and you can see all the artifacts archived as well)