Playing Around with Terraform and Jenkins
Changing Networks with OpenStack
My external network was already internal (in my lab environment) so I decided to deploy an instance on that network (This was after) I played around with the OpenStack provider for terraform). Initially I realized DHCP wasn’t enabled on the network:
root@osa:~# openstack subnet list
+------+----------------+---------+---------------+
| ID   | Name           | Network | Subnet        |
+------+----------------+---------+---------------+
| 121d | public1-subnet | 11513dd | 10.0.0.0/24   |
| e4da | demo-subnet    | 0cd712d | 172.24.0.0/24 |
+------+----------------+---------+---------------+
And checking out the settings:
root@osa:~# openstack subnet show public1-subnet
+-------------------+--------------------------------------+
| Field             | Value                                |
+-------------------+--------------------------------------+
| allocation_pools  | 10.0.0.150-10.0.0.199                |
| cidr              | 10.0.0.0/24                          |
| created_at        | 2017-12-30T23:42:52Z                 |
| description       |                                      |
| dns_nameservers   |                                      |
| enable_dhcp       | False                                |
| gateway_ip        | 10.0.0.1                             |
| host_routes       |                                      |
| id                | 121d5a18-3e64-4ba9-8612-0d219e68ef68 |
| ip_version        | 4                                    |
| ipv6_address_mode | None                                 |
| ipv6_ra_mode      | None                                 |
| name              | public1-subnet                       |
| network_id        | 11513d67-dc3e-45af-b4a3-4fc56117b55e |
| project_id        | 894d79b29fc44e458f24d8bb02f44b92     |
| revision_number   | 0                                    |
| segment_id        | None                                 |
| service_types     |                                      |
| subnetpool_id     | None                                 |
| tags              |                                      |
| updated_at        | 2017-12-30T23:42:52Z                 |
+-------------------+--------------------------------------+
So I enabled that:
root@osa:~# openstack subnet set --dhcp public1-subnet
root@osa:~# openstack subnet set --dns-nameserver 10.0.0.1  public1-subnet
And then I saw those settings configured:
root@osa:~# openstack subnet show public1-subnet
+-------------------+--------------------------------------+
| Field             | Value                                |
+-------------------+--------------------------------------+
| allocation_pools  | 10.0.0.150-10.0.0.199                |
| cidr              | 10.0.0.0/24                          |
| created_at        | 2017-12-30T23:42:52Z                 |
| description       |                                      |
| dns_nameservers   | 10.0.0.1                             |
| enable_dhcp       | True                                 |
| gateway_ip        | 10.0.0.1                             |
| host_routes       |                                      |
| id                | 121d5a18-3e64-4ba9-8612-0d219e68ef68 |
| ip_version        | 4                                    |
| ipv6_address_mode | None                                 |
| ipv6_ra_mode      | None                                 |
| name              | public1-subnet                       |
| network_id        | 11513d67-dc3e-45af-b4a3-4fc56117b55e |
| project_id        | 894d79b29fc44e458f24d8bb02f44b92     |
| revision_number   | 2                                    |
| segment_id        | None                                 |
| service_types     |                                      |
| subnetpool_id     | None                                 |
| tags              |                                      |
| updated_at        | 2018-01-01T20:26:43Z                 |
+-------------------+--------------------------------------+
And I also saw a new DHCP netns:
root@osa:~# ip netns
qrouter-57752fa4-84f2-48a9-beca-d1218825ee0a
qdhcp-11513d67-dc3e-45af-b4a3-4fc56117b55e
qdhcp-0cd712db-07ba-4a66-b412-cc902d4bed1e
Then after doing a new deploy to be on the provider network (instead of the internal one):
<> terraform apply

An execution plan has been generated and is shown below.
Resource actions are indicated with the following symbols:
  + create

Terraform will perform the following actions:

  + openstack_compute_instance_v2.vm1
      id:                         <computed>
      access_ip_v4:               <computed>
      access_ip_v6:               <computed>
      all_metadata.%:             <computed>
      availability_zone:          "nova"
      flavor_id:                  <computed>
      flavor_name:                "m1.tiny"
      force_delete:               "false"
      image_id:                   <computed>
      image_name:                 "cirros"
      key_pair:                   "mykey"
      name:                       "demo2"
      network.#:                  "1"
      network.0.access_network:   "false"
      network.0.fixed_ip_v4:      <computed>
      network.0.fixed_ip_v6:      <computed>
      network.0.floating_ip:      <computed>
      network.0.mac:              <computed>
      network.0.name:             "public1"
      network.0.port:             <computed>
      network.0.uuid:             <computed>
      region:                     <computed>
      security_groups.#:          "1"
      security_groups.3814588639: "default"
      stop_before_destroy:        "false"
      user_data:                  "90f8abf748f00aaee3f0d436dea4cbdc46adac63"


Plan: 1 to add, 0 to change, 0 to destroy.

Do you want to perform these actions?
  Terraform will perform the actions described above.
  Only 'yes' will be accepted to approve.

  Enter a value: yes

openstack_compute_instance_v2.vm1: Creating...
  access_ip_v4:               "" => "<computed>"
  access_ip_v6:               "" => "<computed>"
  all_metadata.%:             "" => "<computed>"
  availability_zone:          "" => "nova"
  flavor_id:                  "" => "<computed>"
  flavor_name:                "" => "m1.tiny"
  force_delete:               "" => "false"
  image_id:                   "" => "<computed>"
  image_name:                 "" => "cirros"
  key_pair:                   "" => "mykey"
  name:                       "" => "demo2"
  network.#:                  "" => "1"
  network.0.access_network:   "" => "false"
  network.0.fixed_ip_v4:      "" => "<computed>"
  network.0.fixed_ip_v6:      "" => "<computed>"
  network.0.floating_ip:      "" => "<computed>"
  network.0.mac:              "" => "<computed>"
  network.0.name:             "" => "public1"
  network.0.port:             "" => "<computed>"
  network.0.uuid:             "" => "<computed>"
  region:                     "" => "<computed>"
  security_groups.#:          "" => "1"
  security_groups.3814588639: "" => "default"
  stop_before_destroy:        "" => "false"
  user_data:                  "" => "90f8abf748f00aaee3f0d436dea4cbdc46adac63"
openstack_compute_instance_v2.vm1: Still creating... (10s elapsed)
openstack_compute_instance_v2.vm1: Creation complete after 14s (ID: 3811cde4-8051-4e3e-97a1-8d434ab40fa6)

Apply complete! Resources: 1 added, 0 changed, 0 destroyed.
I was able to see what the IP of the machine is:
<> terraform show
openstack_compute_instance_v2.vm1:
  id = 3811cde4-8051-4e3e-97a1-8d434ab40fa6
  access_ip_v4 = 10.0.0.161
  access_ip_v6 =
  all_metadata.% = 0
  availability_zone = nova
  flavor_id = 1
  flavor_name = m1.tiny
  force_delete = false
  image_id = 4ec62ba8-923d-4daf-a11c-066661aab759
  image_name = cirros
  key_pair = mykey
  name = demo2
  network.# = 1
  network.0.access_network = false
  network.0.fixed_ip_v4 = 10.0.0.161
  network.0.fixed_ip_v6 =
  network.0.floating_ip =
  network.0.mac = fa:16:3e:97:03:61
  network.0.name = public1
  network.0.port =
  network.0.uuid = 11513d67-dc3e-45af-b4a3-4fc56117b55e
  region =
  security_groups.# = 1
  security_groups.3814588639 = default
  stop_before_destroy = false
  user_data = 90f8abf748f00aaee3f0d436dea4cbdc46adac63
Checking Logs on a Kolla Deployed OpenStack Instance
With kolla, to check out the logs you can check out the kolla_logs volume:
root@osa:~# docker volume ls
DRIVER              VOLUME NAME
local               glance
local               haproxy_socket
local               kolla_logs
local               libvirtd
local               mariadb
local               neutron_metadata_socket
local               nova_compute
local               nova_libvirt_qemu
local               openvswitch_db
local               rabbitmq
You can use inspect to see the location of the volume:
root@osa:~# docker volume inspect kolla_logs
[
    {
        "Driver": "local",
        "Labels": null,
        "Mountpoint": "/var/lib/docker/volumes/kolla_logs/_data",
        "Name": "kolla_logs",
        "Options": {},
        "Scope": "local"
    }
]
And then we can check out the DHCP leases to confirm it’s working:
root@osa:~# cd /var/lib/docker/volumes/kolla_logs/_data/neutron/
root@osa:/var/lib/docker/volumes/kolla_logs/_data/neutron# la
dnsmasq.log  neutron-dhcp-agent.log  neutron-l3-agent.log  neutron-metadata-agent.log  neutron-netns-cleanup.log  neutron-openvswitch-agent.log  neutron-server.log
root@osa:/var/lib/docker/volumes/kolla_logs/_data/neutron# tail neutron-dhcp-agent.log
2018-01-01 14:37:34.657 7 INFO neutron.agent.dhcp.agent [-] Synchronizing state
2018-01-01 14:37:34.845 7 INFO neutron.agent.dhcp.agent [req-d625a955-27b1-4cc4-835d-e5d46b8bb792 - - - - -] All active networks have been fetched through RPC.
2018-01-01 14:37:34.846 7 INFO neutron.agent.dhcp.agent [-] Starting network 0cd712db-07ba-4a66-b412-cc902d4bed1e dhcp configuration
2018-01-01 14:37:34.902 7 INFO neutron.agent.dhcp.agent [-] Starting network 11513d67-dc3e-45af-b4a3-4fc56117b55e dhcp configuration
2018-01-01 14:37:38.766 7 INFO neutron.agent.dhcp.agent [-] Finished network 0cd712db-07ba-4a66-b412-cc902d4bed1e dhcp configuration
2018-01-01 14:37:38.887 7 INFO neutron.agent.dhcp.agent [-] Finished network 11513d67-dc3e-45af-b4a3-4fc56117b55e dhcp configuration
2018-01-01 14:37:38.887 7 INFO neutron.agent.dhcp.agent [req-d625a955-27b1-4cc4-835d-e5d46b8bb792 - - - - -] Synchronizing state complete
2018-01-01 14:38:55.906 7 INFO neutron.agent.dhcp.agent [req-fe6d7fb8-c185-4f21-aef7-91d557a7964b e0b6c3a9d1a644ff8fa34c1b59ab352a 894d79b29fc44e458f24d8bb02f44b92 - - -] Trigger reload_allocations for port admin_state_up=True, allowed_address_pairs=[], binding:host_id=, binding:profile=, binding:vif_details=, binding:vif_type=unbound, binding:vnic_type=normal, created_at=2018-01-01T21:38:55Z, description=, device_id=3811cde4-8051-4e3e-97a1-8d434ab40fa6, device_owner=, extra_dhcp_opts=[], fixed_ips=[{u'subnet_id': u'121d5a18-3e64-4ba9-8612-0d219e68ef68', u'ip_address': u'10.0.0.161'}], id=98cec5f6-c0aa-42a1-831b-d49a89d24234, mac_address=fa:16:3e:97:03:61, name=, network_id=11513d67-dc3e-45af-b4a3-4fc56117b55e, port_security_enabled=True, project_id=894d79b29fc44e458f24d8bb02f44b92, revision_number=3, security_groups=[u'31b55999-af17-4ffa-b2d5-00dc78d927f7'], status=DOWN, tags=[], tenant_id=894d79b29fc44e458f24d8bb02f44b92, updated_at=2018-01-01T21:38:55Z
2018-01-01 14:38:57.183 7 INFO neutron.agent.dhcp.agent [req-688da7c9-fc36-4519-ba6f-cf805c7ae82f fa3355b92f9646d28f45760e4d80287f c879d2d22ac44eddb89ec3905afc2578 - - -] Trigger reload_allocations for port admin_state_up=True, allowed_address_pairs=[], binding:host_id=osa, binding:profile=, binding:vif_details=, binding:vif_type=unbound, binding:vnic_type=normal, created_at=2018-01-01T21:38:55Z, description=, device_id=3811cde4-8051-4e3e-97a1-8d434ab40fa6, device_owner=compute:nova, extra_dhcp_opts=[], fixed_ips=[{u'subnet_id': u'121d5a18-3e64-4ba9-8612-0d219e68ef68', u'ip_address': u'10.0.0.161'}], id=98cec5f6-c0aa-42a1-831b-d49a89d24234, mac_address=fa:16:3e:97:03:61, name=, network_id=11513d67-dc3e-45af-b4a3-4fc56117b55e, port_security_enabled=True, project_id=894d79b29fc44e458f24d8bb02f44b92, revision_number=4, security_groups=[u'31b55999-af17-4ffa-b2d5-00dc78d927f7'], status=DOWN, tags=[], tenant_id=894d79b29fc44e458f24d8bb02f44b92, updated_at=2018-01-01T21:38:56Z
2018-01-01 14:38:58.435 7 INFO neutron.agent.dhcp.agent [req-688da7c9-fc36-4519-ba6f-cf805c7ae82f fa3355b92f9646d28f45760e4d80287f c879d2d22ac44eddb89ec3905afc2578 - - -] Trigger reload_allocations for port admin_state_up=True, allowed_address_pairs=[], binding:host_id=osa, binding:profile=, binding:vif_details=datapath_type=system, ovs_hybrid_plug=True, port_filter=True, binding:vif_type=ovs, binding:vnic_type=normal, created_at=2018-01-01T21:38:55Z, description=, device_id=3811cde4-8051-4e3e-97a1-8d434ab40fa6, device_owner=compute:nova, extra_dhcp_opts=[], fixed_ips=[{u'subnet_id': u'121d5a18-3e64-4ba9-8612-0d219e68ef68', u'ip_address': u'10.0.0.161'}], id=98cec5f6-c0aa-42a1-831b-d49a89d24234, mac_address=fa:16:3e:97:03:61, name=, network_id=11513d67-dc3e-45af-b4a3-4fc56117b55e, port_security_enabled=True, project_id=894d79b29fc44e458f24d8bb02f44b92, revision_number=5, security_groups=[u'31b55999-af17-4ffa-b2d5-00dc78d927f7'], status=DOWN, tags=[], tenant_id=894d79b29fc44e458f24d8bb02f44b92, updated_at=2018-01-01T21:38:56Z
We can also check out the dnsmasq logs:
root@osa:/var/lib/docker/volumes/kolla_logs/_data/neutron# tail dnsmasq.log
Jan  1 14:38:57 dnsmasq[270]: read /var/lib/neutron/dhcp/11513d67-dc3e-45af-b4a3-4fc56117b55e/addn_hosts - 4 addresses
Jan  1 14:38:57 dnsmasq-dhcp[270]: read /var/lib/neutron/dhcp/11513d67-dc3e-45af-b4a3-4fc56117b55e/host
Jan  1 14:38:57 dnsmasq-dhcp[270]: read /var/lib/neutron/dhcp/11513d67-dc3e-45af-b4a3-4fc56117b55e/opts
Jan  1 14:38:58 dnsmasq[270]: read /var/lib/neutron/dhcp/11513d67-dc3e-45af-b4a3-4fc56117b55e/addn_hosts - 4 addresses
Jan  1 14:38:58 dnsmasq-dhcp[270]: read /var/lib/neutron/dhcp/11513d67-dc3e-45af-b4a3-4fc56117b55e/host
Jan  1 14:38:58 dnsmasq-dhcp[270]: read /var/lib/neutron/dhcp/11513d67-dc3e-45af-b4a3-4fc56117b55e/opts
Jan  1 14:39:05 dnsmasq-dhcp[270]: DHCPDISCOVER(tapb50d7951-f3) fa:16:3e:97:03:61
Jan  1 14:39:05 dnsmasq-dhcp[270]: DHCPOFFER(tapb50d7951-f3) 10.0.0.161 fa:16:3e:97:03:61
Jan  1 14:39:05 dnsmasq-dhcp[270]: DHCPREQUEST(tapb50d7951-f3) 10.0.0.161 fa:16:3e:97:03:61
Jan  1 14:39:05 dnsmasq-dhcp[270]: DHCPACK(tapb50d7951-f3) 10.0.0.161 fa:16:3e:97:03:61 host-10-0-0-161
I was also able to SSH to the machine without going through the netns router:
<> ssh cirros@10.0.0.161 -i cirros.pem
$ hostname
demo2
$ ping -c 1 google.com
PING google.com (172.217.1.206): 56 data bytes
64 bytes from 172.217.1.206: seq=0 ttl=57 time=3.845 ms

--- google.com ping statistics ---
1 packets transmitted, 1 packets received, 0% packet loss
round-trip min/avg/max = 3.845/3.845/3.845 ms
I could’ve used a floating IP, but I decided to just deploy directly on the provider network to ease the setup. This is an internal configuration anyways.
Use Terraform with Jenkins
Just for fun I decided to see if I could accomplish the same with jenkins. There is a plugin for it, but I just used it to install the terraform binary (not to configure a freestyle job). So after you install the plugin, configure it to auto install a specific version of terraform and the architecture:
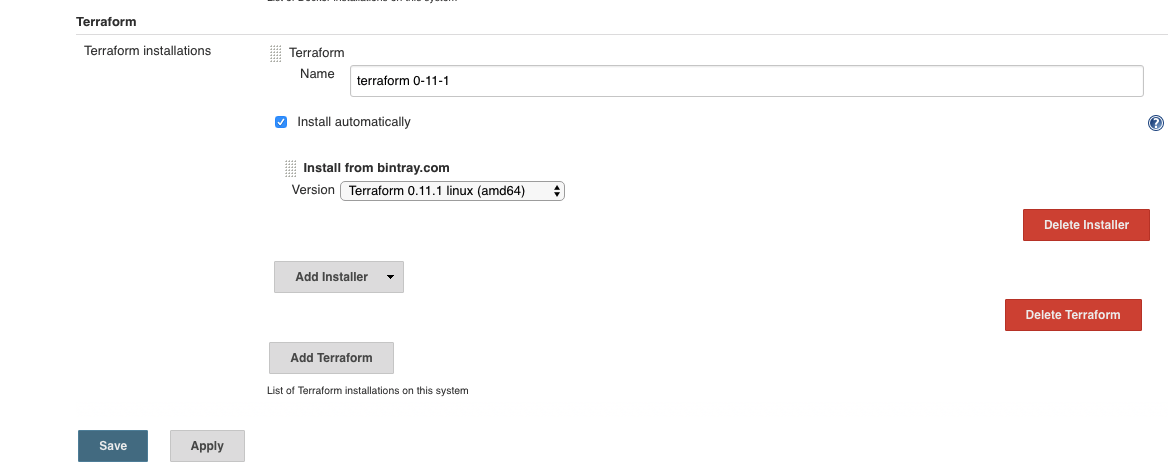
If you ever run a job that uses that tool, it will auto install it:
Started by user Jenkins Admin
[Pipeline] node
Running on Jenkins in /var/jenkins_home/workspace/terraform
[Pipeline] {
[Pipeline] tool
Unpacking https://releases.hashicorp.com/terraform/0.11.1/terraform_0.11.1_linux_amd64.zip to /var/jenkins_home/tools/org.jenkinsci.plugins.terraform.TerraformInstallation/terraform_0-11-1 on Jenkins
[Pipeline] }
[Pipeline] // node
[Pipeline] End of Pipeline
There is actually a pretty good example at Automating Terraform Projects with Jenkins of terraform with pipeline. I created a really bad version of the the code to just do an apply:
node ('master') {
    // Get the Terraform tool.
    def tfHome = tool name: 'terraform 0-11-1'
    def tf = "${tfHome}/terraform"
    sh "${tf} version"
    echo "${tf}"
    dir("/var/jenkins_home/files/terr/"){
        if(!fileExists(".terraform")){
            sh "${tf} init -input=false "
        }
        sh "${tf} plan"
        sh "${tf} apply -input=false -auto-approve"
    }
}
Here is the job running and applying the plan :)
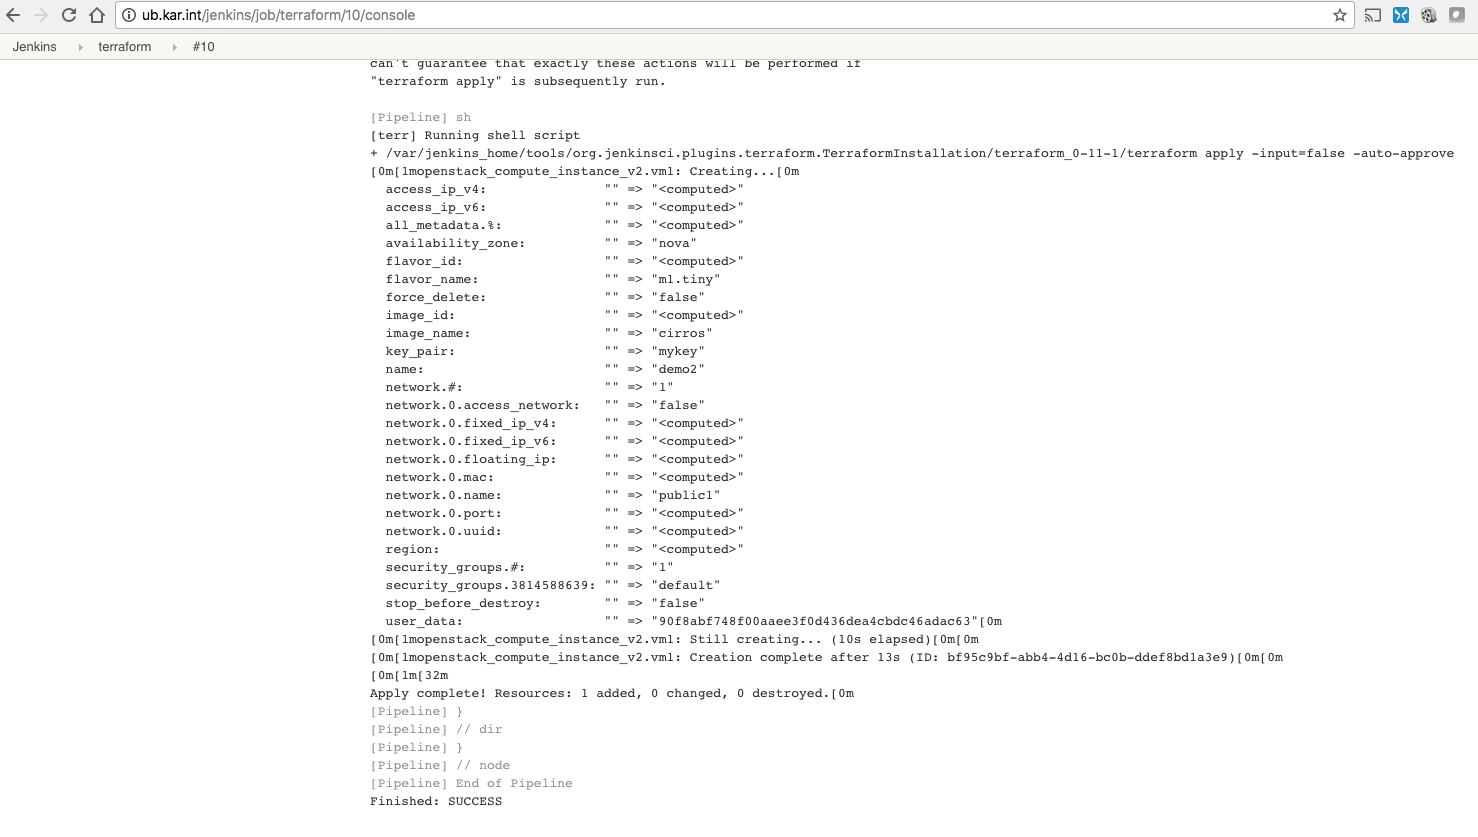
It’s recommended to use a backend that supports locking and remote state. For my quick test I just had the files locally, but this was just to make sure it works.