Using Squid to Proxy SSL Sites
Squid
I wanted to play around with an HTTP Proxy and after reading about a couple of different options, I decided to try out Squid. It’s really flexible and allows many different approaches to proxying.
Installing Squid on CentOS
Looking over different versions it looks like with 3.5 there is better support for SSL-Bumping, which is now called Peek and Slice. This allows Squid to look into the TLS handshake and generate Dynamic Certificates on the fly, so the browser doesn’t throw any warnings (as long as the CA Cert is trusted by the Browser). This is version available on CentOS 7.4:
<> sudo yum info squid
Loaded plugins: fastestmirror, remove-with-leaves
Loading mirror speeds from cached hostfile
 * atomic: www7.atomicorp.com
 * base: centos.expedientevirtual.com
 * epel: mirrors.develooper.com
 * extras: mirror.genesisadaptive.com
 * updates: pubmirrors.dal.corespace.com
Installed Packages
Name        : squid
Arch        : x86_64
Epoch       : 7
Version     : 3.5.20
Release     : 10.el7
Size        : 10 M
Repo        : installed
From repo   : base
Summary     : The Squid proxy caching server
URL         : http://www.squid-cache.org
The install is pretty easy:
<> sudo yum install squid
Then open up your firewall:
<> sudo iptables -L -n -v | grep 3128
    0     0 ACCEPT     tcp  --  *      *       192.168.1.0/24       0.0.0.0/0            state NEW tcp dpt:3128
Generate a CA Certificate to be used by Squid
The process is descibed in detail in Dynamic SSL Certificate Generation and a nice configuration example is available at SSL-Bump using an intermediate CA. So first let’s generate the certificate files:
<> openssl req -new -newkey rsa:2048 -sha256 -days 365 -nodes -x509 -extensions v3_ca -keyout squid-ca-key.pem -out squid-ca-cert.pem
Then combine the files:
<> cat squid-ca-cert.pem squid-ca-key.pem >> squid-ca-cert-key.pem
Then move the file to a location squid can read:
<> sudo mkdir /etc/squid/certs
<> sudo mv squid-ca-cert-key.pem /etc/squid/certs/.
<> sudo chown squid:squid -R /etc/squid/certs
And you should be set with the install.
Configure Squid to Peek-N-Slice SSL Connections
Here is configuration I ended up with:
<> grep -vE '^$|^#' /etc/squid/squid.conf
acl localnet src 10.0.0.0/8	# RFC1918 possible internal network
acl localnet src 172.16.0.0/12	# RFC1918 possible internal network
acl localnet src 192.168.0.0/16	# RFC1918 possible internal network
acl localnet src fc00::/7       # RFC 4193 local private network range
acl localnet src fe80::/10      # RFC 4291 link-local (directly plugged) machines
acl SSL_ports port 443
acl Safe_ports port 80		# http
acl Safe_ports port 21		# ftp
acl Safe_ports port 443		# https
acl Safe_ports port 70		# gopher
acl Safe_ports port 210		# wais
acl Safe_ports port 1025-65535	# unregistered ports
acl Safe_ports port 280		# http-mgmt
acl Safe_ports port 488		# gss-http
acl Safe_ports port 591		# filemaker
acl Safe_ports port 777		# multiling http
acl CONNECT method CONNECT
http_access deny !Safe_ports
http_access deny CONNECT !SSL_ports
http_access allow localhost manager
http_access deny manager
http_access allow localnet
http_access allow localhost
http_access deny all
http_port 3128 ssl-bump \
  cert=/etc/squid/certs/squid-ca-cert-key.pem \
  generate-host-certificates=on dynamic_cert_mem_cache_size=16MB
https_port 3129 intercept ssl-bump \
  cert=/etc/squid/certs/squid-ca-cert-key.pem \
  generate-host-certificates=on dynamic_cert_mem_cache_size=16MB
sslcrtd_program /usr/lib64/squid/ssl_crtd -s /var/lib/ssl_db -M 16MB
acl step1 at_step SslBump1
ssl_bump peek step1
ssl_bump bump all
ssl_bump splice all
coredump_dir /var/spool/squid
refresh_pattern ^ftp:		1440	20%	10080
refresh_pattern ^gopher:	1440	0%	1440
refresh_pattern -i (/cgi-bin/|\?) 0	0%	0
refresh_pattern .		0	20%	4320
Confirm the config is okay:
<> sudo squid -k parse
2018/04/07 15:13:06| Startup: Initializing Authentication Schemes ...
2018/04/07 15:13:06| Startup: Initialized Authentication Scheme 'basic'
2018/04/07 15:13:06| Startup: Initialized Authentication Scheme 'digest'
2018/04/07 15:13:06| Startup: Initialized Authentication Scheme 'negotiate'
2018/04/07 15:13:06| Startup: Initialized Authentication Scheme 'ntlm'
2018/04/07 15:13:06| Startup: Initialized Authentication.
2018/04/07 15:13:06| Processing Configuration File: /etc/squid/squid.conf (depth 0)
2018/04/07 15:13:06| Processing: acl localnet src 10.0.0.0/8	# RFC1918 possible internal network
2018/04/07 15:13:06| Processing: acl localnet src 172.16.0.0/12	# RFC1918 possible internal network
2018/04/07 15:13:06| Processing: acl localnet src 192.168.0.0/16	# RFC1918 possible internal network
2018/04/07 15:13:06| Processing: acl localnet src fc00::/7       # RFC 4193 local private network range
2018/04/07 15:13:06| Processing: acl localnet src fe80::/10      # RFC 4291 link-local (directly plugged) machines
2018/04/07 15:13:06| Processing: acl SSL_ports port 443
2018/04/07 15:13:06| Processing: acl Safe_ports port 80		# http
2018/04/07 15:13:06| Processing: acl Safe_ports port 21		# ftp
2018/04/07 15:13:06| Processing: acl Safe_ports port 443		# https
2018/04/07 15:13:06| Processing: acl Safe_ports port 70		# gopher
2018/04/07 15:13:06| Processing: acl Safe_ports port 210		# wais
2018/04/07 15:13:06| Processing: acl Safe_ports port 1025-65535	# unregistered ports
2018/04/07 15:13:06| Processing: acl Safe_ports port 280		# http-mgmt
2018/04/07 15:13:06| Processing: acl Safe_ports port 488		# gss-http
2018/04/07 15:13:06| Processing: acl Safe_ports port 591		# filemaker
2018/04/07 15:13:06| Processing: acl Safe_ports port 777		# multiling http
2018/04/07 15:13:06| Processing: acl CONNECT method CONNECT
2018/04/07 15:13:06| Processing: http_access deny !Safe_ports
2018/04/07 15:13:06| Processing: http_access deny CONNECT !SSL_ports
2018/04/07 15:13:06| Processing: http_access allow localhost manager
2018/04/07 15:13:06| Processing: http_access deny manager
2018/04/07 15:13:06| Processing: http_access allow localnet
2018/04/07 15:13:06| Processing: http_access allow localhost
2018/04/07 15:13:06| Processing: http_access deny all
2018/04/07 15:13:06| Processing: http_port 3128 ssl-bump cert=/etc/squid/certs/squid-ca-cert-key.pem generate-host-certificates=on dynamic_cert_mem_cache_size=16MB
2018/04/07 15:13:06| Processing: https_port 3129 intercept ssl-bump cert=/etc/squid/certs/squid-ca-cert-key.pem generate-host-certificates=on dynamic_cert_mem_cache_size=16MB
2018/04/07 15:13:06| Starting Authentication on port [::]:3129
2018/04/07 15:13:06| Disabling Authentication on port [::]:3129 (interception enabled)
2018/04/07 15:13:06| Processing: sslcrtd_program /usr/lib64/squid/ssl_crtd -s /var/lib/ssl_db -M 16MB
2018/04/07 15:13:06| Processing: acl step1 at_step SslBump1
2018/04/07 15:13:06| Processing: ssl_bump peek step1
2018/04/07 15:13:06| Processing: ssl_bump bump all
2018/04/07 15:13:06| Processing: ssl_bump splice all
2018/04/07 15:13:06| Processing: coredump_dir /var/spool/squid
2018/04/07 15:13:06| Processing: refresh_pattern ^ftp:		1440	20%	10080
2018/04/07 15:13:06| Processing: refresh_pattern ^gopher:	1440	0%	1440
2018/04/07 15:13:06| Processing: refresh_pattern -i (/cgi-bin/|\?) 0	0%	0
2018/04/07 15:13:06| Processing: refresh_pattern .		0	20%	4320
2018/04/07 15:13:06| Initializing https proxy context
2018/04/07 15:13:06| Initializing http_port [::]:3128 SSL context
2018/04/07 15:13:06| Using certificate in /etc/squid/certs/squid-ca-cert-key.pem
2018/04/07 15:13:06| Initializing https_port [::]:3129 SSL context
2018/04/07 15:13:06| Using certificate in /etc/squid/certs/squid-ca-cert-key.pem
Now let’s create the SSL database and make sure the squid user can access it:
<> sudo /usr/lib64/squid/ssl_crtd -c -s /var/lib/ssl_db
<> sudo chown squid:squid -R /var/lib/ssl_db
Then enable the service, start it, and confirm it’s running:
<> sudo systemctl enable squid
<> sudo systemctl start squid
<> sudo systemctl status squid.service
● squid.service - Squid caching proxy
   Loaded: loaded (/usr/lib/systemd/system/squid.service; enabled; vendor preset: disabled)
   Active: active (running) since Wed 2018-04-04 15:08:15 MDT; 3 days ago
  Process: 1404 ExecStart=/usr/sbin/squid $SQUID_OPTS -f $SQUID_CONF (code=exited, status=0/SUCCESS)
  Process: 1378 ExecStartPre=/usr/libexec/squid/cache_swap.sh (code=exited, status=0/SUCCESS)
 Main PID: 1444 (squid)
   CGroup: /system.slice/squid.service
           ├─1444 /usr/sbin/squid -f /etc/squid/squid.conf
           ├─1449 (squid-1) -f /etc/squid/squid.conf
           ├─1486 (ssl_crtd) -s /var/lib/ssl_db -M 16MB
           ├─1487 (ssl_crtd) -s /var/lib/ssl_db -M 16MB
           ├─1492 (ssl_crtd) -s /var/lib/ssl_db -M 16MB
           ├─1493 (ssl_crtd) -s /var/lib/ssl_db -M 16MB
           ├─1494 (ssl_crtd) -s /var/lib/ssl_db -M 16MB
           └─1496 (logfile-daemon) /var/log/squid/access.log

Apr 04 15:08:15 m2.kar.int systemd[1]: Starting Squid caching proxy...
Apr 04 15:08:15 m2.kar.int squid[1444]: Squid Parent: will start 1 kids
Apr 04 15:08:15 m2.kar.int systemd[1]: Started Squid caching proxy.
Apr 04 15:08:15 m2.kar.int squid[1444]: Squid Parent: (squid-1) process 1449 started
Import Certificate CA into the Browser for Squid
Now as a quick test we can use curl to confirm it’s working. Without the CA, you will see the following warning:
<> curl --proxy http://192.168.1.100:3128 https://google.com
curl: (60) SSL certificate problem: self signed certificate in certificate chain
More details here: https://curl.haxx.se/docs/sslcerts.html

curl performs SSL certificate verification by default, using a "bundle"
 of Certificate Authority (CA) public keys (CA certs). If the default
 bundle file isn't adequate, you can specify an alternate file
 using the --cacert option.
If this HTTPS server uses a certificate signed by a CA represented in
 the bundle, the certificate verification probably failed due to a
 problem with the certificate (it might be expired, or the name might
 not match the domain name in the URL).
If you'd like to turn off curl's verification of the certificate, use
 the -k (or --insecure) option.
HTTPS-proxy has similar options --proxy-cacert and --proxy-insecure.
So I copied the CA to the client machine, and then tried again:
<> curl --proxy http://192.168.1.100:3128 --cacert squid-ca-cert.pem  https://google.com
<HTML><HEAD><meta http-equiv="content-type" content="text/html;charset=utf-8">
<TITLE>301 Moved</TITLE></HEAD><BODY>
<H1>301 Moved</H1>
The document has moved
<A HREF="https://www.google.com/">here</A>.
</BODY></HTML>
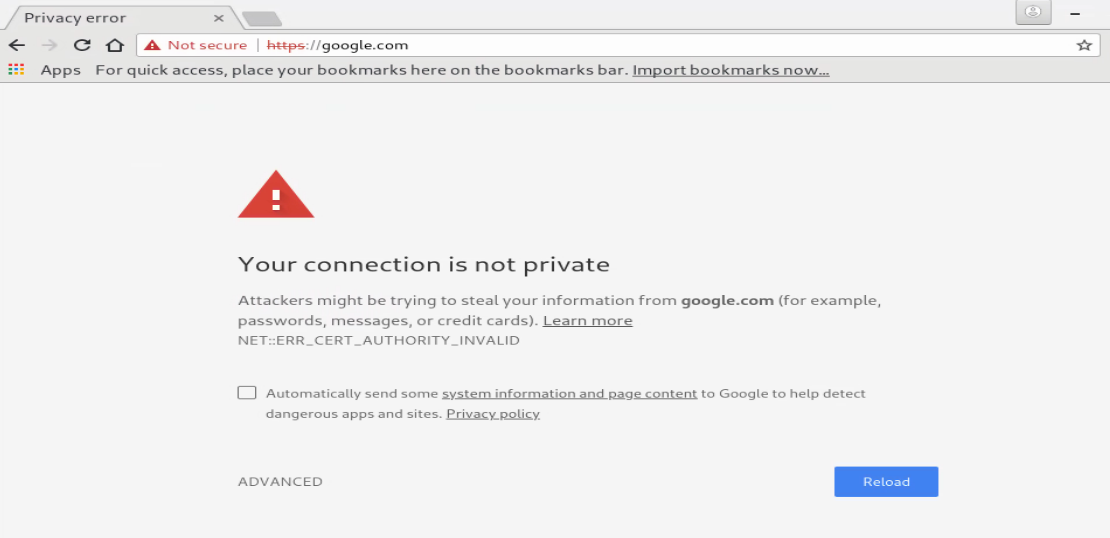
Now if we try with a browser, first specify the proxy server, in Linux we can start chrome with the following parameter:
<> google-chrome-stable --proxy-server=192.168.1.100:3128
and by default you will see an SSL warning:
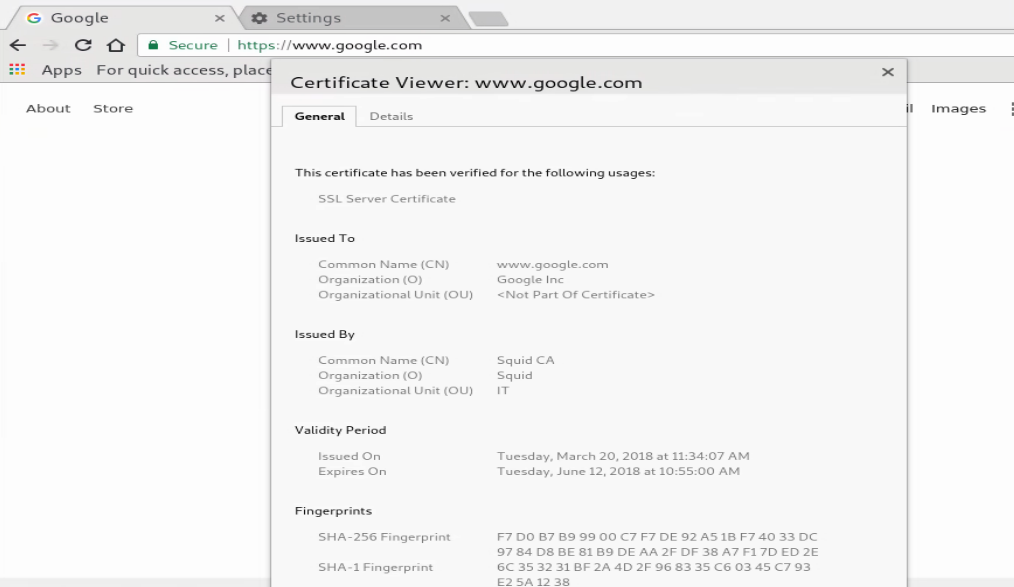
So in the address bat enter chrome://settings/certificates, and then import the CA certificate under the Authorities section, and make sure you choose this certificate to validate websites:

Lastly confirm the certificate is imported:

Now if you go to any site, your browser will trust the Squid CA as Squid will generate a dynamic cert for that hostname:
Check out Squid Logs
After your browser is configured to use Squid as it’s proxy you can check out the access logs to confirm it’s proxying the connections:
<> tail -f /var/log/squid/access.log
1523141358.587     51 192.168.1.107 TAG_NONE/200 0 CONNECT clientservices.googleapis.com:443 - HIER_DIRECT/172.217.11.227 -
1523141358.587     47 192.168.1.107 TAG_NONE/200 0 CONNECT translate.googleapis.com:443 - HIER_DIRECT/172.217.11.234 -
1523141358.631     15 192.168.1.107 TCP_MISS/200 1563 GET https://translate.googleapis.com/translate_a/l? - HIER_DIRECT/172.217.11.234 application/json
Using a proxy auto-config (PAC) file to Specify Proxy Settings
Most of the browsers support specifying a URL for a pac file. A PAC file is a fancy java script file which allows you to make additional choices as to when you would like to use a Proxy. For example you can check the IP of the client, and which URL the client is heading to and then either go through the proxy or forward the client directly to the destination URL. There are a bunch of good examples:
Borrowing most of the content from one of the above sites, here is what I ended up with:
<> cat proxy.pac
function FindProxyForURL(url, host) {

/* Normalize the URL for pattern matching */
url = url.toLowerCase();
host = host.toLowerCase();

/* Don't proxy local hostnames */
if (isPlainHostName(host)) {
  return 'DIRECT';
}

/* Don't proxy local domains */
if (dnsDomainIs(host, ".kar.int") || (host == "kar.int")) {
  return 'DIRECT';
}

/* Don't proxy Windows Update */
if ((host == "download.microsoft.com") || (host == "ntservicepack.microsoft.com") ||
(host == "cdm.microsoft.com") || (host == "wustat.windows.com") ||
(host == "windowsupdate.microsoft.com") || (dnsDomainIs(host, ".windowsupdate.microsoft.com")) ||
(host == "update.microsoft.com") || (dnsDomainIs(host, ".update.microsoft.com")) ||
(dnsDomainIs(host, ".windowsupdate.com"))) {
  return 'DIRECT';
}

if (isResolvable(host)) {
var hostIP = dnsResolve(host);

/* Don't proxy non-routable addresses (RFC 3330) */
if (isInNet(hostIP, '0.0.0.0', '255.0.0.0') || isInNet(hostIP, '10.0.0.0', '255.0.0.0') ||
isInNet(hostIP, '127.0.0.0', '255.0.0.0') || isInNet(hostIP, '169.254.0.0', '255.255.0.0') ||
isInNet(hostIP, '172.16.0.0', '255.240.0.0') || isInNet(hostIP, '192.168.0.0', '255.255.0.0') ||
isInNet(hostIP, '198.18.0.0', '255.254.0.0') || isInNet(hostIP, '224.0.0.0', '240.0.0.0') ||
isInNet(hostIP, '240.0.0.0', '240.0.0.0')) {
  return 'DIRECT';
}

/* Don't proxy local addresses.*/
if (false) {
  return 'DIRECT';
}
}

if (url.substring(0, 5) == 'http:' || url.substring(0, 6) == 'https:' ||
url.substring(0, 4) == 'ftp:') {
  return 'PROXY 192.168.1.100:3128';
}

return 'DIRECT';
}
You can also use a tool called pactester to see the result of the pac file:
<> pactester -p proxy.pac -u https://google.com
PROXY 192.168.1.100:3128
Now you just need to host that file on a webserver and when starting the chrome browser you can just pass the location of the file, here is an example:
<> google-chrome-stable --proxy-pac-url=http://10.0.0.2/proxy.pac
Or manually enter it in the chrome setting section.
Secure Proxy Connections
One thing that I thought was interesting, was that most browsers don’t support an HTTPS connection to a proxy server, so with chrome you actually need to specify it with a pac file or use a socks proxy. From Encrypted browser-Squid connection:
While HTTPS design efforts were focused on end-to-end communication, it would also be nice to be able to encrypt the browser-to-proxy connection (without creating a CONNECT tunnel that blocks Squid from accessing and caching content). This would allow, for example, a secure use of remote proxies located across a possibly hostile network.
Squid can accept regular proxy traffic using https_port in the same way Squid does it using an http_port directive. Unfortunately, popular modern browsers do not permit configuration of TLS/SSL encrypted proxy connections. There are open bug reports against most of those browsers now, waiting for support to appear. If you have any interest, please assist browser teams with getting that to happen.
Meanwhile, tricks using stunnel or SSH tunnels are required to encrypt the browser-to-proxy connection before it leaves the client machine. These are somewhat heavy on the network and can be slow as a result.
The Chrome browser is able to connect to proxies over SSL connections if configured to use one in a PAC file or command line switch. GUI configuration appears not to be possible (yet).
The Firefox 33.0 browser is able to connect to proxies over TLS connections if configured to use one in a PAC file. GUI configuration appears not to be possible (yet)
From Secure Web Proxy, here is a simple pac file which specifies a secure proxy server:
function FindProxyForURL(url, host) { return "HTTPS secure-proxy.example.com:443"; }
It’s good to know it’s possible.
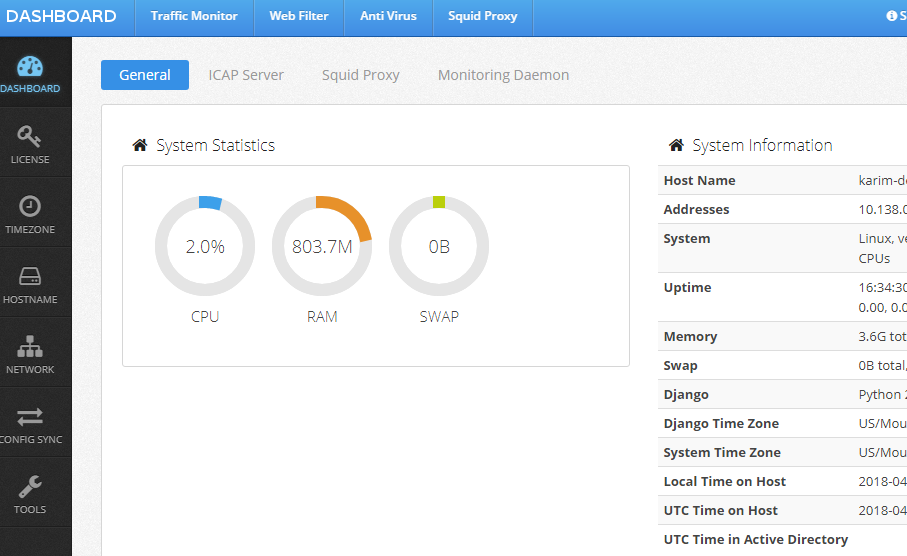
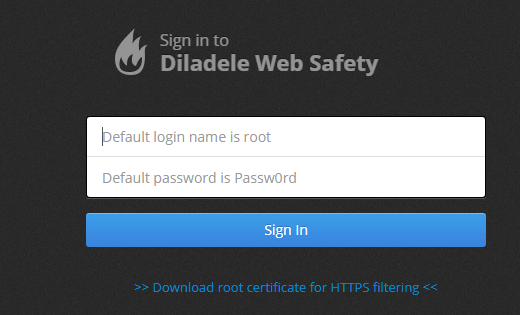
Trying out WebSafety
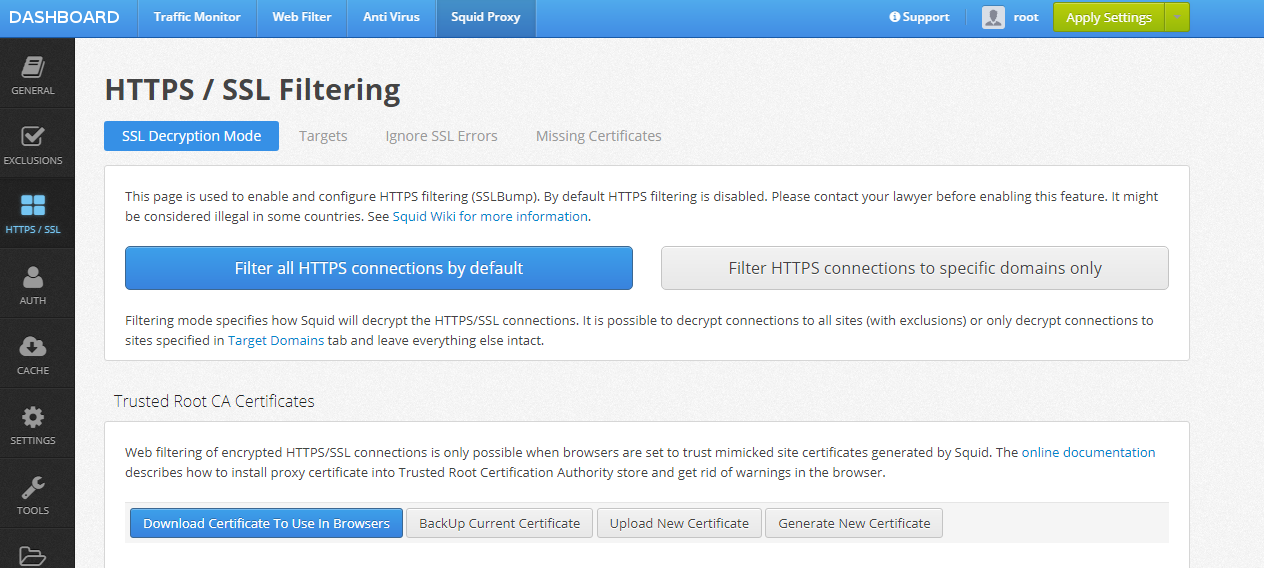
There is a pretty cool product called WebSafety. It integrates really well with Squid to provide advanced web filter options and also a nice UI to configure most of the squid settings. Install instructions cover the setup really well. Everything is configurable through a UI where, for example, you can enable SSL filtering:
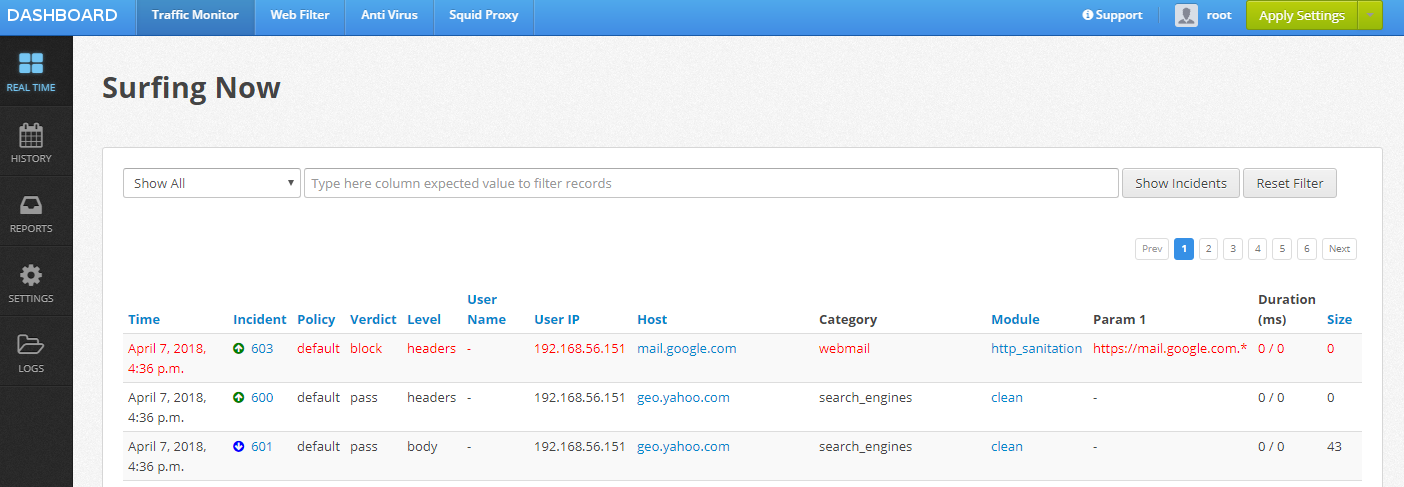
or get a nice overview of the system:
It’s also good at tagging your traffic appropriately. As soon as you visit the admin console it allows you to download the CA certificate that it uses for signing the dynamically generated certificates:
There is a community version but it doesn’t support web filter. You can check out the differences at Community Version. It can show you current traffic and if it blocked anything (if you configured it to do so):