Migrating From ESXi to Proxmox
As I kept migrating to kubernetes, I stopped needing VMware to host my VMs. All I needed was just a hypervisor that runs the VMs, but I didn’t need the fancy bells and whistles any more. I kept reading good things about proxmox and I wanted to give it a try.
Exporting VMs from ESXi
The instructions are covered in Migration of servers to Proxmox VE, so let’s check out the available VMs:
> ovftool vi://root@hp/
Enter login information for source vi://192.168.1.109/
Username: root
Password: ********
Error: Found wrong kind of object (ResourcePool). Possible completions are:
  moxz
  m2
  kerch
  kube2
  na
I initially I tried to export one and received this error:
> ovftool vi://root@hp/moxz moxz.ova
Enter login information for source vi://192.168.1.109/
Username: root
Password: ********
Opening VI source: vi://root@192.168.1.109:443/moxz
Error: Message is: Received SOAP response fault from [<SSL(<io_obj p:0x00007faee40020d8, h:7, <TCP '192.168.1.103 : 40496'>, <TCP '192.168.1.109 : 443'>>), /sdk>]: exportVm
File /vmfs/volumes/f0f262f3-43033e9c-0000-000000000000/freebsd/FreeBSD-12.2-RELEASE-amd64-bootonly.iso was not found,
Fault cause: vim.fault.FileNotFound

Completed with errors
This was due to the fact that is had a left over ISO attached. I deleted the CD drive, retried, and it worked:
> ovftool vi://root@hp/moxz moxz.ova
Enter login information for source vi://192.168.1.109/
Username: root
Password: ********
Opening VI source: vi://root@192.168.1.109:443/moxz
Opening OVA target: moxz.ova
Writing OVA package: moxz.ova
Transfer Completed
Completed successfully
You can check the contents of the OVA like so:
> tar tvf moxz.ova
-rw-r--r-- someone/someone 8838 2023-12-24 13:55 moxz.ovf
-rw-r--r-- someone/someone  264 2023-12-24 13:55 moxz.mf
-rw-r--r-- someone/someone 3944096768 2023-12-24 14:01 moxz-disk1.vmdk
-rw-r--r-- someone/someone       8684 2023-12-24 14:01 moxz-file1.nvram
On another VM I initially received this error:
> ovftool vi://root@hp/m2 m2.ova
Enter login information for source vi://192.168.1.109/
Username: root
Password: ********
Opening VI source: vi://root@192.168.1.109:443/m2
Error:
 - Unknown device: 'PCI device 0'.
Completed with errors
This was a VM that had a pass-through video card:
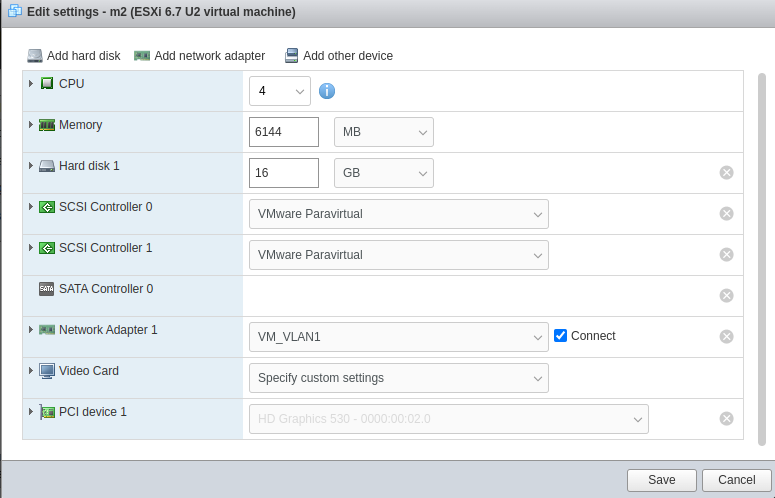
I deleted that and then the export worked.
Gather ESXi Configurations
Networking
I had two standard virtual switches:
[root@hp:~] esxcli network vswitch standard list
vSwitch0
   Name: vSwitch0
   Class: cswitch
   Num Ports: 2816
   Used Ports: 5
   Configured Ports: 128
   MTU: 1500
   CDP Status: listen
   Beacon Enabled: false
   Beacon Interval: 1
   Beacon Threshold: 3
   Beacon Required By:
   Uplinks: vmnic0
   Portgroups: VM_VLAN1, VM Network, VM_VLAN3, Management Network

storage
   Name: storage
   Class: cswitch
   Num Ports: 2816
   Used Ports: 4
   Configured Ports: 1024
   MTU: 9000
   CDP Status: listen
   Beacon Enabled: false
   Beacon Interval: 1
   Beacon Threshold: 3
   Beacon Required By:
   Uplinks: vmnic32
   Portgroups: nfs-for-vm, iscsi
One used for VMs vSwitch0 and another one used for storage storage. Here are the portgroups for each vswitch:
[root@hp:~] esxcli network vswitch standard portgroup list
Name                Virtual Switch  Active Clients  VLAN ID
------------------  --------------  --------------  -------
Management Network  vSwitch0                     1        0
VM Network          vSwitch0                     0        0
VM_VLAN1            vSwitch0                     0        0
VM_VLAN3            vSwitch0                     1        3
iscsi               storage                      1        0
nfs-for-vm          storage                      0        0
I had another VLAN for media related VMs. I hope I can create a similar setup with proxmox. But basically the NIC is connected to a switch port which is a trunk with a default VLAN. So if untagged traffic comes in, it uses VLAN 0. And if tagged traffic comes in, it lets it through.
Storage
For storage I had a dedicated vmknic, which I used for the iSCSI connection:
[root@hp:~] esxcli network ip interface ipv4 address list
Name  IPv4 Address   IPv4 Netmask   IPv4 Broadcast  Address Type  Gateway      DHCP DNS
----  -------------  -------------  --------------  ------------  -----------  --------
vmk0  192.168.1.109  255.255.255.0  192.168.1.255   STATIC        192.168.1.1     false
vmk1  10.1.0.12      255.255.255.0  10.1.0.255      STATIC        0.0.0.0         false
And over that same nic, I also mount an NFS share, which is just used for ISOs and nothing else:
[root@hp:~] esxcli storage nfs41 list
Volume Name  Host(s)   Share          Accessible  Mounted  Read-Only  Security   isPE  Hardware Acceleration
-----------  --------  -------------  ----------  -------  ---------  --------  -----  ---------------------
isos         10.1.0.7  /backups/isos       false    false      false  AUTH_SYS  false  Unknown
Installing proxmox
I downloaded the iso and then I plugged in my USB drive. And then I used dd to install the ISO on there:
> sudo dd if=proxmox-ve_8.1-1.iso of=/dev/sde bs=1M
I booted up from the USB and performed the install, the wizard took care most of the settings. I just needed to provide the management IP and that’s it.
Host Networking Configurations
I reviewed Network Configuration and it talked about the VLAN configurations. So then from UI I added a new bridge which will be my storage bridge. And then I enabled the first bridge to be vlan aware and in the end it had this configuration:
iface eno1 inet manual

auto enx3c18a041c9a7
iface enx3c18a041c9a7 inet manual
    mtu 9000

auto vmbr0
iface vmbr0 inet static
    address 192.168.1.109/24
    gateway 192.168.1.1
    bridge-ports eno1
    bridge-stp off
    bridge-fd 0
    bridge-vlan-aware yes
    bridge-vids 2-4094

auto vmbr1
iface vmbr1 inet static
    address 10.1.0.12/24
    bridge-ports enx3c18a041c9a7
    bridge-stp off
    bridge-fd 0
    mtu 9000
I was able to reach the storage interface and mgmt interface.
Host Storage
To use iSCSI it’s a two step process as discussed in Storage: iSCSI. First you add an iSCSI storage and make sure not to select Use Luns Directly. Then you create an LVM storage type on top of the iSCSI storage. As a quick test make sure you can connect to your storage:
root@pm:~# pvesm scan iscsi 10.1.0.6:3260
iqn.2004-04.com.qnap:tbs-464:iscsi.qnap.7be9ea 10.1.0.6:3260
And after it’s added you will see the pvs created:
# pvs
  PV             VG   Fmt  Attr PSize    PFree
  /dev/nvme0n1p3 pve  lvm2 a--  <475.94g  16.00g
  /dev/sda       qnap lvm2 a--   103.99g 103.99g
Increasing the size of the iSCSI LUN
I modified the size on the storage side and when I ran dmesg, I saw the following:
# dmesg | tail -3
[78027.145174] sd 4:0:0:0: Capacity data has changed
[78038.141383] sd 4:0:0:0: [sda] 419430400 512-byte logical blocks: (215 GB/200 GiB)
[78038.142889] sda: detected capacity change from 218103808 to 419430400
And fdisk saw the new size:
# fdisk -l /dev/sda
Disk /dev/sda: 200 GiB, 214748364800 bytes, 419430400 sectors
Disk model: iSCSI Storage
Units: sectors of 1 * 512 = 512 bytes
Sector size (logical/physical): 512 bytes / 512 bytes
I/O size (minimum/optimal): 512 bytes / 8388608 bytes
Next I needed to update the pvs:
root@pm:~# pvs
  PV             VG   Fmt  Attr PSize    PFree
  /dev/nvme0n1p3 pve  lvm2 a--  <475.94g 16.00g
  /dev/sda       qnap lvm2 a--   103.99g 78.99g
root@pm:~# pvresize /dev/sda
  Physical volume "/dev/sda" changed
  1 physical volume(s) resized or updated / 0 physical volume(s) not resized
root@pm:~# pvs
  PV             VG   Fmt  Attr PSize    PFree
  /dev/nvme0n1p3 pve  lvm2 a--  <475.94g  16.00g
  /dev/sda       qnap lvm2 a--   199.99g 174.99g
And I was able to add new VMs to the Volume Group.
Importing the VM
First let’s add the nfs storage which is where I copied the extracted ova file. Click Datacenter -> Storage -> Add -> NFS:

After adding my NFS store, I was able to able to import my VM. I read the documentation Migration of servers to Proxmox VE:
# qm importovf 200 kerch.ovf local-lvm
  Logical volume "vm-200-disk-0" created.
transferred 0.0 B of 25.0 GiB (0.00%)
transferred 256.0 MiB of 25.0 GiB (1.00%)
transferred 512.0 MiB of 25.0 GiB (2.00%)
transferred 768.0 MiB of 25.0 GiB (3.00%)
transferred 1.0 GiB of 25.0 GiB (4.00%)
...
transferred 25.0 GiB of 25.0 GiB (100.00%)
Guest VM Networking
After the import I added a vmxnet3 NIC and added a VLAN Tag to it:
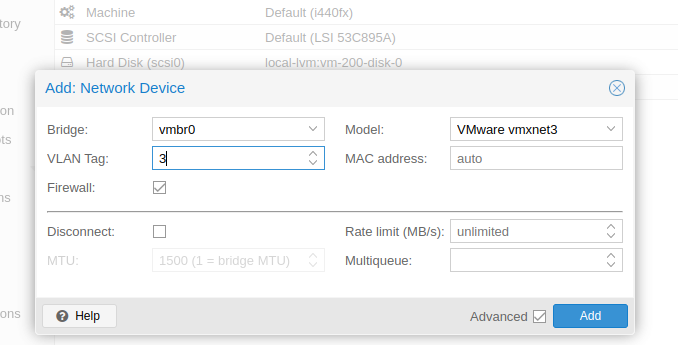
I powered it on, and I was able to reach it just like before:
> ping -c 2 kerch
PING kerch (10.0.0.2) 56(84) bytes of data.
64 bytes from kerch.kar.int (10.0.0.2): icmp_seq=1 ttl=63 time=0.831 ms
64 bytes from kerch.kar.int (10.0.0.2): icmp_seq=2 ttl=63 time=1.07 ms

--- kerch ping statistics ---
2 packets transmitted, 2 received, 0% packet loss, time 1002ms
rtt min/avg/max/mdev = 0.831/0.952/1.074/0.121 ms
On the host you can check the configs of the VM:
root@pm:~# qm config 200
boot: order=scsi0
cores: 2
memory: 2048
name: kerch
net0: vmxnet3=BC:24:11:04:95:CD,bridge=vmbr0,firewall=1,tag=3
scsi0: local-lvm:vm-200-disk-0
smbios1: uuid=a3ccc322-c33b-433f-8d98-e9ce35a04aa7
vmgenid: 3139d61c-6ee8-49bd-bfa9-833ec8d588d3
As a side note, similar config is found at this location:
root@pm:~# cat /etc/pve/nodes/pm/qemu-server/200.conf
boot: order=scsi0
cores: 2
memory: 2048
name: kerch
net0: vmxnet3=BC:24:11:04:95:CD,bridge=vmbr0,firewall=1,tag=3
scsi0: local-lvm:vm-200-disk-0
smbios1: uuid=a3ccc322-c33b-433f-8d98-e9ce35a04aa7
vmgenid: 3139d61c-6ee8-49bd-bfa9-833ec8d588d3
We can see the mac address assigned to my VM is BC:24:11:04:95:CD. Since my VMID is 200, I will see a corresponting tap interface with that ID:
root@pm:~# ip -br l | grep tap200
tap200i0         UNKNOWN        0e:16:73:10:fc:c8 <BROADCAST,MULTICAST,PROMISC,UP,LOWER_UP>
I can also check out my the linux bridge and I should see my mac there:
root@pm:~# brctl show
bridge name    bridge id        STP enabled    interfaces
fwbr200i0        8000.4667c7051a54    no        fwln200i0
                            tap200i0
vmbr0        8000.705a0f42c3e5    no        eno1
                            fwpr200p0
vmbr1        8000.3c18a041c9a7    no        enx3c18a041c9a7

root@pm:~# brctl showmacs vmbr0 | grep -i 95:cd
  2    bc:24:11:04:95:cd    no           8.68
Guest VM Storage
I did a quick dd test, this was just to a local datastore and it was pretty good:
> dd if=/dev/zero of=dd.test bs=1M count=5K
5120+0 records in
5120+0 records out
5368709120 bytes (5.4 GB, 5.0 GiB) copied, 9.86237 s, 544 MB/s
And I saw the lvm group created for the VM:
root@pm:~# lvs
  LV            VG  Attr       LSize    Pool Origin Data%  Meta%  Move Log Cpy%Sync Convert
  data          pve twi-aotz-- <348.82g             7.12   0.66
  root          pve -wi-ao----   96.00g
  swap          pve -wi-ao----    8.00g
  vm-200-disk-0 pve Vwi-aotz--   25.00g data        99.34
And it’s seen as a QEMU disk:
> lsscsi
[2:0:0:0]    disk    QEMU     QEMU HARDDISK    2.5+  /dev/sda
Moving guest disks between storages
The process is fairly easy, you just need to click on the hard disk and click Move Storage (this is also covered in Storage Migration). Initially when I tried I received this warning:

I found a forum on this and I needed to change the disk setting Async IO to native or threads from the default one of io_uring:

After changing that I was able to move the disk to a different storage. After I moved the disk to the iSCSI LVM, while the performance went down, it was still pretty good:
> dd if=/dev/zero of=dd.test bs=1M count=5K
5120+0 records in
5120+0 records out
5368709120 bytes (5.4 GB, 5.0 GiB) copied, 34.1121 s, 157 MB/s