Simple Pipelines with the Harness CI module
I have been using Tekton for a while now and I wanted to try another tool just to compare. After some research I decided to try harness. They have a free offering with some limits, but I think the limits are pretty good. One last note is that you cannot use the harness cloud infrastructure if you register with a personal email address, this is covered in Account verification error with Harness Cloud on Free plan. So we have two options:
- Register with a work domain email
- Use a local runner build infrastructure (more on that setup below)
For the purpose of this evaluation I will just concentrate on the Continuous Integration module, since I use argoCD for most of my Continuos Delivery functionatlity. Let’s cover some basic use cases.
Interacting with Git
Harness has a concept of connectors and there are different type of connectors like: cloud providers, artifact registries, code repositories… etc. When connecting to git, we will use the code repositories connector. From their site:
Harness code repository connectors connect your Harness account with your Git SCM provider. Connectors are used to pull code and other important files, such as Helm charts, Kubernetes manifests, and Terraform scripts, from your Git repos.
I was using github for my repos, but I decided to use the ssh authentication approach since it allowed me, not only to pull the repo, but to also push to a repo as well.
Adding a git connector
To configure the git connecter we can follow all the steps in Use the platform-agnostic Git connector. During the creation of the connector you will be asked to point to a secret, which contains the SSH key. All the setup to create an ssh key are covered in Add SSH keys. After it’s done, it will do a test ssh connection to a hostname of your choice, I used github.com:

When adding a git connector and pointing to the above ssh credential it will do a test pull of a respository of your choice and if all is well you should see the connection succeed:

Using the Clone Repo Step
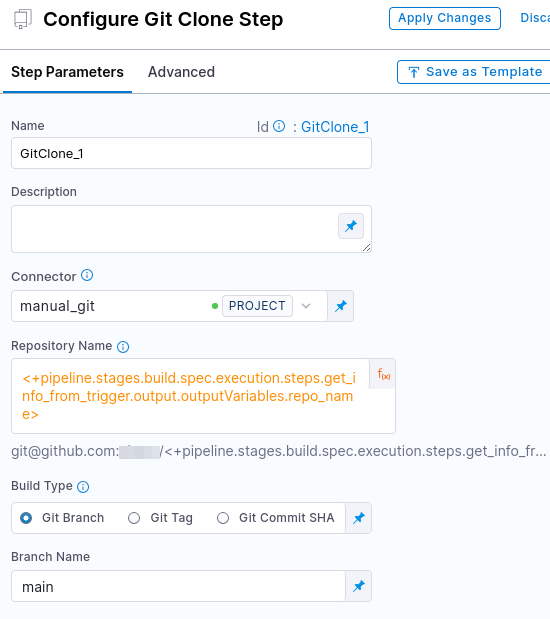
When creating a pipeline, as part of your stage you can create a step and choose the clone repo. At this point you can point to the git connector you created above:

Different Value Types
You will also notice above that I chose a different value which is an expression. You have options of 3: Fixed values, runtime inputs, and expressions.
Reference an output variable with an expression value type
You can use an expression when the value will be dynamically passed from a previous step (like a trigger or another pipeline). In my example the value is: <+pipeline.stages.build.spec.execution.steps.get_info_from_trigger.output.outputVariables.repo_name> and it basically pointing to the output from the previous step in the same stage. From the same site:
Use expressions to reference Harness input, output, and execution variables. These variables represent settings and values that exist in the pipeline before and during execution.
There is also a nice description in Reference an output variable:
Use either of the following expressions to reference an output variable in another step in the same stage:
<+steps.[stepID].output.outputVariables.[varName]>
<+execution.steps.[stepID].output.outputVariables.[varName]>
Use either of the following expressions to reference an output variable in a different stage than the one where it originated:
<+stages.[stageID].spec.execution.steps.[stepID].output.outputVariables.[varName]>
<+pipeline.stages.[stageID].spec.execution.steps.[stepID].output.outputVariables.[varName]>
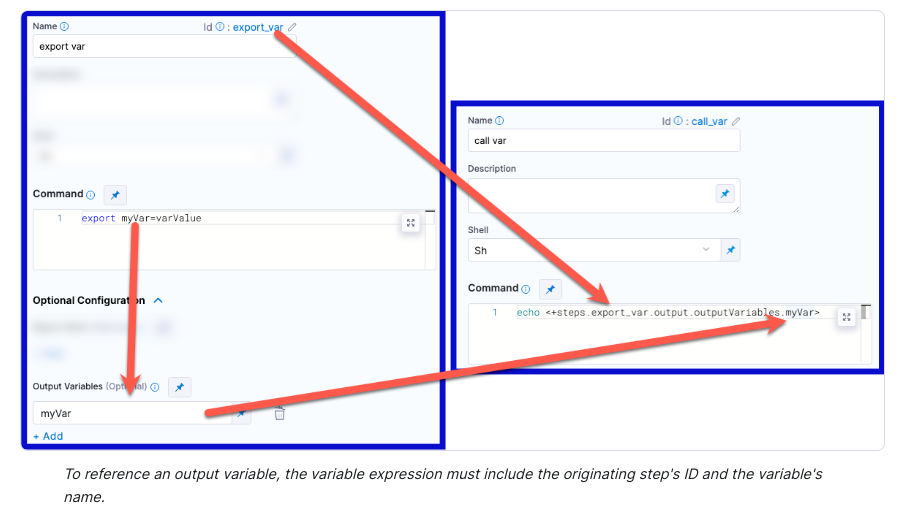
There is also a nice diagram of how to put the whole flow together:

Getting Secrets in a Run Step
In order to push to a repository, I had to manually get the secret with a Run Step, and the process for getting secret in a run step is covered in Add and reference text secrets. Here is how my step looked like:

I first output the secret file to ~/.ssh/id_rsa, like this:
export workspace="/workspace/git-source"
echo '<+secrets.getValue("git_sshkey")>' > ~/.ssh/id_rsa
/usr/bin/chmod 600 ~/.ssh/id_rsa
As a quick test I also ran a quick ssh command:
/usr/bin/ssh -T git@github.com
And that confirms the ssh-key works as intended. Then I run the rest of the git commands manually. That actually worked out for my use case.
Using Triggers
Another cool feature is webhook triggers. After you create the trigger you can get the curl command which will trigger it. There is an example in Trigger a deployment using the cURL command for a custom trigger, it will look something like this:
curl -X POST -H 'content-type: application/json' -H 'X-Api-Key: sample_api_key' --url 'https://app.harness.io/gateway/pipeline/api/webhook/custom/{customWebhookToken}/v3?accountIdentifier=H5W8iol5TNWc4G9h5A2MXg&orgIdentifier=default&projectIdentifier=CD_Docs&pipelineIdentifier=Custom&triggerIdentifier=Custom' -d '{"sample_key": "sample_value"}'
The data you pass in, can later be passed from the trigger to your pipeline. This is covered in Passing data in custom triggers, so if you pass in something like this:
-d '{"artifact_image": "some_value"}'
You can then pass that into an environment variable like this:
<+trigger.payload.artifact_image>
And use that in any step of the stage.
Conditional Step or Step Groups
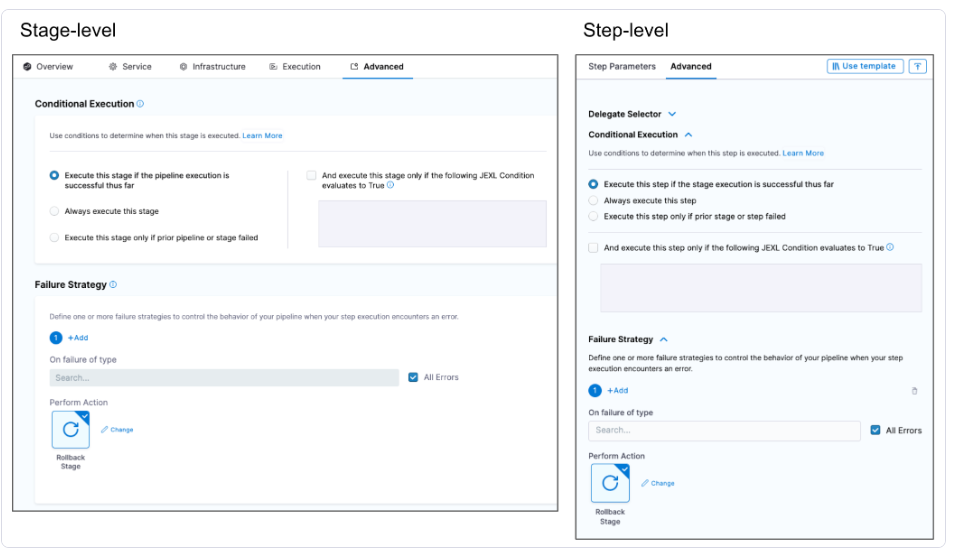
Every step has a condition. This is covered in Stage and step conditional execution settings. Here is screenshot of the configuration:

And the conditions can be similar to expressions. Here are examples of the expression:
<+pipeline.stages.cond.spec.execution.steps.echo.status> == "SUCCEEDED"
<+environment.name> != "QA"
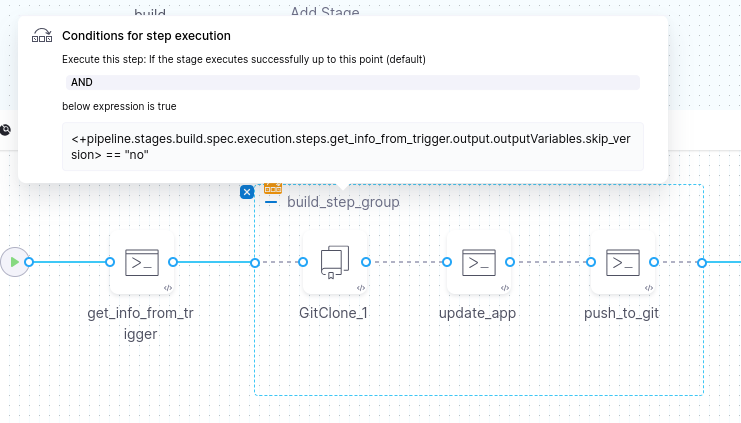
I created an output variable from one of the steps and used that for subsequent steps. On top of that you can create Step Groups, which allow you to create parallel or serial steps grouped together and then when you create a condition on the group it will apply to all the steps in that Step Group:

Building and Pushing to Dockerhub
You can use the Build and Push an image to Docker Registry step to build a container. One thing to note, by default the harness account will have an anonymous docker hub registry connector and if you want to push to your account you have to update the connector with your credentials:

The instructions on the configuration are covered in Configure Harness to always use credentials to pull Harness images
Running Local Builders
If you run out of credits or you end up registering using a personal email you can also create docker local builders. The steps are covered in Set up a local runner build infrastructure. It’s a two step process: install a delegate and install the runner.
Install the Delegate
To install the delegate follow instructions in Install the delegate. After docker is installed, just run this:
docker run --restart=always -d --cpus=1 --memory=2g --net=host \
  -e DELEGATE_NAME=docker-delegate \
  -e NEXT_GEN="true" \
  -e DELEGATE_TYPE="DOCKER" \
  -e ACCOUNT_ID=SDS \
  -e DELEGATE_TOKEN=SDS \
  -e LOG_STREAMING_SERVICE_URL=https://app.harness.io/log-service/ \
  -e DELEGATE_TAGS="linux-amd64" \
  -e MANAGER_HOST_AND_PORT=https://app.harness.io/ harness/delegate:23.02.78306
Install the Docker Runner
Next we need to install the runner, the steps are covered in Install the Harness Docker Runner. After you download the binary you can just run this:
chmod +x harness-docker-runner-linux-amd64
nohup ./harness-docker-runner-linux-amd64 server >log.txt 2>&1 &
After you run that you can check the status like so:
> curl http://localhost:3000/healthz
{
  "version": "0.1.2",
  "docker_installed": true,
  "git_installed": true,
  "lite_engine_log": "no log file at /var/log/lite-engine.log",
  "ok": true
}
You can also confirm the delegate container is running:
> docker ps
CONTAINER ID   IMAGE                          COMMAND        CREATED      STATUS      PORTS     NAMES
f4b3f24bfed8   harness/delegate:24.01.82108   "./start.sh"   2 days ago   Up 2 days             clever_rubin
And the delegate should show up as successfully connected in harness:

That about covers some of the use cases that I tested out. Overall I really enjoyed using Harness.io and the Visual Pipeline editor was really nifty in helping visualize the flow of the CI steps.