OpenStack, Ansible, and Kolla on Ubuntu 16.04
OpenStack and Ansible
Initially I wanted to play around with a pure Ansible deployment for OpenStack. As I kept reading up on it, I realized it will require a lot of resources and it actually involved a pretty compex configuration. From Quick Start:
Absolute minimum server resources (currently used for gate checks):
- 8 vCPU’s
- 50GB free disk space on the root partition
- 8GB RAM
Recommended server resources:
- CPU/motherboard that supports hardware-assisted virtualization
- 8 CPU Cores
- 80GB free disk space on the root partition, or 60GB+ on a blank secondary disk. Using a secondary disk requires the use of the bootstrap_host_data_disk_device parameter.
- 16GB RAM
And also from Appendix A: Example test environment configuration here is a sample deployment:
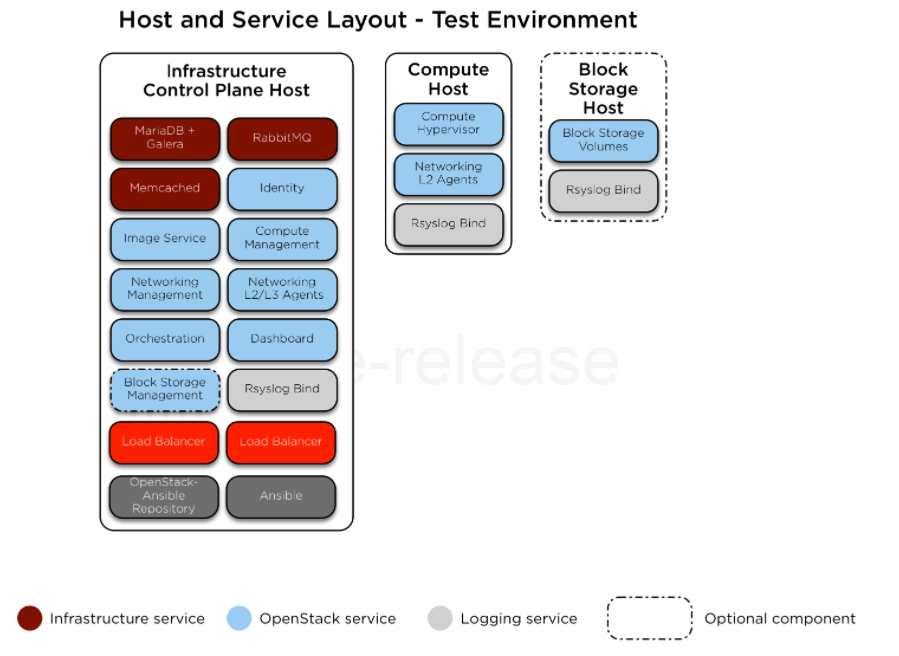
On top of the regular compute and controller nodes there are also infrastructure nodes and services. That’s probably why it requires so many resources. So I wonderered if there was a different project that was less resources intensive.
As a side note looks like there is another project that uses ansible as well: khaleesi
OpenStack Kolla
I ran into another project called Kolla which also uses ansible for the provisioning of OpenStack but it also integrates with docker, which save a lot of resources. Here are some sites that go over the setup:
- Quick Start
- Installation of kolla for openstack in docker
- Kolla: Openstack in Docker containers with Ansible playbooks
Installing Kolla
I started with a base Ubuntu 16.04 OS and went from there. I had two NICs on the VM (ens160 would be the provider network and ens192 would be the management network). Here is the network setup I ended up with:
root@osa:~# cat /etc/network/interfaces
# This file describes the network interfaces available on your system
# and how to activate them. For more information, see interfaces(5).

source /etc/network/interfaces.d/*

# The loopback network interface
auto lo
iface lo inet loopback

# The primary network interface
auto ens192
iface ens192 inet static
  address 192.168.1.125
  netmask 255.255.255.0
  gateway 192.168.1.1
  dns-nameserver 192.168.1.1

auto ens160
iface ens160 inet manual
up ip link set dev ens160 up
down ip link set dev ens160 down
Before starting the install I decided to clean up any lxc packages:
apt-get remove --purge lxd-client lxcfs
Then after that I just followed the Kolla-Ansible Deployment Guide. First let’s install pip:
apt-get update
apt-get install python-pip
pip install -U pip
apt-get install python-dev libffi-dev gcc libssl-dev
Next let’s install ansible:
apt-get install ansible
Now let’s install docker:
curl -sSL https://get.docker.io | bash
Next create a config for systemd for kolla and docker:
mkdir -p /etc/systemd/system/docker.service.d
tee /etc/systemd/system/docker.service.d/kolla.conf <<-'EOF'
[Service]
MountFlags=shared
EOF
Restart daemon to apply:
systemctl daemon-reload
systemctl restart docker
Now let’s install docker-py
pip install -U docker-py
And lastly let’s install kolla:
pip install kolla-ansible
The guide mentioned that the versions are pretty specific, so here is what I ended up with:
### Docker
root@osa:~# docker --version
Docker version 1.12.6, build 78d1802

## Pip
root@osa:~# pip --version
pip 9.0.1 from /usr/local/lib/python2.7/dist-packages (python 2.7)

## docker-py
root@osa:~# pip show docker-py
Name: docker-py
Version: 1.10.6

## Ansible
root@osa:~# ansible --version
ansible 2.3.1.0
  config file =
  configured module search path = Default w/o overrides
  python version = 2.7.12 (default, Nov 19 2016, 06:48:10) [GCC 5.4.0 20160609]

## Kolla Ansible
root@osa:~# pip show kolla-ansible
Name: kolla-ansible
Version: 4.0.2
And luckily those versions worked out for me.
Configure Kolla
First let’s copy the sample configs:
cp -r /usr/local/share/kolla-ansible/etc_examples/kolla /etc/kolla/
cp /usr/local/share/kolla-ansible/ansible/inventory/all-in-one .
Then I configured the networking:
root@osa:~# grep -vE '^$|^#' /etc/kolla/globals.yml
--
kolla_internal_vip_address: "10.10.10.254"
network_interface: "ens192"
neutron_external_interface: "ens160"
designate_backend: "bind9"
designate_ns_record: "sample.openstack.org"
tempest_image_id:
tempest_flavor_ref_id:
tempest_public_network_id:
tempest_floating_network_name:
Then I generated all the password for the deployment:
root@osa:~# kolla-genpwd
Next we can bootstrap the environment:
root@osa:~# kolla-ansible -i all-in-one bootstrap-servers
TASK [baremetal : Reboot] ******************************************************
skipping: [localhost]

PLAY RECAP *********************************************************************
localhost                  : ok=33   changed=17   unreachable=0    failed=0
Next we can pull all the images that we need for the ansible containers:
kolla-ansible pull
Initially I ran into this error during the pull
fatal: [localhost]: FAILED! => {"changed": false, "failed": true, "msg": "Unknown error message: Tag 4.0.2 not found in repository docker.io/kolla/centos-binary-kolla-toolbox"}
    to retry, use: --limit @/usr/local/share/kolla-ansible/ansible/site.retry

PLAY RECAP *********************************************************************
localhost                  : ok=11   changed=0    unreachable=0    failed=1
So then I updated the config to include a specific version of the tag (4.0.0):
root@osa:~# grep -vE '^$|^#' /etc/kolla/globals.yml
---
kolla_base_distro: "centos"
kolla_install_type: "binary"
openstack_release: "4.0.0"
kolla_internal_vip_address: "10.10.10.254"
network_interface: "ens192"
neutron_external_interface: "ens160"
designate_backend: "bind9"
designate_ns_record: "sample.openstack.org"
tempest_image_id:
tempest_flavor_ref_id:
tempest_public_network_id:
tempest_floating_network_name:
Then it worked out:
root@osa:~# kolla-ansible pull
TASK [octavia : include] **********************************************************************************************************************************************************
skipping: [localhost]

PLAY RECAP ************************************************************************************************************************************************************************
localhost                  : ok=79   changed=14   unreachable=0    failed=0
After that I saw all the images:
root@osa:~# docker images
REPOSITORY                                      TAG                 IMAGE ID            CREATED             SIZE
kolla/centos-binary-neutron-server              4.0.0               8dedaf87d819        3 months ago        727.2 MB
kolla/centos-binary-nova-compute                4.0.0               35da27fc5586        3 months ago        1.233 GB
kolla/centos-binary-neutron-openvswitch-agent   4.0.0               d276dcdfcbb6        3 months ago        726.5 MB
kolla/centos-binary-neutron-metadata-agent      4.0.0               e1c0bf5f7745        3 months ago        703.3 MB
kolla/centos-binary-heat-api                    4.0.0               66332a0e6ad4        3 months ago        643.7 MB
kolla/centos-binary-neutron-dhcp-agent          4.0.0               445442cd0f01        3 months ago        703.3 MB
kolla/centos-binary-neutron-l3-agent            4.0.0               445442cd0f01        3 months ago        703.3 MB
kolla/centos-binary-heat-api-cfn                4.0.0               ce92766d3ff1        3 months ago        643.7 MB
kolla/centos-binary-nova-ssh                    4.0.0               3b0f5591ecc8        3 months ago        723.1 MB
kolla/centos-binary-nova-placement-api          4.0.0               8a16c227e835        3 months ago        755.4 MB
kolla/centos-binary-nova-conductor              4.0.0               65a844b9889e        3 months ago        703.4 MB
kolla/centos-binary-nova-api                    4.0.0               d90b06229654        3 months ago        755.3 MB
kolla/centos-binary-nova-consoleauth            4.0.0               487d0b6926d3        3 months ago        703.6 MB
kolla/centos-binary-nova-scheduler              4.0.0               92bdcfc854ac        3 months ago        703.4 MB
kolla/centos-binary-nova-novncproxy             4.0.0               7f246ab0d8f5        3 months ago        704.1 MB
kolla/centos-binary-kolla-toolbox               4.0.0               d771b993a59b        3 months ago        730.5 MB
kolla/centos-binary-keystone                    4.0.0               9b0c48681973        3 months ago        677.1 MB
kolla/centos-binary-glance-registry             4.0.0               68da81d330c4        3 months ago        757.2 MB
kolla/centos-binary-horizon                     4.0.0               dc5a666631eb        3 months ago        862.8 MB
kolla/centos-binary-haproxy                     4.0.0               420fb3e8ce55        3 months ago        438.9 MB
kolla/centos-binary-cron                        4.0.0               74a89fe112f0        3 months ago        417.8 MB
kolla/centos-binary-openvswitch-db-server       4.0.0               37f21379cad8        3 months ago        439.6 MB
kolla/centos-binary-heat-engine                 4.0.0               ab9138c4719c        3 months ago        643.7 MB
kolla/centos-binary-glance-api                  4.0.0               bc61de7fba03        3 months ago        816 MB
kolla/centos-binary-fluentd                     4.0.0               5b98e39f1285        3 months ago        720.4 MB
kolla/centos-binary-nova-libvirt                4.0.0               b21c5bacfbcf        3 months ago        966.2 MB
kolla/centos-binary-openvswitch-vswitchd        4.0.0               b047dd6e83cd        3 months ago        439.6 MB
kolla/centos-binary-memcached                   4.0.0               927246be7bd2        3 months ago        418.4 MB
kolla/centos-binary-rabbitmq                    4.0.0               c9e9af5a39b9        3 months ago        477.5 MB
kolla/centos-binary-mariadb                     4.0.0               7c9305397257        3 months ago        807.8 MB
kolla/centos-binary-keepalived                  4.0.0               b8fb9f966ac4        3 months ago        423.3 MB
lastly I gave it a VIP (this was an available IP on my management network):
root@osa:~# grep -vE '^$|^#' /etc/kolla/globals.yml
---
kolla_base_distro: "centos"
kolla_install_type: "binary"
openstack_release: "4.0.0"
kolla_internal_vip_address: "192.168.1.126"
network_interface: "ens192"
neutron_external_interface: "ens160"
designate_backend: "bind9"
designate_ns_record: "sample.openstack.org"
tempest_image_id:
tempest_flavor_ref_id:
tempest_public_network_id:
tempest_floating_network_name:
I also confirmed my nested virtualization config was okay:
root@osa:~# egrep -c '(vmx|svm)' /proc/cpuinfo
4
Deploy All-In-One OpenStack setup with Kolla
First make sure all the pre-checks are okay:
root@osa:~# kolla-ansible prechecks -i all-in-one
TASK [octavia : include] **********************************************************************************************************************************************************
skipping: [localhost]

PLAY RECAP ************************************************************************************************************************************************************************
localhost                  : ok=124  changed=0    unreachable=0    failed=0
And then the deploy went through:
root@osa:~# kolla-ansible deploy -i all-in-one
TASK [Gathering Facts] ************************************************************************************************************************************************************
ok: [localhost]

TASK [octavia : include] **********************************************************************************************************************************************************
skipping: [localhost]

PLAY RECAP ************************************************************************************************************************************************************************
localhost                  : ok=263  changed=131  unreachable=0    failed=0
Here were all the different containers running:
root@osa:~# docker ps
CONTAINER ID        IMAGE                                                 COMMAND             CREATED             STATUS              PORTS               NAMES
c1ebda4a773b        kolla/centos-binary-horizon:4.0.0                     "kolla_start"       2 minutes ago       Up 2 minutes                            horizon
e005fcfdbad3        kolla/centos-binary-heat-engine:4.0.0                 "kolla_start"       2 minutes ago       Up 2 minutes                            heat_engine
f581b0d962df        kolla/centos-binary-heat-api-cfn:4.0.0                "kolla_start"       2 minutes ago       Up 2 minutes                            heat_api_cfn
a9b5b36c8078        kolla/centos-binary-heat-api:4.0.0                    "kolla_start"       2 minutes ago       Up 2 minutes                            heat_api
6e61b878a94e        kolla/centos-binary-neutron-metadata-agent:4.0.0      "kolla_start"       2 minutes ago       Up 2 minutes                            neutron_metadata_agent
2c01fe2409c9        kolla/centos-binary-neutron-l3-agent:4.0.0            "kolla_start"       2 minutes ago       Up 2 minutes                            neutron_l3_agent
5388b0c11a67        kolla/centos-binary-neutron-dhcp-agent:4.0.0          "kolla_start"       2 minutes ago       Up 2 minutes                            neutron_dhcp_agent
e4cc9a523d08        kolla/centos-binary-neutron-openvswitch-agent:4.0.0   "kolla_start"       2 minutes ago       Up 2 minutes                            neutron_openvswitch_agent
3950ed5e42e0        kolla/centos-binary-neutron-server:4.0.0              "kolla_start"       2 minutes ago       Up 2 minutes                            neutron_server
7cb240c91b8e        kolla/centos-binary-openvswitch-vswitchd:4.0.0        "kolla_start"       2 minutes ago       Up 2 minutes                            openvswitch_vswitchd
0b90f77ab423        kolla/centos-binary-openvswitch-db-server:4.0.0       "kolla_start"       2 minutes ago       Up 2 minutes                            openvswitch_db
4d43c83d1eec        kolla/centos-binary-nova-compute:4.0.0                "kolla_start"       3 minutes ago       Up 3 minutes                            nova_compute
40f51310b550        kolla/centos-binary-nova-novncproxy:4.0.0             "kolla_start"       3 minutes ago       Up 3 minutes                            nova_novncproxy
bc813842df2e        kolla/centos-binary-nova-consoleauth:4.0.0            "kolla_start"       3 minutes ago       Up 3 minutes                            nova_consoleauth
1d881c584109        kolla/centos-binary-nova-conductor:4.0.0              "kolla_start"       3 minutes ago       Up 3 minutes                            nova_conductor
95c455a05042        kolla/centos-binary-nova-scheduler:4.0.0              "kolla_start"       3 minutes ago       Up 3 minutes                            nova_scheduler
753820302c38        kolla/centos-binary-nova-api:4.0.0                    "kolla_start"       3 minutes ago       Up 3 minutes                            nova_api
381eb5c9d594        kolla/centos-binary-nova-placement-api:4.0.0          "kolla_start"       3 minutes ago       Up 3 minutes                            placement_api
90a9634eeeb9        kolla/centos-binary-nova-libvirt:4.0.0                "kolla_start"       3 minutes ago       Up 3 minutes                            nova_libvirt
cc2b0eb696e5        kolla/centos-binary-nova-ssh:4.0.0                    "kolla_start"       3 minutes ago       Up 3 minutes                            nova_ssh
a006fa5186e8        kolla/centos-binary-glance-registry:4.0.0             "kolla_start"       4 minutes ago       Up 4 minutes                            glance_registry
b1c1feebf57f        kolla/centos-binary-glance-api:4.0.0                  "kolla_start"       4 minutes ago       Up 4 minutes                            glance_api
b5856049f78b        kolla/centos-binary-keystone:4.0.0                    "kolla_start"       4 minutes ago       Up 4 minutes                            keystone
a5f259c43cdb        kolla/centos-binary-rabbitmq:4.0.0                    "kolla_start"       4 minutes ago       Up 4 minutes                            rabbitmq
54a30f980d1f        kolla/centos-binary-mariadb:4.0.0                     "kolla_start"       5 minutes ago       Up 5 minutes                            mariadb
a76d807f388b        kolla/centos-binary-memcached:4.0.0                   "kolla_start"       5 minutes ago       Up 5 minutes                            memcached
4889622524d7        kolla/centos-binary-keepalived:4.0.0                  "kolla_start"       5 minutes ago       Up 5 minutes                            keepalived
9fabcf0c76f5        kolla/centos-binary-haproxy:4.0.0                     "kolla_start"       5 minutes ago       Up 5 minutes                            haproxy
39d46895177b        kolla/centos-binary-cron:4.0.0                        "kolla_start"       5 minutes ago       Up 5 minutes                            cron
82f06a257ba4        kolla/centos-binary-kolla-toolbox:4.0.0               "kolla_start"       5 minutes ago       Up 5 minutes                            kolla_toolbox
42f80c86d8bb        kolla/centos-binary-fluentd:4.0.0                     "kolla_start"       5 minutes ago       Up 5 minutes                            fluentd
Now let’s generate the source files to connect to OpenStack as the admin user:
root@osa:~# kolla-ansible post-deploy
Post-Deploying Playbooks : ansible-playbook -i /usr/local/share/kolla-ansible/ansible/inventory/all-in-one -e @/etc/kolla/globals.yml -e @/etc/kolla/passwords.yml -e CONFIG_DIR=/etc/kolla  /usr/local/share/kolla-ansible/ansible/post-deploy.yml

PLAY [Creating admin openrc file on the deploy node] ******************************************************************************************************************************

TASK [Gathering Facts] ************************************************************************************************************************************************************
ok: [localhost]

TASK [template] *******************************************************************************************************************************************************************
changed: [localhost]

PLAY RECAP ************************************************************************************************************************************************************************
localhost                  : ok=2    changed=1    unreachable=0    failed=0
To check out the setup so far you can install the openstack client
root@osa:~# pip install python-openstackclient
root@osa:~# openstack --version
openstack 3.11.0
And then source the setup file:
root@osa:~# source /etc/kolla/admin-openrc.sh
And then make sure you can check out some of the settings:
root@osa:~# openstack compute service list
+----+------------------+------+----------+---------+-------+----------------------------+
| Id | Binary           | Host | Zone     | Status  | State | Updated At                 |
+----+------------------+------+----------+---------+-------+----------------------------+
|  1 | nova-scheduler   | osa  | internal | enabled | up    | 2017-07-02T03:21:47.000000 |
|  2 | nova-consoleauth | osa  | internal | enabled | up    | 2017-07-02T03:21:48.000000 |
|  3 | nova-conductor   | osa  | internal | enabled | up    | 2017-07-02T03:21:49.000000 |
|  6 | nova-compute     | osa  | nova     | enabled | up    | 2017-07-02T03:21:50.000000 |
+----+------------------+------+----------+---------+-------+----------------------------+
Configure OpenStack After the Kolla Deployment
There is a nice script which does an initial setup of all the initial networks, flavors, and images. Just copy it over, modify it to fit your needs, and run it. I just modified the following settings:
root@osa:~# cp /usr/local/share/kolla-ansible/init-runonce .
root@osa:~# grep IMAGE_URL= init-runonce -A 6
IMAGE_URL=http://download.cirros-cloud.net/0.3.4/
IMAGE=cirros-0.3.4-x86_64-disk.img
IMAGE_NAME=cirros
EXT_NET_CIDR='10.0.0.0/24'
EXT_NET_RANGE='start=10.0.0.150,end=10.0.0.199'
EXT_NET_GATEWAY='10.0.0.1'
root@osa:~# grep 172 init-runonce -B 1
openstack network create --provider-network-type vxlan demo-net
openstack subnet create --subnet-range 172.24.0.0/24 --network demo-net \
    --gateway 172.24.0.1 --dns-nameserver 10.0.0.1 demo-subnet
And then ran the script:
root@osa:~# ./init-runonce
Done.

To deploy a demo instance, run:

openstack server create \
    --image cirros \
    --flavor m1.tiny \
    --key-name mykey \
    --nic net-id=a1d803e7-56c0-4eea-9338-3ad4d2dbc6f5 \
    demo1
So let’s fire up a VM on our compute node (which is also running docker for all the openstack services):
openstack server create \
    --image cirros \
    --flavor m1.tiny \
    --key-name mykey \
    --nic net-id=a1d803e7-56c0-4eea-9338-3ad4d2dbc6f5 \
    demo1
And confirm it’s running:
root@osa:~# openstack server list
+--------------------------------------+-------+--------+----------------------+------------+
| ID                                   | Name  | Status | Networks             | Image Name |
+--------------------------------------+-------+--------+----------------------+------------+
| 84871338-e76c-4881-a0b6-a772ab62abcb | demo1 | ACTIVE | demo-net=172.24.0.10 | cirros     |
+--------------------------------------+-------+--------+----------------------+------------+
Making OpenStack Changes after the Kolla Deployment
So initially I ran into the issue with the VM not booting, so I decided to use qemu (added one more option since it was mentioned here), here are the configs:
mkdir -p /etc/kolla/config/nova
cat << EOF > /etc/kolla/config/nova/nova-compute.conf
[libvirt]
virt_type=qemu
cpu_mode=none
EOF
Reading over Deploy OpenStack Designate with Kolla site, I could just do this:
kolla-ansible reconfigure -i all-in-one --tags nova
If you don’t want to wait for the reconfigure, I also read over Post-Deployment Configuration Changes Are Not Automatically Copied to Containers and Deploying OpenStack using Docker containers with Hyper-V and Kolla and you could just restart the impacted container:
root@osa:~# docker ps --format 'table {{.Names}}' | grep nova
nova_compute
nova_novncproxy
nova_consoleauth
nova_conductor
nova_scheduler
nova_api
nova_libvirt
nova_ssh

root@osa:~# docker restart nova_compute
I took the reconfigure approach:
root@osa:~# kolla-ansible reconfigure -i all-in-one --tags nova
TASK [octavia : include] ***********************************************************************************************************************************************************************************************************
skipping: [localhost]

PLAY RECAP *************************************************************************************************************************************************************************************************************************
localhost                  : ok=141  changed=2    unreachable=0    failed=0
And I saw the appropriate node restarted automatically:
root t@osa:~# docker ps -f name="compute"
CONTAINER ID        IMAGE                                    COMMAND             CREATED             STATUS              PORTS               NAMES
66747984b5eb        kolla/centos-binary-nova-compute:4.0.0   "kolla_start"       10 minutes ago      Up 22 seconds                            nova_compute
Notice it’s been up for only 22 seconds. I made similar changes to neutron:
root@osa:~# cat /etc/kolla/config/neutron/ml2_conf.ini
[ovs]
enable_tunneling = true
Then for the reconfigure:
root@osa:~# kolla-ansible reconfigure -i all-in-one -t neutron
PLAY RECAP *****************************************************************************************************************************************************************************************************************
localhost                  : ok=151  changed=7    unreachable=0    failed=0
And confirm the containers are restarted:
root@osa:~# docker ps -f name=neutron
CONTAINER ID        IMAGE                                                 COMMAND             CREATED             STATUS              PORTS               NAMES
f85b7aac7597        kolla/centos-binary-neutron-metadata-agent:4.0.0      "kolla_start"       4 hours ago         Up 40 seconds                           neutron_metadata_agent
b21ea8839a67        kolla/centos-binary-neutron-l3-agent:4.0.0            "kolla_start"       4 hours ago         Up 42 seconds                           neutron_l3_agent
13b67d701d0c        kolla/centos-binary-neutron-dhcp-agent:4.0.0          "kolla_start"       4 hours ago         Up 53 seconds                           neutron_dhcp_agent
92452b6a66be        kolla/centos-binary-neutron-openvswitch-agent:4.0.0   "kolla_start"       4 hours ago         Up 58 seconds                           neutron_openvswitch_agent
40e8ed916391        kolla/centos-binary-neutron-server:4.0.0              "kolla_start"       4 hours ago         Up 59 seconds                           neutron_server
Confirm Instance is deployed in OpenStack
After fixing my nova configuration I saw that the VM booted up and got a DHCP address:
root@osa:~# openstack console log show demo1 | tail -40
/run/cirros/datasource/data/user-data was not '#!' or executable
=== system information ===
Platform: RDO OpenStack Compute
Container: none
Arch: x86_64
CPU(s): 1 @ 3408.101 MHz
Cores/Sockets/Threads: 1/1/1
Virt-type: AMD-V
RAM Size: 491MB
Disks:
NAME MAJ:MIN       SIZE LABEL         MOUNTPOINT
vda  253:0   1073741824
vda1 253:1   1061061120 cirros-rootfs /
=== sshd host keys ===
-----BEGIN SSH HOST KEY KEYS-----
ssh-rsa A= root@demo1
-----END SSH HOST KEY KEYS-----
=== network info ===
if-info: lo,up,127.0.0.1,8,::1
if-info: eth0,up,172.24.0.10,24,fe80::f816:3eff:feb6:be42
ip-route:default via 172.24.0.1 dev eth0
ip-route:169.254.169.254 via 172.24.0.2 dev eth0
ip-route:172.24.0.0/24 dev eth0  src 172.24.0.10
=== datasource: ec2 net ===
instance-id: i-00000002
name: N/A
availability-zone: nova
local-hostname: demo1.novalocal
launch-index: 0
=== cirros: current=0.3.4 latest=0.3.5 uptime=10.87 ===
  ____               ____  ____
 / __/ __ ____ ____ / __ \/ __/
/ /__ / // __// __// /_/ /\ \
\___//_//_/  /_/   \____/___/
   http://cirros-cloud.net


login as 'cirros' user. default password: 'cubswin:)'. use 'sudo' for root.
demo1 login:
And then I was able to ssh into the machine, through the router namespace:
root@osa:~# ip netns
qrouter-ec37ce79-b992-4e37-b53d-7cb8889179ca
qdhcp-4a71fbfd-f1d7-44ba-9c9b-9815316243bd
Here is the connection:
root@osa:~# ip netns exec qrouter-ec37ce79-b992-4e37-b53d-7cb8889179ca ssh cirros@172.24.0.10
The authenticity of host '172.24.0.10 (172.24.0.10)' can't be established.
RSA key fingerprint is SHA256:13TBTZ+/39kBIqrSsCimm/sC+G0mzhRKLbeEZy7lHuM.
Are you sure you want to continue connecting (yes/no)? yes
Warning: Permanently added '172.24.0.10' (RSA) to the list of known hosts.
$ ip -4 a
1: lo: <LOOPBACK,UP,LOWER_UP> mtu 16436 qdisc noqueue
    inet 127.0.0.1/8 scope host lo
2: eth0: <BROADCAST,MULTICAST,UP,LOWER_UP> mtu 1450 qdisc pfifo_fast qlen 1000
    inet 172.24.0.10/24 brd 172.24.0.255 scope global eth0
$ ip l
1: lo: <LOOPBACK,UP,LOWER_UP> mtu 16436 qdisc noqueue
    link/loopback 00:00:00:00:00:00 brd 00:00:00:00:00:00
2: eth0: <BROADCAST,MULTICAST,UP,LOWER_UP> mtu 1450 qdisc pfifo_fast qlen 1000
    link/ether fa:16:3e:b6:be:42 brd ff:ff:ff:ff:ff:ff
Whie I was on the VM, I made sure I could reach out to the internet:
$ ping -c 1 google.com
PING google.com (8.8.8.8): 56 data bytes
64 bytes from 8.8.8.8: seq=0 ttl=57 time=4.439 ms

--- google.com ping statistics ---
1 packets transmitted, 1 packets received, 0% packet loss
round-trip min/avg/max = 4.439/4.439/4.439 ms
Pretty cool.
Networking Traffic Flow
I wanted to see how the openvswitch configuration compares to the linux bridge configuration, so I looked over these pages:
- Connect An Instance to the Physical Network
- Networking in too much detail
- Under the Hood OpenVswitch Scenario 1
- East-west scenario 1: Instances on the same network
- Network Troubleshooting
I liked the image from here on the overall flow:
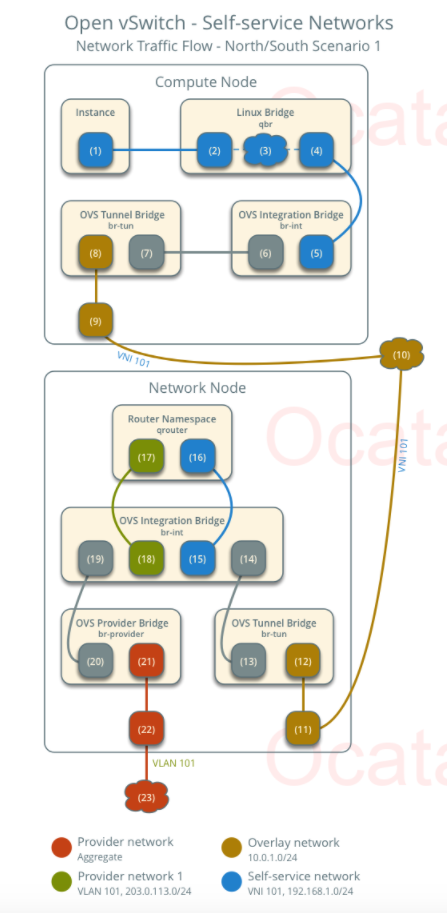
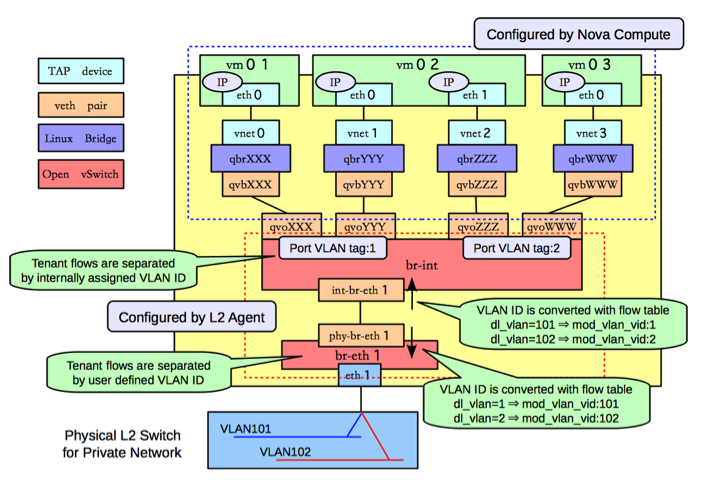
The image from here provides the best overview of all the components involved:
And this page, had the simplest diagram of the traffic flow:
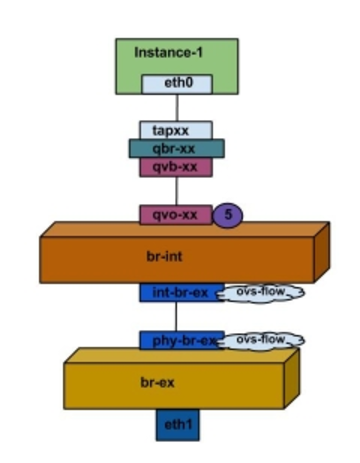
In it’s simplest from, here is a very succint desriction taken from here:
There are four distinct type of virtual networking devices: TAP devices, veth pairs, Linux bridges, and Open vSwitch bridges. For an Ethernet frame to travel from eth0 of virtual machine vm01 to the physical network, it must pass through nine devices inside of the host: TAP vnet0, Linux bridge qbrNNN, veth pair (qvbNNN, qvoNNN), Open vSwitch bridge br-int, veth pair (int-br-eth1, phy-br-eth1), and, finally, the physical network interface card eth1.
1. Packet Leaves VM
From Open vSwitch: Self-service networks
The instance interface (1) forwards the packet to the security group bridge instance port (2) via veth pair.
From Connect An Instance to the Physical Network
Packets leaving the eth0 interface of the instance will first arrive at the linux bridge qbrxx.
From Networking in too much detail:
An outbound packet starts on eth0 of the virtual instance, which is connected to a tap device on the host, tap7c7ae61e-05. This tap device is attached to a Linux bridge device, qbr7c7ae61e-05.
From Under the Hood OpenVswitch Scenario 1:
A TAP device, such as vnet0 is how hypervisors such as KVM and Xen implement a virtual network interface card (typically called a VIF or vNIC). An Ethernet frame sent to a TAP device is received by the guest operating system.
We could do a packet capture on the tap interface to confirm this:
root@osa:~# tcpdump -nne -i tap7060060e-21 icmp
tcpdump: verbose output suppressed, use -v or -vv for full protocol decode
listening on tap7060060e-21, link-type EN10MB (Ethernet), capture size 262144 bytes
11:31:11.729807 fa:16:3e:b6:be:42 > fa:16:3e:43:5c:90, ethertype IPv4 (0x0800), length 98: 172.24.0.10 > 8.8.8.8: ICMP echo request, id 26881, seq 0, length 64
11:31:11.733895 fa:16:3e:43:5c:90 > fa:16:3e:b6:be:42, ethertype IPv4 (0x0800), length 98: 8.8.8.8 > 172.24.0.10: ICMP echo reply, id 26881, seq 0, length 64
2. Packets gets to the Security Group bridge (qbr-xxx)
From the above sites:
Security group rules (3) on the security group bridge handle firewalling and connection tracking for the packet.
Next:
A veth pair is a pair of directly connected virtual network interfaces. An Ethernet frame sent to one end of a veth pair is received by the other end of a veth pair. Networking uses veth pairs as virtual patch cables to make connections between virtual bridges.
Bridge qbr-xx is connected to br-int using veth pair qvb-xx <-> qvo-xxx. This is because the bridge is used to apply the inbound/outbound firewall rules defined by the security group.
And:
Ideally, the TAP device vnet0 would be connected directly to the integration bridge, br-int. Unfortunately, this isn’t possible because of how OpenStack security groups are currently implemented. OpenStack uses iptables rules on the TAP devices such as vnet0 to implement security groups, and Open vSwitch is not compatible with iptables rules that are applied directly on TAP devices that are connected to an Open vSwitch port.
We can check out the iptables rules to see all the forwarding that occurs for that TAP interface:
root@osa:~# iptables -S | grep tap7060060e-21
-A neutron-openvswi-FORWARD -m physdev --physdev-out tap7060060e-21 --physdev-is-bridged -m comment --comment "Direct traffic from the VM interface to the security group chain." -j neutron-openvswi-sg-chain
-A neutron-openvswi-FORWARD -m physdev --physdev-in tap7060060e-21 --physdev-is-bridged -m comment --comment "Direct traffic from the VM interface to the security group chain." -j neutron-openvswi-sg-chain
-A neutron-openvswi-INPUT -m physdev --physdev-in tap7060060e-21 --physdev-is-bridged -m comment --comment "Direct incoming traffic from VM to the security group chain." -j neutron-openvswi-o7060060e-2
-A neutron-openvswi-sg-chain -m physdev --physdev-out tap7060060e-21 --physdev-is-bridged -m comment --comment "Jump to the VM specific chain." -j neutron-openvswi-i7060060e-2
-A neutron-openvswi-sg-chain -m physdev --physdev-in tap7060060e-21 --physdev-is-bridged -m comment --comment "Jump to the VM specific chain." -j neutron-openvswi-o7060060e-2
Here is our qbr-xx bridge with the tap device and the qvb-xx veth interface:
root@osa:~# brctl show
bridge name     bridge id               STP enabled     interfaces
docker0         8000.0242c878ec62       no
qbr7060060e-21  8000.2208ba465650       no              qvb7060060e-21
                                                        tap7060060e-21
We can also do a packet capture on that guy:
root@osa:~# tcpdump -nne -i qbr7060060e-21 icmp
tcpdump: verbose output suppressed, use -v or -vv for full protocol decode
listening on qbr7060060e-21, link-type EN10MB (Ethernet), capture size 262144 bytes
11:39:13.068373 fa:16:3e:b6:be:42 > fa:16:3e:43:5c:90, ethertype IPv4 (0x0800), length 98: 172.24.0.10 > 8.8.8.8: ICMP echo request, id 27137, seq 0, length 64
11:39:13.072324 fa:16:3e:43:5c:90 > fa:16:3e:b6:be:42, ethertype IPv4 (0x0800), length 98: 8.8.8.8 > 172.24.0.10: ICMP echo reply, id 27137, seq 0, length 64
3. Packet gets to the OVS integration bridge (br-int)
From the same sites:
The security group bridge OVS port (4) forwards the packet to the OVS integration bridge security group port (5) via veth pair. The OVS integration bridge adds an internal VLAN tag to the packet. The OVS integration bridge exchanges the internal VLAN tag for an internal tunnel ID.
Next:
A Linux bridge behaves like a simple MAC learning switch: you can connect multiple (physical or virtual) network interfaces devices to a Linux bridge. The Linux bridge uses a MAC caching table to record which interface on the bridge is used to communicate with a host on the link. For any Ethernet frames that come in from one interface attached to the bridge, the host MAC address and port on which the frame was received is recorded in the MAC caching table for a limited time. When the bridge needs to forward a frame, it will check to see if the frame’s destination MAC address is recorded in the table. If so, the Linux bridge forwards the frame through only that port. If not, the frame is flooded to all network ports in the bridge, with the exception of the port where the frame was received.
An Open vSwitch bridge behaves like a virtual switch: network interface devices connect to Open vSwitch bridge’s ports, and the ports can be configured much like a physical switch’s ports, including VLAN configurations.
The br-int Open vSwitch bridge is the integration bridge: all guests running on the compute host connect to this bridge. Networking implements isolation across these guests by configuring the br-int ports.
More:
Interface qvbxx is connected to the qbrxx linux bridge, and qvoxx is connected to the br-int Open vSwitch (OVS) bridge.
And lastly:
A second interface attached to the bridge, qvb7c7ae61e-05, attaches the firewall bridge to the integration bridge, typically named br-int
The integration bridge, br-int, performs VLAN tagging and un-tagging for traffic coming from and to your instances.
The interface qvo7c7ae61e-05 is the other end of qvb7c7ae61e-05, and carries traffic to and from the firewall bridge. The tag: 1 you see in the above output integrates that this is an access port attached to VLAN 1. Untagged outbound traffic from this instance will be assigned VLAN ID 1, and inbound traffic with VLAN ID 1 will stripped of it’s VLAN tag and sent out this port. Each network you create (with neutron net-create) will be assigned a different VLAN ID.
To see the other veth pair, we can check out the openvswitch config:
root@osa:~# docker exec -it openvswitch_vswitchd /bin/bash
(openvswitch-vswitchd)[root@osa /]# ovs-vsctl show
515cbdd4-681e-4f0a-b172-ee4c735c9268
    Bridge br-int
        Controller "tcp:127.0.0.1:6633"
            is_connected: true
        fail_mode: secure
        Port br-int
            Interface br-int
                type: internal
        Port "qg-ed634bc6-87"
            tag: 2
            Interface "qg-ed634bc6-87"
                type: internal
        Port int-br-ex
            Interface int-br-ex
                type: patch
                options: {peer=phy-br-ex}
        Port "qr-5bab859c-e3"
            tag: 1
            Interface "qr-5bab859c-e3"
                type: internal
        Port "qvo7060060e-21"
            tag: 1
            Interface "qvo7060060e-21"
        Port "tapb9135624-f6"
            tag: 1
            Interface "tapb9135624-f6"
                type: internal
        Port patch-tun
            Interface patch-tun
                type: patch
                options: {peer=patch-int}
We can see out tap and qvo-xxx interfaces. And we can see out veth pair using the ip a command:
root@osa:~# ip a | grep qvo
17: qvo7060060e-21@qvb7060060e-21: <BROADCAST,MULTICAST,PROMISC,UP,LOWER_UP> mtu 1450 qdisc noqueue master ovs-system state UP group default qlen 1000
18: qvb7060060e-21@qvo7060060e-21: <BROADCAST,MULTICAST,PROMISC,UP,LOWER_UP> mtu 1450 qdisc noqueue master qbr7060060e-21 state UP group default qlen 1000
We can also see the Tag on the qvo-xxx interface on the openvswitch, from one of the above sites:
Port qvoxx is tagged with the internal VLAN tag associated with the flat provider network. In this example, the VLAN tag is 5. Once the packet reaches qvoxx, the VLAN tag is appended to the packet header.
To check out the traffic on the qvo-xxx port (taken from here), we can do the following on the vswitch container:
(openvswitch-vswitchd)[root@osa /]# ip link add name snooper0 type dummy
(openvswitch-vswitchd)[root@osa /]# ip link set dev snooper0 up
(openvswitch-vswitchd)[root@osa /]# ovs-vsctl add-port br-int snooper0
(openvswitch-vswitchd)[root@osa /]# ovs-vsctl -- set Bridge br-int mirrors=@m  -- --id=@snooper0 \
>   get Port snooper0  -- --id=@qvo7060060e-21 get Port qvo7060060e-21 \
>   -- --id=@m create Mirror name=mymirror select-dst-port=@qvo7060060e-21 \
>   select-src-port=@qvo7060060e-21 output-port=@snooper0 select_all=1
9a6ffaf2-f740-4a71-bc00-29c639b878cc
Then on the host:
root@osa:~# tcpdump -i snooper0 -nne
12:01:45.421184 fa:16:3e:b6:be:42 > fa:16:3e:43:5c:90, ethertype 802.1Q (0x8100), length 102: vlan 1, p 0, ethertype IPv4, 172.24.0.10 > 8.8.8.8: ICMP echo request, id 28417, seq 0, length 64
12:01:45.421203 fa:16:3e:15:99:dc > 78:24:af:7b:1f:08, ethertype 802.1Q (0x8100), length 102: vlan 2, p 0, ethertype IPv4, 10.0.0.152 > 8.8.8.8: ICMP echo request, id 28417, seq 0, length 64
12:01:45.425130 78:24:af:7b:1f:08 > fa:16:3e:15:99:dc, ethertype 802.1Q (0x8100), length 102: vlan 2, p 0, ethertype IPv4, 8.8.8.8 > 10.0.0.152: ICMP echo reply, id 28417, seq 0, length 64
12:01:45.425165 fa:16:3e:43:5c:90 > fa:16:3e:b6:be:42, ethertype 802.1Q (0x8100), length 102: vlan 1, p 0, ethertype IPv4, 8.8.8.8 > 172.24.0.10: ICMP echo reply, id 28417, seq 0, length 64
And you will see the VLAN tag 1 and 2. We can then run the following to remove the port mirror:
(openvswitch-vswitchd)[root@osa /]# ovs-vsctl clear Bridge br-int mirrors
(openvswitch-vswitchd)[root@osa /]# ovs-vsctl del-port br-int snooper0
(openvswitch-vswitchd)[root@osa /]# ip link delete dev snooper0
(openvswitch-vswitchd)[root@osa /]#
5. Packet goes from OVS integration bridge (br-int) to OVS tunnel bridge (br-tun)
From the above sites:
The OVS integration bridge patch port (6) forwards the packet to the OVS tunnel bridge patch port (7).
And
The interface named patch-tun connects the integration bridge to the tunnel bridge, br-tun.
The tunnel bridge translates VLAN-tagged traffic from the integration bridge into GRE tunnels. The translation between VLAN IDs and tunnel IDs is performed by OpenFlow rules installed on br-tun
In general, these rules are responsible for mapping traffic between VLAN ID 1, used by the integration bridge, and tunnel id 2, used by the GRE tunnel.
Or VXLAN in some cases. At this point we can check out the rules on the virtual switch:
(openvswitch-vswitchd)[root@osa /]# ovs-ofctl dump-flows br-tun
NXST_FLOW reply (xid=0x4):
 cookie=0x9e71d200b05c476d, duration=9483.262s, table=0, n_packets=68, n_bytes=5430, idle_age=768, priority=1,in_port=1 actions=resubmit(,2)
 cookie=0x9e71d200b05c476d, duration=9483.262s, table=0, n_packets=0, n_bytes=0, idle_age=9483, priority=0 actions=drop
 cookie=0x9e71d200b05c476d, duration=9483.261s, table=2, n_packets=21, n_bytes=1080, idle_age=768, priority=1,arp,dl_dst=ff:ff:ff:ff:ff:ff actions=resubmit(,21)
 cookie=0x9e71d200b05c476d, duration=9483.260s, table=2, n_packets=12, n_bytes=1052, idle_age=768, priority=0,dl_dst=00:00:00:00:00:00/01:00:00:00:00:00 actions=resubmit(,20)
 cookie=0x9e71d200b05c476d, duration=9483.259s, table=2, n_packets=35, n_bytes=3298, idle_age=2458, priority=0,dl_dst=01:00:00:00:00:00/01:00:00:00:00:00 actions=resubmit(,22)
 cookie=0x9e71d200b05c476d, duration=9483.259s, table=3, n_packets=0, n_bytes=0, idle_age=9483, priority=0 actions=drop
 cookie=0x9e71d200b05c476d, duration=9282.478s, table=4, n_packets=0, n_bytes=0, idle_age=9282, priority=1,tun_id=0xf actions=mod_vlan_vid:1,resubmit(,10)
 cookie=0x9e71d200b05c476d, duration=9483.258s, table=4, n_packets=0, n_bytes=0, idle_age=9483, priority=0 actions=drop
 cookie=0x9e71d200b05c476d, duration=9483.258s, table=6, n_packets=0, n_bytes=0, idle_age=9483, priority=0 actions=drop
 cookie=0x9e71d200b05c476d, duration=9483.257s, table=10, n_packets=0, n_bytes=0, idle_age=9483, priority=1 actions=learn(table=20,hard_timeout=300,priority=1,cookie=0x9e71d200b05c476d,NXM_OF_VLAN_TCI[0..11],NXM_OF_ETH_DST[]=NXM_OF_ETH_SRC[],load:0->NXM_OF_VLAN_TCI[],load:NXM_NX_TUN_ID[]->NXM_NX_TUN_ID[],output:OXM_OF_IN_PORT[]),output:1
 cookie=0x9e71d200b05c476d, duration=9483.257s, table=20, n_packets=12, n_bytes=1052, idle_age=768, priority=0 actions=resubmit(,22)
 cookie=0x9e71d200b05c476d, duration=9483.256s, table=21, n_packets=21, n_bytes=1080, idle_age=768, priority=0 actions=resubmit(,22)
 cookie=0x9e71d200b05c476d, duration=9483.256s, table=22, n_packets=68, n_bytes=5430, idle_age=768, priority=0 actions=drop
I found a couple of sites that talk about the Openflow tables:
- Distributed Virtual Routing – Overview and East/West Routing
- Openstack Neutron using VXLAN
- Troubleshooting OpenStack Neutron Networking, Part One
One of the above page goes over the tables in great detail and actually has a nice diagram:
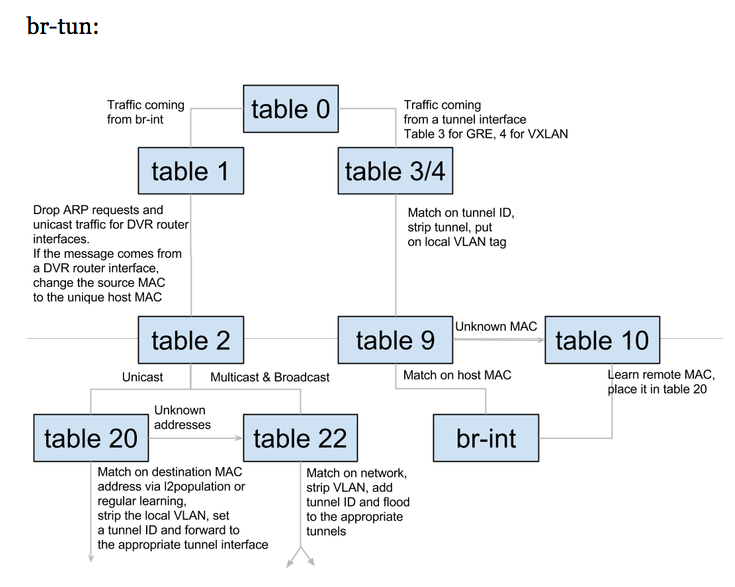
We can see that the br-tun does the translation here between the vxlan (15 or 0xf) and the internal vlan (1).
(openvswitch-vswitchd)[root@osa /]# ovs-ofctl dump-flows br-tun table=4
NXST_FLOW reply (xid=0x4):
 cookie=0x9e71d200b05c476d, duration=9850.233s, table=4, n_packets=0, n_bytes=0, idle_age=9850, priority=1,tun_id=0xf actions=mod_vlan_vid:1,resubmit(,10)
 cookie=0x9e71d200b05c476d, duration=10051.013s, table=4, n_packets=0, n_bytes=0, idle_age=10051, priority=0 actions=drop
The here is the relevant section tun_id=0xf actions=mod_vlan_vid:1, this corresponds to the vxlan 15, which is what our private switch is using:
root@osa:~# openstack network show demo-net -c provider:segmentation_id -c provider:network_type
+--------------------------+-------+
| Field                    | Value |
+--------------------------+-------+
| provider:network_type    | vxlan |
| provider:segmentation_id | 15    |
+--------------------------+-------+
Looking at other examples:
It looks like I should’ve had a vxlan port on my openvswitch, like so:
Bridge br-tun
 Port br-tun
 Interface br-tun
 type: internal
 Port patch-int
 Interface patch-int
 type: patch
 options: {peer=patch-tun}
 Port "vxlan-0a00015c"
 Interface "vxlan-0a00015c"
 type: vxlan
 options: {df_default="true", in_key=flow,
local_ip="10.0.1.81", out_key=flow, remote_ip="10.0.1.92"}
 Port "vxlan-0a00015b"
 Interface "vxlan-0a00015b"
 type: vxlan
 options: {df_default="true", in_key=flow,
local_ip="10.0.1.81", out_key=flow, remote_ip="10.0.1.91"}
But in my case it was more like the flow in Connect An Instance to the Physical Network and I just had a direct connection from the br-ex to br-int. So we can just skip to Step 7 and then to Step 10. Here a note from that page:
> The packet is then moved to the br-ex OVS bridge using patch-peer int-br-ex <-> phy-br-ex
And I do see that patch peer:
 Bridge br-ex
        Controller "tcp:127.0.0.1:6633"
            is_connected: true
        fail_mode: secure
        Port "ens160"
            Interface "ens160"
        Port br-ex
            Interface br-ex
                type: internal
        Port phy-br-ex
            Interface phy-br-ex
                type: patch
                options: {peer=int-br-ex}
and on the internal one:
Bridge br-int
        Controller "tcp:127.0.0.1:6633"
            is_connected: true
        fail_mode: secure
        Port br-int
            Interface br-int
                type: internal
        Port "qg-ed634bc6-87"
            tag: 2
            Interface "qg-ed634bc6-87"
                type: internal
        Port int-br-ex
            Interface int-br-ex
                type: patch
                options: {peer=phy-br-ex}
For the sake of understand the flow, let’s continue as we had a separate compute and network node.
6. Packet goes from the OVS tunnel bridge (br-tun) to the OVS integration bridge (br-int)
From the above sites:
The OVS tunnel bridge patch port (13) forwards the packet to the OVS integration bridge patch port (14).
And
Traffic arrives on the network host via the GRE tunnel attached to br-tun. This bridge has a flow table very similar to br-tun on the compute host:
The integration bridge on the network controller serves to connect instances to network services, such as routers and DHCP servers.
We can do a similar approach and check out the patch-tun port of the openvswitch
(openvswitch-vswitchd)[root@osa ~]# ovs-vsctl add-port br-int snooper0
(openvswitch-vswitchd)[root@osa ~]# ovs-vsctl -- set Bridge br-int mirrors=@m  -- --id=@snooper0 \
>   get Port snooper0  -- --id=@patch-tun get Port patch-tun \
>   -- --id=@m create Mirror name=mymirror select-dst-port=@patch-tun \
>   select-src-port=@patch-tun output-port=@snooper0 select_all=1
ef872559-9358-4cf8-b5ce-1949b598a0b0

root@osa:~# tcpdump -i snooper0 -nne
18:04:55.310260 fa:16:3e:b4:0e:76 > fa:16:3e:43:5c:90, ethertype 802.1Q (0x8100), length 102: vlan 1, p 0, ethertype IPv4, 172.24.0.12 > 8.8.8.8: ICMP echo request, id 22017, seq 0, length 64
18:04:55.310413 fa:16:3e:15:99:dc > 78:24:af:7b:1f:08, ethertype 802.1Q (0x8100), length 102: vlan 2, p 0, ethertype IPv4, 10.0.0.152 > 8.8.8.8: ICMP echo request, id 22017, seq 0, length 64
18:04:55.314405 78:24:af:7b:1f:08 > fa:16:3e:15:99:dc, ethertype 802.1Q (0x8100), length 102: vlan 2, p 0, ethertype IPv4, 8.8.8.8 > 10.0.0.152: ICMP echo reply, id 22017, seq 0, length 64
18:04:55.314435 fa:16:3e:43:5c:90 > fa:16:3e:b4:0e:76, ethertype 802.1Q (0x8100), length 102: vlan 1, p 0, ethertype IPv4, 8.8.8.8 > 172.24.0.12: ICMP echo reply, id 22017, seq 0, length 64
7. OVS Intergration Bridge Forwards to Router Namespace
From the above sites:
The OVS integration bridge port for the self-service network (15) removes the internal VLAN tag and forwards the packet to the self-service network interface (16) in the router namespace.
For IPv4, the router performs SNAT on the packet which changes the source IP address to the router IP address on the provider network and sends it to the gateway IP address on the provider network via the gateway interface on the provider network (17).
And
The integration bridge on the network controller serves to connect instances to network services, such as routers and DHCP servers.
A Neutron router is a network namespace with a set of routing tables and iptables rules that performs the routing between subnets. Recall that we saw two network namespaces in our configuration:
Using the ip netns exec command, we can inspect the interfaces associated with the router
The first interface, qg-d48b49e0-aa, connects the router to the gateway set by the router-gateway-set command. The second interface, qr-c2d7dd02-56, is what connects the router to the integration bridge:
Looking at the routing tables inside the router, we see that there is a default gateway pointing to the .1 address of our external network, and the expected network routes for directly attached networks:
We can first list our name spaces:
root@osa:~# ip netns
qrouter-ec37ce79-b992-4e37-b53d-7cb8889179ca
qdhcp-4a71fbfd-f1d7-44ba-9c9b-9815316243bd
We also see the IPs assigned in the qrouter namespace:
root@osa:~# ip netns exec qrouter-ec37ce79-b992-4e37-b53d-7cb8889179ca ip a
1: lo: <LOOPBACK,UP,LOWER_UP> mtu 65536 qdisc noqueue state UNKNOWN group default qlen 1
    link/loopback 00:00:00:00:00:00 brd 00:00:00:00:00:00
    inet 127.0.0.1/8 scope host lo
       valid_lft forever preferred_lft forever
    inet6 ::1/128 scope host
       valid_lft forever preferred_lft forever
10: qr-5bab859c-e3: <BROADCAST,MULTICAST,UP,LOWER_UP> mtu 1450 qdisc noqueue state UNKNOWN group default qlen 1
    link/ether fa:16:3e:43:5c:90 brd ff:ff:ff:ff:ff:ff
    inet 172.24.0.1/24 brd 172.24.0.255 scope global qr-5bab859c-e3
       valid_lft forever preferred_lft forever
    inet6 fe80::f816:3eff:fe43:5c90/64 scope link
       valid_lft forever preferred_lft forever
11: qg-ed634bc6-87: <BROADCAST,MULTICAST,UP,LOWER_UP> mtu 1500 qdisc noqueue state UNKNOWN group default qlen 1
    link/ether fa:16:3e:15:99:dc brd ff:ff:ff:ff:ff:ff
    inet 10.0.0.152/24 brd 10.0.0.255 scope global qg-ed634bc6-87
       valid_lft forever preferred_lft forever
    inet6 fe80::f816:3eff:fe15:99dc/64 scope link
       valid_lft forever preferred_lft forever
Then we can do a packet capture on the qr-xxx interface of the qrouter namespace:
root@osa:~# ip netns exec qrouter-ec37ce79-b992-4e37-b53d-7cb8889179ca tcpdump -i qr-5bab859c-e3 -nne
18:13:53.076522 fa:16:3e:b4:0e:76 > fa:16:3e:43:5c:90, ethertype IPv4 (0x0800), length 98: 172.24.0.12 > 8.8.8.8: ICMP echo request, id 22273, seq 0, length 64
18:13:53.090903 fa:16:3e:43:5c:90 > fa:16:3e:b4:0e:76, ethertype IPv4 (0x0800), length 98: 8.8.8.8 > 172.24.0.12: ICMP echo reply, id 22273, seq 0, length 64
We can also see the iptables rules in that name spaces for the NAT’ing:
root@osa:~# ip netns exec qrouter-ec37ce79-b992-4e37-b53d-7cb8889179ca iptables -S -t nat
-P PREROUTING ACCEPT
-P INPUT ACCEPT
-P OUTPUT ACCEPT
-P POSTROUTING ACCEPT
-N neutron-l3-agent-OUTPUT
-N neutron-l3-agent-POSTROUTING
-N neutron-l3-agent-PREROUTING
-N neutron-l3-agent-float-snat
-N neutron-l3-agent-snat
-N neutron-postrouting-bottom
-A PREROUTING -j neutron-l3-agent-PREROUTING
-A OUTPUT -j neutron-l3-agent-OUTPUT
-A POSTROUTING -j neutron-l3-agent-POSTROUTING
-A POSTROUTING -j neutron-postrouting-bottom
-A neutron-l3-agent-POSTROUTING ! -i qg-ed634bc6-87 ! -o qg-ed634bc6-87 -m conntrack ! --ctstate DNAT -j ACCEPT
-A neutron-l3-agent-PREROUTING -d 169.254.169.254/32 -i qr-+ -p tcp -m tcp --dport 80 -j REDIRECT --to-ports 9697
-A neutron-l3-agent-snat -j neutron-l3-agent-float-snat
-A neutron-l3-agent-snat -o qg-ed634bc6-87 -j SNAT --to-source 10.0.0.152
-A neutron-l3-agent-snat -m mark ! --mark 0x2/0xffff -m conntrack --ctstate DNAT -j SNAT --to-source 10.0.0.152
-A neutron-postrouting-bottom -m comment --comment "Perform source NAT on outgoing traffic." -j neutron-l3-agent-snat
Here is the important rule:
-A neutron-l3-agent-snat -o qg-ed634bc6-87 -j SNAT --to-source 10.0.0.152
If we added a floating IP we would see more rules, just we did in the this post.
8. Packet goes from Router to OVS Intergration Bridge (br-tun)
From the above pages:
The router forwards the packet to the OVS integration bridge port for the provider network (18).
The OVS integration bridge adds the internal VLAN tag to the packet.
We can see that by checking out a tcpdump on the qg-xxx interface on the qrouter namespace:
root@osa:~# ip netns exec qrouter-ec37ce79-b992-4e37-b53d-7cb8889179ca tcpdump -i qg-ed634bc6-87 -nne
tcpdump: verbose output suppressed, use -v or -vv for full protocol decode
listening on qg-ed634bc6-87, link-type EN10MB (Ethernet), capture size 262144 bytes
18:26:23.165185 fa:16:3e:15:99:dc > 78:24:af:7b:1f:08, ethertype IPv4 (0x0800), length 98: 10.0.0.152 > 8.8.8.8: ICMP echo request, id 22529, seq 0, length 64
18:26:23.175661 78:24:af:7b:1f:08 > ff:ff:ff:ff:ff:ff, ethertype ARP (0x0806), length 60: Request who-has 10.0.0.152 tell 10.0.0.1, length 46
18:26:23.175681 fa:16:3e:15:99:dc > 78:24:af:7b:1f:08, ethertype ARP (0x0806), length 42: Reply 10.0.0.152 is-at fa:16:3e:15:99:dc, length 28
18:26:23.175883 78:24:af:7b:1f:08 > fa:16:3e:15:99:dc, ethertype IPv4 (0x0800), length 98: 8.8.8.8 > 10.0.0.152: ICMP echo reply, id 22529, seq 0, length 64
9. Packet goes from OVS Integration Bridge (br-tun) to OVS provider Bridge (br-ex)
From the above pages:
The OVS integration bridge int-br-provider patch port (19) forwards the packet to the OVS provider bridge phy-br-provider patch port (20).
The OVS provider bridge swaps the internal VLAN tag with actual VLAN tag 101.
And
“External” traffic flows through br-ex via the qg-d48b49e0-aa interface in the router name space
Here is how the br-ex looks like in openswitch:
Bridge br-ex
        Controller "tcp:127.0.0.1:6633"
            is_connected: true
        fail_mode: secure
        Port "ens160"
            Interface "ens160"
        Port br-ex
            Interface br-ex
                type: internal
        Port phy-br-ex
            Interface phy-br-ex
                type: patch
                options: {peer=int-br-ex}
Let’s set up another port mirror to see the traffic:
(openvswitch-vswitchd)[root@osa ~]# ovs-vsctl add-port br-ex snooper0
(openvswitch-vswitchd)[root@osa ~]# ovs-vsctl -- set Bridge br-ex mirrors=@m  -- --id=@snooper0 \
>         get Port snooper0  -- --id=@br-ex get Port br-ex \
>         -- --id=@m create Mirror name=mymirror select-dst-port=@br-ex \
>         select-src-port=@br-ex output-port=@snooper0 select_all=1
778be0ba-9081-452a-a6ab-225e1180225d

root@osa:~# tcpdump -i snooper0 -nne icmp
tcpdump: verbose output suppressed, use -v or -vv for full protocol decode
listening on snooper0, link-type EN10MB (Ethernet), capture size 262144 bytes
18:35:57.358266 fa:16:3e:15:99:dc > 78:24:af:7b:1f:08, ethertype IPv4 (0x0800), length 98: 10.0.0.152 > 8.8.8.8: ICMP echo request, id 23041, seq 0, length 64
18:35:57.362145 78:24:af:7b:1f:08 > fa:16:3e:15:99:dc, ethertype IPv4 (0x0800), length 98: 8.8.8.8 > 10.0.0.152: ICMP echo reply, id 23041, seq 0, length 64
10. Packet goes from OVS provider bridge (br-ex) to the Physical NIC (ens160)
From the above pages:
The OVS provider bridge provider network port (21) forwards the packet to the physical network interface (22).
And:
The br-eth1 bridge provides connectivity to the physical network interface card, eth1. It connects to the integration bridge by a veth pair: (int-br-eth1, phy-br-eth1).
And
The packet is then moved to the br-ex OVS bridge using patch-peer int-br-ex <-> phy-br-ex
When this packet reaches phy-br-ex on br-ex, an OVS flow inside br-ex strips the VLAN tag (5) and forwards it to the physical interface.
Here is the Openflow rule which strips the internal vlan (dl_vlan=2 actions=strip_vlan):
(openvswitch-vswitchd)[root@osa ~]# ovs-ofctl dump-flows br-ex
NXST_FLOW reply (xid=0x4):
 cookie=0xad71d8fbf765e8db, duration=17385.449s, table=0, n_packets=40, n_bytes=2813, idle_age=269, priority=4,in_port=2,dl_vlan=2 actions=strip_vlan,NORMAL
 cookie=0xad71d8fbf765e8db, duration=17417.584s, table=0, n_packets=70, n_bytes=5616, idle_age=387, priority=2,in_port=2 actions=drop
 cookie=0xad71d8fbf765e8db, duration=17417.587s, table=0, n_packets=2289489, n_bytes=455538523, idle_age=0, priority=0 actions=NORMAL
And as we saw from the openvswitch bridge here is the physical NIC attached to that bridge:
  Bridge br-ex
       Controller "tcp:127.0.0.1:6633"
           is_connected: true
       fail_mode: secure
       Port "ens160"
           Interface "ens160"
       Port br-ex
           Interface br-ex
               type: internal
       Port phy-br-ex
           Interface phy-br-ex
               type: patch
               options: {peer=int-br-ex}
Yet another pretty complex setup :)
Cleaning up the Kolla Deployment
There are a couple of options. You can either stop all the containers, when I tried to stop all the services it actually failed for me:
root@osa:~# kolla-ansible stop -i all-in-one
Stop Kolla containers : ansible-playbook -i all-in-one -e @/etc/kolla/globals.yml -e @/etc/kolla/passwords.yml -e CONFIG_DIR=/etc/kolla  /usr/local/share/kolla-ansible/ansible/stop.yml

PLAY [all] *******************************************************************************

TASK [stop : Stopping Kolla containers] *******************************************************************************************************************************************************************************
fatal: [localhost]: FAILED! => {"changed": true, "cmd": ["/tmp/kolla-stop/tools/stop-containers"], "delta": "0:00:00.013070", "end": "2017-07-01 22:38:59.797830", "failed": true, "rc": 1, "start": "2017-07-01 22:38:59.784760", "stderr": "", "stderr_lines": [], "stdout": "Some qemu processes were detected.\nDocker will not be able to stop the nova_libvirt container with those running.\nPlease clean them up before rerunning this script.", "stdout_lines": ["Some qemu processes were detected.", "Docker will not be able to stop the nova_libvirt container with those running.", "Please clean them up before rerunning this script."]}
        to retry, use: --limit @/usr/local/share/kolla-ansible/ansible/stop.retry

PLAY RECAP ************************************************************************************************************************************************************************************************************
localhost                  : ok=4    changed=3    unreachable=0    failed=1

Command failed ansible-playbook -i all-in-one -e @/etc/kolla/globals.yml -e @/etc/kolla/passwords.yml -e CONFIG_DIR=/etc/kolla  /usr/local/share/kolla-ansible/ansible/stop.yml
Rather than just deleting the server using openstack (openstack server delete demo1), I decided to just manually stop it to see if that would work out:
root@osa:~# docker exec -it nova-libvirt /bin/sh
(nova-libvirt)[root@osa /]$ virsh list
 Id    Name                           State
----------------------------------------------------
 2     instance-00000002              running
(nova-libvirt)[root@osa /]$ virsh destroy 2
Domain 2 destroyed

(nova-libvirt)[root@osa /]$ virsh list
 Id    Name                           State
----------------------------------------------------

(nova-libvirt)[root@osa /]$ exit
And then the stop command worked:
root@osa:~# kolla-ansible stop -i all-in-one
Stop Kolla containers : ansible-playbook -i all-in-one -e @/etc/kolla/globals.yml -e @/etc/kolla/passwords.yml -e CONFIG_DIR=/etc/kolla  /usr/local/share/kolla-ansible/ansible/stop.yml

TASK [stop : Stopping Kolla containers] *******************************************************************************************************************************************************************************
changed: [localhost]

PLAY RECAP ************************************************************************************************************************************************************************************************************
localhost                  : ok=5    changed=1    unreachable=0    failed=0
Then I could re-deploy again if I wanted to. Or you could destroy all the containers completely:
root@osa:~# kolla-ansible destroy -i all-in-one
WARNING:
    This will PERMANENTLY DESTROY all deployed kolla containers, volumes and host configuration.
    There is no way to recover from this action. To confirm, please add the following option:
    --yes-i-really-really-mean-it

root@osa:~# kolla-ansible destroy -i all-in-one --yes-i-really-really-mean-it
Destroy Kolla containers, volumes and host configuration : ansible-playbook -i all-in-one -e @/etc/kolla/globals.yml -e @/etc/kolla/passwords.yml -e CONFIG_DIR=/etc/kolla  /usr/local/share/kolla-ansible/ansible/destroy.yml

TASK [destroy : Destroying kolla-cleanup folder] **********************************************************************************************************************************************************************
changed: [localhost]

PLAY RECAP ************************************************************************************************************************************************************************************************************
localhost                  : ok=8    changed=7    unreachable=0    failed=0
And then you ran re-deploy again to start from scratch:
root@osa:~# kolla-ansible deploy -i all-in-one
root@osa:~# kolla-ansible post-deploy -i all-in-one
root@osa:~# . /etc/kolla/admin-openrc.sh
root@osa:~# ./init-runonce
root@osa:~# openstack server create --image cirros --flavor m1.tiny --key-name mykey --nic net-id=f23dc56d-f60d-459e-a097-54ae84868d04 demo1
root@osa:~# openstack server list
root@osa:~# openstack console log show demo1
root@osa:~# openstack console url show demo1
Then you could login to the horizon dashboard (http://<kolla_internal_vip_address>) using the credentials from the setup file:
root@osa:~# grep -E 'USERN|PASS' /etc/kolla/admin-openrc.sh
export OS_USERNAME=admin
export OS_PASSWORD=3JslywF7EfgRvp9UT9Y9lXlMybj0piH4t9sTISx6
And you should see your OpenStack Project:
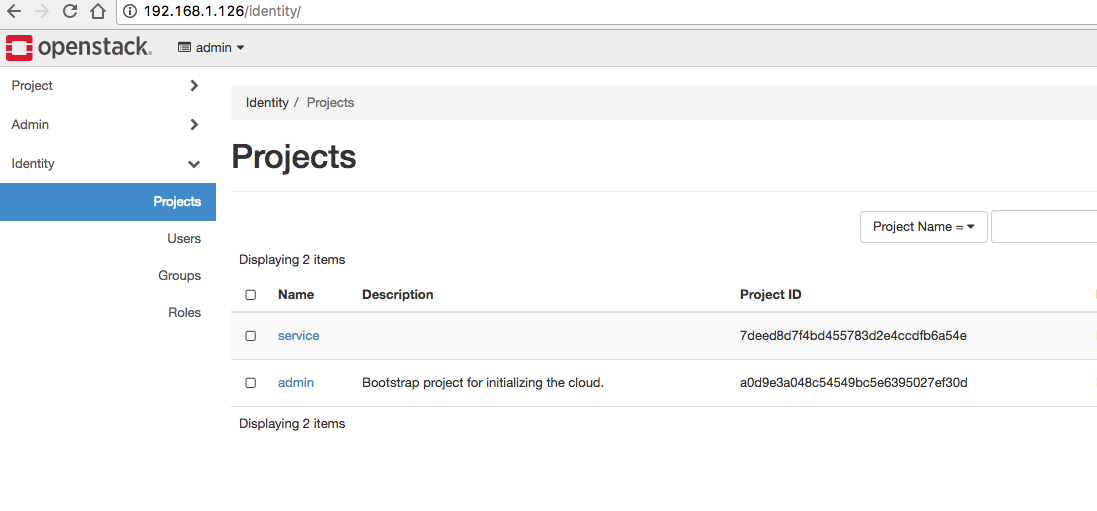
and you could check out your networking:
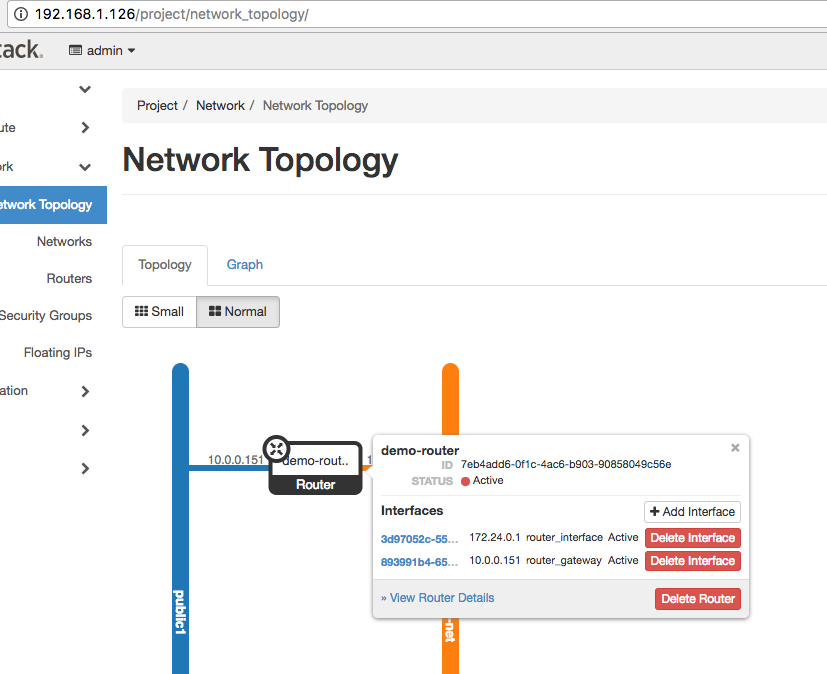
and you can connect to your deployed instance:
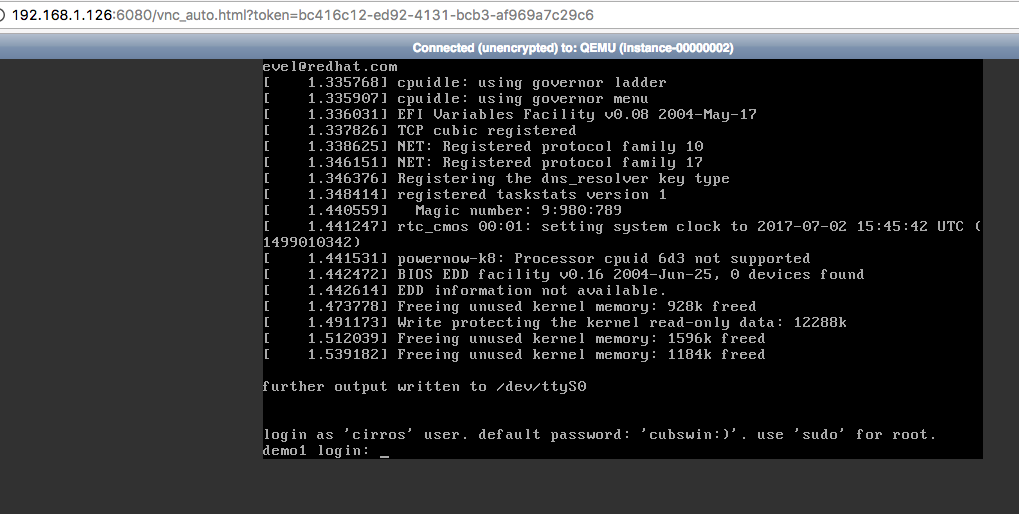
Containers Sharing the OpenVswitch Database
Since I was using an All-In-One deployment I noticed that all the nodes used the same openvswitch configuration. Therefore I didn’t have different settings (usually the compute, network, and controller nodes all have their own). So I decided to find out which containers share that db. First I discovered where the db resided:
(openvswitch-vswitchd)[root@osa openvswitch]# ovsdb-client list-dbs -v
2017-07-03T21:29:02Z|00001|jsonrpc|DBG|unix:/var/run/openvswitch/db.sock: send request, method="list_dbs", params=[], id=0
2017-07-03T21:29:02Z|00002|poll_loop|DBG|wakeup due to 0-ms timeout
2017-07-03T21:29:02Z|00003|poll_loop|DBG|wakeup due to [POLLIN] on fd 3 (<->/run/openvswitch/db.sock) at lib/stream-fd.c:155
2017-07-03T21:29:02Z|00004|jsonrpc|DBG|unix:/var/run/openvswitch/db.sock: received reply, result=["Open_vSwitch"], id=0
Open_vSwitch
And since /var/run points to /run:
(openvswitch-vswitchd)[root@osa ~]# ls -l /var/run
lrwxrwxrwx 1 root root 6 Mar 15 13:58 /var/run -> ../run
I tracked down which machines share the /run folder with the host:
root@osa:~# for i in $(docker ps --format "table {{.Names}}"| grep -v NAMES); do echo $i; docker inspect $i | grep '/run:'; done
horizon
heat_engine
heat_api_cfn
heat_api
neutron_metadata_agent
neutron_l3_agent
                "/run:/run:shared",
neutron_dhcp_agent
neutron_openvswitch_agent
                "/run:/run:shared",
neutron_server
openvswitch_vswitchd
                "/run:/run:shared",
openvswitch_db
                "/run:/run:shared",
nova_compute
                "/run:/run:shared"
nova_novncproxy
nova_consoleauth
nova_conductor
nova_scheduler
nova_api
placement_api
nova_libvirt
nova_ssh
glance_registry
glance_api
keystone
rabbitmq
mariadb
memcached
keepalived
haproxy
cron
kolla_toolbox
fluentd
This is probably why I didn’t have a vxlan setup in my deployment.